Install JDK
Uninstall the JDK pre installed in the system. Linux comes with java, but it cannot be compiled without javac, so it needs to be uninstalled and reinstalled
rpm -qa | grep openjdk
Perform uninstall. Use -- nodeps to ignore dependencies during uninstall
[root@localhost ~]# rpm -e --nodeps java-1.8.0-openjdk-headless-1.8.0.161-2.b14.el7.x86_64
[root@localhost ~]# rpm -e --nodeps java-1.7.0-openjdk-1.7.0.171-2.6.13.2.el7.x86_64
[root@localhost ~]# rpm -e --nodeps java-1.8.0-openjdk-1.8.0.161-2.b14.el7.x86_64
[root@localhost ~]# rpm -e --nodeps java-1.7.0-openjdk-headless-1.7.0.171-2.6.13.2.el7.x86_64
Restart the system
reboot
Download jdk from the official website
https://www.oracle.com/java/technologies/javase/javase-jdk8-downloads.html
Upload the downloaded installation package to the linux server (I uploaded it with xftp downloaded from Xshell)
Transfer to Linux of/opt In the folder
Unzip the tar package
tar -zxvf /opt/jdk-8u321-linux-x64.tar.gz
Enter the etc folder
cd /etc
The profile file needs to be modified to prevent error correction and backup first (you can also skip this operation)
cp profile profile.bak
Open the profile file using vim
vim profile
Add the following
# Create environment variable: JAVA_HOME
JAVA_HOME=/opt/jdk1.8.0_321

# Append a new value to the PATH environment variable and never overwrite its old value
PATH=$JAVA_HOME/bin:$PATH

# Publish the above two environment variables
export JAVA_HOME PATH
After saving and exiting vim, execute the / etc/profile script with the source command to make the environment variables published in the script take effect. However, it is limited to the current process. If you want the new environment variable to take effect globally, you need to reboot.
source /etc/profile
echo output the environment variable to see if it has taken effect
echo $JAVA_HOME
echo $PATH
Install tomcat
Download the tomcat installation package and upload it to the Linux server / opt file directory
https://tomcat.apache.org/download-90.cgi
Unzip the tar package
tar -zxvf /opt/apache-tomcat-9.0.59.tar.gz
Start Tomcat
./apache-tomcat-9.0.59/bin/startup.sh
Stop Tomcar
./apache-tomcat-9.0.59/bin/startup.sh
view log
tail -F /opt/apache-tomcat-9.0.59/logs/catalina.out
The deployment war package is placed in the webapps directory
/opt/apache-tomcat-9.0.59/webapps
Using a browser to access localhost:8080 on Linux
- The local host browser can be used to access the Linux system
- Linux IP address is required to access Tomcat on Linux server in Windows system( http://192.168.198.100:8080/ )
Install Mysql
It's best to take a snapshot before installation
TIP: MySQL was acquired by Oracle. The community is worried that MySQL will be closed by Oracle in the future. The open source mode will become commercial operation like Oracle database. Therefore, the community has developed a community version of MySQL. It is the same as MySQL internally, but its name is different. This is mariadb. However, mariadb, which has been pre installed in the Linux system, is only a fragment and cannot be used directly. So you still have to uninstall first
Uninstall the system and pre install mariadb
rpm -e --nodeps mariadb-libs-1:5.5.56-2.el7.x86_64
Install server-side programs
rpm -ivh /opt/MySQL-server-5.5.52-1.el6.x86_64.rpm
verification
[root@localhost opt]# id mysql

uid=988(mysql) gid=982(mysql) group=982(mysql)
Install client program
rpm -ivh /opt/MySQL-client-5.5.52-1.el6.x86_64.rpm
Start MySQL service
systemctl start mysql.service
Test service, process and port number
systemctl status mysql.service

ps -ef | grep mysql | grep -v grep

netstat -anp | grep mysql
Set the root user password (set the password by remembering what you entered, the screen will not be displayed, and enter after entering)
Note: the root user here is the root user of MySQL, not Linux
[root@apple opt]# mysqladmin -u root password
New password:
Confirm new password:
Log in to MySQL test (it is proved to be successful if all databases can be displayed. What is written later is random play, which can be skipped)
[root@apple opt]# mysql -u root -p
Enter password:
Welcome to the MySQL monitor.  Commands end with ; or \g.
Your MySQL connection id is 2
Server version: 5.5.52 MySQL Community Server (GPL)

Copyright (c) 2000, 2016, Oracle and/or its affiliates. All rights reserved.

Oracle is a registered trademark of Oracle Corporation and/or its
affiliates. Other names may be trademarks of their respective
owners.

Type 'help;' or '\h' for help. Type '\c' to clear the current input statement.

//Show all databases
mysql> show databases;
+--------------------+
| Database           |
+--------------------+
| information_schema |
| mysql              |
| performance_schema |
| test               |
+--------------------+
4 rows in set (0.00 sec)

//New database
mysql> create database happy;
Query OK, 1 row affected (0.00 sec)

//new table
mysql> create table t_happy(
    -> happy_id int auto_increment primary key,
    -> happy_name char(100),
    -> happy_price double(10,2));
Query OK, 0 rows affected (0.03 sec)

//Table structure
mysql> desc t_happy;
+-------------+--------------+------+-----+---------+----------------+
| Field       | Type         | Null | Key | Default | Extra          |
+-------------+--------------+------+-----+---------+----------------+
| happy_id    | int(11)      | NO   | PRI | NULL    | auto_increment |
| happy_name  | char(100)    | YES  |     | NULL    |                |
| happy_price | double(10,2) | YES  |     | NULL    |                |
+-------------+--------------+------+-----+---------+----------------+
3 rows in set (0.00 sec)

//insert
mysql> insert into t_happy(happy_name,happy_price) values("eat","10.0");
Query OK, 1 row affected (0.00 sec)

//query
mysql> select * from t_happy;
+----------+------------+-------------+
| happy_id | happy_name | happy_price |
+----------+------------+-------------+
|        1 | eat        |       10.00 |
+----------+------------+-------------+
1 row in set (0.00 sec)
windows client logs in to MySQL server of Linux
Error prompt intercepted by firewall (you can also test the connection in the database management tool of windows and read what is wrong)

Solve the problem by turning off the firewall server
systemctl stop firewalld.service
systemctl disable firewalld.service
Connection rejected by MySQL itself

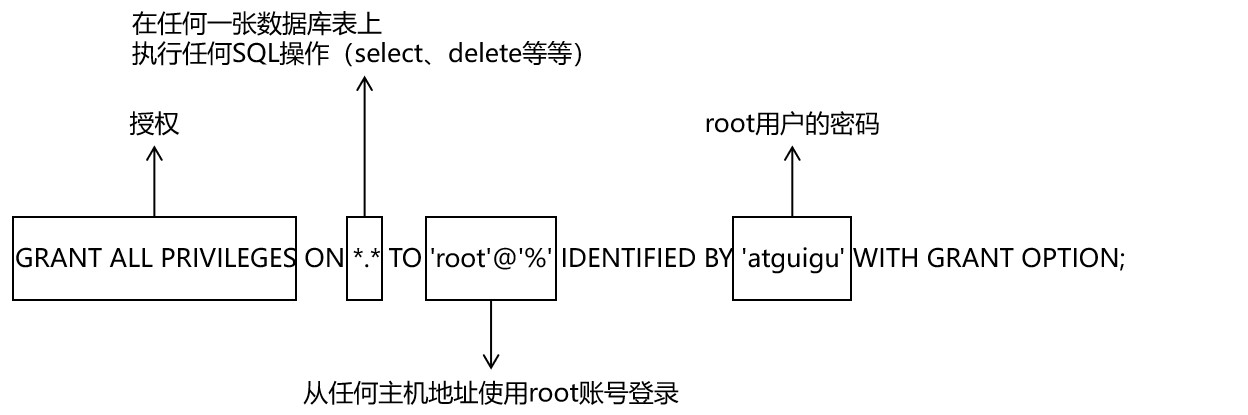
Set the MySQL server to allow access to any host address
Execute SQL statement
GRANT ALL PRIVILEGES ON *.* TO 'root'@'%' IDENTIFIED BY 'mysql password' WITH GRANT OPTION;
Restart mysql
mysql> quit
Bye
[root@localhost opt]# systemctl restart mysql.service
Solve the problem of character scrambling
After installing mariadb, you need to modify the character set, otherwise the data in the built database will be garbled in Chinese
View character related variables
You need to change all of Latin 1 to utf-8
mysql> show variables like "%char%";
+--------------------------+----------------------------+
| Variable_name            | Value                      |
+--------------------------+----------------------------+
| character_set_client     | utf8                       |
| character_set_connection | utf8                       |
| character_set_database   | latin1                     |
| character_set_filesystem | binary                     |
| character_set_results    | utf8                       |
| character_set_server     | latin1                     |
| character_set_system     | utf8                       |
| character_sets_dir       | /usr/share/mysql/charsets/ |
+--------------------------+----------------------------+
8 rows in set (0.00 sec)
Prepare MySQL configuration file
Put / usr/share/mysql's my small CNF, copy it to / etc and rename it my cnf
cp /usr/share/mysql/my-small.cnf /etc/my.cnf

vim /etc/my.cnf
Add character set server = utf8 at the end of the configuration in the [mysqld] section. Note: be sure to enter the editing mode and paste again!
[mysqld]
port            = 3306
socket          = /var/lib/mysql/mysql.sock
skip-external-locking
key_buffer_size = 16K
max_allowed_packet = 1M
table_open_cache = 4
sort_buffer_size = 64K
read_buffer_size = 256K
read_rnd_buffer_size = 256K
net_buffer_length = 2K
thread_stack = 128K
character-set-server=utf8
Restart MySQL service
systemctl restart mysql.service
View character set related variables
mysql> show variables like "%char%";
+--------------------------+----------------------------+
| Variable_name            | Value                      |
+--------------------------+----------------------------+
| character_set_client     | utf8                       |
| character_set_connection | utf8                       |
| character_set_database   | utf8                       |
| character_set_filesystem | binary                     |
| character_set_results    | utf8                       |
| character_set_server     | utf8                       |
| character_set_system     | utf8                       |
| character_sets_dir       | /usr/share/mysql/charsets/ |
+--------------------------+----------------------------+
8 rows in set (0.00 sec)
Re create database, create database table, insert Chinese character data verification.
Install redis
Upload the tar package to the Linux server / opt file directory
redis-4.0.2.tar.gz
Unzip the tar package
tar -zxvf /opt/redis-4.0.2.tar.gz
Install the C language compilation environment (it is recommended to take a snapshot first)
yum install -y gcc-c++
Because you want to modify the configuration file, back up src/Makefile
cp src/Makefile src/Makefile.bak
Open profile
vim src/Makefile
Modify the installation path of the configuration file
PREFIX?=/usr/local/redis
Compile in the redis decompression directory
[root@localhost redis-4.0.2]# make
install
make install
Start Redis server
/usr/local/redis/bin/redis-server
Shut down Redis server
/usr/local/redis/bin/redis-cli shutdown
Install Google browser
wget https://dl.google.com/linux/direct/google-chrome-stable_current_x86_64.rpm

yum install ./google-chrome-stable_current_x86_64.rpm
By default, it cannot be run by root user. Right click to open the attribute and add the following content after the command
--no-sandbox