Article catalog
I RAID concept
II Type of RAID
- Implementation of RAID:
- Implementation of soft raid 5
1) Add a new hard disk and create 5 partitions - Create RAID
- Format mount
- View raid information again
- Simulate a broken disk and remove it
- After repairing the sdb2 that has just been deleted, add it to the array again
Summary:
I RAID concept
The following are references:
Raid (Redundant Arrays of Independent Disks) means "an array with redundant capability composed of Independent Disks". A disk array is a disk group with a large capacity composed of many inexpensive disks in the form of hardware (RAID card) or software (MDADM). Multiple disks are combined to improve the efficiency of the whole disk system.
Using this technology, the data is cut into many sections and stored on each hard disk. Disk arrays can also take advantage of Parity checking
According to the concept of Check), when any hard disk in the array fails, the data can still be read out. When the data is reconstructed, the data is calculated and re placed into the new hard disk
To sum up, RAID is a disk array. Its function is to improve the read and write rate, and it can have fault tolerance.
The basic idea of RAID: combine several hard disks in a certain way to form a new hard disk array group, so that the new hard disk array group can meet the requirements of high-performance hard disks.
II Type of RAID
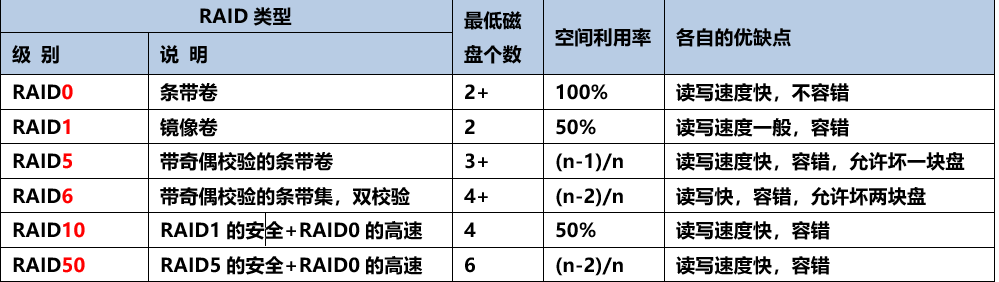
1. Implementation of raid:
- Hard RAID: it needs a RAID card, has its own cpu, and the processing speed is very fast
- Soft RAID: it can be realized by operating system, windows and Linux
2. Implementation of soft raid 5
Experimental steps:
1) Create 4 hard disks
2) Create RAID
3) Format, Mount
4) Viewing RAID information
5) Simulate the failure of one of the hard disks
6) Rejoin the repaired disk to the existing array
1) Add a new hard disk and create 5 partitions

Partition the newly added hard disk into five to simulate five hard disks.
[root@xinsz08-15 ~]# ll /dev/sd*   #Existing partitions
brw-rw---- 1 root disk 8,  0 6 May 29:45 /dev/sda
brw-rw---- 1 root disk 8,  1 6 May 29:45 /dev/sda1
brw-rw---- 1 root disk 8,  2 6 May 29:45 /dev/sda2
brw-rw---- 1 root disk 8,  3 6 May 29:45 /dev/sda3
brw-rw---- 1 root disk 8, 16 6 May 29:45 /dev/sdb
[root@xinsz08-15 ~]# fdisk /dev/sdb

Command (m for help): n
Command action
   e   extended
   p   primary partition (1-4)
p
Partition number (1-4):
Value out of range.
Partition number (1-4): 1
First cylinder (1-3263, default 1):
Using default value 1
Last cylinder, +cylinders or +size{K,M,G} (1-3263, default 3263): +5G

Command (m for help):
According to the above zoning method, there are four zones, all 5G
Note: logical partitions cannot be used as disk arrays
[root@xinsz08-15 ~]# ll /dev/sdb*
brw-rw---- 1 root disk 8, 16 6 June 29:02 /dev/sdb
brw-rw---- 1 root disk 8, 17 6 June 29:02 /dev/sdb1
brw-rw---- 1 root disk 8, 18 6 June 29:02 /dev/sdb2
brw-rw---- 1 root disk 8, 19 6 June 29:02 /dev/sdb3
brw-rw---- 1 root disk 8, 20 6 June 29:02 /dev/sdb4
2. Create RAID
[root@xinsz08-15 ~]# yum install mdadm
Basic parameters of mdadm:
| parameter | effect |
|---|---|
| C | Create RAID |
| /dev/m0 | First RAID device |
| -L5 | RAID5 |
| -n | Number of RAID members |
| -x | Number of hot spare disks |
| -a | Add hot spare |
| -G | Hot standby to membership |
Next, we create the first RAID device, make a raid 5, use three disks as the array, and add one as the hot standby.
[root@xinsz08-15 ~]# mdadm -C /dev/md0 -l5 -n3 -x1 /dev/sdb{1,2,3,4}
mdadm: /dev/sdb4 appears to be part of a raid array:
       level=raid0 devices=0 ctime=Thu Jan  1 08:00:00 1970
mdadm: partition table exists on /dev/sdb4 but will be lost or
       meaningless after creating array
mdadm: largest drive (/dev/sdb4) exceeds size (5249024K) by more than 1%
Continue creating array? y
mdadm: Defaulting to version 1.2 metadata
mdadm: array /dev/md0 started.
[ root@xinsz08 -15 ~]# mdadm -D -s > /etc/mdadm. Conf # setting takes effect after startup
Query existing arrays
  [root@xinsz08-15 ~]# mdadm -D -s
ARRAY /dev/md0 metadata=1.2 spares=1 name=xinsz08-15:0 UUID=85d2c0f0:d2e390b4:6f91164c:c7e3f691

[root@xinsz08-15 ~]# mdadm -D -s /dev/md0   # Directly specify the name of the disk array MD0
ARRAY /dev/md0 metadata=1.2 spares=1 name=xinsz08-15:0 UUID=85d2c0f0:d2e390b4:6f91164c:c7e3f691
3. Format mount
[root@xinsz08-15 ~]# mkfs.ext4 /dev/md0   # Format the disk array as an ext4 system
mke2fs 1.41.12 (17-May-2010)
File system label=
operating system:Linux
 Block size=4096 (log=2)
Block size=4096 (log=2)
Stride=128 blocks, Stripe width=256 blocks
657072 inodes, 2624512 blocks
131225 blocks (5.00%) reserved for the super user
 First data block=0
Maximum filesystem blocks=2688548864
81 block groups
32768 blocks per group, 32768 fragments per group
8112 inodes per group
Superblock backups stored on blocks:
        32768, 98304, 163840, 229376, 294912, 819200, 884736, 1605632

Writing inode surface: complete
Creating journal (32768 blocks): complete
Writing superblocks and filesystem accounting information: complete

This filesystem will be automatically checked every 32 mounts or
180 days, whichever comes first.  Use tune2fs -c or -i to override.
[root@xinsz08-15 ~]#
Create a mount directory and mount
[root@xinsz08-15 ~]# mkdir /mnt/raid5
[root@xinsz08-15 ~]# mount /dev/md0 /mnt/raid5
[root@xinsz08-15 ~]# df -h
/dev/md0        9.8G   23M  9.3G   1% /mnt/raid5
[root@xinsz08-15 ~]#
4. View raid information again
[root@xinsz08-15 ~]# mdadm -D /dev/md0    #View disk information
/dev/md0:   #Disk name
        Version : 1.2   #Disk version
  Creation Time : Mon Jun 29 06:03:43 2020   #Time the disk array was created
     Raid Level : raid5       #The disk array is riad5
     Array Size : 10498048 (10.01 GiB 10.75 GB)
  Used Dev Size : 5249024 (5.01 GiB 5.38 GB)
   Raid Devices : 3     #RAID array composed of three disks
  Total Devices : 4     #There are four fast disks in total, because there is a spare disk
    Persistence : Superblock is persistent

    Update Time : Mon Jun 29 06:09:43 2020
          State : clean
 Active Devices : 3    #3 active disks
Working Devices : 4    #Four in total
 Failed Devices : 0    #0 broken
  Spare Devices : 1    #1 shared spare disk

         Layout : left-symmetric
     Chunk Size : 512K

           Name : xinsz08-15:0  (local to host xinsz08-15)
           UUID : 85d2c0f0:d2e390b4:6f91164c:c7e3f691
         Events : 18

    Number   Major   Minor   RaidDevice State
       0       8       17        0      active sync   /dev/sdb1
       1       8       18        1      active sync   /dev/sdb2
       4       8       19        2      active sync   /dev/sdb3

       3       8       20        -      spare   /dev/sdb4
[root@xinsz08-15 ~]#
5. Simulate a broken disk and remove it
Terminal 1: simulate a broken disk and remove it
-f simulation broken, - r removed
[root@xinsz08-15 ~]# mdadm /dev/md0 -f /dev/sdb2 -r /dev/sdb2

mdadm: set /dev/sdb2 faulty in /dev/md0
mdadm: hot removed /dev/sdb2 from /dev/md0
Terminal 2: view changes
[root@xinsz08-15 ~]# watch -n 0.5 'mdadm -D /dev/md0'

Finally, you will see that the spare disk of spare Devices has become a known working disk. The total number of discs became three.
6. Repair the sdb2 deleted just now and add it to the array again
[root@xinsz08-15 ~]# mdadm /dev/md0 -a /dev/sdb2
mdadm: added /dev/sdb2
see:
You can see that sdb2 becomes a hot spare
[root@xinsz08-15 ~]# mdadm -D /dev/md0
/dev/md0:
        Version : 1.2
  Creation Time : Mon Jun 29 06:03:43 2020
     Raid Level : raid5
     Array Size : 10498048 (10.01 GiB 10.75 GB)
  Used Dev Size : 5249024 (5.01 GiB 5.38 GB)
   Raid Devices : 3
  Total Devices : 4
    Persistence : Superblock is persistent

    Update Time : Mon Jun 29 06:29:52 2020
          State : clean
 Active Devices : 3
Working Devices : 4
 Failed Devices : 0
  Spare Devices : 1

         Layout : left-symmetric
     Chunk Size : 512K

           Name : xinsz08-15:0  (local to host xinsz08-15)
           UUID : 85d2c0f0:d2e390b4:6f91164c:c7e3f691
         Events : 39

    Number   Major   Minor   RaidDevice State
       0       8       17        0      active sync   /dev/sdb1
       3       8       20        1      active sync   /dev/sdb4
       4       8       19        2      active sync   /dev/sdb3

       5       8       18        -      spare   /dev/sdb2
Summary:
Experiments show true knowledge. If you just look at the text and don't understand what it means, it is recommended to follow the operation and learn the operation and maintenance series step by step. All articles in the operation and maintenance series have been verified on the machine. If you encounter problems in the process, you are also welcome to leave a message to discuss with me.