I. NFS
NFS(Network File
System (Network File System) is a file system supported by FreeBSD, which allows computers in the network to share resources through TCP/IP network. In NFS applications, local NFS client applications can transparently read and write files on remote NFS servers, just like accessing local files.
Composition: The NFS system has at least two main parts: an NFS server and several clients, as shown in the right figure.
Clients access data stored on NFS servers remotely through TCP/IP networks. Before the NFS server is officially launched, some NFS parameters need to be configured according to the actual environment and requirements. 
server
//Installation configuration
1 yum install nfs-utils                ##Install nfs-utils
--> systemctl start nfs-server         ##Open nfs service
--> systemctl enable nfs-server        ##Set up boot start
Experiment
2 mkdir /helloshare                    ##Create the helloshare directory
-->touch /helloshare/hellofile{1..3    ##Create three files in this directory
-->chmod 777 /helloshare               ##Give full permission to the directory
3 vim /etc/exports              ##Edit nfs configuration file
/helloshare 172.25.254.254.27(sync) 172.25.254.227(ro)
                                ##27 Host can refresh data synchronously, 227 can only read
4 exportfs -r                   ##Refresh nfs service, service content is not visible
           -v                   ##List service content, but not refresh
           -rv                  ##Refresh and List Service Contents
Install nfs 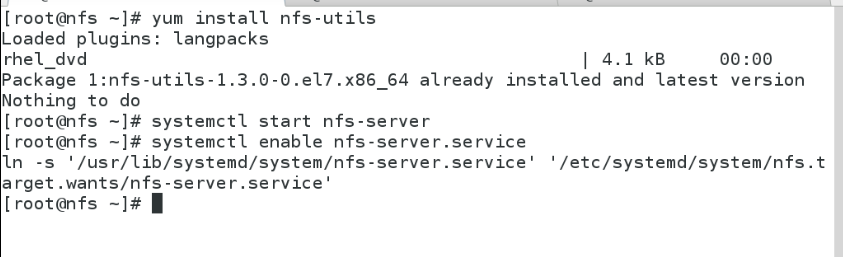
Create a shared directory, load files created in the shared directory, edit nfs configuration files, and refresh the configuration.
Note: The service cannot be restarted, because restarting the service, the server will update and synchronize all shared directory hosts, and the process will be quite slow. 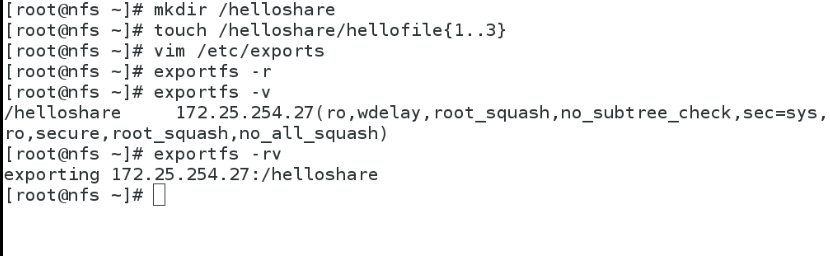
Refresh and list 
client test
client1 172.25.254.27
1 showmount -e 172.25.254.127 ##View the shared directory content of 127 hosts
2 mount 172.25.254.127:/helloshare /mnt/
                     ##Mount the shared directory of 127 hosts on / mnt of client1 host
-->df                ##View mount information
client2 172.25.254.227
1 showmount -e 172.25.254.127 #View the shared directory content of 127 hosts
2 mount 172.25.254.127:/helloshare /mnt/
                     ##Mount the shared directory of 127 hosts on / mnt of client 2 hosts
-->df                ##View mount information
-->rm -fr *          ##Delete failed, read only
227 host can view, but the mount failed, because only read permission, no synchronous refresh permission. 
27 Host can view or mount, but can not write, no write permission 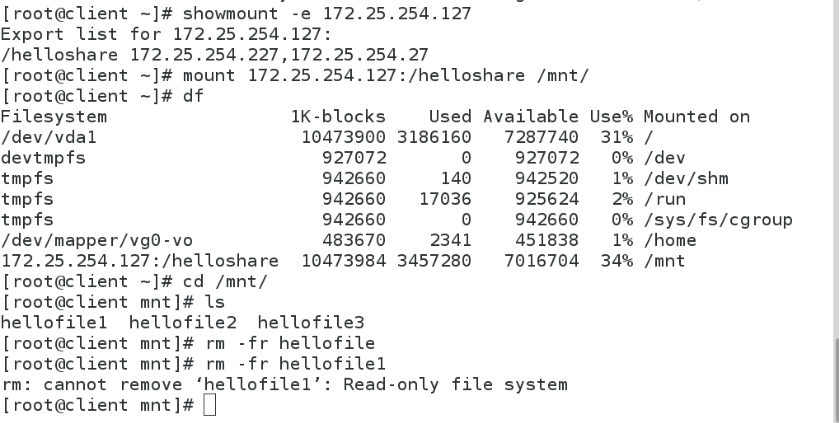
The service host gives 227 host sync permission to mount 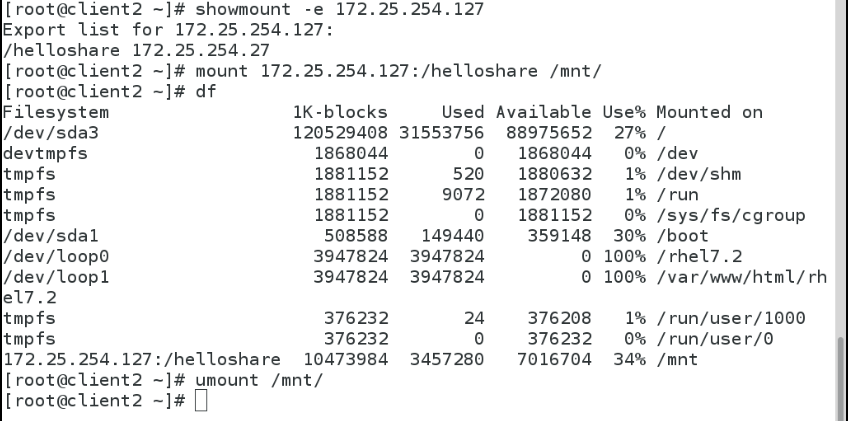
2. Opening of Shared Directory
Take client2 as an example
server127 terminal
1 vim /etc/exports
-->/helloshare 172.25.254.227(sync,rw)->wq->exportfs -rv)                   ##Shared directory writable
-->/helloshare 172.25.254.227(sync,rw,no_root_squash)->wq->exportfs -rv)     ##Anonymous users establish file systems as roots
-->/helloshare 172.25.254.227(sync,rw,anonuid=1000)->wq->exportfs -rv)       ##Anonymous users establish file systems as id1000 users
-->/helloshare 172.25.254.227(sync,rw,anonuid=1000,anongid=1001)->wq->exportfs -rv)
             ##Anonymous users establish file system as id1000 user identity and id1001 user group identity
Specify root identity permissions for anonymous users on 27 hosts when performing corresponding operations on shared directories 
Specify that when anonymous users of 27 hosts perform corresponding operations in shared directories, both the owner and the user are identified as id1000. 
Refresh service 
client1 test: Take 27 hosts as an example
Write permissions are available in shared directories 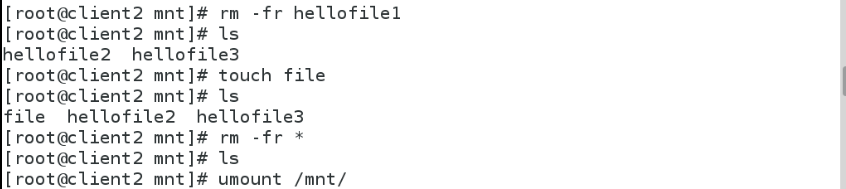
When anonymous users create files and directories, the system defaults to nfsnobady users, nfsnobody groups 
Establishment is a kiosk user, and the second modification is the 1001 user group 
3. client End Automatic Mounting
1 yum install autofs.x86_64         ##Install autofs.x86_64
-->systemctl start autofs.service   ##Open autofs service
-->systemctl enable autofs.service  ##Set up boot start
2 cd /net                           ##Switch to / net
-->cd 172.25.254.127->ls            ##Shared directories that can be switched directly to 127 hosts
-->cd helloshare/                   ##Switched shared directories
-->df                               ##View, it has been mounted directly
Install autofs Automount Plug-in 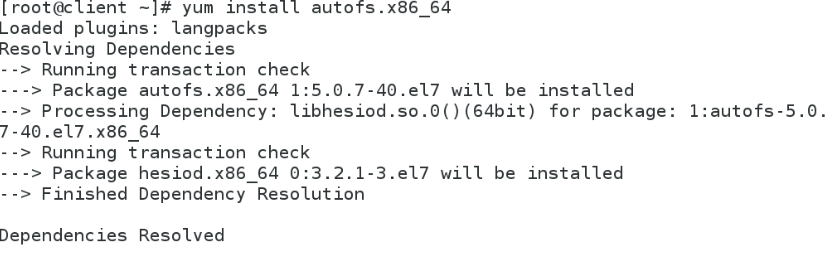
Switch to / net directory, share directory with 127 hosts, and mount automatically 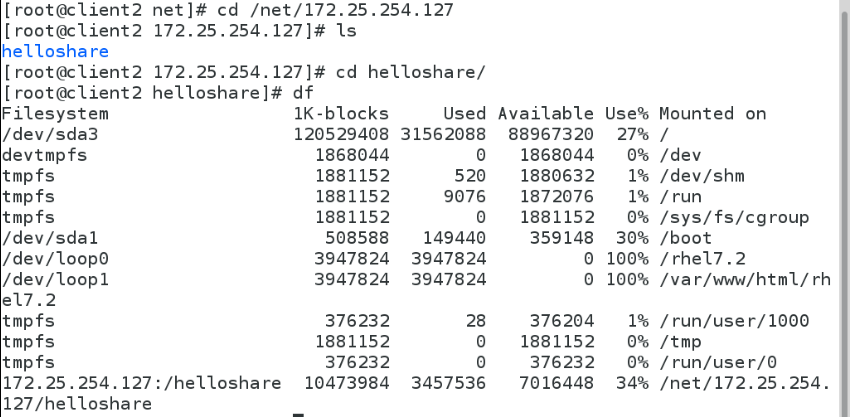
Change mount directory
server
1 cp -rp /home/student/ /helloshare/
##Copy the student user's home directory to the shared directory, - r recursion, directory and all contents in the directory, - P replication privilege, must be added - p, otherwise the experiment will be a lot of trouble, leading to the failure of the experiment results.
  cp -rp /home/hello/ /helloshare/
                                ##Copy the hello user's home directory to the shared directory
2 vim /etc/exports              ##Edit nfs configuration file
/helloshate/student 172.25.254.0/24(sync,rw,anonuid=1000,anongid=1000)
##student user home directory, open to 172.25.254.ip segment, synchronously refresh writable, create file system using ID 1000 user and group identity
/helloshate/hello 172.25.254.0/24(sync,rw,anonuid=1001,anongid=1001)
##hello User Home Directory, open to 172.25.254.ip segment, refresh writable synchronously, create file system using ID 1001 user and group identity
3 exports -rv                   ##Refresh and list service content
Recursively copy the student, hello user's home directory with privileges to the shared directory 
Editing configuration files for shared directories 
client

1 vim /etc/sysconfig/autofs             ##Edit auto.nfs configuration file
#
/misc /etc/auto.misc
/nfs  /etc/auto.nfs     ##The default mount directory is / nfs, and the files you see are / etc/auto.nfs
#
2 vim /etc/auto.nfs                     ##Edit the mount read rule for default files
* 172.25.254.127:/helloshare/&
3 vim /etc/auto.master                  ##Edit auto.master file
#
TIMEOUT=3                               ##Unmount automatically after 3 seconds of exit
#
4 systemctl restart autofs.srevice      ##Restart autofs service
Do the operation as shown in the figure 
Edit auto.nfs file 
Edit autofs configuration file 
Edit auto.master file 
Test, switch to the designated mount directory, automatically mount, the default is to cancel the mount 300 Miao after exit, and change the default to 3 seconds. 
test
client
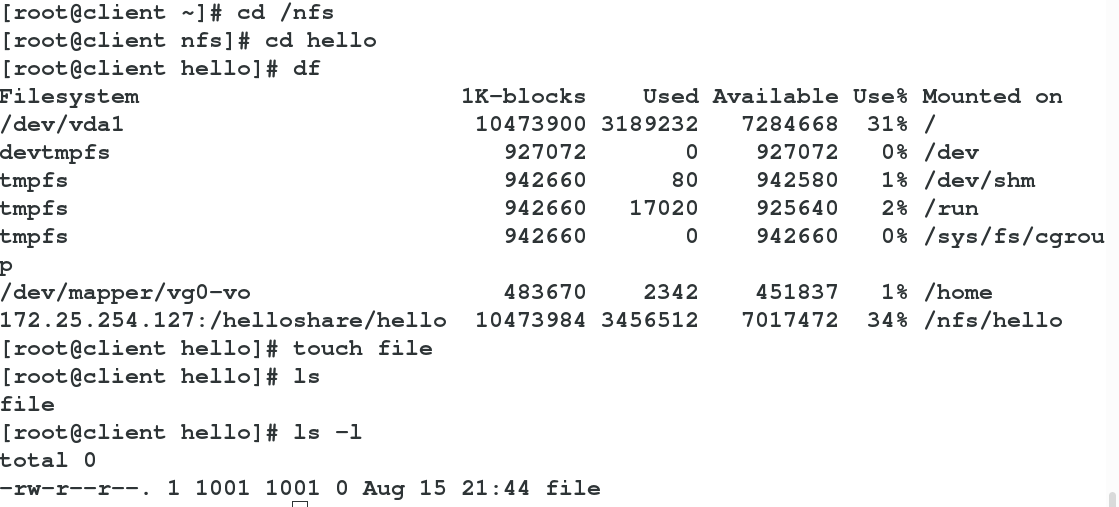
1 cd /nfs ##Switch to the default mount directory
--> cd hello ##Switch to hello users
-->df ##Already mounted
-->touch file ##create file
-->ls -l ##Create files that are id1000 users and user groups
-->cd ##Sign out
-->df (3Seconds later) ##Auto Unmount
2 cd /nfs ##Switch to the default mount directory
--> cd student ##Switch to hello users
-->df ##Already mounted
-->touch nihao ##create file
-->ls -l ##Creating files is id1001 user and user group
-->cd ##Sign out
-->df (3Seconds later) ##Auto UnmountTest success
Switch to the specified shared directory, switch to the student user, establish the file is the student user, student user group 
Switch to the specified shared directory, switch to the hello user, create the file is 1001 user, 1001 user group