catalogue
1: Viewing user and group information
View user information
View password information
View group information
Special group wheel
2: Management of user and group information
user management
Group management
3: File permissions
View of file permissions
Modification of file permissions
ACL control permission setfacl, getfacl
Umask, Suid, Sgid, viscous bit
In Linux, everything is a file (folders and hardware devices are special files). If possible, try to use text files. Text file is a file that human and machine can understand, and it has also become the best way for human and machine to communicate. Since all configuration files are text, you only need the simplest editor to modify them. Because it is so simple to modify text files, the Linux system itself must be standardized. This leads to the concepts of user (Group) and permission. The introduction of these two concepts perfectly ensures the security of Linux without adding complexity. Because everything is a document. Therefore, Linux introduces three files to manage users (groups), / etc/passwd stores user information, / etc/shadow stores user password information, / etc/group stores group information, and then adds the relationship information between users and files in the file header of each file in the file system.
There are three relationships among users, groups and files
- There are only two relationships between users and files, with and without.
- There are only two relationships between groups and files, with and without.
- There are only two relationships between users and groups, belonging to and not belonging to.
By superimposing these three relationships, the final relationship between users and files can be divided into three categories
- The user owns the file
- The user belongs to a group and a group owns the file (that is, the user owns the file by belonging to a group)
- The user does not own the file
1: Viewing user and group information
Under Linux, users are divided into three categories: super user (root), ordinary user and program user.
- Superuser: UID=0
- Program user: Rhel5/6, UID=1-499; Rhel7,UID=1-999
- Ordinary user: Rhel5/6, UID=500-65535; Rhel7,UID=1000-60000
There are three commands to view the user's related information
cat  /etc/passwd         #View user information
cat  /etc/shadow         #View user's password information
cat  /etc/group          #View user's group information
View user information
cat /etc/passwd #/The default permission of etc/passwd is 644, and its minimum permission is 444
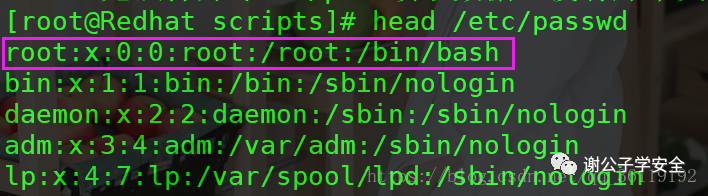
The display of user information has 7 fields
- Field 1: username -- > root
- Field 2: password placeholder -- > x (replaced by X here)
- Field 3: uid, user ID -- > 0
- Field 4: gid, group ID -- > 0
- Field 5: user description -- > root
- Field 6: home directory -- > / root
- Field 7: login shell (when the user logs in to the shell, / bin/bash means he can log in, / sbin/nologin means he is not authorized to log in)
Note: Generally speaking, only the UID of the root user is 0. If a hacker changes the UID of an ordinary user to 0, the system will automatically switch to root as long as he logs in with the user name and password of an ordinary user. Therefore, when strengthening the system, you must filter out which users have UID of 0
Viewing user information using scripts
#! /bin/bash
# Author: Mr. Xie
# Date:2018-10-12
# Function: query all the information of the user according to the user name
read -p "Please enter the user name to query:" A
echo "------------------------------"
n=`cat /etc/passwd | awk -F: '$1~/^'$A'$/{print}' | wc -l`
if [ $n -eq 0 ];then
echo "The user does not exist"
echo "------------------------------"
else
  echo "User name of this user: $A"
  echo "The name of the user UID: `cat /etc/passwd | awk -F: '$1~/^'$A'$/{print}'|awk -F: '{print $3}'`"
  echo "The user's group is:`id $A | awk {'print $3'}`"
  echo "The name of the user GID Is:`cat /etc/passwd | awk -F: '$1~/^'$A'$/{print}'|awk -F: '{print $4}'`"
  echo "The user's home directory is:`cat /etc/passwd | awk -F: '$1~/^'$A'$/{print}'|awk -F: '{print $6}'`"
  Login=`cat /etc/passwd | awk -F: '$1~/^'$A'$/{print}'|awk -F: '{print $7}'`
  if [ $Login == "/bin/bash" ];then
  echo "The user has the right to log in to the system!!"
  echo "------------------------------"
  elif [ $Login == "/sbin/nologin" ];then
  echo "The user does not have permission to log in to the system!!"
  echo "------------------------------"
  fi
fi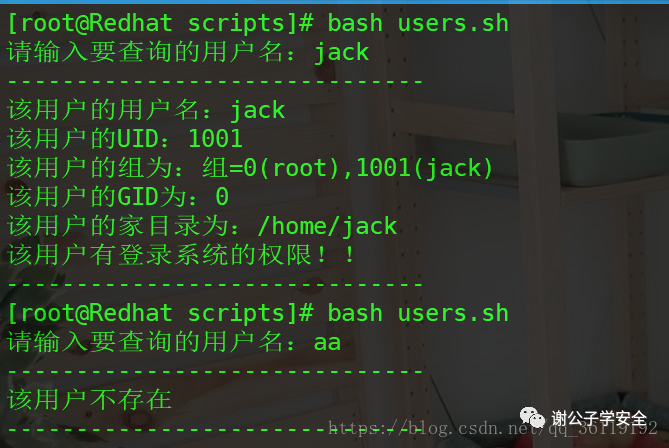
View password information
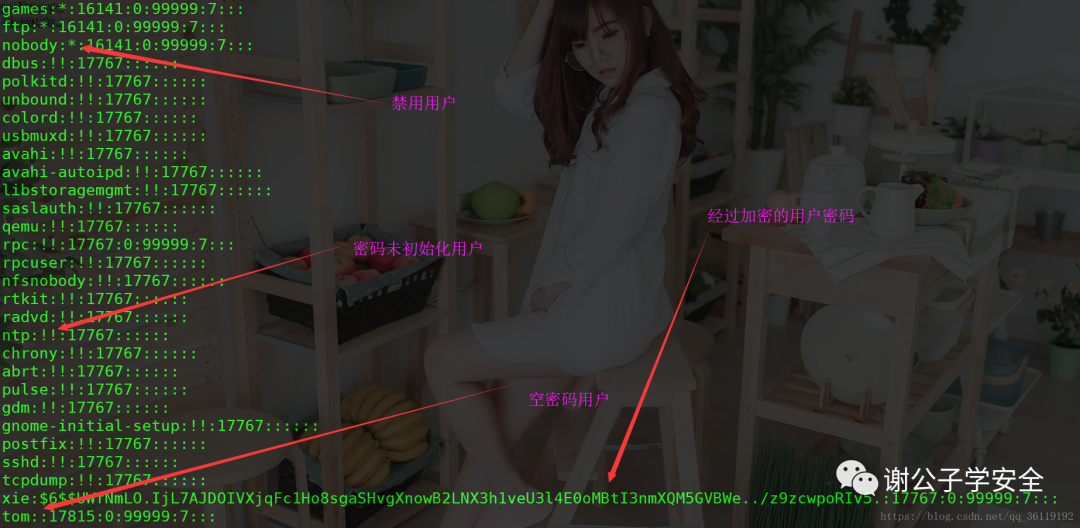
cat /etc/shadow #The default permission of shadow is 600 and the minimum permission is 400

The display of password information has 9 fields
- Field 1: user name
- Field 2: password encrypted by sha-512 (secondary encryption, after the first encryption, add random number for the second time and encrypt again)
- Field 3: number of days between the last password change and January 1, 1970
- Field 4: minimum password validity
- Field 5: maximum password validity
- Field 6: warn a few days before password expiration
- Field 7: number of days locked after account expiration
- Field 8: number of days between account expiration time and January 1, 1970
- Field 9: unassigned function
Field 2 is the password bit of the user. If it is *, it means that the user is disabled,!! Indicates that the user password is uninitialized. If it is empty, it indicates that the password is empty
Note: with the help of the chage command, you can modify the user's password policy or edit / etc/shadow (not recommended)
For example: chage - L bob, view the password policy of user bob
Chage - M 90 bob, change the validity period of user bob's password to 90 days
The script implements modifying the user's password policy
- #!/bin/bash
- #Author: Mr. Xie
- # Date: 2018-10-12
- #Function: set the user password policy, such as the maximum validity period of the password
- read -p "set the maximum number of days the password can not be modified:" A
- read -p "set the minimum number of days between password changes:" B
- read -p "set minimum password length:" C
- read -p "set the number of days to notify the user before the password expires:" D
- sed -i '/^PASS_MAX_DAYS/c\PASS_MAX_DAYS '$A'' /etc/login.defs
- sed -i '/^PASS_MIN_DAYS/c\PASS_MIN_DAYS '$B'' /etc/login.defs
- sed -i '/^PASS_MIN_LEN/c\PASS_MIN_LEN '$C'' /etc/login.defs
- sed -i '/^PASS_WARN_AGE/c\PASS_WARN_AGE '$D'' /etc/login.defs
- echo "password policy has been set..."

View group information
cat /etc/group
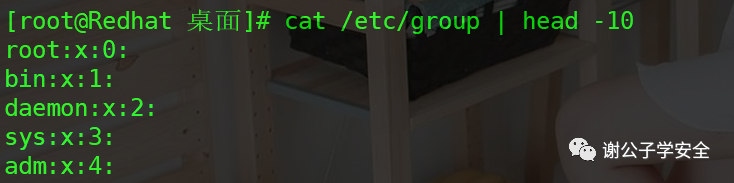
The display of group information has four fields
- Field 1: group name -- > root
- Field 2: group password placeholder -- > x
- Field 3: GID -- > 0
- Field 4: group members
Note: a user can only have one primary group and up to 31 additional groups. Primary groups are all default groups when users create files. Additional groups are mainly used for permission management. No matter which group the user belongs to, the user can have the permissions of the group
Special group wheel
In Linux, there is a special group wheel, which is similar to an administrator's group. In Linux, even if we have the permission of system administrator root, it is not recommended to log in with root. Generally, you can log in as an ordinary user. When you need root permission to perform some operations, you can su log in as root user. However, as long as anyone knows the password of root user, he can log in as root user through Su command -- which undoubtedly brings security risks to the system. Therefore, add an ordinary user to the wheel group, and the ordinary user will become a user in the administrator group. Then, you can modify the configuration file so that only the users in the wheel group can switch to the root user.
Related article: set that only the specified user can use the su command to switch to the root user
2: Management of user and group information
user management
The new user system will do three things
- When creating a new user, the system will copy the directory and files in / etc/skel to the new user's home directory
- In / var/spool/mail, create a new mailbox for the user name
- Add user information in passwd, shadow and group files under / etc
Specify parameters when adding users:
- When adding a user, use - g to specify the group of the new user and - u to specify the user uid
- -The G parameter can specify additional groups for new users
- Use - S / SBIN / nologin to specify that the created user does not have permission to log in to the system
- You can also use the - M parameter to specify that the created user does not create a home directory under the home directory
- You can also use the - d parameter to specify its home directory
The following command directly generates a user with root permission: venus with password: 123qwe. The premise is that the execution of this command requires root permission.
useradd -p `openssl passwd -1 -salt 'user' 123qwe` -u 0 -o -g root -G root -s /bin/bash -d /home/user venus
Note: when users create, the default attributes (such as UID, GID, whether to create home directory, create mailbox, etc.) are through / etc / login It is controlled by the defs file. Modifying the attributes of this file will affect all users created later. You can also specify parameter modification when creating a user, which is only valid for the current user
Delete user:
userdel -r james #When deleting users, you must remember to add the - r parameter!!
- Without the - r parameter, only the user information in the passwd, shadow and group files will be deleted, the files in / home directory will not be deleted, and the files in / var/spool/mail / will not be deleted
- Add the - r parameter to delete the user information in passwd, shadow and group files, as well as the user's home directory and mailbox
Modify account password:
passwd james #Set password for james user
When the current user is root:
- You don't need to know the current password
- When setting a new password, you do not need to follow the password requirements
When the current user is an ordinary user:
- Need to know current password
- When setting a new password, you must follow the password requirements (1. No less than 8 characters, 2. Meet the complexity requirements)
Modify account attributes:
usermod parameter james
- -S modify the user's login shell usermod - S / SBIN / nologin James
- -L account locking (you can view the status of the account through passwd -S account name)
- -U unlock account
- -g modify the account group. For example, change bob's group to james: usermod - g james bob
- -G add an additional group to the account example: add an additional group john: usermod - G john bob to bob; Delete user bob from the attached group: gpasswd - D bob john
- -A by default, when a user already has an additional group, adding an additional group will replace the previous additional group. Adding the - a parameter will not replace the original additional group, which means that the user can have multiple additional groups.
[root@Redhat ]# id james
uid=1000(james) gid=2002(james) group=2002(james)

[root@Redhat ]# usermod -g aaa james ; id james;  // Modify the user's primary group to AAA
uid=1000(james) gid=2000(aaa) group=2000(aaa)

[root@Redhat ]# usermod -G xie james ;id james;   // Add additional groups to users Xie
uid=1000(james) gid=2000(aaa) group=2000(aaa),1000(xie)

[root@Redhat ]# usermod -G xiao james ;id james;  // Add an additional group to the user, and replace the original additional group if there is one
uid=1000(james) gid=2000(aaa) group=2000(aaa),2001(xiao)

[root@Redhat ]# usermod -aG xie james;id james;  // Add an additional group Xie to the user without replacing the original additional group
uid=1000(james) gid=2000(aaa) group=2000(aaa),1000(xie),2001(xiao)
Lock and unlock users:
- Lock user: usermod - L Xie or passwd - L Xie
- Unlock user: usermod - U Xie or passwd - U Xie
- View user status: passwd - s Xie
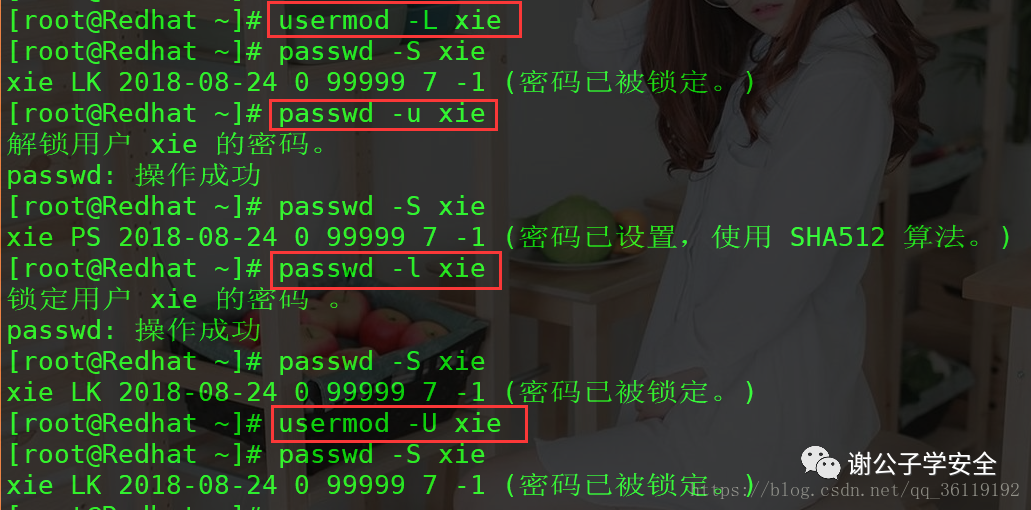
Note: Although both usermod and passwd commands can lock and unlock users, there are still differences. One of the differences is that there will be a prompt after the passwd command is completed. Another difference is that passwd has greater permissions than usermod. Users locked with usermod can be unlocked with passwd, but users locked with passwd cannot be unlocked with usermod
Group management
Add group: groupadd Xie
- -g. -- gid use gid for the new group. For example, groupadd - G 2000 xie creates a new group xie, and the gid is set to 2000
- -K. -- key does not use / etc / login Default values in defs
- -o. -- non unique allows the creation of groups with duplicate GID S
- -p. -- password use this encrypted password for the new group
- -r. -- system create a system account
Delete group: groupdel Xie
- -R, -- remove delete home directory and mail pool
Note: only the additional group can be deleted, not the primary group!!!!
Modify group properties: groupmod Xie
-g. -- GID GID change the group ID to gid -n. -- new name renamed NEW_GROUP -o. -- non unique allows duplicate GID S
groupmod  -g  2000 bob       //Change the GID of bob group to 2000
groupmod  -n  aaa   bob      //Change the name of bob group to aaa
groups    bob                //View all groups bob belongs to
Modify users in the group: groupmems
groupmems   -a  john  -g  xie     Will user john Add xie Group
groupmems   -d  john  -g  xie     Will user john from xie Remove or delete from group gpasswd -d  john  xie
3: File permissions
View of file permissions
Use ls -lh to view the specific information of the file, including the permissions of different users on the file
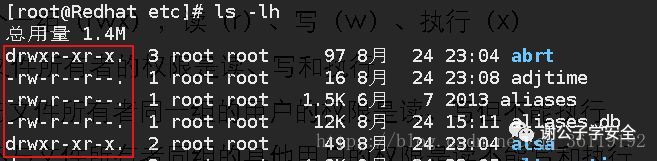
- Drwxr-xr-x. 3 root 97 August 24 23:04 abrt
- -rw-r--r--. 1 root 16 August 24 23:08 adjtime
Let's take the abrt directory and the adjtime file to explain.
The first 11 characters determine what different users can do with the file The first character represents file (-), directory (d), link (l) device (C) block device (b) The remaining characters are grouped in groups of three (rwx), read (r), write (w) and execute (x)
- The first group rwx: the permissions of the file owner are read, write and execute
- Second group rw-: users in the same group as the file group have read and write permissions but cannot execute
- The third group r--: the permissions of other users who are not in the same group as the file owner are read, write and execute
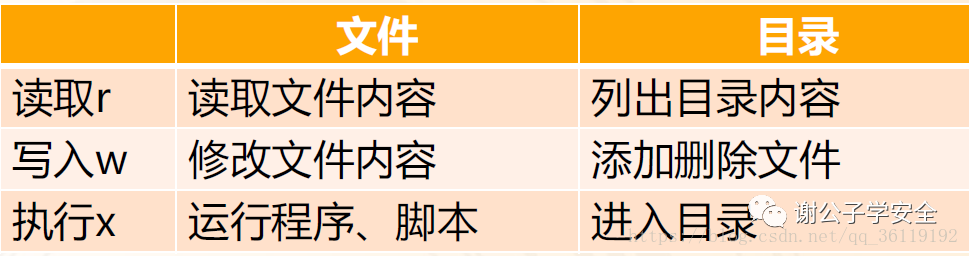
final. Represents no ACL extension permission + represents ACL extension permission. For files:
- r indicates that the file can be read
- w indicates that the file content can be modified
- x indicates that the file is executable
For directory:
- r means that the contents of the directory can be listed (LS can be used), provided that you have x permission, because if you can't enter the directory, how can you list the contents of the directory
- w means that you can add, delete, modify and query in the directory, provided that you have x permission, because if you can't enter this directory, how can you add, delete, modify and query
- x means that you can enter the directory, but you may not be able to read the contents of the directory. To read the contents of the directory, you need to have r permission, and to modify, you need to have w permission!
Note: the permission of the directory is special. You can see that x permission is the most basic permission of the directory, because if you can't enter the directory, you can't read the content and add, delete, modify and check. Another is when you have rwx permissions on the directory. If there is a file in the directory, the file has no w permission for your permission, but you can modify the file in the directory because you match the permission of the directory first, so you can force to modify the file, save and exit!
Meaning of the following fields:
- 3 represents that the number of links to the file is 3;
- root represents the user of the file;
- root represents the group to which the file belongs. Generally, the group to which the file belongs is the group of the owner of the file. In special cases, you can modify it at will!!
- 97 represents the size of the file;
- 23:04 on August 24 represents the last modification date of the document;
- abrt indicates the file name
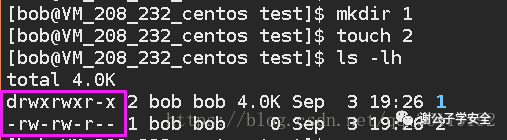
example:         Here are a few users whose UID and GID They are as follows
root User:   uid=0(root)     gid=0(root)     groups=0(root)
xie  User:   uid=1000(xie)   gid=1001(john)  groups=1001(john)
john User:   uid=1001(john)  gid=1001(john)  groups=1001(john)
james User:   uid=1002(james) gid=1002(james) groups=1002(james)
jerry User:   uid=1003(jerry) gid=1002(james) groups=1002(james)

Then we root Create a new folder as test ,be test The default permissions are as follows
drwxr-xr-x 2 root root 4096 Aug 31 19:16 test
 We modify the file permission, file owner and file group as follows
drwxrwx--- 2 xie james 4096 Aug 31 19:19 test
 Finally, the conclusions are as follows:

xie The user's identity is the file owner, who can create files in this directory, and the information of creating files is as follows  -rw-r--r-- 1 xie   john  0 Aug 31 19:45 file1
john The identity of the user is other,No action can be done on this file
james The user identity is a member of the group to which the file belongs. The information of creating files in this directory is as follows  -rw-rw-r-- 1 james james 0 Aug 31 19:32 file2
jerry The user's identity is a member of the group to which the file belongs. The information of creating files in this directory is as follows  -rw-r--r-- 1 jerry james 0 Aug 31 19:43 file3
Modification of file permissions
Modify file permissions chmod
chmod  755 abrt                         //Give abrt permission rwxr-xr-x
chmod  u=rwx ,g=rx,o=rx abrt          //Give abrt rwxr-xr-x permission. u = user permissions, g = group permissions, o = other user permissions of different groups
chmod  u-x , g+w   abrt               //Remove the user execution permission and increase the group write permission for abc
chmod  a+r          abrt               //Add read permissions to all users
Modify the owner chown and group chgrp of the file
chown   bob    adjtime           // Change the owner of adjtime to bob
chgrp   root   abrt             //Change the group to which adjtime belongs to root

chgrp   -R  root  abrt           //Change the abc directory and the organization of all files in the directory to root
chown   ‐R  root  abrt           //Change the abc directory and all the files and directories under it. The owner is root
Note: the method of modifying the owner and group of the file and folder is the same. If you want to modify the owner and group of the file in the folder, add the - R parameter. Chown can modify not only the master attribute, but also the group attribute. Syntax: chown master group file
chown john:james adjtime //Change the owner of adjtime to john and the group to james
ACL control permission setfacl, getfacl
setfacl: set file access control rules
- -M, add an extended ACL rule to the file, setfacl - m u: Bob: R abrt;
- -X, remove the extended ACL rule for the file, setfacl - x U: Bob abrt;
- -b. Remove all ACL rules of the file, setfacl - B U: Bob abrt;
- -R, recursively operate all files and directories in all directories, setfacl - R - m u: Bob: RWX abrt;
- -d. set the default ACL rule
getfacl: get file access control rules
example:         Here are a few users whose UID and GID They are as follows
 user a: uid=1006(a)  gid=1006(a)  groups=1006(a)
user b: uid=1007(b)  gid=1007(b)  groups=1007(b)
user c: uid=1007(c)  gid=1000(root)  groups=1000(root)

We take root Create a new file in the root directory as file,Its authority is shown on the right:-rw-r--r-- 1 root root 4 Aug 31 23:00 file
 his acl The information is as follows: getfacl file
            # file:  file
            # owner: root
            # group: root
            user::rw-
            group::r--
            other::r--
So users a And users b Only have read permission for him. Now we want to let the user a have rwx Permissions, not users b No change
 Set user a of ACL jurisdiction: setfacl -m u:a:rwx  file
 Finished setting acl After that, the file file Your permissions become:-rw-rwxr--+ 1 root root 4 Aug 31 23:01 file
Note: the change of the user's group permission bit is equal to acl In information mask Value, one more+Extended permission bit. At this time, although the user c yes root Group, but users c On file file Your permissions are still the same as before r--,instead of rwx
 see file of acl information  getfacl  file   ,As shown below
            # file:  file
            # owner: root
            # group: root
            user::rw-
            user:a:rwx     // ACL permissions of user a
            group::r--
            mask::rwx      // Equal to the user's previous permission and the permission set by acl
            other::r-
It can be seen that the user a Yes rwx Permissions, user b There is still only r Permissions for
 To remove acl ,be  setfacl  -x  u:a  file
After removal, a The authority is still only r You're out of permission
Note: if user a originally had only R permission on the file and the acl set was setfacl - m u: A: W file, then after setting the acl, user a only had w permission on the file and no r permission
If you want all existing files in a folder to inherit the permission attribute of acl set in the folder, you can use setfacl - R - m u: A: RWX file name
Umask, Suid, Sgid, viscous bit
UMSK
The umask value of root user is 0022 by default, and that of ordinary user is 0002 by default. The umask value can be modified manually. The first bit is a special bit. It has a value only when SUID(4), SGID(2) and viscosity bit (1) are configured.
Therefore, when the root user creates a folder, its permission is 777-022 = 755, while when creating a file, its permission is 755-111 = 644
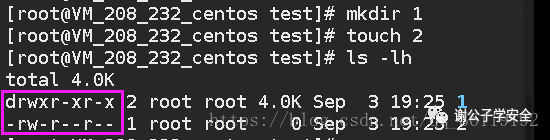
When an ordinary user creates a folder, his permission is 777-002 = 775, while when creating a file, his permission is 775-111-664
Therefore, the difference between the root user and the ordinary user lies in the group. The group location of root user is w only in his own hands. However, an ordinary user has w rights as long as he is in the same group.
SUID, SGID and sticky bit
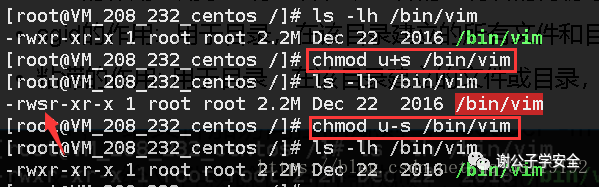
- suid is used to execute a file and run the file as the owner of the file. chmod u+s file name
- Function of sgid: used for directories. For all files and directories created in the directory, the group inherits the group of the directory. When other members of the group modify files in the directory, their owner and group will not change! CHMOD G + s directory
- Function of sticky bit: used for the directory. Only the creator can delete and modify the files or directories created in the directory, and other users cannot delete and modify the CHMOD O + T directory
Role of suid: suid is the abbreviation of set uid. It appears on the execution bit of the main permission to which the file belongs, and the flag is s. When suid is set, the first bit of UMSK is 4. We know that the password file of our account is stored in / etc/shadow, and the permission of / etc/shadow is -----------. That is, only the root user can operate on this directory, while other users do not even have permission to view it. When ordinary users want to change their passwords, they can use the passwd command. The passwd command is in / bin/passwd. After we execute this command, we can change the password in / etc/shadow. So why can we modify a file that we do not have permission through the passwd command? Suid is used here. The purpose of suid is to let the user executing the command execute with the permission of root, which means that when ordinary users execute passwd, they will have the permission of root. In this way, the file / etc/passwd can be modified. Command: chmod u+s file name
Several conditions for using suid
- SUID is only valid for executables
- The caller has the right to execute the document
- During execution, the caller will temporarily gain the owner's permission of the file.
- This permission is only valid during program execution
Function of SGID: SGID is the abbreviation of set gid. It appears above the execution bit of the group permission to which the file belongs, and the flag bit is s. When SGID is set, the first bit of UMSK is 2. It acts on the directory. When user a has rwx rights to a directory, the user can create a file in the directory. The owner and group of the new file inherit from user a. When another user b also has rwx permission to the directory, it can modify the file created by a, and the master and group of the modified file will become b! However, if the directory is decorated with SGID, all files created by users with rwx permissions in this directory belong to the group to which this directory belongs. When other users modify, there are three situations:
- When both users belong to the group, the primary and group of the modified file will not be, and read only will not be prompted when modifying the file! It can be modified normally
- When both users belong to other, the group of the modified file will remain unchanged, and the owner will become another user. When modifying the file, you will be prompted to read only and must be forced to save and exit
- When one user is a group and the other is another, the group of the modified file will remain unchanged, and the owner will become another user. When modifying the file, you will be prompted to read only, and you must save and exit forcibly
SGID example code
example:         Here are a few users whose UID and GID They are as follows
s1 User: uid=1004(s1) gid=1005(s1) groups=1005(s1),1004(sgid)
s2 user:      uid=1005(s2) gid=1006(s2) groups=1006(s2),1004(sgid)

We take root Create an identity in the root directory test The default permissions of the file are shown on the right: drwxr-xr-x 2 root root 4096 Aug 31 20:54 test
 Modify its default permissions, as shown on the right: drwxrwx--- 2 root sgid 4096 Aug 31 20:54 test
 because s1 and s2 All groups sgid Members within, so s1 and s2 All right test File execution rwx jurisdiction
s1 get into test Inside, create a file file1 ,Its authority is shown on the right:-rw-rw-r-- 1 s1 s1 3 Aug 31 21:01 file1
s2 get into test Inside, use vim open file1 Files, displaying files read only. Modify it, force save and exit! then file1 The permissions of are shown on the right:-rw-rw-r-- 1 s2  s2 3 Aug 31 21:04 file1
 so s2 You can force modification s1 Create a new file. although s2 about file1 Yes other,But because s1 and s2 All belong to sgid Group, so you can test The data in the folder has the permission to read, write and execute, so it can be used vim Force modification, save and exit. After modification, file1 The user and group to which the file belongs have become s2 It's too late.
Obviously, this is not what we want, if we want s2 After modifying the file, we need to use it if all users and groups of the file remain unchanged SGID Yes.
implement  chmod  g+s  /test
s1 Create another file file2,Its authority is shown on the right:-rw-rw-r-- 1 s1  sgid 3 Aug 31 21:03 file2    It can be seen that the group it belongs to inherits the folder test Group to which
s2 Reuse vim open file2,Do not prompt file read only Yes, modify, save and exit! then file2 The permissions of are shown on the right:-rw-rw-r-- 1 s1  sgid 13 Aug 31 21:04 file2
 It can be seen that the SGID After, after other members in the same group modify the file, their owner and group will not change!
Action of viscous potential:
SBIT is Sticky Bit, which appears on the execution bit of other user permissions. The flag bit is t. when the Sticky Bit is set, the first bit of UMSK is 1. It can only be used to decorate A directory. When A directory has SBIT permission, any user who can create files in this directory can modify and delete the files created by this user in this directory only by himself and root, and other users can't modify and delete!! We know that / tmp is the temporary file directory of the system. All users have all permissions in this directory, that is, they can create, modify and delete files arbitrarily in this directory. If user A creates A file in this directory and user B deletes or modifies the file, we can't allow this. In order to achieve this goal, the concept of stick bit appears.
Whether two users belong to group or other, or one belongs to group and the other, files created by others cannot be modified or deleted!!
example:         Here are a few users whose UID and GID They are as follows
 user a:        uid=1006(a)  gid=1007(a)  groups=1007(a)
user b:        uid=1007(b)  gid=1008(b)  groups=1008(b)

We take root Create an identity in the root directory test The default permissions of the file are shown on the right: drwxr-xr-x 2 root root 4096 Aug 31 20:54 test
 We modify its permissions: drwxrwxrwx 2 root root 4096 Aug 31 20:54 test
 user a matching test Folder other Permissions, owning rwx Permissions, entering test Inside, create a new folder file1,Its authority is shown on the right:-rw-rw-r-- 1 a a 5 Aug 31 21:45 file1
 user b matching test Folder other Permissions, owning rwx Permissions, entering test Within, deletion can be performed file1. Because users b Own folder test of rwx Permission, so you can delete all data in its folder. even if file1 of other Permission is read-only!!
Obviously, this is not what we want
 implement  chmod  o+t /test
s1 Create another file file2,Its authority is shown on the right:-rw-rw-r-- 1 a  a 3 Aug 31 21:03 file2
s2 Try deleting again file2,Can't delete!! Only the owner of the file can delete it
 It can be seen that only the owner of the file can delete the file after stack hysteresis is executed
Note: sometimes when you set the s or T permission, you will find that it becomes s or T. This is because you don't give it x (executable) permission at that location. In this case, this setting will not be effective. You can give it x permission first, and then give it s or T permission
Source: childe Xie's blog( https://xie1997.blog.csdn.net/ )