Note: The WEB server and database need to be separated, and the WEB server also needs to compile and install MySQL.
The important idea of cluster architecture is to find the backbone and extend from the backbone area to the outside.
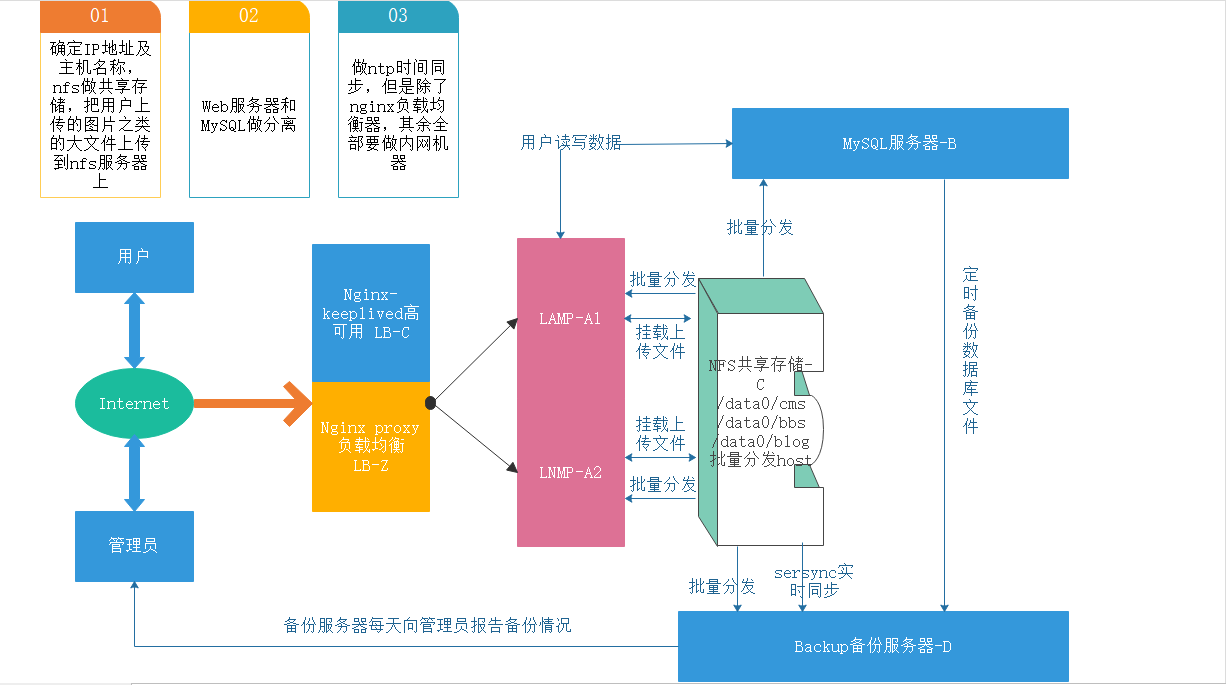
WEB Server: apache nginx makes three products locally, dedecms work process discuz, which stores pictures for users, and the directory of attachments is mounted on the shared directory of nfs server
The NFS server makes three shared directories locally, and stores the user's uploaded pictures and attachments in the corresponding directories respectively.
sersync is used to synchronize with the backup server in real time, distribute keys and scripts in batches, host files (in actual production environment, under the same LAN, hosts files are usually consistent).
MySQL Server: A server for users to store data.
Backup server: Server used for backup to prevent other servers from downtime, virus infection, and other data loss. At the same time, the contents of daily backup should be sent to administrators by mail to ensure the success of data backup.
My main idea is to configure LAMP and LNMP servers first, then to extend the configuration of nfs servers and MySQL servers, then pack all the data needed to backup, configure backup servers, and finally do nginx load balancing server, if you have the energy and ability, continue to extend a high nginx. Available (prompting ngixn High Availability Services to use VRRP technology)
1.LAMP(192.168.190.20)
(1)tar xvf /apache-2.2.27

cd apache-2.2.27

Compile and install

./configure \

-- prefix=/application/appache2.2.27\ Installation directory

enable-deflate Compression Installation

-- enable-expires\ expiration cache time

--enable-headers \

enable-modules=most module activation

--enable-so \

With-mpm = worker apache: worker,prefork

--enable-rewrite && make &&make install

(Note that there is no space behind the line break in the compiler environment. Notes are added to the above compilation. If you paste, please delete it by yourself and ignore it by hand.)


ln -s /application/apache-2.2.27 /application/apache

echo "<html>

<head><title> a ,s blog. </title><head>

<body>

        Hi,i'm a ,My blog address is

<a href="" targe=_parent > </a>

</ body>

</html>" > /application/apache/htdos/index.html

/application/apache/bin/apachectl graceful
Browser input 192.168.190.20 will appear
The words Hi, i'm a, My blog address is and so on indicate the successful installation of apache service
(2) Install database msyql
Decompress, compile and install. The compilation process is slightly longer. Check for soft links after installation.
Create MySQL Virtual Users and User Groups
groupadd mysql

  cat /etc/group

  useradd -g mysql -M -s /sbin/nologin mysql

id mysql

//Compile and install MySQL

./configure \

--prefix=/application/mysql5.1.72 \

--with-unix-socket-path=/application/mysql5.1.72/tmp/mysql.sock \

--localstatedir=/application/mysql5.1.72/data \

--enable-assembler \

--enable-thread-safe-client \

--with-mysqld-user=mysql \

--with-big-tables \

--without-debug \

--with-pthread \

--enable-assembler \

--with-extra-charsets=complex \

--with-readline \

--with-ssl \

--with-embedded-server \

--enable-local-infile \

--with-plugins=partition,innobase \

--with-mysqld-ldflags=-all-static \

--with-client-ldflags=-all-static

#--with-plugin-PLUGIN \

make && make install
echo $? Check that the compilation is successful
Ln-s/application/mysql 5.1.72/application/mysql Create soft links
Copy the configuration file for configuring mysql
cd  mysql-5.1.72/support-files/

ls

cp -p my-small.cnf /etc/my.cnf

chown -R mysql.mysql /application/mysql    To grant authorization MySQL User management rights

//Initialize mysql

/application/mysql/bin/mysql_install_db --basedir=/application/mysql --datadir=/application/mysql/data/ --user=mysql           ##Two OK s are successful initialization

/application/mysql/bin/mysqld_safe &    start-up mysql

netstat -lntup|grep mysqld       ##See if MySQL service started successfully

mysqladmin -u root password '123456'        ##Setting MySQL User Password
(3) After installing apache and mysql, install php (note that php and apache exist as modules)
yum install -y openssl-devel

tar -xvf  php-5.3.27.tar.gz

cd php-5.3.27.tar.gz

./configure \

--prefix=/application/php5.3.27 \     //Note the installation directory of php

--with-apxs2=/application/apache/bin/apxs \        //Note the installation directory of apache

--with-mysql=/application/mysql \

--with-xmlrpc \

--with-openssl \

--with-zlib \

--with-freetype-dir \

--with-gd \

--with-jpeg-dir \

--with-png-dir \

--with-iconv=/usr/local/libiconv \

--enable-short-tags \

--enable-sockets \

--enable-zend-multibyte \

--enable-soap \

--enable-mbstring \

--enable-static \

--enable-gd-native-ttf \

--with-curl \

--with-xsl \

--enable-ftp \

--with-libxml-dir && make && make install
ln -s /application/php5.3.27/ /application/php  ##Make a Soft Link to Version Number

cp /application/apache/conf/httpd.conf /application/apache/conf/httpd.conf.bak.1

vim /application/apache/conf/httpd.conf       #Modify the master configuration file

cd /application/apache/conf

diff  httpd.conf httpd.conf.bak.1

67,68c67,68

< User www

< Group www

---

> User daemon

> Group daemon

149c149

<     DirectoryIndex  index.php index.html

---

>     DirectoryIndex  index.html

292,294c292

<     AddType application/x-httpd-php .php .phtml

<     AddType application/x-httpd-php-source .phps

---

>

401c401

< Include conf/extra/httpd-vhosts.conf

---

># Include conf/extra/httpd-vhosts.conf:

423 <Directory "/data0/www">

424     Options -Indexes FollowSymLinks

425     AllowOverride None

426     Order allow,deny

427     Allow from all

428 </Directory>
Create the corresponding apache virtual user www
useradd www -s /sbin/nologin -M
id www
cd /application/apache/conf/extra
vim httpd-vhosts.conf
NameVirtualHost *:80

#

# VirtualHost example:

# Almost any Apache directive may go into a VirtualHost container.

# The first VirtualHost section is used for all requests that do not

# match a ServerName or ServerAlias in any <VirtualHost> block.

#

<VirtualHost *:80>

    ServerAdmin 1227566276@qq.com

    DocumentRoot "/data0/www/cms"

    ServerName cms.etiantian.org

    ServerAlias etiantian.org

    ErrorLog "logs/dummy-host.example.com-error_log"

    CustomLog "|/usr/local/sbin/cronolog /app/logs/access_cms_%Y%m%d.log" combined

</VirtualHost>

<VirtualHost *:800>

    ServerAdmin 1227566276@qq.com

    DocumentRoot "/data0/www/bbs"

    ServerName bbs.etiantian.org

    ErrorLog "logs/dummy-host.example.com-error_log"

    CustomLog "|/usr/local/sbin/cronolog /app/logs/access_bbs_%Y%m%d.log" combined

</VirtualHost>

<VirtualHost *:8000>

    ServerAdmin 1227566276@qq.com

    DocumentRoot "/data0/www/blog"

    ServerName blog.etiantian.org

    ErrorLog "logs/dummy-host.example.com-error_log"

    CustomLog "|/usr/local/sbin/cronolog /app/logs/access_blog_%Y%m%d.log" combined

</VirtualHost>
Check the error log if there are errors
cd /application/appache/logs/
Establishing Site Catalogue
mkdir /data0/{www,blog,bbs}
for n in www blog bbs ;do echo "$n.etiantian.org" > /data0/$n/index.html;done
/ Application/apache/bin/apachectl-t # Check the syntax of the configuration file
/ application/apache/bin/apachectl graceful # Smooth restart Apache
Do hosts parsing locally. Visit three websites to see if the domain name-based virtual host has been successfully configured.
Dedecms, Discuz, and Workprocess are self-installed after decompression (after installing MySQL database, install it again)
2.LNMP(192.168.190.10)
(1) Install nginx service
Installation before compiling nginx
1.pcre pcre-devel
yum install -y pcre pcre-devel
2.openssl
yum install openssl openssl-devel -y
Compile and install nginx
./configure --user=nginx --group=nginx --prefix=/application/nginx1.6.2 --with-http_stub_status_module --with-http_ssl_module

make && make install

ln -s /application/nginx1.6.2/ /application/nginx
start nginx
/application/nginx/sbin/nginx
Lsof-I:80 Check whether the nginx service started successfully
(2) Install MySQL database
Compile and install MySQL
./configure --prefix=/application/mysql5.1.72 --with-unix-socket-path=/application/mysql5.1.72/tmp/mysql.sock --localstatedir=/application/mysql5.1.72/data --enable-assembler
--enable-thread-safe-client --with-mysqld-user=mysql --with-big-tables --without-debug --with-pthread --enable-assembler --with-extra-charsets=complex --with-readline
--with-ssl --with-embedded-server --enable-local-infile --with-plugins=partition,innobase --with-mysqld-ldflags=-all-static --with-client-ldflags=-all-static

make && make install
echo $?
Database initialization:
Chown-R mysql.mysql/application/mysql Authorizes MySQL User Management Permissions
Initialize mysql
/application/mysql/bin/mysql_install_db --basedir=/application/mysql --datadir=/application/mysql/data/ --user=mysql
// Initialization shows two OK s for successful initialization
(3) Install PHP(PHP works with nginx as a daemon)
(Before installing php, you need to install the package Yum install zlib libxml libjpeg free type libpng GD curl libiconv zlib-devel libxml2-devel libjpeg-devel free type-devel libpng-devel gd-devel curl-devel-y)
tar zxf libiconv-1.14.tar.gz

cd libiconv-1.14

./configure --prefix=/usr/local/libiconv      //Then compile and install

make && make install
Installation-related dependencies
Libmcrypt , mhash ,mcrypt
Install php (install libxslt*, or else you will report an error) to decompress
./configure --prefix=/application/php5.3.27 --with-mysql=/application/mysql --with-iconv-dir=/usr/local/libiconv --with-freetype-dir --with-jpeg-dir --with-png-dir --with-zlib
--with-libxml-dir=/usr --enable-xml --disable-rpath --enable-safe-mode --enable-bcmath --enable-shmop --enable-sysvsem --enable-inline-optimization --with-curl
--with-curlwrappers --enable-mbregex --enable-fpm --enable-mbstring --with-mcrypt --with-gd --enable-gd-native-ttf --with-openssl --with-mhash --enable-sockets --with-xmlrpc
--enable-zip --enable-soap --enable-short-tags --enable-zend-multibyte --enable-static --with-xsl --with-fpm-user=nginx --with-fpm-group=nginx --enable-ftp
&& make && make install
Upload the modified startup file php-frm.conf (complete with modifications in the package group) and upload it to / application/php/etc
Create log files
mkdir /app/logs // / If not created, error will occur when checking grammar
/ Application/php/sbin/php-fpm-t//Check Syntax
/ application/php/sbin/php-fpm//Start PHP
Set up boot-up self-start in rc.local
Mysql php nginx
## Optimizing configuration files
cat /application/nginx/conf/

cat nginx.conf

worker_processes  1;

events {

    worker_connections  1024;

}

http {

    include       mime.types;

    default_type  application/octet-stream;

    sendfile        on;

    keepalive_timeout  65;

        include extra/cms.conf;

        include extra/bbs.conf;

        include extra/blog.conf;

}

mdkir extra

touch {bbs,blog,cms}.conf

cat cms.conf

server {

        listen       80;

        server_name  cms.etiantian.org;

            root   /data0/www/cms;

            index index.php index.html index.htm;

        location ~ \.(php|php5)?$ {

        fastcgi_pass 127.0.0.1:9000;

        fastcgi_index index.php;

        include fastcgi.conf;

        }

}

cat bbs.conf

server {

        listen       800;

        server_name  bbs.etiantian.org;

            root   /data0/www/bbs;

            index index.php index.html index.htm;

        location ~ \.(php|php5)?$ {

        fastcgi_pass 127.0.0.1:9000;

        fastcgi_index index.php;

        include fastcgi.conf;

        }

}

cat blog,conf

server {

        listen       8000;

        server_name  blog.etiantian.org;

                    root   /data0/www/blog;

            index  index.php index.html index.htm;

  location ~ \.(php|php5)?$ {

        fastcgi_pass 127.0.0.1:9000;

        fastcgi_index index.php;

        include fastcgi.conf;

 }

}

mkdir /data0/{www,blog,bbs}

for n in www blog bbs ;do echo "$n.etiantian.org" > /data0/$n/index.html;done
Discuz,dedecms,workprocess three products installed into the site directory bbs,www,blog
3.NFS Server (192.168.190.30)
(1) Install NFS and rpcbind(nfs services are relayed via rpcbind forwarding ports)
yum install nfs-utils rpcbind -y
echo "/etc/init.d/nfs restart">/etc/rc.local // / Set up NFS boot-up self-start using chkconfig as well
vim /etc/exports
#shared storage for LAMP,LNMP

/data0 192.168.190.10(rw,async) 192.168.190.20(rw.async)
(2) Batch distribution
Ssh-copy-id-i can realize key distribution in small environment, but if there are hundreds of servers, it is necessary to develop scripts to distribute keys automatically.
After the key distribution is completed, the local hosts files are distributed (it is necessary to parse hosts locally under the unified Intranet in the actual production environment)
vim /etc/rsync.password
123456
chmod 600 /etc/rsync.password
(3)sersync realizes real-time synchronization with backup server
Install sersync
cd /tools
uzip sersync2.5.4_64bit_binary_stable_final.tar
mv sersync2 /usr/local/sersync
cd /usr/local/sersync/conf
echo 'export PATH=$PATH:/usr/local/sersync/bin' >>/etc/profile
Vim/usr/local/sersync/conf/www_conf xml.xml (which directory rsync server needs to synchronize to write which directory, here blog workprocess as an example name for rsync server module name IP is the target IP address)
24 <localpath watch="/data0/www/blog/wp-content/uploads">

 25         <remote ip="192.168.190.50" name="nfs"/>

 26 </localpath>
echo 'sersync -r -d -o /usr/local/sersync/conf/www_confxml.xml' >> /etc/rc.local
So far, real-time synchronization between sersync and backup server has been completed.
4. Install MySQL Server (192.168.190.40), create the database of the products you make, create the database users used by each product, and authorize users.
Create MySQL virtual user useradd-g mysql-M-s/sbin/nologin MySQL
(1) Compile and install MySQL database
tar xvf mysql5.1.72.tar.gz
cd mysql5.1.72
./configure --prefix=/application/mysql5.1.72 --with-unix-socket-path=/application/mysql5.1.72/tmp/mysql.sock --localstatedir=/application/mysql5.1.72/data --enable-assembler
 --enable-thread-safe-client --with-mysqld-user=mysql --with-big-tables --without-debug --with-pthread --enable-assembler --with-extra-charsets=complex --with-readline
--with-ssl --with-embedded-server --enable-local-infile --with-plugins=partition,innobase --with-mysqld-ldflags=-all-static --with-client-ldflags=-all-static

ln -s /application/mysql5.1.72/ /application/mysql
/ Application/mysql/bin/mysql_install_db--basedir=/application/mysql--datadir=/application/mysql/data/--user=mysql\\ Initializes the database
cd /tools/msyql5.1.71
\cp support-files/mysql.server /etc/init.d/mysqld
/etc/init.d/mysqld start
Netstat-lntup | grep MySQL # Check if MySQL3306 port is open
Mysqladmin-u root password'123456'
(2) Enter the database to create users and authorize them to create the database cms bbs blog used by users
mysql -uroot -p123456
mysql> create database bbs;

mysql> create database cms;

mysql> create database blog;

mysql> show databases;       ##view the database

mysql> grant select,insert,update,delete,alter,create on cms.* to  cms@"192.168.190.%" identified by '123456';

mysql> grant select,insert,update,delete,alter,create on bbs.* to  bbs@'192.168.190.%' identified by '123456';

mysql> grant select,insert,update,delete,alter,create on blog.* to  blog@'192.168.190.%' identified by '123456';

mysql> select user,host from mysql.user;       ##Check whether the user created successfully
(3)MySQL database data backup, using periodic scheduling task timing push (simple backup using mysqldump, high-level backup using replication or drbd)
[root@mysql scripts]# cat mysqldunmp.sh
!#bin/bash

cd /backup

echo "You are in backup dir"

File = /backup/

mysqldump -uroot -p123456 --quick --databases bbs blog cms --flush-logs --single-transaction > /backup/mysql$(date +%F).bak

rsync -az /backup/mysql* rsync_backup@192.168.190.50::mysql --password-file=/etc/rsync.password

echo "Your database backup successfully completed"
vim /etc/rsync.password
123456
chmod 600 /etc/rsync.password
crontab -e
#send mysqlbak

00 00 * * * /bin/sh -x /server/script/mysqldump.sh
5.backup Server (192.168.190.40 rsync, check the pushed backup content every day, send mail regularly to inform the system administrator whether the backup is successful)
Useradd-s/sbin/nologin rsync
yum install -y rsync
echo "/usr/bin/rsync --daemon" >> /etc/rc.local
vim /etc/rsyncd.conf
##rsyncd.conf start##

uid = rsync

gid = rsync

use chroot = no

max connections = 200

timeout = 300

pid file = /var/run/rsyncd.pid

lock file = /var/run/rsync.lock

log file = /var/log/rsyncd.log

ignore errors

read only = false

list = false

hosts allow = 10.0.0.0/24

hosts deny = 0.0.0.0/32

auth users = rsync_backup

secrets file = /etc/rsync.password

[zhang]

path = /zhang/

[cms]

path =/data0/www/cms/

[bbs]

path =/data0/www/bbs/

[blog]

path =/data0/www/blog/

[backup]

path =/backup/

[nfs]

path =/backup/nfs/

[mysql]

path =/mysql/
All push folders must exist or rsync startup will fail
chown -R rsync.rsync /zhang/
chown -R rsync.rsync /data0/www/cms/
chown -R rsync.rsync /data0/www/bbs/
chown -R rsync.rsync /data0/www/blog/
chown -R rsync.rsync /backup/
chown -R rsync.rsync /backup/nfs/
chown -R rsync.rsync /mysql/
vim /etc/rsync.password
rsync_backup:123456
chmod 600 /etc/rsync.password
echo "/usr/bin/rsync --daemon" >> /etc/rc.local
vim /server/script/check.sh
ls /mysql >> /root/check.txt
ls -l /backup/192.168.190.30/|awk '{print $9}' >> /root/check.txt
egrep -v "^$| " /root/check.txt > /root/checkadd.txt
Finally, push the checkadd.txt text document to the system administrator to see what files have been backed up.
mail -s "Hello from linuxde.net by file" 1227566276@qq.com < checkadd.txt
6. Main nginx Load Balancing Server (192.168.190.23)
(1) Install and configure nginx load balancer
Installation before compiling nginx
1.pcre pcre-devel
yum install -y pcre pcre-devel
2.openssl
yum install openssl openssl-devel -y
## Creating virtual users for nginx
usedadd nginx -s /sbin/nologin -M
Compile and install nginx
./configure --user=nginx --group=nginx --prefix=/application/nginx1.6.2 --with-http_stub_status_module --with-http_ssl_module

make && make install

ln -s /application/nginx1.6.2/ /application/nginx
## Start nginx
/application/nginx/sbin/nginx
vim /application/nginx/conf/nginx.conf
worker_processes  1;

events {

    worker_connections  1024;

}

http {

    include       mime.types;

    default_type  application/octet-stream;

    sendfile        on;

    keepalive_timeout  65;


upstream backend {

        ip_hash;

        server 192.168.190.10:80 max_fails=3 fail_timeout=30s;

        server 192.168.190.20:80 max_fails=3 fail_timeout=30s;

}

upstream backendyy {

        server 192.168.190.10:800 max_fails=3 fail_timeout=30s;

        server 192.168.190.20:800 max_fails=3 fail_timeout=30s;

}

upstream backendblog {

        ip_hash;

        server 192.168.190.10:8000 max_fails=3 fail_timeout=30s;

        server 192.168.190.20:8000 max_fails=3 fail_timeout=30s;

}


   server {

        listen       80;

        server_name  cms.etiantian.org;

        index  index.html index.htm;

        location / {

        proxy_pass http://backend;

        }

        error_page   500 502 503 504  /50x.html;

        location = /50x.html {

            root   html;

        }

}

       server {

        listen       80;

        server_name  bbs.etiantian.org;

        index  index.html index.htm;

        location / {

        proxy_pass http://backendyy;

        }

        error_page   500 502 503 504  /50x.html;

        location = /50x.html {

            root   html;

        }

    }


   server {

        listen       80;

        server_name  blog.etiantian.org;

        index  index.html index.htm;

        location / {

        proxy_pass http://backendblog;

        }

        error_page   500 502 503 504  /50x.html;

        location = /50x.html {

            root   html;

        }

    }

}
Smooth restart nginx:/application/nginx/bin/nginx-s reload
(2) Installation configuration keepalived
yum install -y keepalived
netstat -lntup |grep keepalived
vim /etc/keepalived/keepalived.conf
global_defs {


   notification_email {


     acassen@firewall.loc


     failover@firewall.loc


     sysadmin@firewall.loc


   }


   notification_email_from Alexandre.Cassen@firewall.loc


   smtp_server 192.168.200.1


   smtp_connect_timeout 30


   router_id lb01

}

vrrp_instance VI_1 {


    state MASTER


    interface eth1


    virtual_router_id 55


    priority 150


    advert_int 1


    authentication {


        auth_type PASS


        auth_pass 123456


    }


    virtual_ipaddress {

        192.168.190.23/24 dev eth1 label eth1:1

    }

}
/ etc/init.d/keepalived restart/ifconfig will find that a virtual IP address you want is generated
7. Highly available backup nginx load balancing server (192.168.190.23)
(1) Install and configure nginx load balancer
Installation before compiling nginx
1.pcre pcre-devel
yum install -y pcre pcre-devel
2.openssl
yum install openssl openssl-devel -y
Compile and install nginx
./configure --user=nginx --group=nginx --prefix=/application/nginx1.6.2 --with-http_stub_status_module --with-http_ssl_module

make && make install

ln -s /application/nginx1.6.2/ /application/nginx
## Creating virtual users for nginx
usedadd nginx -s /sbin/nologin -M
## Start nginx
/application/nginx/sbin/nginx
vim /application/nginx/conf/nginx.conf
worker_processes  1;

events {

    worker_connections  1024;

}

http {

    include       mime.types;

    default_type  application/octet-stream;

    sendfile        on;

    keepalive_timeout  65;


upstream backend {

        ip_hash;

        server 192.168.190.10:80 max_fails=3 fail_timeout=30s;

        server 192.168.190.20:80 max_fails=3 fail_timeout=30s;

}

upstream backendyy {

        server 192.168.190.10:800 max_fails=3 fail_timeout=30s;

        server 192.168.190.20:800 max_fails=3 fail_timeout=30s;

}

upstream backendblog {

        ip_hash;

        server 192.168.190.10:8000 max_fails=3 fail_timeout=30s;

        server 192.168.190.20:8000 max_fails=3 fail_timeout=30s;

}


   server {

        listen       80;

        server_name  cms.etiantian.org;

        index  index.html index.htm;

        location / {

        proxy_pass http://backend;

        }

        error_page   500 502 503 504  /50x.html;

        location = /50x.html {

            root   html;

        }

}

       server {

        listen       80;

        server_name  bbs.etiantian.org;

        index  index.html index.htm;

        location / {

        proxy_pass http://backendyy;

        }

        error_page   500 502 503 504  /50x.html;

        location = /50x.html {

            root   html;

        }

    }


   server {

        listen       80;

        server_name  blog.etiantian.org;

        index  index.html index.htm;

        location / {

        proxy_pass http://backendblog;

        }

        error_page   500 502 503 504  /50x.html;

        location = /50x.html {

            root   html;

        }

    }

}
Smooth restart nginx:/application/nginx/bin/nginx-s reload
(2) Install keepalived
yum install -y keepalived
vim /etc/keepalived/keepalived.conf
global_defs {


   notification_email {


     acassen@firewall.loc


     failover@firewall.loc


     sysadmin@firewall.loc


   }


   notification_email_from Alexandre.Cassen@firewall.loc


   smtp_server 192.168.200.1


   smtp_connect_timeout 30


   router_id lb02


}


vrrp_instance VI_1 {


    state BACKUP


    interface eth2


    virtual_router_id 55


    priority 100       ##The higher the priority value, the higher the priority


    advert_int 1


    authentication {


        auth_type PASS


        auth_pass 123456


    }


    virtual_ipaddress {


        192.168.190.23 dev eth2 label eth2:1

    }

}
/ etc/init.d/keepalived restart Start keepalived to shut down the main nginx load balancing server, and you will find that the standby keepalived node server generates a virtual IP
host parsing of 192.168.190.23
Keepalived High Availability Fault Handover Transfer Principle
The failover transfer between Keepalived high-availability service pairs is achieved through VRRP. When the keepalived service works, the master Master node sends heartbeat messages (multicast) to the standby node to tell the standby Backup node that it is still alive. When the primary node fails, the heartbeat message cannot be sent, and the standby node can not continue to detect the heartbeat from the primary node. Then it will call its own takeover program to take over the IP resources and services of the main node. When the primary node restores, the standby node will release the IP resources and services it takes over when the primary node fails, and restore to the original standby role.