I have been studying various ways of using ListView for several consecutive periods. If careful students may find that the efficiency of ListView needs to be improved, we will learn some methods and techniques to optimize the efficiency of ListView.
I. Use convertView
Both the custom Array Adapter and the custom BaseAdapter mentioned above override the getView() method, which is very inefficient although it can be used normally. When there are many list items, each time the user scrolls the screen, he creates a new set of View objects to fill in the new list items, which will inevitably affect the user experience.
We can see that a parameter convertView is passed into the getView() method to verify that the value of the convertView is sometimes null, sometimes not null, especially when the user scrolls the ListView. In fact, this is how the adapter uses the same component to dynamically bind data. Why?
Can you imagine that if there were hundreds or thousands of list items, would Android create a new list item component for each list item? Of course, this is impossible. After all, the Android system has limited memory, and it is impossible to create unlimited list item components. In fact, Android caches view components, because there is a Recycler component in Android system, its working principle is shown in the following figure.
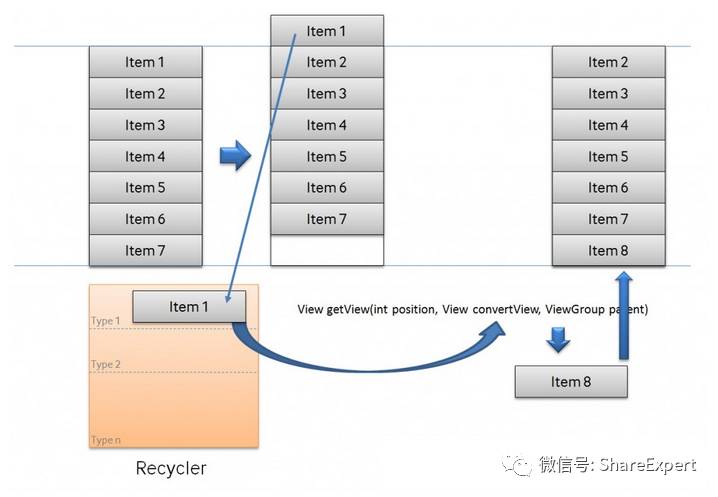
If there are many list items, only the visible list item components are stored in memory, and the rest are in Recycler. In fact, Recyler can be understood as a queue to store items that are not in the scope of the screen. If the item is completely rolled out of the scope of the screen, the item is saved in the queue. If the new item is to scroll out, it will first check whether the Recyler contains a reusable View, and if so, directly reset the data source of the View and display it.
In fact, the item cached by Recycler is the parameter convertView in the getView() method. So you will find that convertView is sometimes null and sometimes not null. So can we use this to optimize the efficiency of our ListView? The answer is yes.
Next, we start to optimize on the basis of "Custom BaseAdapter", except that the getView() method code of the MyBaseAdapter class will change, and the others will remain unchanged. The modified MyBaseAdapter class code is as follows:
package com.jinyu.cqkxzsxy.android.listviewsample.adapter;

import android.content.Context;
import android.view.LayoutInflater;
import android.view.View;
import android.view.ViewGroup;
import android.widget.BaseAdapter;
import android.widget.ImageView;
import android.widget.TextView;

import com.jinyu.cqkxzsxy.android.listviewsample.R;
import com.jinyu.cqkxzsxy.android.listviewsample.entity.Data;

import java.util.List;

/**
 * @Founder Xinji
 * @Describe Android Zero Foundation Introduction to Proficiency Series. Welcome to ShareExpert
 */
public class MyBaseAdapter extends BaseAdapter {
    private Context mContext; // Context environment
    private List<Data> mDatas; // List data set
    private int mResId; // List Item Layout File ID

    // Construction method
    public MyBaseAdapter(Context context, List<Data> datas, int resId) {
        this.mContext = context;
        this.mDatas = datas;
        this.mResId = resId;
    }

    // Get the number of list items
    @Override
    public int getCount() {
        return mDatas.size();
    }

    // Get the current list item
    @Override
    public Data getItem(int position) {
        return mDatas.get(position);
    }

    // Get the ID of the current list item
    @Override
    public long getItemId(int position) {
        return position;
    }

    // Get the list item component at position
    @Override
    public View getView(int position, View convertView, ViewGroup viewGroup) {
        if(null == convertView) {
            // Get the LayoutInflate object
            LayoutInflater inflater = LayoutInflater.from(mContext);
            // Load List Item View
            convertView = inflater.inflate(mResId, null);
        }

        // Get list item components
        ImageView iconImg = (ImageView) convertView.findViewById(R.id.icon_img);
        TextView titleTv = (TextView) convertView.findViewById(R.id.title_tv);
        TextView infoTv = (TextView) convertView.findViewById(R.id.info_tv);

        // Assign values to list items
        Data data = getItem(position);
        if(null != data) {
            iconImg.setImageResource(data.getIcon());
            titleTv.setText(data.getTitle());
            infoTv.setText(data.getInfo());
        }

        return convertView;
    }
}
After such modification, the getView() method first checks whether the convertView is empty, and if so, loads a new list item component, otherwise reuses it, avoiding the memory overhead caused by excessive loading.
II. Use of the Holder Model
Another expensive operation to create a list item component is to call the findViewById() method. This method goes deep into the loaded rows and extracts the corresponding components according to the specified identifier, making it easy to modify the contents of the list item components, such as modifying the text of TextView. Because the findViewById() method can find components from all the subcomponents of the root view where the row is located, a considerable number of instructions may need to be executed, especially in the case of duplicated identical components.
In some GUI toolkits, this problem can be avoided by declaring composite View objects as a whole in program code. Because when accessing this component, it's all about calling getter methods or accessing fields. Of course, this can also be done in Android, but the code will be more complex and cumbersome. An ideal solution is to still use the XML layout, but also to cache the key subcomponents in the row, that is, just look up once, which means using the holder pattern.
In the previous study of View, you learned that each View object has a getTag() and setTag() method by which you can establish relationships between any object and component. In the holder mode, Tag tags are used to save objects, while objects are used to save subcomponents to be used. After adding the holder to the view, as long as the line is used, it is easy to access its subcomponents without calling the findViewById() method.
Next, we continue to optimize on the basis of "Custom BaseAdapter", with the exception of adding a holder class to the MyBaseAdapter class and modifying the getView() method code. The modified MyBaseAdapter class code is as follows:
package com.jinyu.cqkxzsxy.android.listviewsample.adapter;

import android.content.Context;
import android.view.LayoutInflater;
import android.view.View;
import android.view.ViewGroup;
import android.widget.BaseAdapter;
import android.widget.ImageView;
import android.widget.TextView;

import com.jinyu.cqkxzsxy.android.listviewsample.R;
import com.jinyu.cqkxzsxy.android.listviewsample.entity.Data;

import java.util.List;

/**
 * @Founder Xinji
 * @Describe Android Zero Foundation Introduction to Proficiency Series. Welcome to ShareExpert
 */
public class MyBaseAdapter extends BaseAdapter {
    private Context mContext; // Context environment
    private List<Data> mDatas; // List data set
    private int mResId; // List Item Layout File ID

    // Construction method
    public MyBaseAdapter(Context context, List<Data> datas, int resId) {
        this.mContext = context;
        this.mDatas = datas;
        this.mResId = resId;
    }

    // Get the number of list items
    @Override
    public int getCount() {
        return mDatas.size();
    }

    // Get the current list item
    @Override
    public Data getItem(int position) {
        return mDatas.get(position);
    }

    // Get the ID of the current list item
    @Override
    public long getItemId(int position) {
        return position;
    }

    // Get the list item component at position
    @Override
    public View getView(int position, View convertView, ViewGroup viewGroup) {
        ViewHolder holder = null;
        if(null == convertView) {
            // Get the LayoutInflate object
            LayoutInflater inflater = LayoutInflater.from(mContext);
            // Load List Item View
            convertView = inflater.inflate(mResId, null);

            // New Holder ViewHolder
            holder = new ViewHolder();
            // Get list item components
            holder.iconImg = (ImageView) convertView.findViewById(R.id.icon_img);
            holder.titleTv = (TextView) convertView.findViewById(R.id.title_tv);
            holder.infoTv = (TextView) convertView.findViewById(R.id.info_tv);

            // Store ViewHolder objects in convertView
            convertView.setTag(holder);
        } else {
            // Remove ViewHolder object from convertView
            holder = (ViewHolder) convertView.getTag();
        }

        // Setting content for list item components
        Data data = getItem(position);
        if(null != data) {
            holder.iconImg.setImageResource(data.getIcon());
            holder.titleTv.setText(data.getTitle());
            holder.infoTv.setText(data.getInfo());
        }

        return convertView;
    }

    // Holder class
    private class ViewHolder {
        ImageView iconImg; // Icon
        TextView titleTv; // Title
        TextView infoTv; // content
    }
}
ViewHolder is used here as the holder class, which is relatively simple to use directly without giving getter and setter methods. When convertView is empty, load a list item component and create the corresponding ViewHolder object at the same time; when convertView is not empty, you simply need to remove the ViewHolder object from it to fill the content of the sub-component easily.
The Use of Head and End of List
When using ListView in practice, there is often a need to display a search box at the top of the ListView to search for list content or to display drop-down refreshes, and a pull-up to load more functions at the bottom of the ListView. Because this display is different from the ListView list item content, you can control the position to achieve the effect, but it is very cumbersome, of course, Android provides ListView's list head and end functions.
Add HeadView and FootView to ListView, make HeadView slide when ListView slides to the first item in the list, and FootView slide when ListView slides to the last item in the list.
Next, we will use an example to learn how to use the ListView list head and end. It's still done on the basis of "Custom Base Adapter".
First, we design a ListView list header layout list_headview_layout.xml, which is mainly a search box. The code is as follows:
<?xml version="1.0" encoding="utf-8"?>
<LinearLayout xmlns:android="http://schemas.android.com/apk/res/android"
              android:layout_width="match_parent"
              android:layout_height="match_parent">

    <EditText
        android:id="@+id/search_et"
        android:layout_width="match_parent"
        android:layout_height="wrap_content"
        android:hint="search"
        android:padding="10dp"/>
</LinearLayout>
Next, we design a list_footview_layout.xml layout at the end of the ListView list, which mainly prompts the user to pull up and load more. The code is as follows:
<?xml version="1.0" encoding="utf-8"?>
<LinearLayout xmlns:android="http://schemas.android.com/apk/res/android"
              android:layout_width="match_parent"
              android:layout_height="wrap_content"
              android:gravity="center_horizontal">

    <TextView
        android:id="@+id/prompt_tv"
        android:layout_width="wrap_content"
        android:layout_height="wrap_content"
        android:padding="10dp"
        android:text="Pull-up Load More"/>
</LinearLayout>
Finally, add the list header layout defined above to the ListView list, mainly modify the onCreate method of the Activity class, other unchanged, the code is as follows:
package com.jinyu.cqkxzsxy.android.listviewsample;

import android.os.Bundle;
import android.support.v7.app.AppCompatActivity;
import android.view.View;
import android.widget.ListView;

import com.jinyu.cqkxzsxy.android.listviewsample.adapter.MyBaseAdapter;
import com.jinyu.cqkxzsxy.android.listviewsample.entity.Data;

import java.util.ArrayList;
import java.util.List;

public class CustomBaseAdapterActivity extends AppCompatActivity {

    @Override
    protected void onCreate(Bundle savedInstanceState) {
        super.onCreate(savedInstanceState);
        setContentView(R.layout.custom_baseadapter_layout);

        // Getting Interface Components
        ListView listView = (ListView) findViewById(R.id.listview);

        // Get the list and the end of the list
        View hearderView = getLayoutInflater().inflate(R.layout.list_headview_layout, null);
        View footView = getLayoutInflater().inflate(R.layout.list_footview_layout, null);

        // Add lists and endings to ListView
        listView.addHeaderView(hearderView);
        listView.addFooterView(footView);

        // Wrap the array as a custom MyBaseAdapter
        MyBaseAdapter adapter = new MyBaseAdapter(this, getData(), R.layout.custom_baseadapter_item);

        // Setting Adapter for ListView
        listView.setAdapter(adapter);
    }

    /**
     * Get list data
     * @return
     */
    private List<Data> getData() {
        List<Data> datas = new ArrayList<>();
        datas.add(new Data(R.drawable.item_01, "Theravada school", "radio station DJ"));
        datas.add(new Data(R.drawable.item_02, "army officer's hat ornaments", "Four beauties"));
        datas.add(new Data(R.drawable.item_03, "Tea with milk", "Pure sister"));
        datas.add(new Data(R.drawable.item_04, "Chinese rhubarb", "It's puppy."));
        datas.add(new Data(R.drawable.item_05, "hello", "every thing"));
        datas.add(new Data(R.drawable.item_06, "world", "hello world"));
        return datas;
    }
}
It's important to note that the code that adds lists and endings to ListView must be placed before the Adapter code is set, otherwise an error will be reported.
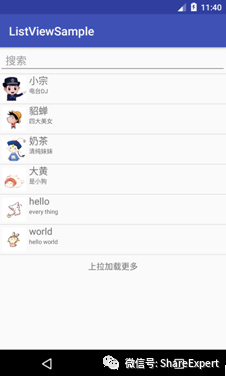
Running the program, you can see the effect shown in the following figure.
The functions of list search and loading are not studied too much here, and they will be learned later as needed.
At this point, the simple optimization of ListView and the simple use of the head and the end of the list have been studied. If you are not familiar with it, it is suggested that you practice more and learn the dynamic update of ListView data together in the next period.
Let's stop here today. If you have any questions, please leave a message and discuss it together. Welcome to join Android Zero Basic Technology to discuss Wechat Group and grow up together! _________.
Copyright of this article is owned by Share Expert. If you need to reproduce this article, please contact the authorized author.
Summary and share:
Android Zero Foundation Introduction Section 1: Android's Past and Present Life
Android Zero Foundation Introduction Section 2: Android System Architecture and Application Components
Android Zero Foundation Introduction Section 3: Let's talk about Android development environment.
Android Zero Foundation Introduction Section 4: Correctly install and configure JDK, Gao Fu Shuai develops the first move
Android Zero Foundation Introduction Section 5: Use ADT Bundle to Meet Goddess Easily
Android Zero Foundation Introduction Section 6: Configuration optimization SDK Manager, official dating goddess
Android Zero Foundation Introduction Section 7: Find Android Simulator and Start a Sweet Journey
Android Zero Foundation Introduction Section 8: Hello World, the starting point of my first trip
Android Zero Foundation Introduction Section 9: Android applications can be developed without knowing the code
Android Zero Foundation Introduction Section 10: Developing IDE upgrades finally ushered in Android Studio
Android Zero Foundation Introduction Section 11: Simple steps to take you flying and run the Android Studio project
Android Zero Foundation Introduction Section 12: Familiar with Android Studio interface, start to pretend to sell.
Android Zero Foundation Introduction Section 13: Android Studio Configuration Optimization to Build Development Tools
Android Zero Foundation Introduction Section 14: Using High Speed Genymotion to Enter the Rocket Age
Android Zero Foundation Introduction Section 15: Master the structure of Android Studio project and set sail
Android Zero Foundation Introduction Section 16: Overview of Android User Interface Development
Android Zero Foundation Introduction Section 17: TextView Attributes and Methods
Android Zero Foundation Introduction Section 18: Attributes and usage methods of EditText
Android Zero Foundation Introduction Section 19: Button Use Details
Android Zero Foundation Introduction Section 20: CheckBox and RadioButton use Daquan
Android Zero Foundation Introduction Section 21: Toggle Button and Swich Usage Daquan
Android Zero Foundation Introduction Section 22: The properties and methods of ImageView
Android Zero Foundation Introduction Section 23: ImageButton and ZoomButton use Daquan
Android Zero Foundation Introduction Section 24: Custom View is easy to use to create your own controls
Android Zero Foundation Introduction Section 25: Simple and most commonly used Linear Layout linear layout
Android Zero Foundation Introduction Section 26: Two alignments, layout_gravity and gravity, are quite different
Android Zero Foundation Introduction Section 27: Correct use of padding and margin
Android Zero Foundation Introduction Section 28: Easily grasp Relative Layout relative layout
Android Zero Foundation Introduction Section 29: Make Good Use of TableLayout Table Layout
Android Zero Foundation Introduction Section 30: Two Minutes to Master FrameLayout Frame Layout Layout Layout
Android Zero Foundation Introduction Section 31: Absolute Layout Absolute Layout Absolute Layout
Android Zero Foundation Introduction Section 32: New GridLayout Grid Layout
Android Zero Foundation Introduction Section 33: Overview of Android Event Processing
Android Zero Foundation Introduction Section 34: Monitoring-based event handling in Android
Android Zero Foundation Introduction Section 35: Callback-based event handling in Android
Android Zero Foundation Introduction Section 36: Processing of Android System Events
Android Zero Foundation Introduction Section 37: First Understanding ListView
Android Zero Foundation Introduction Section 38: First Understanding of Adapter
Android Zero Foundation Introduction Section 39: ListActivity and custom list items
Android Zero Foundation Introduction Section 40: Custom Array Adapter
Android Zero Foundation Introduction Section 41: Using SimpleAdapter
Android Zero Foundation Introduction Section 42: Customize BaseAdapter