Main contents of this issue
1, Perfect what you didn't notice before. Set the mouse movement event before, and forget to modify the mouse click event
 Add the code in the original place

2, Understand the configuration file of this model file and configure it according to your own needs

3, Modify the source code to fit our model file.
1, Perfect what you didn't notice before
First, click the event and open [sample \ typescript \ demo \ SRC \ lapdelegate. TS] to find the initialize() function and add it to the function
//Add mouse click event
//Listen to global mouse click events
document.addEventListener("click",function(e){
	if(!LAppDelegate.getInstance()._view){
   		LAppPal.printLog("view notfound");
    	return;
    }
    let rect =  canvas.getBoundingClientRect();
    let posX: number = e.clientX -rect.left;
    let posY: number = e.clientY - rect.top ;
    //In fact, just copy the above and add the following two lines of code
    LAppDelegate.getInstance()._view.onTouchesBegan(posX, posY);
    LAppDelegate.getInstance()._view.onTouchesEnded(posX, posY);
},false);
In this function body, delete the contents of else
if(supportTouch){
   // Log in with the number of users
   //This is like a touch event on a mobile phone
   canvas.ontouchstart = onTouchBegan;
   canvas.ontouchmove = onTouchMoved;
   canvas.ontouchend = onTouchEnded;
   canvas.ontouchcancel = onTouchCancel;
}else{
//Delete all parts of this branch
//Since we have added the mouse click event, we have deleted the event registered on the official canvas for later debugging
}
2, Understand the profile of this model file
First of all, we need to understand the function of each file, and then customize the effect we want.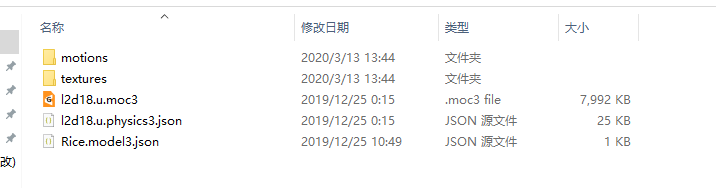
Generally, this structure is extracted from the game, the most important of which are motions (action file), textures (map), moc3 (character model file), model3.json (resource loading management file, equivalent to the program entry). When we customize, we can only modify the file at the end of JSON.
model3.json file:
#model3.json File, responsible for managing all kinds of actions, maps and persona resources to be loaded
{
  "Version": 3,
  "FileReferences": {
     #The file name of the model file. No need to change the moc3 file name
    "Moc": "l2d18.u.moc3",
     #Map, same as above
    "Textures": [
      "textures/texture_00.png"
    ],
    #Sometimes it's better to delete this sentence if you want to model a ghost animal
    "Physics": "l2d18.u.physics3.json",
    #Here is the focus of our changes. Only the actions we like are loaded, not all the actions. That is, fill in the relative path and File name of the desired action File after the File field
    "Motions": {
     #The array here is named by referring to the official model file.
		"Idle":[
    #After opening the web page, even if there is no interaction, there will be some actions, playing randomly
		 {"File":"motions/Mgirl06_stand.motion3.json"},
		 {"File":"motions/Mgirl06_weixiao.motion3.json"}
		],
		"TapBody":[
      #Action to respond to when clicking on body area
			{"File":"motions/Mgirl06_baoxiong.motion3.json"},
			{"File":"motions/Mgirl06_lahua.motion3.json"}
		]

    }
  },
  "Groups": []
}
motions/xxx.motion3.json file
#Generally, we don't need to move this file. When the software loading model can be loaded normally and there is nothing on the web page, we can modify it
{
  "Version": 3,
  "Meta": {
     #This will affect the duration of the character's actions
    "Duration": 30,
    "Fps": 30.0,
    "Loop": true,
    "AreBeziersRestricted": true,
    "CurveCount": 134,
    #When there is a problem in only loading the model on the web page, modify these two values of the corresponding action file, and change them a little larger.
    "TotalSegmentCount": 3000,
    "TotalPointCount": 6000,
    "UserDataCount": 0,
    "TotalUserDataSize": 0
  },
  "Curves": [
    {
      "Target": "Parameter",
      "Id": "PARAM_ANGLE_X",
      "Segments": [
        ......The following ellipsis....
2.1 import the model file you find
- The file name of a moc3 file must be the same as its folder name
- If there is no problem with your configuration, you still can't load the model. You can use the developer tool of the browser to monitor the network request to see whether the download link request is prompted with [HTTP response truncation]. If there is one, you can only give up and then change a template file (the web front-end technology and live2D are super small white, you can only give up this model)
- After some editing, do not preview directly on the local machine without opening the server, otherwise there will be nothing. Because of the browser security problem, the configuration file can only be loaded through the network request. If it is directly requested locally, the same source policy error will be reported
- If the material is extracted from the game or other ways, the normal software can be opened without any problem, and it will not be loaded on the web, and the above problems are eliminated. Most of the reasons are because the number of TotalSegmentcount and TotalPoints in the motion folder xxx.motion3.json is insufficient. Just increase the value.
2.2 profile modification
To modify the configuration file, you need to compare the model with the official source code to modify it
Use Cubism 3 Viewer to open xxx.model3.json file of our own character model, and then find moc3 file in the left border. After clicking, various parameters and a line segment will appear in the bottom. At the same time, open the [framework \ cubismdefaultparameter. TS] file in the project and find the content under the second line of comments.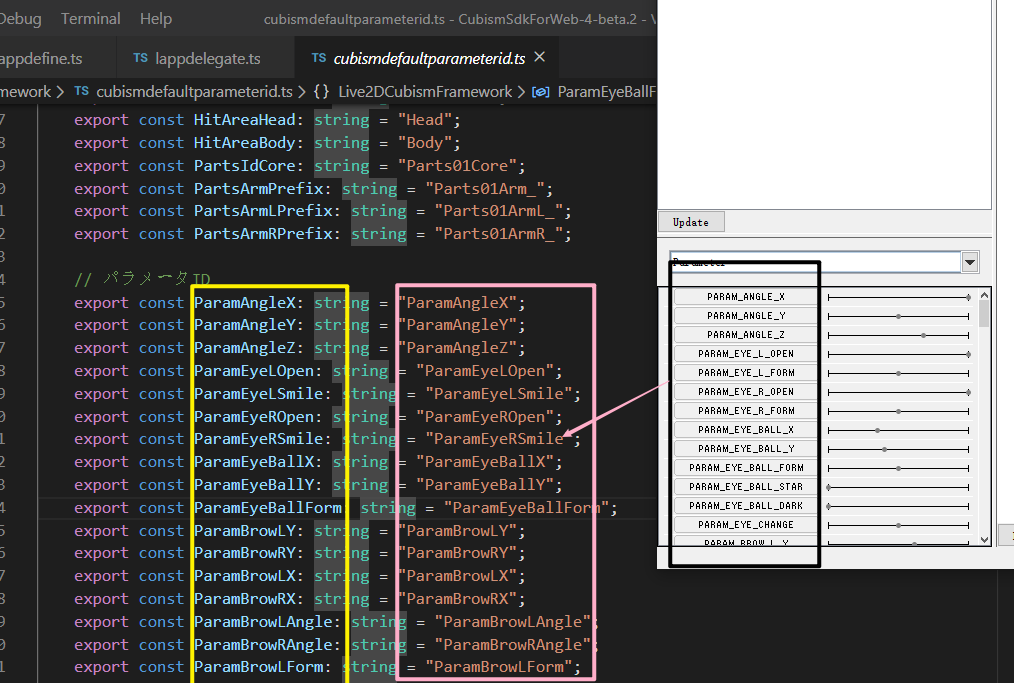
What we need to do is to match the parameters of moc3 (in black box) file according to the meaning of source constant (in yellow box) and modify the constant assignment statement.
If the meaning does not match, the constant meaning shall prevail. Drag the attribute value of each parameter in the black box (to the right of the black box), and then determine which parameter changes. When the corresponding part of the character model or the English meaning of the action matches the constant value, then modify according to the corresponding relationship.
Some parameters have no actual English meaning, such as AngleX, AngleY and AngleZ (which must be modified). These three parameters are generally head or body twisting (do not change the central position of the part, for example, the head is only twisting), up and down moving and left and right moving (change the central position of the corresponding part, for example, the head is round with the neck)
What we need to modify generally is: AngleX,Y,Z, head, body and eyes, because the interaction with the mouse generally only involves these items.
After the modification, import our model file (remember that the name of xxx.model3.json file must be the same as the folder name). When compiling the project again, you should be able to observe that the human model can interact with the mouse.
Well, just the interaction of mouse movement certainly doesn't meet our needs. We can't click how to do it.
If you want to have a click event, you must first add the "TapBody" array and the corresponding action file to the model3.json file. For the configuration method, refer to the official or the corresponding JSON file above. The following shows the source code modification
Open [sample \ typescript \ demo \ SRC \ laplive2dmanager. TS] to find the onTap function
/**
     * Picture, time and reason
     *
     * @param x Picture の X coordinate
     * @param y Screen の Y coordinate
     */
    public onTap(x: number, y: number): void
    {
        if(LAppDefine.DebugLogEnable)
        {
            LAppPal.printLog("[APP]tap point: {x: {0} y: {1}}", x.toFixed(2), y.toFixed(2));
        }
        //Click event trigger. When the provided model has no hit effect, you can manually set the hit effect:
        for(let i: number = 0; i < this._models.getSize(); i++)
        {
            if(this._models.at(i).hitTest(LAppDefine.HitAreaNameHead, x, y))//If you click on the head
            {
                if(LAppDefine.DebugLogEnable)
                {
                    LAppPal.printLog("[APP]hit area: [{0}]", LAppDefine.HitAreaNameHead);
                }
                this._models.at(i).setRandomExpression();
            }
            else if(this._models.at(i).hitTest(LAppDefine.HitAreaNameBody, x, y))//If you click on the body
            {
                if(LAppDefine.DebugLogEnable)
                {
                    LAppPal.printLog("[APP]hit area: [{0}]", LAppDefine.HitAreaNameBody);
                }
                this._models.at(i).startRandomMotion(LAppDefine.MotionGroupTapBody, LAppDefine.PriorityNormal);
            }

            //The following code is the region determination code we want to add, which is followed by the original if else statement
            else{//When none of them are true, we can customize our own click trigger events here. The valid range is x [- 1,1] y [- 1,1]
                //On behalf of the canvas area of the model
                if(x > -1 && x<1&&y<1&&y>-1){
                    //The valid range is x [- 1,1] y [- 1,1]
                    if(x > -0.20 && x < 0.20 && y>0.20 && y< 0.65){
                      //Here is the head area. Set the corresponding expression below
                        this._models.at(i).setRandomExpression();
                    }
                    if(x > -0.20 && x < 0.20 && y>-1.0 && y< 0.1){
             			//This is the body area. Set the corresponding action
                       this._models.at(i).startRandomMotion(LAppDefine.MotionGroupTapBody, LAppDefine.PriorityNormal);
                    }
                }
            }
        }
    }
After adding, compile the test again, and you should be able to interact with the click event.
At this time, you should find that your character's head follows the mouse a little bit. Here's a solution
Find the update function of the [sample \ typescript \ demo \ SRC \ lapmodel. TS] file
  //The annotation is translated from Japanese. It feels strange. I only tested one model, which is not necessarily suitable for your model. The multiplier in this may need to be modified and tested by myself
   // Drag change
        // Drag to adjust face direction
        this._model.addParameterValueById(this._idParamAngleX, this._dragX*30 );  // Add value to - 30 to 30
        this._model.addParameterValueById(this._idParamAngleY, this._dragY*2);
        this._model.addParameterValueById(this._idParamAngleZ, this._dragX * this._dragY * -2);

        // Drag to adjust body direction
        this._model.addParameterValueById(this._idParamBodyAngleX, this._dragX * 10);  // -10, 10, 10

        // Drag to adjust eye direction
        this._model.addParameterValueById(this._idParamEyeBallX, this._dragX); // -1 か 1 の 1 の
        this._model.addParameterValueById(this._idParamEyeBallY, this._dragY);
At this point, the tutorial is all over, and the ability is limited, so we can only modify it to this extent. However, the problem of being a Kanban mother should be small (I think)
There are corresponding videos in this issue, but due to the impact of new coronavirus, the audit of station B is slow. I will add the link after the audit
Thank you for your support!

