1, Overview
1.1 about Nginx
- Like Apache, nginx uses modular design. Nginx module includes built-in module and third-party module, in which the built-in module includes main module and event module
- Simply put, both apache httpd and nginx are web servers, but they adapt to different scenarios, that is, they focus on solving different problems
- apache httpd: stable and strong for dynamic request processing, but with high concurrency, its performance is weak and consumes more resources
- nginx: high concurrency, strong processing ability, good at handling static requests, reverse proxy and load balancing
1.2 features
- High concurrency. Static small file
- Occupy less resources. 20000 concurrent, 10 threads, memory consumption of hundreds of M
- There are many kinds of functions. web,cache,proxy. Each function is not particularly strong
- Support epoll model, so that nginx can support high concurrency
- nginx cooperates with dynamic services, which is different from Apache (FASTCGI interface)
- Using nginx, you can speed limit IP and limit the number of connections
- Simple configuration and more flexible
2, Nginx service deployment
2.1 compiling and installing Nginx
Close the firewall and upload the Nginx installation package
- systemctl stop firewalld
- setenforce 0
- Upload package

- decompression
- tar zxvf nginx-1.12.2.tar.gz
Install corresponding dependent packages
yum -y install pcre-devel zlib-devel gcc gcc-c++ make
Create users, groups
The Nginx service program runs as nobody by default, so we need to create a special user account for it to control its access rights
- useradd -M -s /sbin/nologin nginx
Compile and install
cd nginx-1.12.2/
./configure \
> --prefix=/usr/local/nginx \				# Specify the installation path of nginx
> --user=nginx \							# Specify user name
> --group=nginx \							# Specify group name
> --with-http_stub_status_module			# Enable http_stub_status_module module to support status statistics
make -j2 && make install
ln -s /usr/local/nginx/sbin/nginx /usr/local/sbin/ # Let the system recognize the operation commands of nginx
Start, close, restart, etc
inspect
- nginx -t
- Check whether the configuration file is correct

- Check whether the configuration file is correct
open
- nginx
Direct opening
stop it
cat /usr/local/nginx/logs/nginx.pid 		# Query PID number of nginx
120959

kill -3 120959								# Normal end process, no forced end is required
netstat -natp | grep :80					# Search port 80 no results


killall -3 nginx							# You can also end by specifying a name
heavy load
kill -1 121115					# -1 heavy load
killall -1 nginx				# According to the process name
supplement
- kill -USR1 121115
- Log separator, reopen log file
- kill -USR2 121115
- Smooth upgrade
upgrade
- Unzip the new upgrade package
- Enter new directory
cd nginx-1.xxxx								# Directory after installation of new upgrade package
./configure \
> --prefix=/usr/local/nginx \
> --user=nginx \
> --group=nginx \
> --with-http_stub_status_module
> --with-http_ssl_module
- Compile and install
make -j2					# compile
mv /usr/local/nginx/sbin/nginx /usr/local/nginx/sbin/nginx_old			# Move the original configuration and rename it
cp objs/nginx /usr/local/nginx/sbin/nginx
make upgrade				# install

If it cannot be installed, first killall nginx ,again/usr/local/nginx/sbin/nginx
3, Add system service
We can simply start, shut down and restart nginx through scripts
3.1 first method
- vim /etc/init.d/nginx
- The script needs to be placed in init D directory
#!/bin/bash											# Declaration interpreter
#chkconfig: - 99 20									# -It means that it is not started at any level, 99 means that the self starting sequence is 99, and 20 means that the closing sequence is the 20th
#description:Nginx Service Control Script			# The description control script is nginx
COM="/usr/local/nginx/sbin/nginx"					# Define variables, nginx commands
PID="/usr/local/nginx/logs/nginx.pid"				# Specifies the path to the PID file
case "$1" in										# Loop first position variable
# If the first is start, the variable COM is executed
start)
  $com
;;

# Shut down the service and execute the following command
stop)
  kill -s QUIT $(cat $PID)
;;

# Restart the service and execute the shutdown and start commands
restart)
  $0 stop
  $0 start
;;

# Overload, specify the process number to complete
reload)
  kill -s HUP $(cat $PID)
;;

*)

echo "Usage: $0 {start|stop|restart|reload}"			# If the input is wrong, the prompt content
exit 1													# Exit script, return code 1

esac
exit 0													# Normal receipt code
- test
chmod +x /etc/init.d/nginx 				# Give script permission
chkconfig --add nginx					# Add as system service
systemctl stop nginx					# close
systemctl start nginx					# open
3.2 second method
Make systemd script to manage services
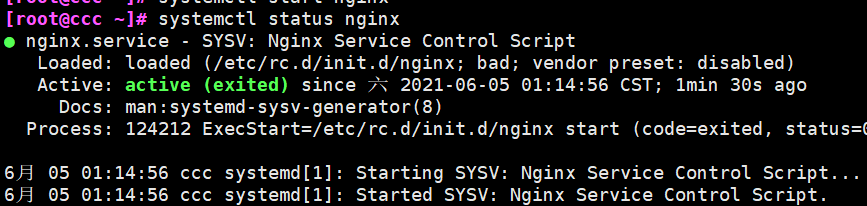
- vim /lib/systemd/system/nginx.service
- Create a script file in the systemd directory
[Unit]											# Service description
Description=nginx								# Description service is nginx
After=network.target							# After is dependent, which means that nginx will be started after the network card service is started
[Service]										# Service settings
Type=forking									# Background start
PIDFile=/usr/local/nginx/logs/nginx.service		# Command formula
ExecStart=/usr/local/nginx/sbin/nginx			# Specific operation command
ExecrReload=/bin/kill -s HUP $MAINPID			# Restart command
ExecrStop=/bin/kill -s QUIT $MAINPID			# Stop command
privateTmp=true									# Allocate separate temporary space to services
[Install]										# Related settings of service installation, multi-user can be set
wantedBy=multi-user.target
- chmod 754 /lib/systemd/system/nginx.service
- Set permissions
4, Main configuration file of nginx
4.1 working directory
/usr/local/nginx/conf/nginx.conf
4.2 global configuration
  2 #user  nobody;								# If the user is not specified, it defaults to nobody
  3 worker_processes  1;						# The number of working processes can be configured as server kernel book * 2. If the website traffic is small, set 1
  4
  5 #error_log  logs/error.log;					# Location of the error log file
  6 #error_log  logs/error.log  notice;
  7 #error_log  logs/error.log  info;
  8
  9 #pid        logs/nginx.pid;					# Location of PID file

4.3 I/O event configuration
 12 events {
 		use epoll;							# Using epoll model can improve performance. This option is not available by default
 13     worker_connections  1024;			# 1024 connections per process
 14 }

-
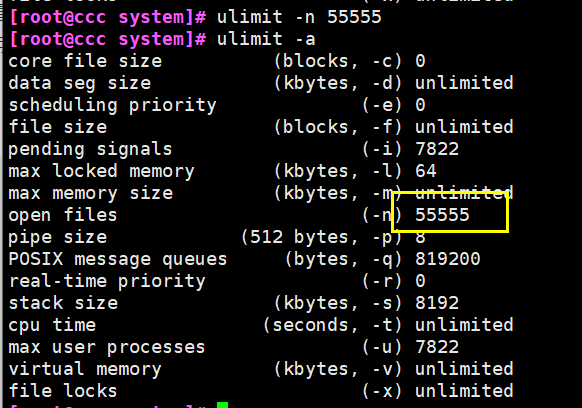
If you want to increase the number of connections per process, you need to execute the "ulimit -n 65535" command to temporarily modify the maximum number of files that can be opened by each local process
-
On the Linux platform, when processing highly concurrent TCP connections, the maximum number of concurrent connections must be limited by the system to the number of files that can be opened by a single process colleague of the user (this is because the system creates a socket handle for each TCP connection, and each socket handle colleague is also a file handle)
-
You can use the ulinmit -a command to view the limit of the number of files that the system allows the current user process to open

4.4 HTTP configuration
 17 http {
 		# File extension and file type mapping table
 18     include       mime.types;
 		# Default file type
 19     default_type  application/octet-stream;
 20
		# Log format setting (see the table below for detailed explanation)
 21     #log_format  main  '$remote_addr - $remote_user [$time_local] "$request" '
 22     #                  '$status $body_bytes_sent "$http_referer" '
 23     #                  '"$http_user_agent" "$http_x_forwarded_for"';
 24
 		# Access log location
 25     #access_log  logs/access.log  main;
 26
 		# Support file sending (downloading)
 27     sendfile        on;
 		# This option allows or disables TCP using socket_ Cork option, which is only used when sendfile is used
 28     #tcp_nopush     on;
 29
 		# Link hold timeout, in seconds
 30     #keepalive_timeout  0;
 31     keepalive_timeout  65;
 32
 		# Set whether gzip compression is enabled
 33     #gzip  on;
Log format setting
$remote_addr and $http_x_forwarded_for is used to record the ip address of the client
- $remote_user
- Record client user name
- $time_local
- Record access time and time zone
- $request
- Record the url and http protocol of the request
- $status
- Record the request status, and the success is 200
- $body_bytes_sent
- Record the size of the body content of the file sent to the client
- $http_referer
- Record which page link you accessed from
- $http_user_agent
- Record relevant information of client browser
Usually, the web server is placed behind the reverse proxy, so you can't get the customer's IP address through $remote_ The IP address obtained by add is the IP address of the reverse proxy server
The reverse proxy server can add x to the http header information of the forwarding request_ forwarded_ For information, which is used to record the IP address of the original client and the server address requested by the original client
# Listening configuration of web Services
 35     server {
 36         listen       80;				# Listening address and port
 37         server_name  localhost;			# Site domain names can be multiple, separated by spaces
 38
 39         #charset koi8-r;				# Default character set, utf-8 for universal characters

# Configuration of root directory
 43         location / {
 44             root   html;						# Location of root directory / usr/local/nginx/html
 45             index  index.html index.htm;		# Default home page file name
 46         }
 52         error_page   500 502 503 504  /50x.html;	# Feedback page for internal errors
 53         location = /50x.html {						# Configuration of error page
 54             root   html;
 55         }
 56 	}
location common configuration
root,alias,proxy_pass
- Root (root path configuration): request www.cc01.com com/test/111. Jpg, the file / usr / local / nginx / HTML / test / 111 will be returned jpg
- Alias (alias configuration): request www.cc01.com com/test/111. Jpg, the file / usr / local / nginx / HTML / 111 will be returned jpg
- proxy_pass (reverse proxy configuration)
- proxy_ pass http://192.168.253.11:8080/ ; Will forward the request to http://192.168.253.11:8080/111.jpg
- proxy_ pass http://192.168.253.11:8080 ; Will forward the request to http://192.168.253.11:8080/test/111.jpg
5, Access status statistics configuration
5.1 installation of search module
- /usr/local/nginx/sbin/nginx -V
- Check to see if stub is installed_ status

- Check to see if stub is installed_ status
5.2 modifying configuration files
- cd /usr/local/nginx/conf/
- Enter directory
- cp nginx.conf nginx.conf.bak
- Copy the source file and do not delete it
- vim nginx.conf
- modify
events {
use epoll; # Add to improve performance
worker_connections 1024;
}
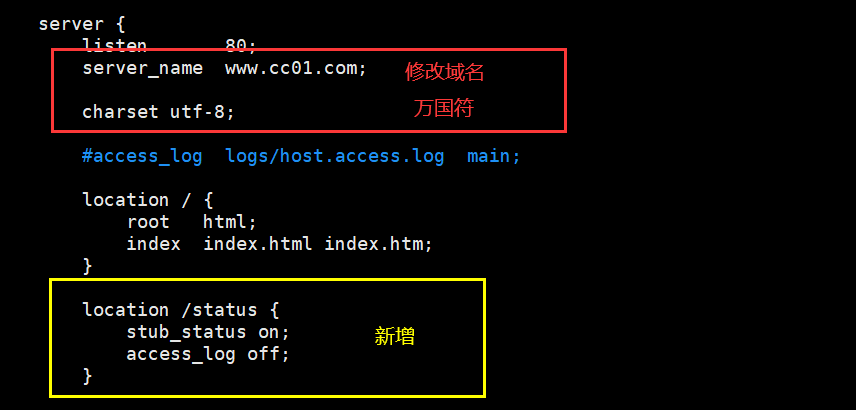
server {
listen 80;
server_name www.cc01.com; # Set domain name
charset utf-8;
location /status { # The access location is / status
stub_status on; # Turn on the status statistics function
access_log off; # Turn off logging at this location
}

5.3 restart test
- systemctl restart nginx
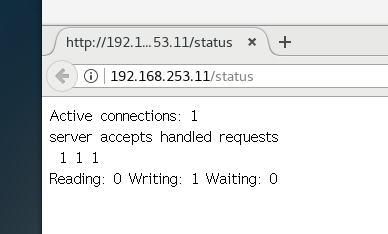
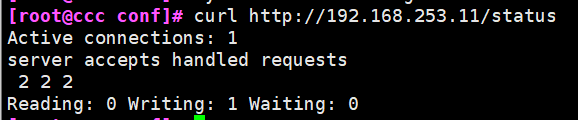
- http://192.168.253.11/status
- Active connections indicates the current number of active connections
- server accepts handled requests indicates the connection information that has been processed. The three numbers in turn indicate the number of connections that have been processed, the number of successful TCO handshakes, and the number of requests that have been processed
- curl http://192.168.253.11/status
- This command can view web pages
- This command can view web pages
- curl http://192.168.253.11/status | awk 'Active connections/ {print $3}'
- Cooperate with pipeline compliance and awk for data screening

- Cooperate with pipeline compliance and awk for data screening
6, Access control
6.1 authorization based access control
Generate user password authentication file
yum -y install httpd-tools							# Install corresponding software package

htpasswd -c /usr/local/nginx/passwd.db cc01			# Set user and password
New password:
Re-type new password:
Adding password for user cc01

chown nginx /usr/local/nginx/passwd.db				# Change the file user name, otherwise it will not be recognized
chmod 400 /usr/local/nginx/passwd.db 				# For security, only read-only permissions are set

Configure master profile
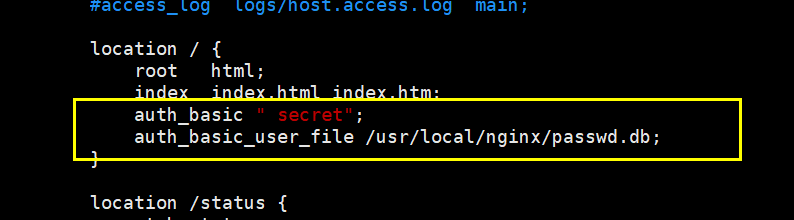
- vim /usr/local/nginx/conf/nginx.conf
        location / {
            root   html;
            index  index.html index.htm;
            auth_basic " secret";									# Set password prompt box text message
            auth_basic_user_file /usr/local/nginx/passwd.db;
        }
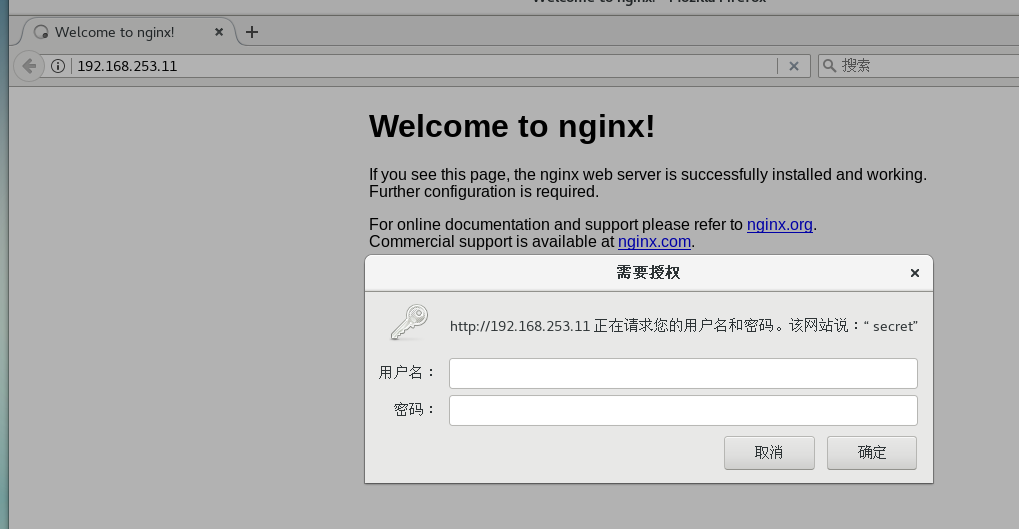
Restart test
- systemctl restart nginx
6.2 client based access control
rule
- deny IP/IP segment: deny client access to an IP or IP segment
- allow IP/IP segment: allows clients of an IP or IP segment to access
- The rule is from top to bottom, and the matching stops
test
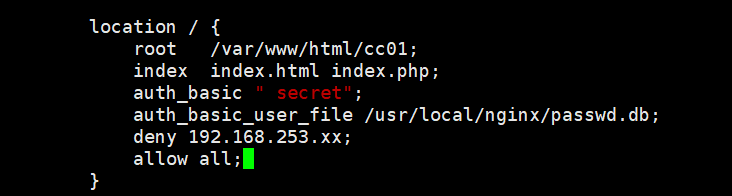
- vim /usr/local/nginx/conf/nginx.conf
            deny 192.168.253.xx;			# Access denied IP
            allow all;						# Allow all access
7, Domain name based Nginx virtual host
7.1 setting domain name resolution
- echo "192.168.253.11 www.cc01.com www.benet.com" >> /etc/hosts
- Temporarily set up domain name resolution
7.2 preparation of Web documents
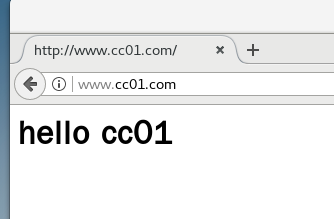
mkdir -p /var/www/html/benet
mkdir -p /var/www/html/cc01
echo "<h1>hello cc01</h1>" > /var/www/html/cc01/index.html			# Create web content
echo "<h1>hello benet</h1>" > /var/www/html/benet/index.html


7.3 modifying configuration files
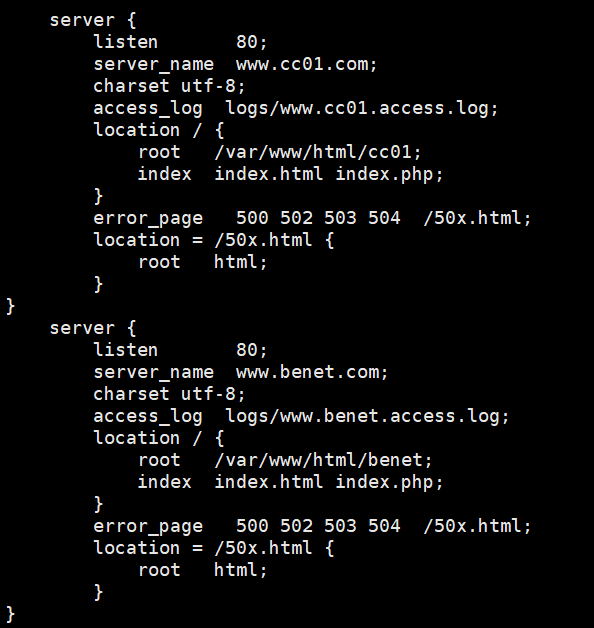
- vim /usr/local/nginx/conf/nginx.conf
    server {
        listen       80;
        server_name  www.cc01.com;						# Set domain name
        charset utf-8;
        access_log  logs/www.cc01.access.log;			# Log name
        location / {
            root   /var/www/html/cc01;					# working directory
            index  index.html index.php;
        }
        error_page   500 502 503 504  /50x.html;
        location = /50x.html {
            root   html;
        }
}
    server {
        listen       80;
        server_name  www.benet.com;
        charset utf-8;
        access_log  logs/www.benet.access.log;
        location / {
            root   /var/www/html/benet;
            index  index.html index.php;
        }
        error_page   500 502 503 504  /50x.html;
        location = /50x.html {
            root   html;
        }
}
7.4 testing
- systemctl restart nginx

8, IP based nginx virtual host
8.1 setting up virtual network card
- ifconfig ens33:1 192.168.253.111 netmask 255.255.255.0
Modify profile
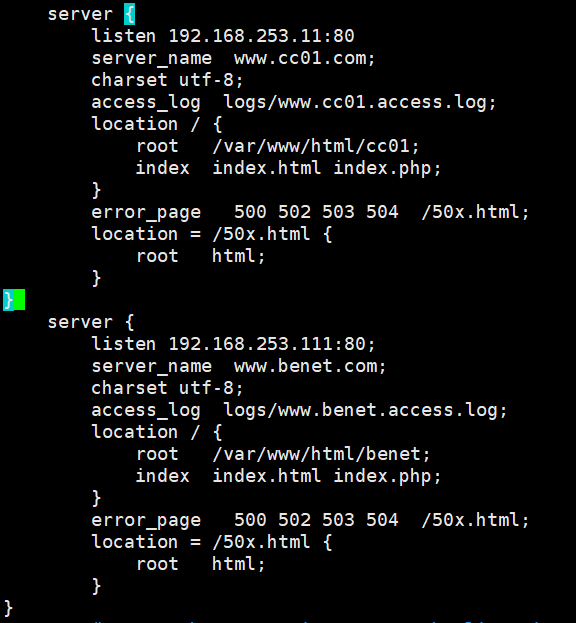
    server {
        listen 192.168.253.11:80					# Monitor ip
        server_name  www.cc01.com;
        charset utf-8;
        access_log  logs/www.cc01.access.log;
        location / {
            root   /var/www/html/cc01;
            index  index.html index.php;
        }
        error_page   500 502 503 504  /50x.html;
        location = /50x.html {
            root   html;
        }
}
    server {
        listen 192.168.253.111:80;
        server_name  www.benet.com;
        charset utf-8;
        access_log  logs/www.benet.access.log;
        location / {
            root   /var/www/html/benet;
            index  index.html index.php;
        }
        error_page   500 502 503 504  /50x.html;
        location = /50x.html {
            root   html;
        }
}
9, Port based nginx virtual host
Modify profile
    server {
        listen 192.168.253.11:666						# Port listening 666
        server_name  www.cc01.com;
        charset utf-8;
        access_log  logs/www.cc01.access.log;
        location / {
            root   /var/www/html/cc01;
            index  index.html index.php;
        }
        error_page   500 502 503 504  /50x.html;
        location = /50x.html {
            root   html;
        }
}
    server {
        listen 192.168.253.11:888;						# Monitor 888
        server_name  www.benet.com;
        charset utf-8;
        access_log  logs/www.benet.access.log;
        location / {
            root   /var/www/html/benet;
            index  index.html index.php;
        }
        error_page   500 502 503 504  /50x.html;
        location = /50x.html {
            root   html;
        }
}