Implementation environment:
server1
server2
server3
1. Load balancing with haproxy
[root@server1 ~]# yum install haproxy -y install software
[root@server2 ~]# Systemctl start httpd start apache on server2
[root@server3 ~]# Systemctl start httpd start apache on Server3
[root@server1 ~]# cd /etc/haproxy/
[root@server1 haproxy]# ls
haproxy.cfg
[root@server1 haproxy]# vim haproxy.cfg edit configuration file
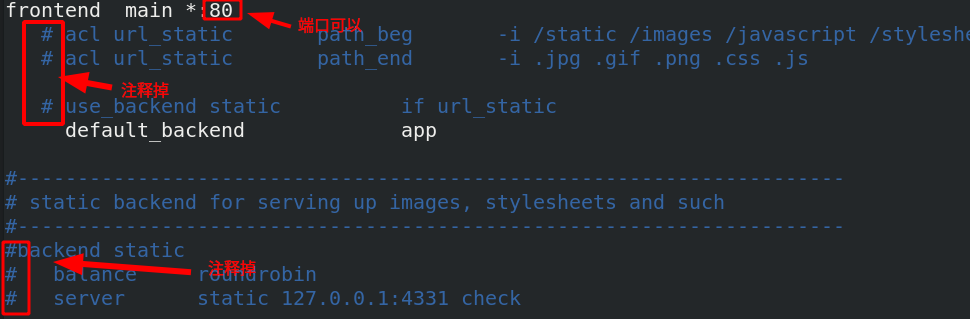
backend app
    balance     roundrobin   roundrobin Representation algorithm
    server  app1 172.25.50.2:80 check   app1 Indicates the naming of the backend, check Indicates a health check
    server  app2 172.25.50.3:80 check   app2 Indicates the naming of the backend,  check Indicates a health check
[root@server1 haproxy]# systemctl start haproxy.service start service
View port

[root@foundation50 ~]# curl 172.25.50.1 access scheduler, and load balancing has been realized
server2
[root@foundation50 ~]# curl 172.25.50.1
server3
[root@foundation50 ~]# curl 172.25.50.1
server2
haproxy does not need to configure the back end, and the back end has its own health check
[root@server2 ~]# systemctl stop httpd.service when the backend server2 apache service is stopped
[root@foundation50 ~]# curl 172.25.50.1 is scheduled again. Only server3 is available. There is a health check
server3
[root@foundation50 ~]# curl 172.25.50.1
server3
[root@server2 ~]# Systemctl start httpd serve2 start apache again
[root@foundation50 ~]# Curl 172.25.50.1 server2 resumed immediately
server2
[root@foundation50 ~]# curl 172.25.50.1
server3
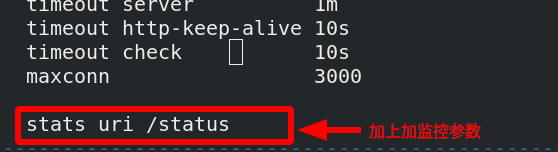
2. Add monitoring parameters and authentication parameters to the haproxy configuration file
[root@server1 haproxy]# vim haproxy.cfg edit configuration file
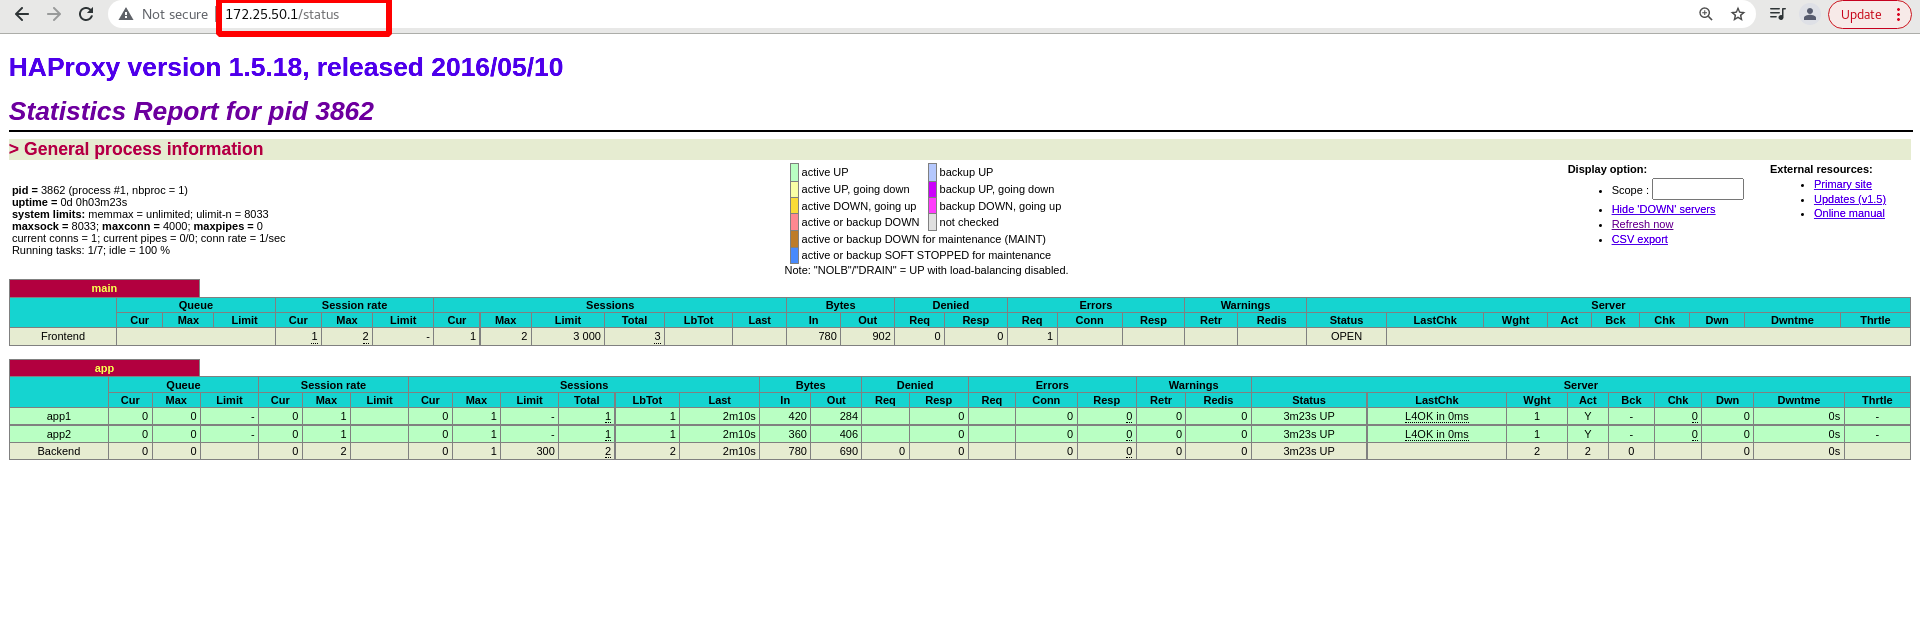
[root@server1 haproxy]# systemctl restart haproxy.service reload service
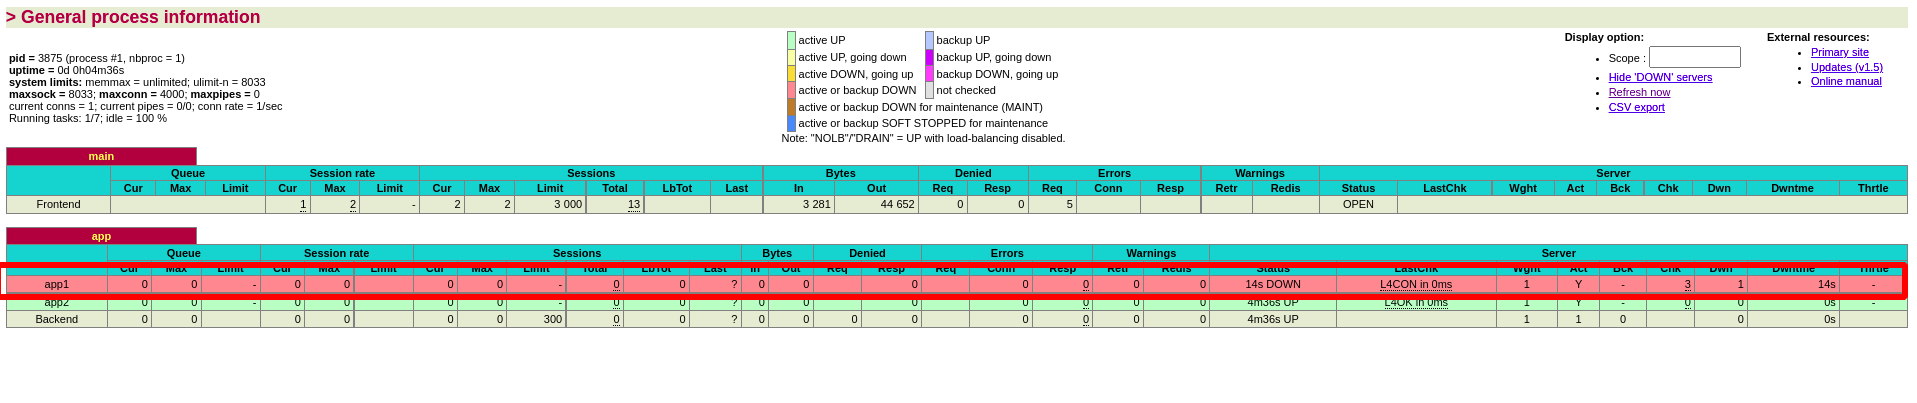
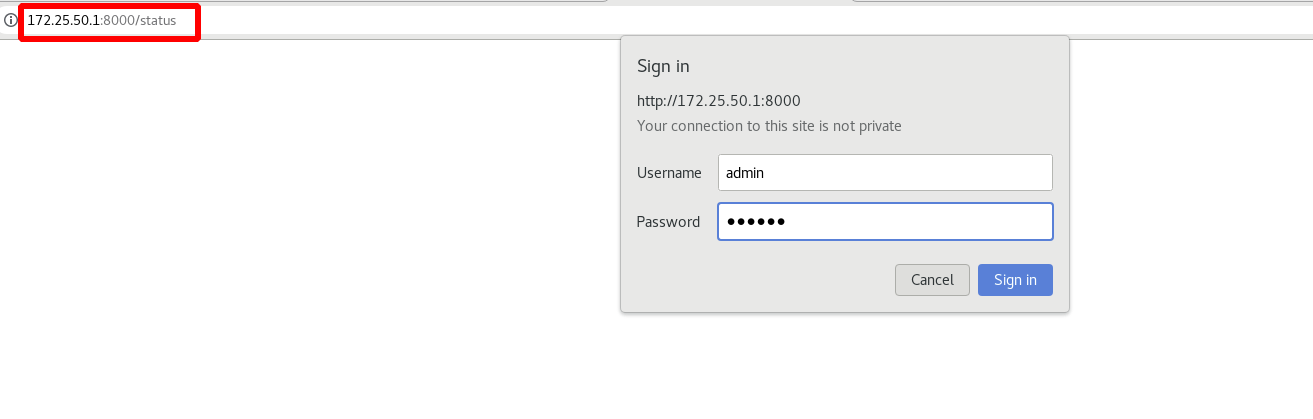
Visit 172.25.50.1/status
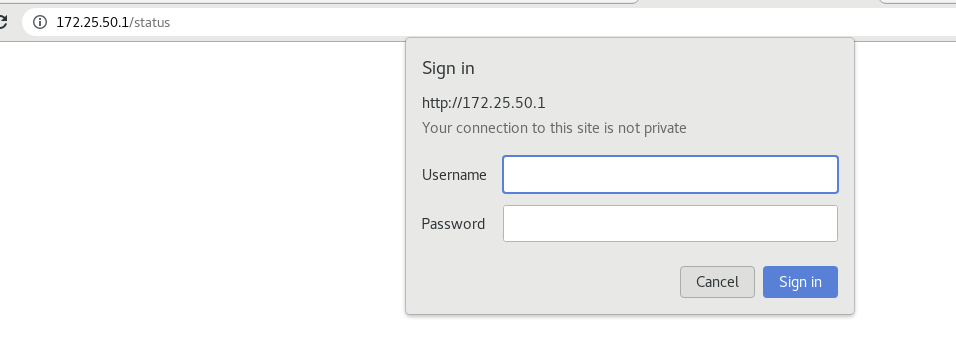
Add an authentication to the monitoring page:
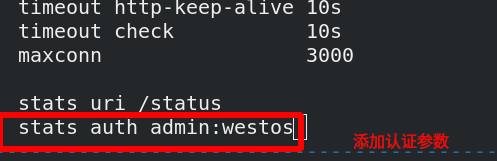
[root@server1 haproxy]# systemctl restart haproxy.service reload
To access 172.25.50.1 again, you need to enter the user and password
Test:
[root@server2 ~]# systemctl stop httpd.service stop the httpd service on server2
The color of the monitoring page will change
3. haproxy logs are stored independently
[ root@server1 haproxy]# cat haproxy.cfg view configuration file
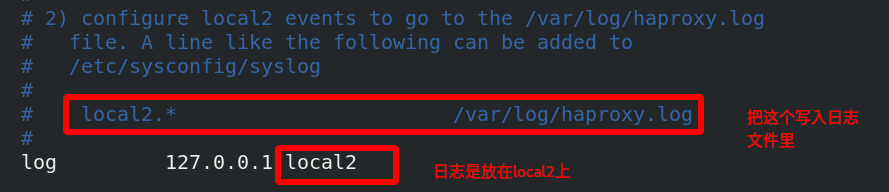
[root@server1 haproxy]# vim /etc/rsyslog.conf

Activate udp port
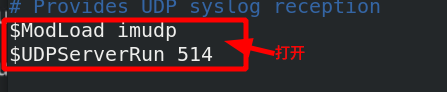

[root@server1 haproxy]# vim /etc/sysconfig/rsyslog add - r to rsyslog

[root@server1 haproxy]# systemctl restart rsyslog restart
[root@foundation50 ~]# curl 172.25.50.1 access
server2
[root@foundation50 ~]# curl 172.25.50.1
server3
[root@foundation50 ~]# curl 172.25.50.1
server2
Check whether logs are logged

The haproxy.log log already exists
Monitoring and authentication parameters can be placed under the port

Restart the service and view the port
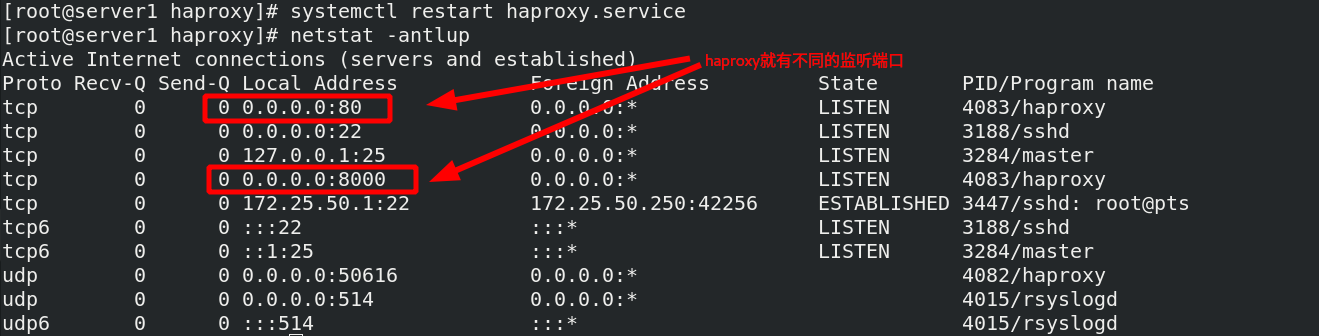
Access requires 8000 ports
4. Set maximum app access
[root@server1 haproxy]# vim haproxy.cfg the maximum number of accesses is set to 6535
 [root@server1
haproxy]# systemctl restart haproxy.service restart the service
Traffic rules: kener (kernel) > System: 1024 > app: 65535, but the operating system system is only 1024, and the kernel is enough to meet the requirements greater than app65535
Therefore, the operating system needs to be modified

Set to 65535 files allowed to be opened by the system
5. haproxy algorithm
There are a variety of algorithms to understand, not one by one

[root@server1 haproxy]# vim haproxy.cfg edit the configuration file and change the algorithm

[root@server1 haproxy]# systemctl reload haproxy.service overload service
source: If the same client accesses, it will not load, and it will schedule to the same back end
[root@foundation50 ~]# curl 172.25.50.1 access
server2
[root@foundation50 ~]# curl 172.25.50.1
server2
[root@foundation50 ~]# curl 172.25.50.1
server2
6. haproxy access control
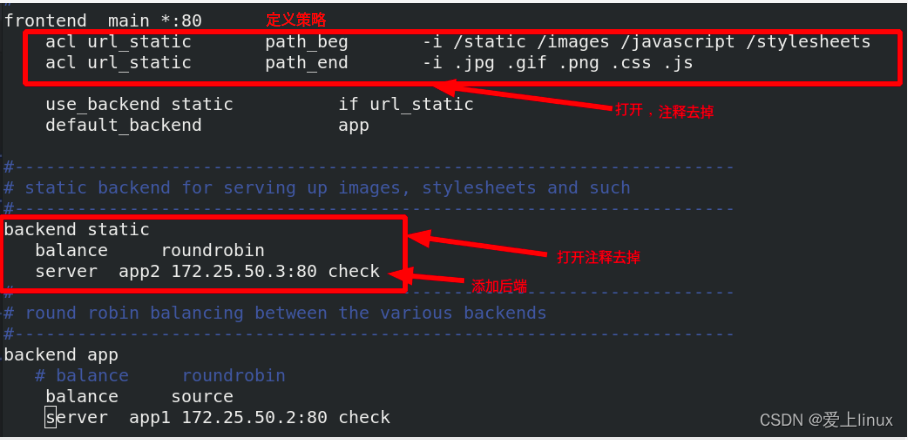
[ root@server1 haproxy]# vim haproxy.cfg edit configuration file
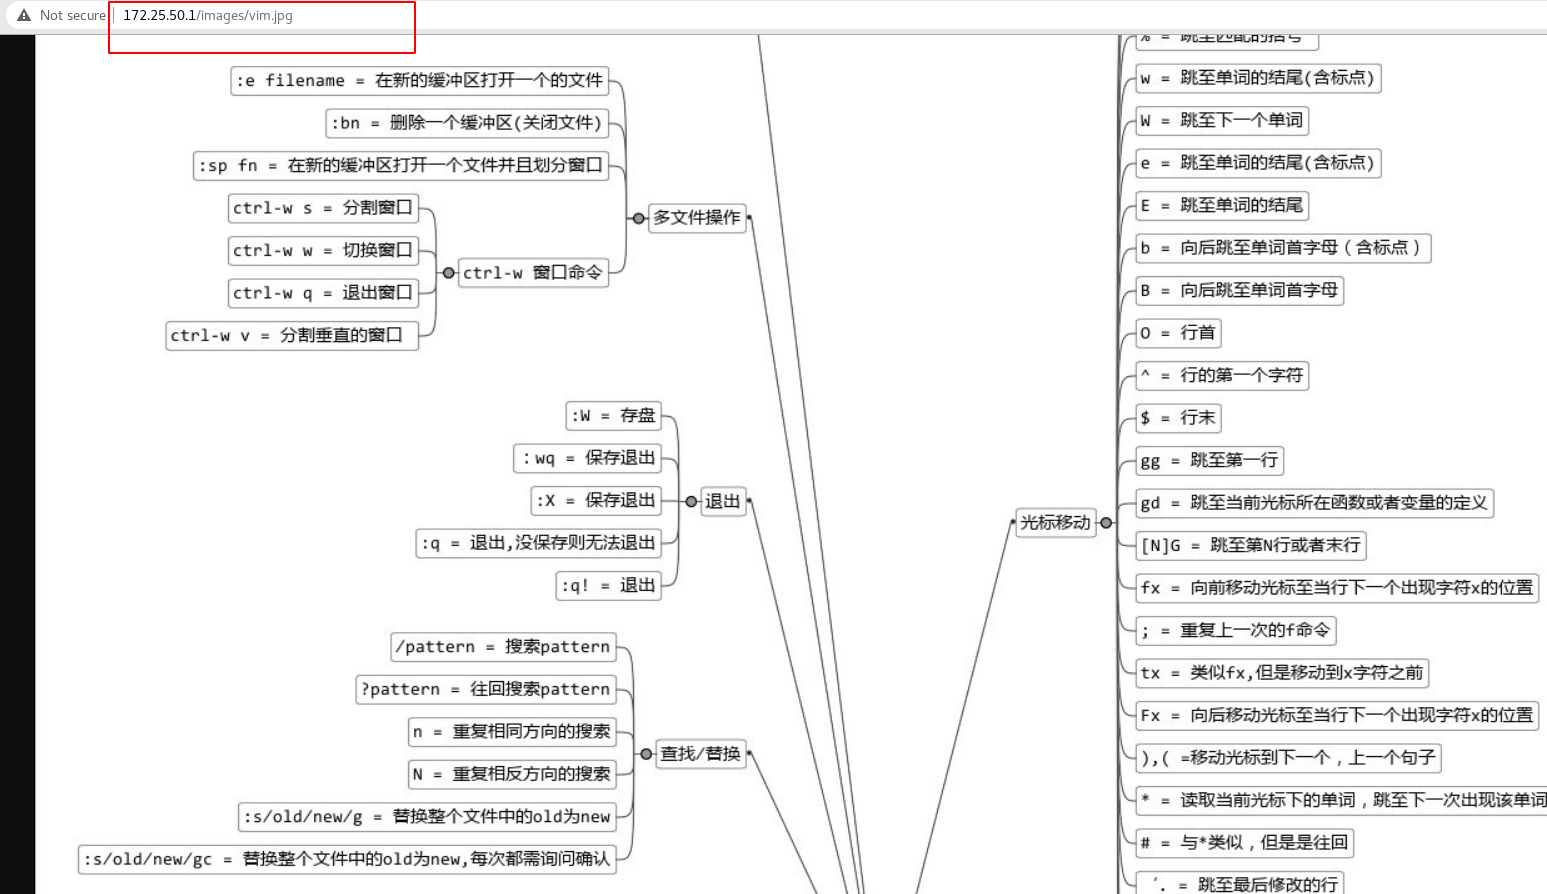
[root@server1 haproxy]# systemctl reload haproxy.service overload service

[root@server3 mnt]# cd /var/www/html/
[root@server3 html]# ls
index.html
[root@server3 html]# mkdir images create the images directory on server3
[root@server3 html]# cd images/
[root@server3 images]# ls
vim.jpg   Put jpg picture
Two policies and two different back ends are defined. If it is detected that the url starts with the directory in the policy, here is / images, and ends with the suffix in the policy, here is
jpg format. If it matches, access the static backend
Visit 172.25.50.1/images/vim.jpg to see the following figure:
Add blacklist policy
[root@server1 haproxy]# vim haproxy.cfg
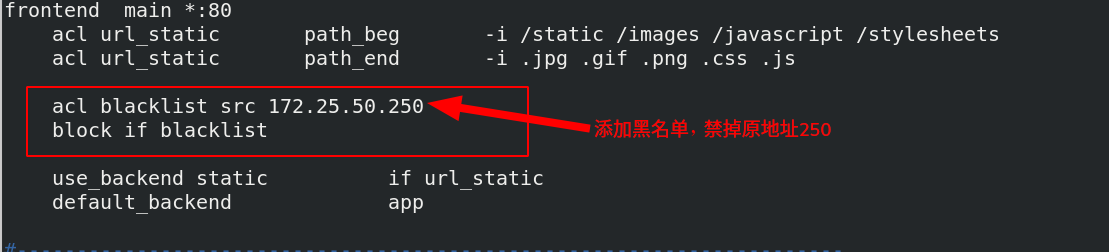
[root@server1 haproxy]# systemctl reload haproxy.service overload service
172.25.50.250 the host cannot access 172.25.50.1/images/vim.jpg, and 250 has been added to the blacklist

172.25.50.4 the host can access 172.25.50.1/images/vim.jpg, and 172.25.50.4 is not blacklisted
[root@server4 ~]# curl 172.25.50.1
server2
[root@server4 ~]# curl 172.25.50.1
server2
[root@server4 ~]# curl 172.25.50.1
server2
[ root@server1 haproxy]# vim haproxy.cfg edit configuration file or network segment

[root@server1 haproxy]# systemctl reload haproxy.service overload service
server4 accesses again and reports an error, but it is inappropriate to directly display the error to the customer

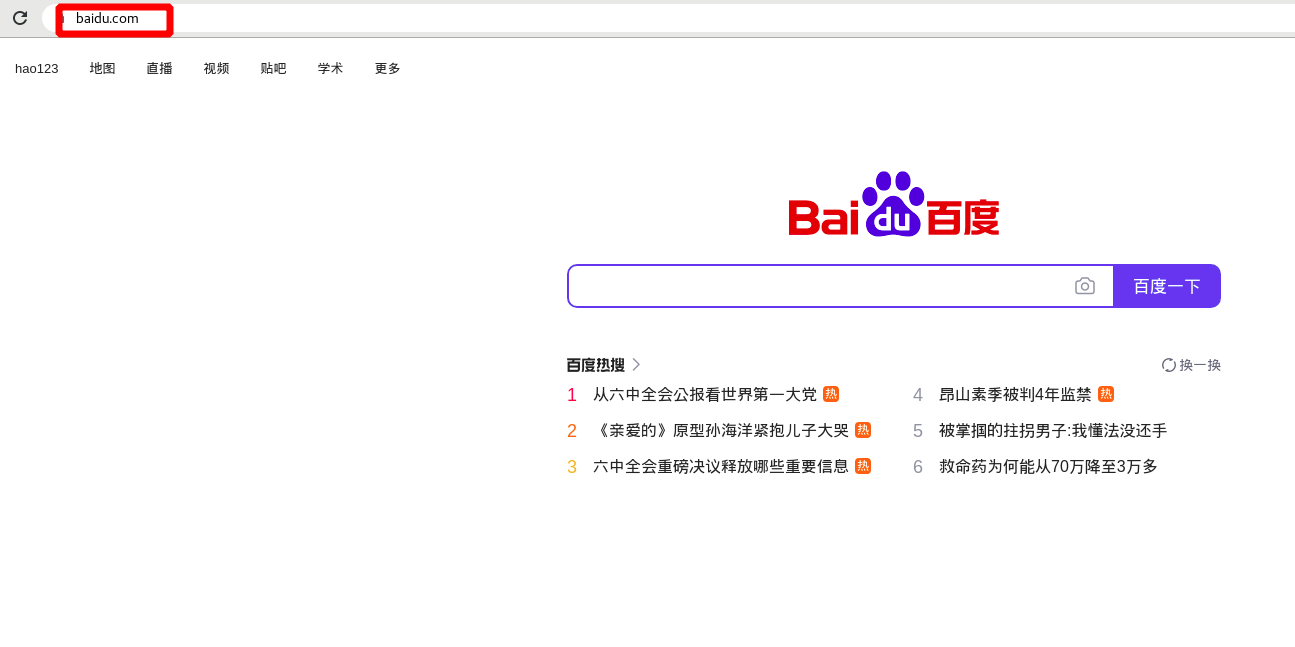
It is inappropriate to directly display the error message to the customer, which can be redirected
[root@server1 haproxy]# vim haproxy.cfg edit configuration file

[root@server1 haproxy]# systemctl reload haproxy.service overload
Visit 172.25.50.1/images/vim.jpg again and go directly to Baidu
Read write separation:
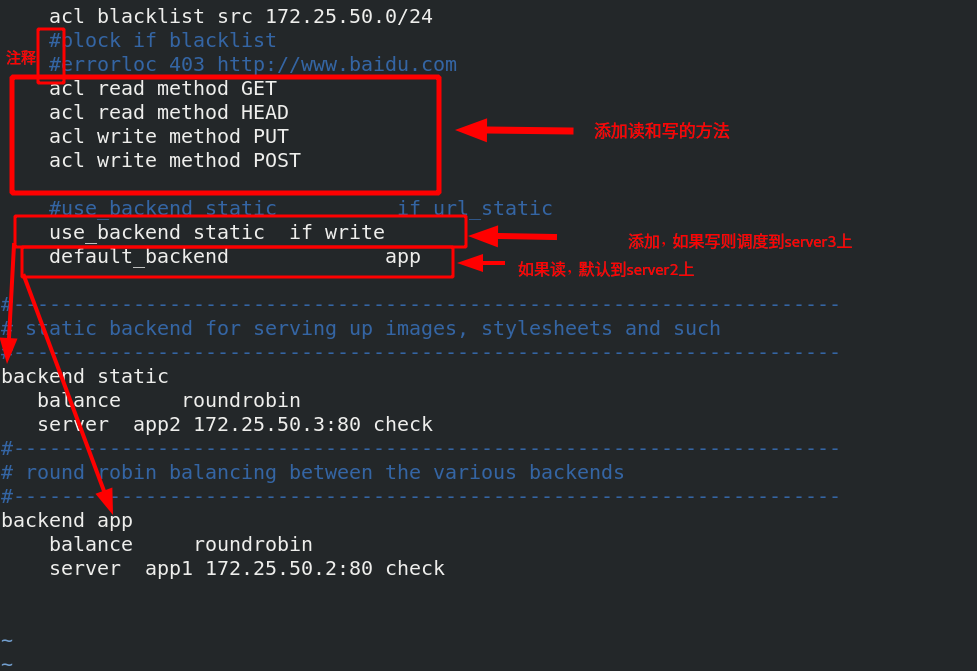
[root@server1 haproxy]# systemctl reload haproxy.service restart the service
Access 172.25.50.1 and read it on server2

Write a dynamic language php and schedule it on server3
[root@server3 ~]# yum install php -y to install a dynamic language
[root@foundation50 haproxy]# scp -r upload/ root@172.25.50.3:/var/www/html / transfer the upload directory to the default publishing directory of server3
root@172.25.50.3's password:
index.php                                     100%  257    22.2KB/s   00:00
upload_file.php                               100%  927     1.7MB/s   00:00
[root@server3 ~]# cd /var/www/html / enter the default publishing directory of server3
[root@server3 html]# mv upload / *.. move the files in the upload directory to the default release directory
[root@server3 html]# ls
images  index.html  index.php  upload  upload_file.php   There are two php file
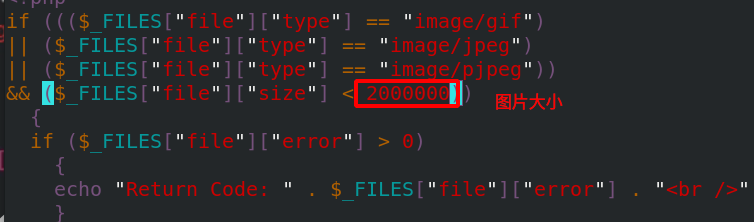
[ root@server3 html]# vim upload_ File.php edit the file and modify the maximum image size to 2M
[root@server3 html]# chmod 777 upload maximizes the permissions of the upload directory so that things can be uploaded to the upload directory, so as not to allow permissions
[root@server2 ~]# yum install php -y to install php on server2 as well
[root@server3 html]# scp -r index.php upload_file.php upload server2:/var/www/html/
take server2 Upper php Documents and upload Copy directory to server2 In the default release directory
[root@server2 ~]# systemctl restart httpd.service restart apache to make it take effect
Access the scheduler 172.25.50.1/index.php. It is still on server2 when it is not uploaded. If you click Submit

Submitted successfully, as shown in the figure below

It can be seen that although the image is submitted on server2, the image is uploaded to server3, which is read-write separation

High availability implementation
stay server4 Also build haproxy
[root@server4 haproxy]# yum install haproxy -y to install haproxy on server4
[root@server1 haproxy]# scp haproxy.cfg server4:/etc/haproxy / copy the configuration file on server1 to server4
[root@server4 haproxy]# Systemctl start haproxy.service start service
The highly available software used by lvs is keepalived, but keepalived has a defect: keepalived will not monitor when the vip is removed
haproxy to achieve high availability, with another software
[root@server1 haproxy]# Systemctl status kept.service ensure that kept is not turned on
● keepalived.service - LVS and VRRP High Availability Monitor
   Loaded: loaded (/usr/lib/systemd/system/keepalived.service; disabled; vendor preset: disabled)
   Active: inactive (dead)
 [root@foundation50 mfs]# cd /mnt/pub/docs/mfs / enter the mfs directory
 [root@foundation50 mfs]# evince Pacemaker-1.1-Clusters_from_Scratch-en-US.pdf view the document and follow the document
[root@server1 haproxy]# Yum install - y pacemaker PCs psmisc policycoreutils Python Install Kit

It is found that two installation packages are not installed. You need to configure the software warehouse
[root@server1 yum.repos.d]# vim dvd.repo
[dvd]
name=rhel7.6
baseurl=http://172.25.50.250/rhel7.6
gpgcheck=0


[HighAvailability]
name=HighAvailability
baseurl=http://172.25.50.250/rhel7.6/addons/HighAvailability
gpgcheck=0

[root@server1 yum.repos.d]# Yum install - y pacemaker PCs psmisc policycoreutils python. Install again successfully
Make secret free for server4
[root@server1 yum.repos.d]# ssh-keygen
[root@server1 .ssh]# ssh-copy-id server4
Copy the software warehouse on serve1 to server4
[root@server1 yum.repos.d]# scp dvd.repo server4:/etc/yum.repos.d/
dvd.repo                                                         100%  182   260.5KB/s   00:00
[root@server1 haproxy]# SSH server4 Yum install - y pacemaker PCs psmisc policycoreutils Python server4
 Disable firewall
[root@server1 ~]# Systemctl enable -- now pcsd.service start PCSD daemon on server1
Created symlink from /etc/systemd/system/multi-user.target.wants/pcsd.service to /usr/lib/systemd/system/pcsd.service.
[root@server1 ~]# ssh server4 systemctl enable --now pcsd starts the pcsd daemon on server4
Created symlink from /etc/systemd/system/multi-user.target.wants/pcsd.service to /usr/lib/systemd/system/pcsd.service.
After we install the high availability suite, the system will create a user called hacluster,You need to create a password for this user
oot@server1 ~]# Echo westos | passwd -- stdin create password for hacluster user on hacluster Server1
Changing password for user hacluster.
passwd: all authentication tokens updated successfully.
[root@server1 ~]# SSH server4 'echo westos | passwd -- stdin hacluster' create password for hacluster user on server4
Changing password for user hacluster.
passwd: all authentication tokens updated successfully.
[root@server1 ~]# pcs cluster auth server1 server4 adds node authentication. The nodes are server1 and server4. You can add several more nodes
Username: hacluster
Password:
server4: Authorized
server1: Authorized    Authentication successful
[root@server1 ~]# pcs cluster setup --name mycluster server1 server4 create two node server1 and server4 clusters
[root@server1 ~]# pcs cluster start --all start all nodes
server1: Starting Cluster (corosync)...   corosync Indicates dual hot standby, which is responsible for the transmission of heartbeat information between two nodes. It determines who hangs up and who takes over through heartbeat
server4: Starting Cluster (corosync)...
server4: Starting Cluster (pacemaker)...  pacemaker Represents the cluster resource manager, which manages the entire resources of the cluster
server1: Starting Cluster (pacemaker)...
[root@server1 ~]#  pcs cluster enable --all sets the node to start automatically
server1: Cluster Enabled
server4: Cluster Enabled
[root@server1 ~]# pcs status view the cluster status with warning
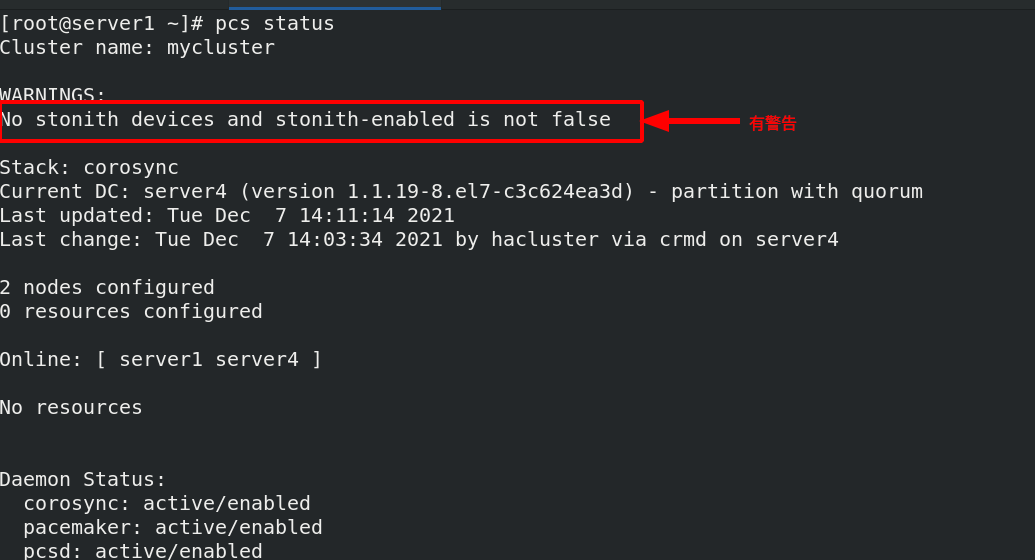
[root@server1 ~]# PCs property set stonith enabled = false there is a warning and this function needs to be disabled
[root@server1 ~]# crm_ Verify - LV syntax detection, no error reported
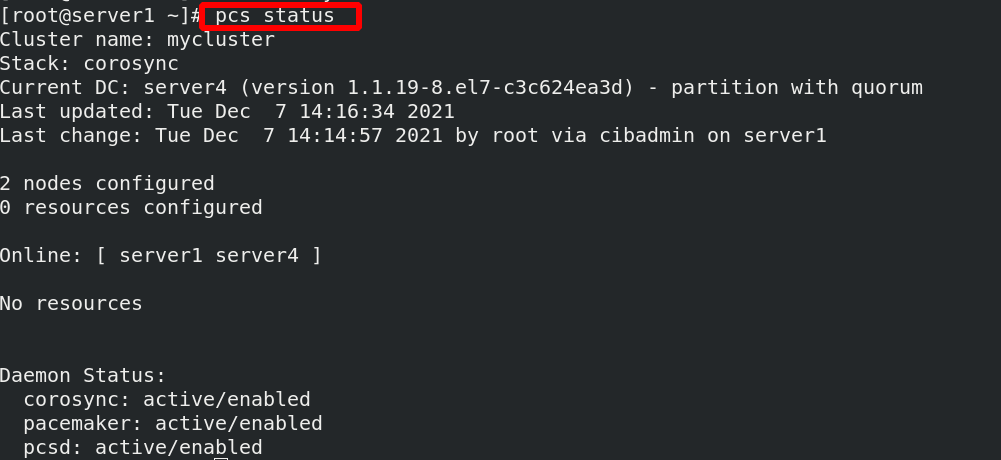
Check the status and find that there are no warnings
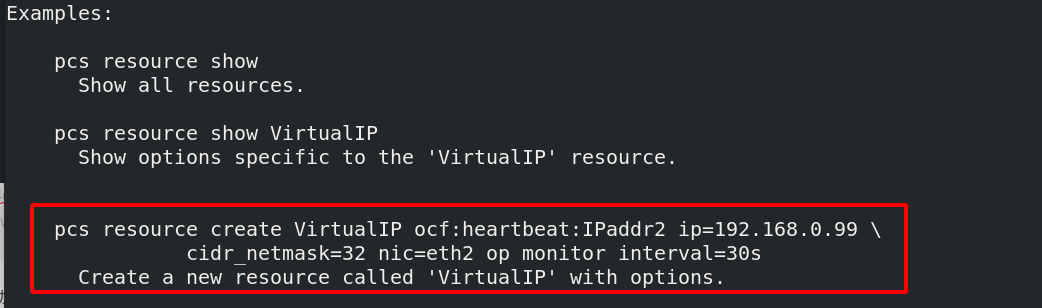
[ root@server1 ~]#PCs resource -- help view the help for creating resources. There are examples
[ root@server1 ~]# pcs resource describe ocf 💓 IPaddr2 check the parameters in it
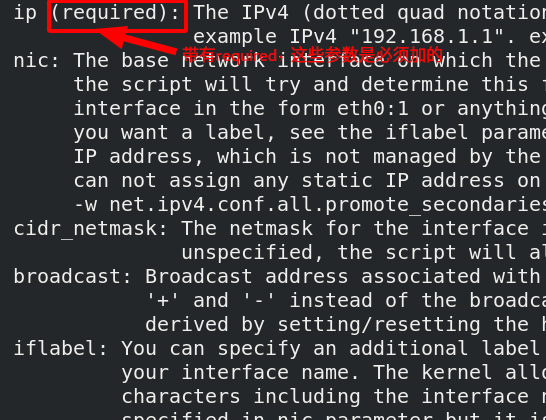
[root@server1 ~]# pcs resource create vip ocf:heartbeat:IPaddr2 ip=172.25.50.100 cidr_netmask=24 op monitor interval=30s create resources, add VIP resources,
ocf:heartbeat:IPaddr2 Represents a script, ip For the parameters in the script, they must be added,
 cidr_netmask Represents the subnet mask, monitor interval=30s  Monitor screen rate, indicating every 30 s Monitor once vip State of
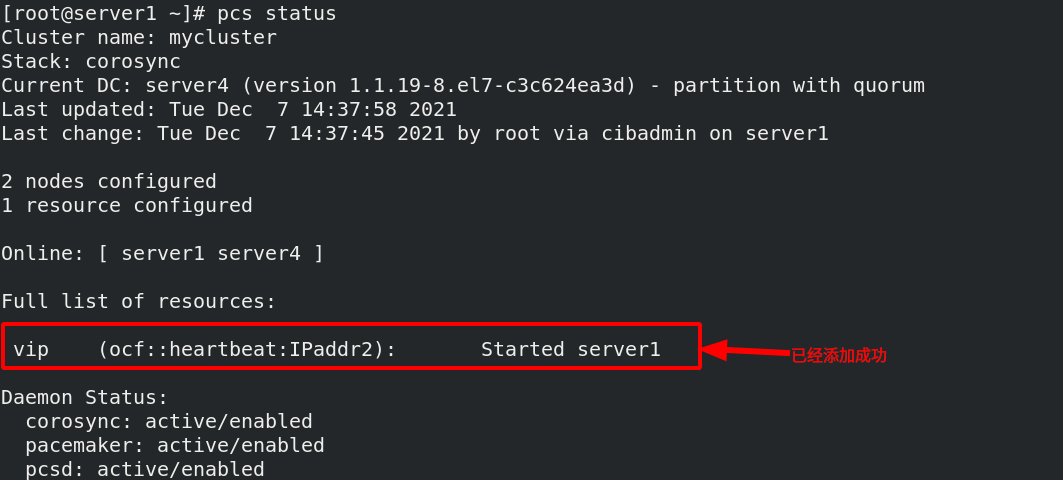

vip has been handed over to the cluster. Now do the following tests:
[ root@server1 ~]#To handle the failure of PCs node standby, first let Server1 rest and only server4 is running, so vip will jump to server4
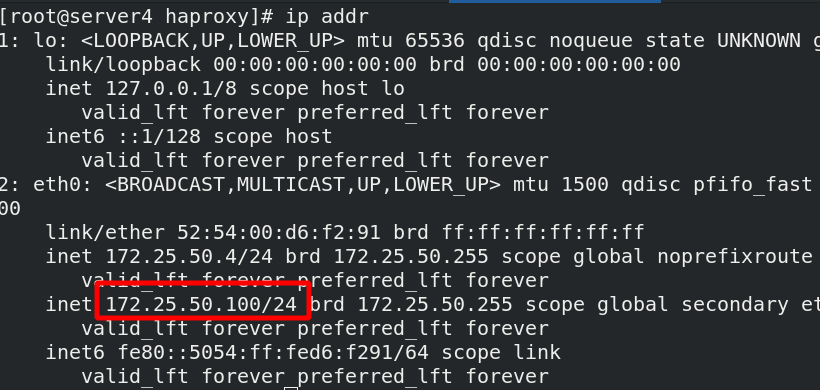
You can find that the vip is uploaded to server4
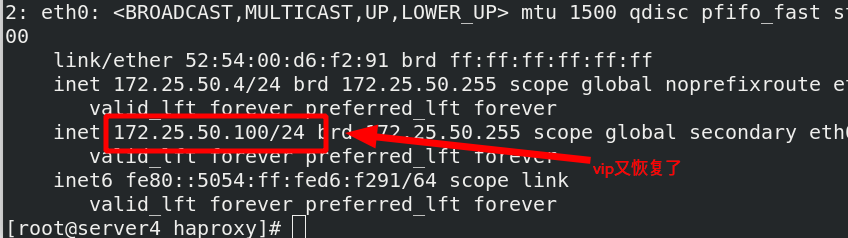
Even if the vip on server4 is deleted, it will restart the vip after 30s
[ root@server4 haproxy]# ip addr del 172.25.50.100/24 dev eth0 delete vip
[root@server4 haproxy]# ip addr
How to hand over the haproxy service to the cluster
[ root@server1 ~]#Systemctl stop haproxy.service stop the service first
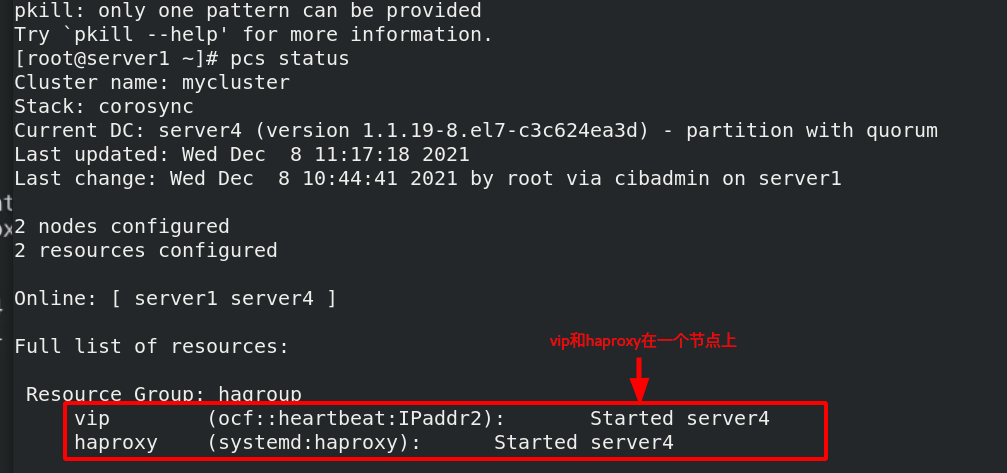
[ root@server1 ~]#PCs resource create haproxy systemd: haproxy OP monitor interval = 60s systemd: haproxy means calling the haproxy script in systemd
[ root@server1 ~]#PCs status view status

It will automatically haprxoy start
Question: now both vip and haproxy resources are on the same node, will they not be on the same node?
[ root@server1 ~]#PCs node unstandby recovers Server1
[ root@server1 ~]#pcs status view pcs status

root@server1 ~]# pcs resource group add hagroup vip haproxy puts vip haproxy resources in a group, which must be together on a node at the same time, and the writing order of resources is the order in which resources are activated in the cluster
[root@server1 ~]# pcs status
 Test:
Test:
[root@server4 haproxy]# pcs node standby failed server4 and transferred vip and haproxy to server1 at the same time
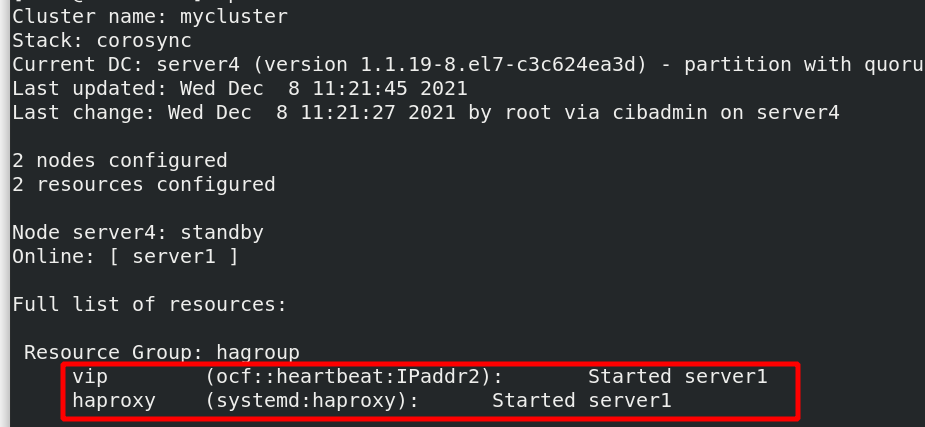
[root@server4 haproxy]# PCs node unsteadby recover server4
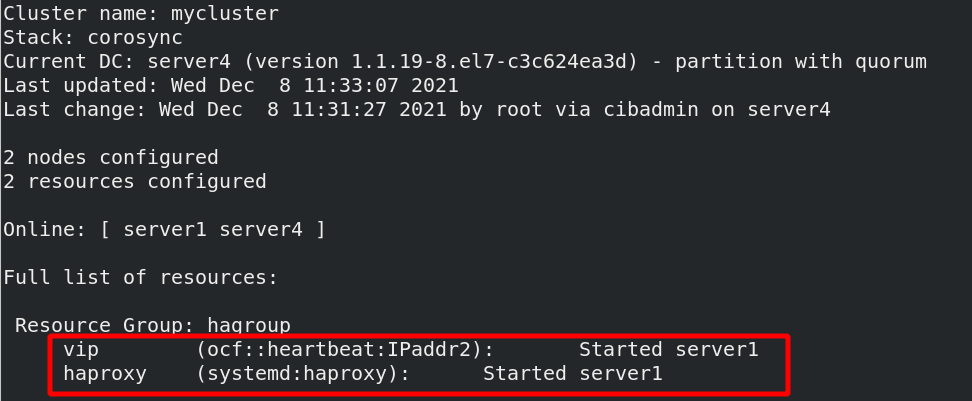
Restoring again will not switch to server4
Suppose that the network interface of server1 is broken, ip link set down eth0, and the heartbeat between server1 and server4 is broken. They think that each other is broken and there is a brain crack;
Once there is a network failure or kernel crash, it will cause brain crack. How to solve it??
Introduce fence:
FENCE equipment is an indispensable part of RHCS cluster. The phenomenon of "brain crack" caused by unpredictable conditions can be avoided through FENCE equipment
The emergence of fence equipment is to solve these problems. Fence equipment mainly sends hardware management instructions to the server or storage directly through the hardware management interface of the server or storage itself or external power management equipment, restart or shut down the server, or disconnect from the network
stay serve1 and server4 Upper installation fence client
root@server1 ~]# yum install -y fence-virt
[root@server4 haproxy]# yum install -y fence-virt
[root@server1 ~]# stonith_ Admin - I list
 fence_xvm
 fence_virt
2 devices found
[root@server1 ~]# stonith_admin  -M -a fence_xvm view fence_xvm proxy metadata information - M represents metadata and - A represents proxy
fence operation principle:
Management tools operate external interfaces to manage the kernel
Connect the libvirt external interface through the libvirt backend to start and stop the virtual machine

Install the fence installation package on the host
[root@foundation50 isos]# yum install fence-virtd-multicast.x86_64 fence-virtd.x86_64 fence-virtd-libvirt.x86_64 -y
[root@foundation50 isos]# rpm -qa | grep ^fence the following three installation packages to complete the installation
fence-virtd-multicast-0.4.0-9.el8.x86_64
fence-virtd-libvirt-0.4.0-9.el8.x86_64
fence-virtd-0.4.0-9.el8.x86_64
[root@foundation50 ~]# fence_virtd -c creates a configuration file and configures
Module search path [/usr/lib64/fence-virt]:   enter

Available backends:
    libvirt 0.3     Available backend
Available listeners:
    multicast 1.2  Available backend

Listener modules are responsible for accepting requests
from fencing clients.

Listener module [multicast]:   Enter, monitoring module

The multicast listener module is designed for use environments
where the guests and hosts may communicate over a network using
multicast.

The multicast address is the address that a client will use to
send fencing requests to fence_virtd.

Multicast IP Address [225.0.0.12]:   Enter, address

Using ipv4 as family.

Multicast IP Port [1229]:    Enter, port

Setting a preferred interface causes fence_virtd to listen only
on that interface.  Normally, it listens on all interfaces.
In environments where the virtual machines are using the host
machine as a gateway, this *must* be set (typically to virbr0).
Set to 'none' for no interface.

Interface [virbr0]: br0    Need to write here br0  Because the virtual machine and the host are through br0 To communicate
The key file is the shared key information which is used to
authenticate fencing requests.  The contents of this file must
be distributed to each physical host and virtual machine within
a cluster.

Key File [/etc/cluster/fence_xvm.key]:    key ,To confirm key Is there any

Backend modules are responsible for routing requests to
the appropriate hypervisor or management layer.

Backend module [libvirt]:       enter

The libvirt backend module is designed for single desktops or
servers.  Do not use in environments where virtual machines
may be migrated between hosts.

Libvirt URI [qemu:///system]: Enter

Configuration complete.

=== Begin Configuration ===
backends {
	libvirt {
		uri = "qemu:///system";
	}

}

listeners {
	multicast {
		port = "1229";
		family = "ipv4";
		interface = "br0";
		address = "225.0.0.12";
		key_file = "/etc/cluster/fence_xvm.key";
	}

}

fence_virtd {
	module_path = "/usr/lib64/fence-virt";
	backend = "libvirt";
	listener = "multicast";
}

=== End Configuration ===
Replace /etc/fence_virt.conf with the above [y/N]? y   write in

 [root@foundation50 ~]# ll /etc/cluster/fence_xvm.key confirm whether there is a fence_xvm.key this file
ls: cannot access '/etc/cluster/fence_xvm.key': No such file or directory   Did you find it
[root@foundation50 ~]# mkdir /etc/cluster if you do not have this directory, create it
[root@foundation50 ~]# cd /etc/cluster / enter this directory
[root@foundation50 cluster]# dd if=/dev/urandom of=fence_xvm.key bs=128 count=1 then create a fence_xvm.key file
1+0 records in
1+0 records out
128 bytes copied, 5.3822e-05 s, 2.4 MB/s
[root@foundation50 cluster]# ls
fence_xvm.key  Creation complete
[root@foundation50 cluster]# systemctl restart fence_virtd.service restart service
[root@foundation50 cluster]# netstat -anulp | grep :1229
udp        0      0 0.0.0.0:1229            0.0.0.0:*                           37701/fence_virtd    Port 1229 is now open

[root@server1 ~]# mkdir /etc/cluster establish the key directory on cluster node server1
[root@server4 ~]# mkdir /etc/cluster establish the key directory on cluster node server4
[root@foundation50 cluster]# scp fence_xvm.key  root@172.25.50.1 Fence / etc / cluster on the host machine:_ Copy xvm.key to server1
root@172.25.50.1's password:
fence_xvm.key                                 100%  128   227.6KB/s   00:00
[root@foundation50 cluster]# scp fence_xvm.key  root@172.25.50.4 Fence / etc / cluster on the host machine:_ Copy xvm.key to server4
The authenticity of host '172.25.50.4 (172.25.50.4)' can't be established.
ECDSA key fingerprint is SHA256:xz6MrlZHE0V7Nv7ukq0/9OR0n8BMz6PLp88JFhoXC4M.
Are you sure you want to continue connecting (yes/no/[fingerprint])? yes
Warning: Permanently added '172.25.50.4' (ECDSA) to the list of known hosts.
root@172.25.50.4's password:
fence_xvm.key                                 100%  128   204.3KB/s   00:00
[root@server1 ~]# pcs stonith create  vmfence fence_xvm pcmk_host_map="server1:vm1;server4:vm4" op monitor interval=60s create a fence on the cluster node
pcmk_host_map Indicates mapping, because the host name is in the cluster and the virtual machine management interface is the virtual machine name. In order to identify one-to-one correspondence, mapping is required
[root@server1 ~]# PCs property set stoneth enabled = true open this property
Test:
Disconnect the network card

[root@server1 ~]# pcs status

server4 virtual machine restarts, and server1 takes over vmfence
[ root@server1 ~]#Echo C > / proc / sysrq trigger kernel crash on Server1
server1 will be restarted immediately, and then added as a cluster again