catalogue
1. Characteristics of lvs-dr mode
3. Deploy LVS-DR load balancing cluster
Important functions of keepalived service
Principle of keepalived high availability failover
2. LVS + DR + Keepalived high availability cluster construction
(1) Configuration from load scheduler
(2) Master slave load scheduler installation configuration keepalived
1, LVS-DR
1. Characteristics of lvs-dr mode
- Director Server and Real Server Must be on the same physical network.
- Real Server You can use either a private address or a public address. If you use a public network address, you can access it through the Internet RIP Direct access.
- Director Server Serves as an access portal to the cluster, but not as a gateway.
- All request messages via Real Server,But the reply response message cannot pass through Director Server.
- Real Server Gateway for does not allow pointing to Director Server IP,Namely Real Server The sent packet is not allowed to pass through Director Server.
- Real Server Upper lo Interface configuration VIP Address.
2. ARP problem in LVS-DR
Having the same IP address in the LAN is bound to cause the disorder of ARP communication among servers
When the ARP broadcast is sent to the LVS-DR cluster, because both the load balancer and the node server are connected to the same network, they will receive the ARP broadcast settings
Only the front-end load balancer responds, and other node servers do not respond to ARP broadcasts
//resolvent:
Using virtual interfaces lo:0 load bearing VIP address
 Set kernel parameters arp_ignore=1(The system responds only to the purpose IP For local IP of ARP (request)
The message returned by RealServer (the source IP is VIP) is forwarded by the router. When re encapsulating the message, you need to obtain the MAC address of the router first
When sending an ARP request, Linux uses the source IP address of the IP packet (VIP s) as the source IP address in the ARP request packet by default instead of the IP address of the sending interface
After receiving the ARP request, the router will update the ARP table entry
The MAC address of the Director corresponding to the original VIP will be updated to the MAC address of the RealServer corresponding to the VIP, and the router will forward the new request message to the RealServer according to the ARP table entry, resulting in the failure of the VIP of the Director
//resolvent:
Process the node server and set kernel parameters arp_announce=2(System not used IP The source address of the package ARP The source address of the request, and the address of the sending interface is selected IP (address)
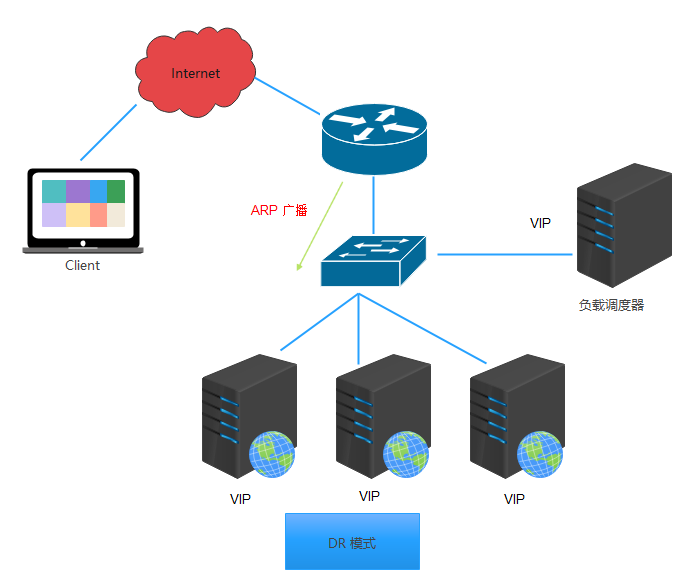
3. Deploy LVS-DR load balancing cluster
Architecture Overview
In a DR mode cluster, the LVS load scheduler serves as an access portal to the cluster, but not as a gateway
All nodes in the server pool are connected to the Internet, and the Web response packets sent to the client do not need to go through the LVS load scheduler
In this way, the inbound and outbound access data are processed separately, so the LVS load scheduler and all node servers need to be configured with VIP addresses to respond to the access of the whole cluster
Considering the security of data storage, shared storage devices will be placed in the internal private network
Installation environment
- Host: Win10 professional workstation version
- VMware Pro 16
- CentOS 7
- Network adapters: all in NAT mode
- Network card configuration: obtain IP statically
- YUM source: local
Formal deployment
Load LVS kernel module
systemctl stop firewalld.service && systemctl disable firewalld.service
setenforce 0
modprobe ip_vs
cat /proc/net/ip_vs
yum install -y ipvsadm
Configure virtual address (VIP)
cd /etc/sysconfig/network-scripts/ && cp ifcfg-ens33 ifcfg-ens33:0
echo > /etc/sysconfig/network-scripts/ifcfg-ens33:0

cat > /etc/sysconfig/network-scripts/ifcfg-ens33:0 <<EOF
DEVICE=ens33:0
ONBOOT=yes
IPADDR=192.168.10.25
NETMASK=255.255.255.255
EOF

ifup ens33:0
ifconfig ens33:0
Adjust proc response parameters
cat >> /etc/sysctl.conf <<EOF
net.ipv4.ip_forward = 0
net.ipv4.conf.all.send_redirects = 0
net.ipv4.conf.default.send_redirects = 0
net.ipv4.conf.ens33.send_redirects = 0
EOF

sysctl -p	#Make configuration effective
Configure load distribution policy
ipvsadm-save > /etc/sysconfig/ipvsadm
systemctl start ipvsadm && systemctl enable ipvsadm

ipvsadm -C
#Clear original policy

ipvsadm -A -t 192.168.10.25:80 -s rr
ipvsadm -a -t 192.168.10.25:80 -r 192.168.10.30:80 -g
ipvsadm -a -t 192.168.10.25:80 -r 192.168.10.40:80 -g
#If tunnel mode is used, replace - g at the end with - i

ipvsadm

ipvsadm -ln
#View the node status. Route represents DR mode
Configure NFS shared storage
systemctl stop firewalld && systemctl disable firewalld
setenforce 0
yum install -y nfs-utils rpcbind
systemctl start nfs && systemctl enable nfs
systemctl start rpcbind && systemctl enable rpcbind
mkdir /opt/test1 /opt/test2
chmod 777 /opt/test1/ /opt/test2/

cat > /etc/exports <<EOF
/usr/share *(ro,sync)
/opt/test1 192.168.10.0/24(rw,sync)
/opt/test2 192.168.10.0/24(rw,sync)
EOF

exportfs -rv
showmount -e
Configure WEB node server
use DR In mode, WEB Node servers also need to be configured VIP Address and adjust the kernel ARP Response parameters to organize updates VIP of MAC Address to avoid conflicts
 besides, Web Service configuration and NAT Similar way
WEB1
get ready
systemctl stop firewalld && systemctl disable firewalld
setenforce 0
#In order to simulate the Intranet environment, the gateway and DNS of the two WEB node servers can be commented out and the network card can be restarted
#If there is a gateway server, point to the gateway server
#You need to download the software to use the local YUM warehouse
Configure virtual IP address
#This address is only used as the source address for sending Web response packets, and does not need to listen to the client's access requests (instead, the scheduler listens and distributes them)
#Therefore, the virtual interface lo:0 is used to host the VIP address, and a routing record is added for the local machine to limit the data accessing the VIP locally to avoid communication disorder
cd /etc/sysconfig/network-scripts/ && cp ifcfg-lo ifcfg-lo:0
echo > /etc/sysconfig/network-scripts/ifcfg-lo:0

cat > /etc/sysconfig/network-scripts/ifcfg-lo:0 <<EOF
DEVICE=lo:0
IPADDR=192.168.10.25
NETMASK=255.255.255.255
ONBOOT=yes
EOF

ifup lo:0
ifconfig lo:0
route add -host 192.168.10.25 dev lo:0
route -n

cat >> /etc/rc.local <<EOF
/sbin/route add -host 192.168.10.25 dev lo:0
EOF

chmod +x /etc/rc.d/rc.local
Adjust the ARP response parameters of the kernel to prevent updating the MAC address of the VIP and avoid conflicts
cat >> /etc/sysctl.conf <<EOF
net.ipv4.conf.lo.arp_ignore = 1
net.ipv4.conf.lo.arp_announce = 2
net.ipv4.conf.all.arp_ignore = 1
net.ipv4.conf.all.arp_announce = 2
EOF

sysctl -p
Mount shared directory
yum -y install nfs-utils rpcbind httpd
systemctl start rpcbind && systemctl enable rpcbind
systemctl start httpd && systemctl enable httpd
mount.nfs 192.168.10.50:/opt/test1 /var/www/html/
echo 'Hello test1~' > /var/www/html/index.html
echo "192.168.10.50:/opt/test1 /var/www/html nfs defaults,_netdev 0 0" >> /etc/fstab
mount -a
WEB2
Except for the shared directory, other configurations are the same as WEB1
systemctl stop firewalld && systemctl disable firewalld
setenforce 0
cd /etc/sysconfig/network-scripts/ && cp ifcfg-lo ifcfg-lo:0
echo > /etc/sysconfig/network-scripts/ifcfg-lo:0

cat > /etc/sysconfig/network-scripts/ifcfg-lo:0 <<EOF
DEVICE=lo:0
IPADDR=192.168.10.25
NETMASK=255.255.255.255
ONBOOT=yes
EOF

ifup lo:0
route add -host 192.168.10.25 dev lo:0

cat >> /etc/rc.local <<EOF
/sbin/route add -host 192.168.10.25 dev lo:0
EOF

chmod +x /etc/rc.d/rc.local

cat >> /etc/sysctl.conf <<EOF
net.ipv4.conf.lo.arp_ignore = 1
net.ipv4.conf.lo.arp_announce = 2
net.ipv4.conf.all.arp_ignore = 1
net.ipv4.conf.all.arp_announce = 2
EOF

sysctl -p

yum -y install nfs-utils rpcbind httpd
systemctl start rpcbind && systemctl enable rpcbind
systemctl start httpd && systemctl enable httpd
mount.nfs 192.168.10.50:/opt/test2 /var/www/html/
echo 'Hello test2~' > /var/www/html/index.html
echo "192.168.10.50:/opt/test2 /var/www/html nfs defaults,_netdev 0 0" >> /etc/fstab
mount -a
2, Kept
1. General
Why keep alive
In enterprise applications, a single server bears the risk of a single point of failure. Once a single point of failure occurs, the enterprise service will be interrupted, causing great harm and loss.
What is kept alive
the keepalived software was originally designed for LVS load balancing software to manage and monitor the status of each service node in the LVS cluster, and later added the VRRP function that can realize high availability. Therefore, in addition to managing LVS clusters, keepalived can also achieve high availability for other services (such as Nginx, Haproxy, MySQL, etc.).
keepalived software mainly realizes high availability through VRRP protocol. VRRP is the abbreviation of Virtual Router Redundancy Protocol. The purpose of VRRP is to solve the problem of single point of failure of static routing. It can ensure that the whole network can run continuously when individual nodes are down.
therefore, on the one hand, kept has the function of configuring and managing LVS, and also has the function of health check for the nodes under LVS. On the other hand, it can also realize the high availability of system network services.
Important functions of keepalived service
Manage LVS load balancing software
Support automatic Failover
Realize Health Checking of nodes in LVS Cluster
Achieve high availability (HA) of LVS load scheduler and node server
general enterprise clusters need to meet three characteristics: load balancing, health check and failover. LVS + kept can fully meet the requirements.
Principle of keepalived high availability failover
The failover of the keepalived high availability service to clusters is realized through VRRP (Virtual Router Redundancy Protocol).
when the keepalived service works normally, the Master node will continuously send heartbeat messages (in the form of multicast) to the Backup node to tell the standby node that it is still alive. When the Master node fails, it cannot send heartbeat messages, and the standby node cannot continue to detect the heartbeat from the Master node, so it calls its own takeover program, Take over the IP resources and services of the Master node. When the primary node recovers, the standby node will release the IP resources and services taken over by itself when the primary node fails and restore to the original standby role.
2. LVS + DR + Keepalived high availability cluster construction
Cluster overview
The design goal of kept is to build a highly available LVS load balancing cluster. You can call ipvsadm tool to create virtual servers and manage server pools, not just as dual machine hot standby
Using keepalived to build LVS cluster is more convenient and easy to use. The main advantages are: hot standby switching is realized for LVS load scheduler to improve availability; Check the health of the nodes in the server pool, automatically remove the failed nodes, and rejoin them after recovery
Based on the DR mode LVS cluster, the scheme will add a slave load scheduler, use keepalived to realize the hot standby of the master and slave schedulers, and build an LVS cluster architecture with both load balancing and high availability
Ipvsadm management tool is also required when building LVS clusters with keepalived, but most of the work will be completed automatically by keepalived, and there is no need to manually execute ipvsadm (except for viewing and monitoring clusters)
Formal deployment
(1) Configuration from load scheduler
systemctl stop firewalld.service && systemctl disable firewalld.service
setenforce 0
modprobe ip_vs
cat /proc/net/ip_vs
yum install -y ipvsadm
cd /etc/sysconfig/network-scripts/ && cp ifcfg-ens33 ifcfg-ens33:0
echo > /etc/sysconfig/network-scripts/ifcfg-ens33:0

cat > /etc/sysconfig/network-scripts/ifcfg-ens33:0 <<EOF
DEVICE=ens33:0
ONBOOT=yes
IPADDR=192.168.10.25
NETMASK=255.255.255.255
EOF

ifup ens33:0	#lvs_01 there are already VIP s. If you directly use ifup, the execution will fail
systemctl restart network
ifup ens33:0	#Execute again
ip a			#Confirm whether ens33:0 is effective

cat >> /etc/sysctl.conf <<EOF
net.ipv4.ip_forward = 0
net.ipv4.conf.all.send_redirects = 0
net.ipv4.conf.default.send_redirects = 0
net.ipv4.conf.ens33.send_redirects = 0
EOF

sysctl -p
ipvsadm-save > /etc/sysconfig/ipvsadm
systemctl start ipvsadm && systemctl enable ipvsadm
ipvsadm -C
ipvsadm -A -t 192.168.10.25:80 -s rr
ipvsadm -a -t 192.168.10.25:80 -r 192.168.10.30:80 -g
ipvsadm -a -t 192.168.10.25:80 -r 192.168.10.40:80 -g
ipvsadm
ipvsadm -ln
(2) Master slave load scheduler installation configuration keepalived
yum -y install keepalived
#Install package

cd /etc/keepalived/
cp keepalived.conf keepalived.conf.bak
#backups


vim keepalived.conf
#The configuration file only needs to be from global_ For the content started by defs, the useless configuration above is also cleared
global_defs {						#Define global parameters
    #Line 10, the mail service points to the local
	smtp_server 127.0.0.1
    #In line 12, specify the name of the server (router). The names of the primary and standby servers must be different. The primary server is LVS_01, standby LVS_02
	router_id LVS_01
}

vrrp_instance VI_1 {				#Define VRRP hot spare instance parameters
#Line 20: specify the hot standby status. The primary is MASTER and the standby is BACKUP
    state MASTER
    #Line 21, specify the physical interface that hosts the vip address
    interface ens33
    #In line 22, specify the ID number of the virtual router. Each hot spare group should be consistent
    virtual_router_id 10
    #In line 23, specify the priority. The higher the value, the higher the priority. The primary is 100 and the standby is 99
    priority 100
    advert_int 1					#Notification interval seconds (heartbeat rate)
    authentication {				#Define the authentication information and keep it consistent for each hot standby group
		auth_type PASS				#Certification Type
        #In line 27, specify the authentication password. The primary and standby servers are consistent
        auth_pass 123123
    }
    virtual_ipaddress {				#Specify cluster vip address
        192.168.10.25
    }
}
#Line 34, specify the virtual server address (VIP) and port, and define the virtual server and Web server pool parameters
virtual_server 192.168.10.25 80 {
    delay_loop 6					#Interval between health checks (seconds)
    lb_algo rr						#Specify scheduling algorithm, polling (rr)
    #Line 37, specify cluster operating mode, direct routing (DR)
    lb_kind DR
    persistence_timeout 50			#Connection hold time (seconds)
    protocol TCP					#The application service adopts TCP protocol
    #Line 41, specify the address and port of the first Web node
    real_server 192.168.10.30 80 {
        weight 1					#Weights of nodes
        #In line 43, add the following health check method and delete the unnecessary configuration
        TCP_CHECK {
			connect_port 80			#Add target port for check
			connect_timeout 3		#Add connection timeout (seconds)
			nb_get_retry 3			#Add retry count
			delay_before_retry 3	#Add retry interval
		}
	}

	real_server 192.168.10.40 80 {		#Add the address and port of the second Web node
        weight 1
        TCP_CHECK {
			connect_port 80
			connect_timeout 3
			nb_get_retry 3
			delay_before_retry 3
		}
	}
}
#You can delete the following redundant network segments


systemctl start keepalived && systemctl enable keepalived
#The two load schedulers enable the keepalived service

ip addr show dev ens33
#View virtual network card vip
Windows 10 test access
- In the browser of the client, the Web page content can be accessed normally through the VIP address of LVS + kept cluster
- When either the master or slave scheduler fails, the Web site can still be accessed (you may need to refresh or reopen the browser)
- As long as two or more real servers are available, the load balance of traffic can be realized