This article is also published in my WeChat official account. It can scan the two-dimensional code at the bottom of the article or search for Guo Lin in WeChat.
Today, I don't want to talk about some new features and features of Android. I especially want to talk about this old topic: layoutinflator.
Now most of my articles are old Android. I believe that it is common for everyone to use layoutinflator.
But even so, I still think this knowledge point can be analyzed. After reading it, maybe you will have some new understanding of layoutinflator.
First, summarize what layoutinflator is used for.
As we all know, when developing Android applications, the layout is basically written through xml files. Of course, you can also write the layout by hand in the code, but everyone who has written it knows that writing the layout will be very troublesome.
So how is the layout file written in xml converted into a View object in Android and displayed in the application? This is the function of layoutinflator.
Simply put, the job of layoutinflator is to convert the layout written in xml file into View object in Android, and this is also the only way for Android to convert xml layout into View.
Some friends may say, no, I haven't used layoutinflator much at ordinary times. Isn't it OK to call the setContentView() method in the Activity to convert xml layout into View?
This is because the Android SDK has made some good packaging for us on the upper layer, making the development work easier. If you open the source code of setContentView() method to find out, you will find that its underlying layer also uses layoutinflator:
@Override
public void setContentView(int resId) {
    ensureSubDecor();
    ViewGroup contentParent = mSubDecor.findViewById(android.R.id.content);
    contentParent.removeAllViews();
    LayoutInflater.from(mContext).inflate(resId, contentParent);
    mAppCompatWindowCallback.getWrapped().onContentChanged();
}
So how does layoutinflator convert an xml layout into a View object?
Of course, this is a very complex process, but if you briefly summarize it, the most important thing is two steps:
- Parse the contents of the xml file through the parser.
- Use reflection to create the parsed element as a View object.
Here I don't want to take you step by step to pursue the source code in the article, so the article may look tired and boring, so I only post some code that I think is more critical.
Code snippet for parsing xml file content:
public View inflate(@LayoutRes int resource,
                    @Nullable ViewGroup root,
                    boolean attachToRoot) {
    ...
    XmlResourceParser parser = res.getLayout(resource);
    try {
        return inflate(parser, root, attachToRoot);
    } finally {
        parser.close();
    }
}
You can see that an XmlResourceParser object is obtained here to parse the xml file. Since the specific parsing rules are too complex, we won't follow them.
Code snippet for creating a View object using reflection:
public final View createView(@NonNull Context viewContext, @NonNull String name,
            @Nullable String prefix, @Nullable AttributeSet attrs)
            throws ClassNotFoundException, InflateException {
    ...
    if (constructor == null) {
        // Class not found in the cache, see if it's real, and try to add it
        clazz = Class.forName(prefix != null ? (prefix + name) : name, false,
                mContext.getClassLoader()).asSubclass(View.class);
        constructor = clazz.getConstructor(mConstructorSignature);
        constructor.setAccessible(true);
        sConstructorMap.put(name, constructor);
    }
    ...
    try {
        final View view = constructor.newInstance(args);
        if (view instanceof ViewStub) {
            // Use the same context when inflating ViewStub later.
            final ViewStub viewStub = (ViewStub) view;
            viewStub.setLayoutInflater(cloneInContext((Context) args[0]));
        }
        return view;
    }
    ...
}
After seeing this, we have a basic understanding of the general working principle of layoutinflator.
However, as mentioned earlier, this article is not to take you to read the source code, but to have a new understanding of layoutinflator from the usage level.
Then, the most common usage of layoutinflator is as follows:
View view = LayoutInflater.from(context).inflate(resourceId, parent, false);
The meaning of this code is to first call the from() method of layouteinflator to obtain an instance of layouteinflator, and then call its inflate() method to parse and load a layout, so as to convert it into a View object and return it.
However, I think this code is extremely unfriendly to novices, even to many veterans.
Let's take a look at the parameter definition of the inflate() method:
public View inflate(int resource,
                    @Nullable ViewGroup root,
                    boolean attachToRoot) {
    ...
}
The inflate() method receives three parameters. The first parameter resource is easy to understand, that is, we need to parse the resource id of the loaded xml file. What does the second parameter root and the third parameter attachToRoot mean? Maybe even many programmers who have done Android development for many years may not be able to explain it clearly.
This code will be used when we use RecyclerView or Fragment. When I was writing the first line of code, I had to talk about the usage of RecyclerView in an early chapter, but I felt it was difficult to explain the relevant contents of layoutinflator to beginners, so I always felt that this content was not well explained. You can only memorize this part of the code by rote for the time being.
Today, I hope to make layoutinflator really clear.
We know that the layout structure of Android is a tree structure. Each layout can contain several sub layouts, and each sub layout can continue to contain sub layouts, so as to build any style View and present it to the user.
Therefore, we can roughly understand that each layout must have a parent layout.
This is also the function of the second parameter root of the inflate() method, which is to specify a parent layout for the xml layout to be parsed and loaded.
Can a layout have no parent layout? Of course, it is also possible, which is why the root parameter is marked @ Nullable.
But if we inflate a layout without a parent layout, how can we show it? Naturally, there is no way to show it, so we can only add it to an existing layout in the way of addView. Or the layout you inflate is a top-level layout, so it does not need to have a parent layout. However, these scenarios are relatively rare. Therefore, in most cases, we need to specify the parent layout when using the expand () method of layoutinflator.
In addition, if you do not specify the parent layout for the layout generated by the inflate, another problem will arise. Let's explain it through an example.
Here we define a button_layout.xml layout file. The code is as follows:
<?xml version="1.0" encoding="utf-8"?>
<Button xmlns:android="http://schemas.android.com/apk/res/android"
    android:layout_width="wrap_content"
    android:layout_height="wrap_content"
    android:text="Button" />
This layout file is very simple. There is only one button in it.
Next, we use layoutinflator to load the layout file and add it to an existing layout:
public class MainActivity extends Activity {

	@Override
	protected void onCreate(Bundle savedInstanceState) {
		super.onCreate(savedInstanceState);
		setContentView(R.layout.activity_main);
		LinearLayout mainLayout = (LinearLayout) findViewById(R.id.main_layout);
		View buttonLayout = LayoutInflater.from(this).inflate(R.layout.button_layout, null);
		mainLayout.addView(buttonLayout);
	}

}
As you can see, we didn't give button here_ Layout specifies the parent layout, but a null is passed in. When the second parameter is passed in null, the third parameter is meaningless, so you don't need to specify it.
But as mentioned earlier, a layout cannot be displayed without a parent layout, so we used the addView() method to add it to an existing layout.
The code is so simple. Now we can run the program, and the effect is shown in the figure below:
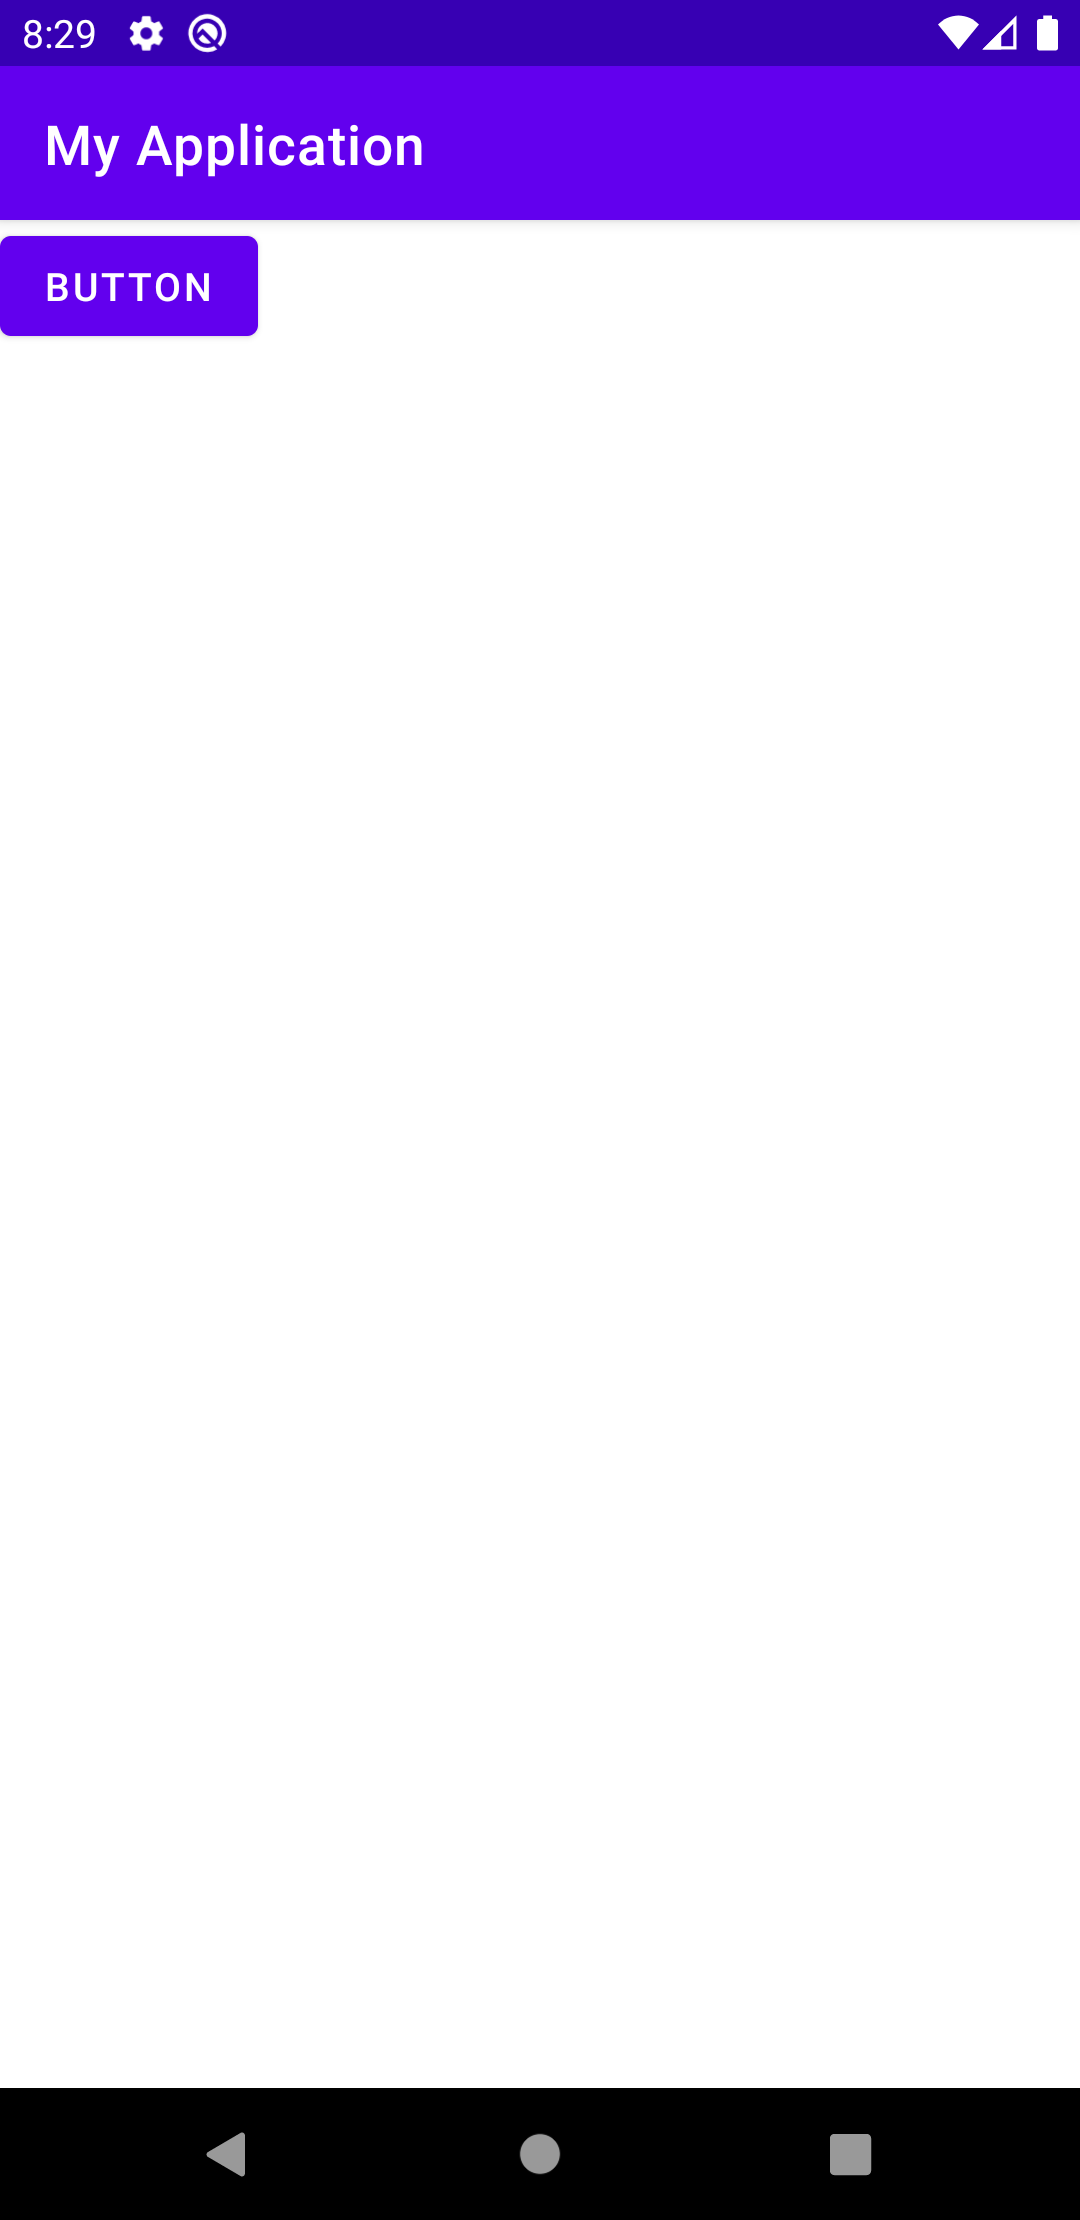
It seems that there is no problem. The button can be displayed normally. It means button_ layout. The XML layout was successfully loaded and added to the existing layout.
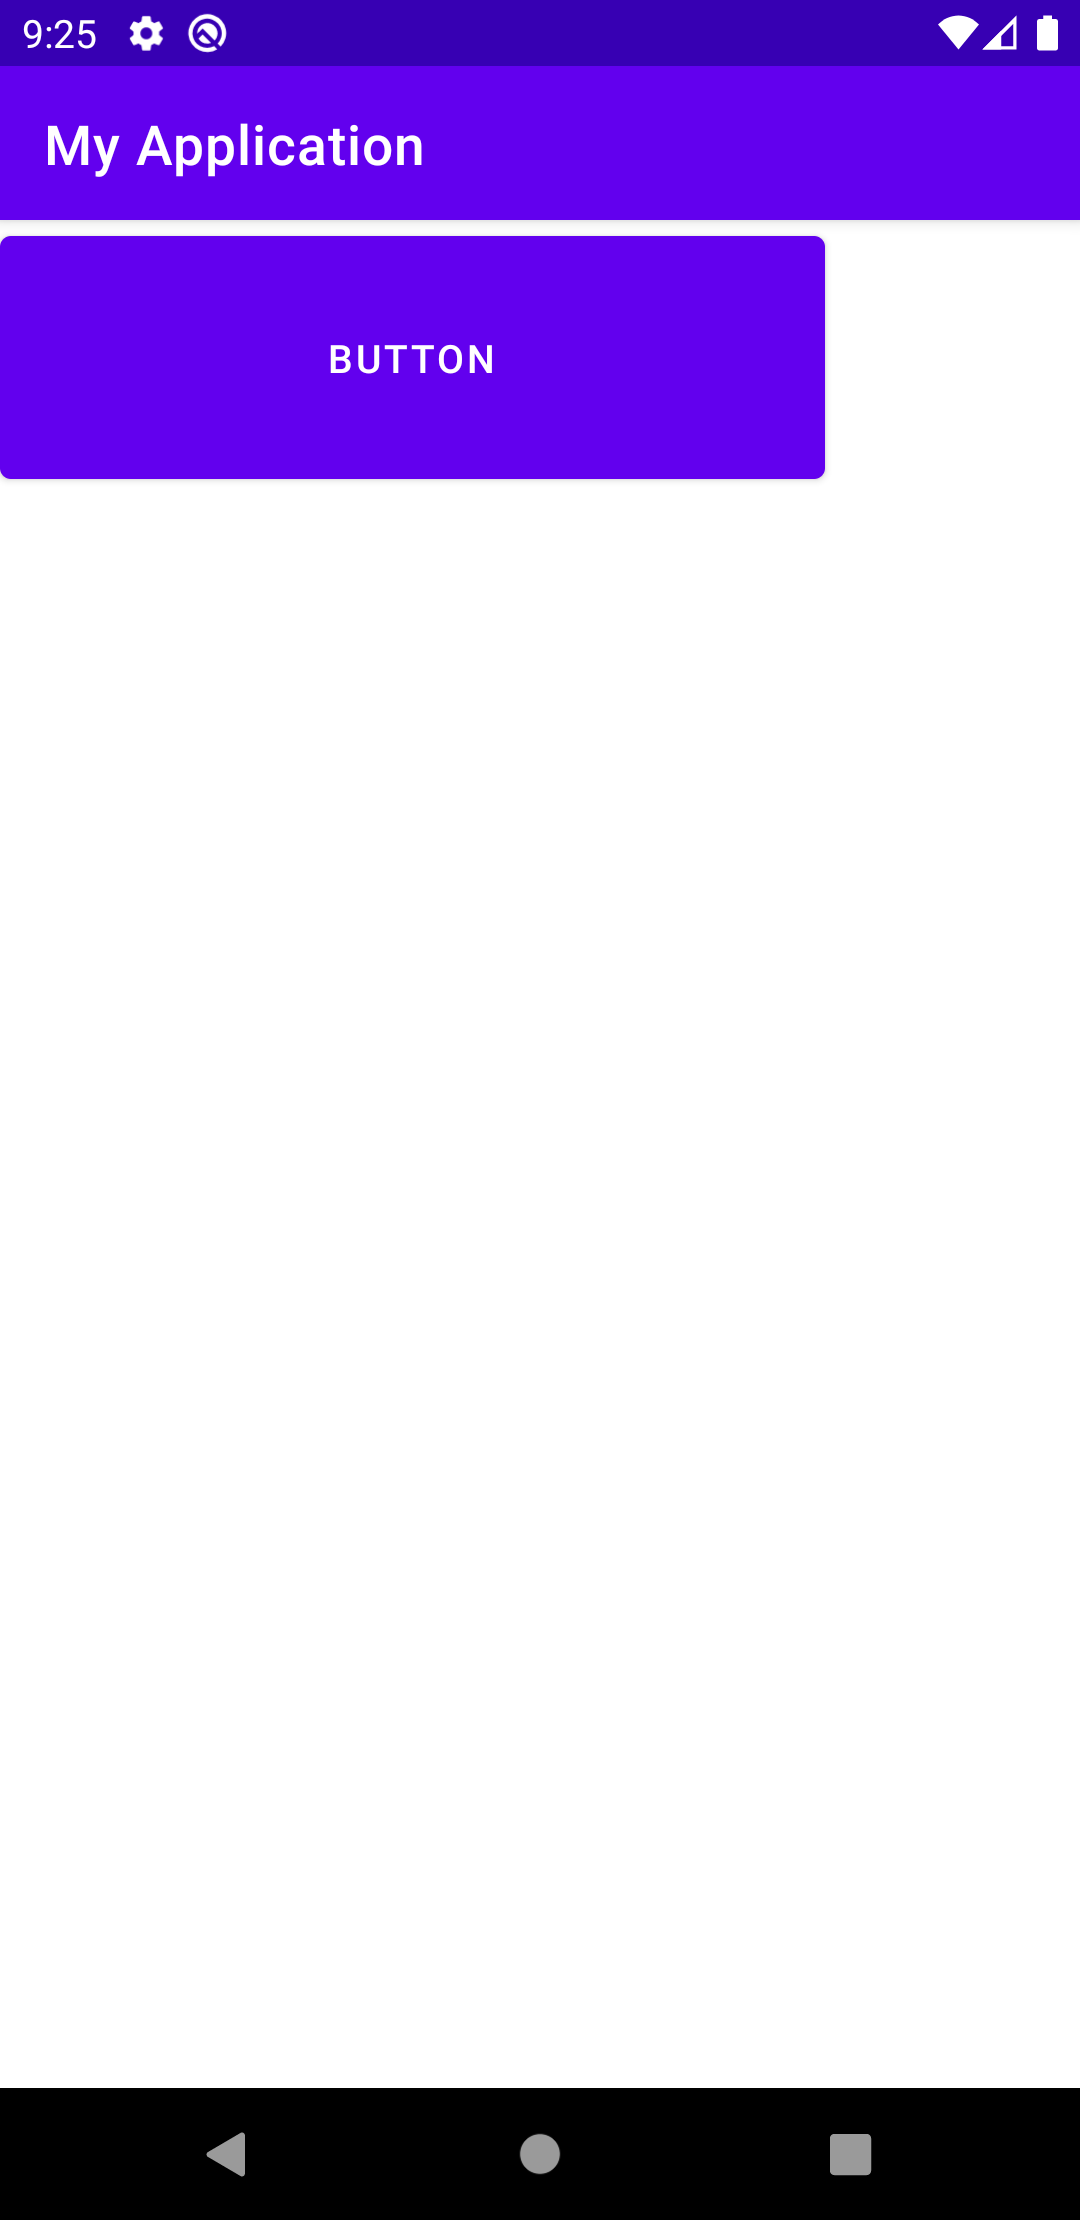
But if you try to adjust the size of the button, you will find that the size of the button will not change no matter how you adjust it:
<?xml version="1.0" encoding="utf-8"?>
<Button xmlns:android="http://schemas.android.com/apk/res/android"
    android:layout_width="300dp"
    android:layout_height="100dp"
    android:text="Button" />
Here, we specify the width and height of the button as 300dp and the height as 100dp. There is no change in the program interface after rerunning.
Why did this happen?
In fact, no matter where you put the layout of the Button_ Width and layout_ How much the value of height is changed will not have any effect, because these two values have completely lost their function. We often use layout_width and layout_height to set the size of the View, and it works normally all the time, as if these two properties are really used to set the size of the View.
In fact, they are used to set the size of the View in the layout, that is, the View must exist in a layout first. This is why these two properties are called layout_width and layout_height, not width and height.
And because we are using layoutinflator to load buttons_ layout. XML does not specify a parent layout for this layout, so here is layout_width and layout_ The height attribute loses its function. To be more precise, all are based on layout_ All properties at the beginning will lose their function.
Now we modify the code as follows:
public class MainActivity extends Activity {

	@Override
	protected void onCreate(Bundle savedInstanceState) {
		super.onCreate(savedInstanceState);
		setContentView(R.layout.activity_main);
		LinearLayout mainLayout = (LinearLayout) findViewById(R.id.main_layout);
		View buttonLayout = LayoutInflater.from(this).inflate(R.layout.button_layout, mainLayout, false);
		mainLayout.addView(buttonLayout);
	}

}
As you can see, the second parameter of the inflate() method is specified as mainLayout. In other words, we are button_layout.xml this layout specifies a parent layout. In that case, layout_width and layout_ The height attribute can take effect.
Re run the program, and the effect is shown in the following figure:
So far, we have explained the role of the second parameter root of the inflate() method very clearly. Then another question is, what does the third parameter attachToRoot mean?
Note that in the above code, we specify the second parameter as mainLayout and the third parameter as false. If you try to specify the third parameter as true and rerun the code, the program will crash directly. The crash information is as follows:
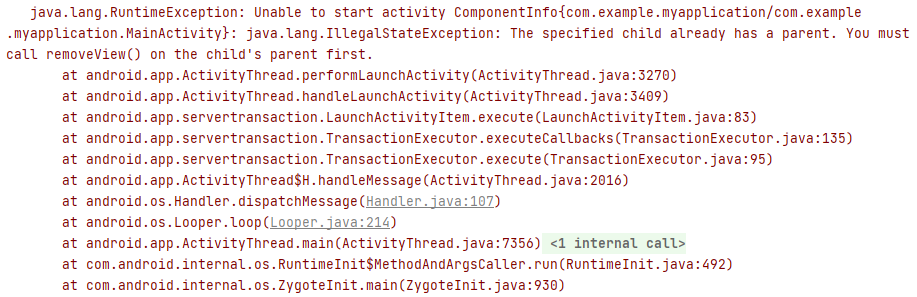
The crash message means that we are adding a child View, but the child View already has a parent layout. The parent layout needs to call removeView() to remove the child View before adding it.
Why does this error occur after modifying the third parameter? Let's analyze it now.
First, focus on the name of the third parameter, attachToRoot. Literally, it's asking if we want to add it to root. So what is root? Looking at the definition of the inflate() method again, you will find that the second parameter is not root?
public View inflate(int resource, @Nullable ViewGroup root, boolean attachToRoot) {
    ...
}
In other words, attachToRoot means to ask whether we want to add the currently loaded xml layout to the parent layout passed in by the second parameter. If true is passed in, it means that it will be added. If false is passed in, it means that it will not be added.
So in the code just now, we first passed in false in the third parameter of the inflate() method, then the button_layout.xml layout will not be added to mainLayout. We can manually call addView() method to add it to mainLayout later.
If the third parameter is changed to true, it means button_ layout. The XML layout has been automatically added to the mainLayout. At this time, call the addView() method again and find the button_ layout. If XML has a parent layout, the above exception will be thrown naturally.
After this explanation, do you have a clear understanding of the role of each parameter in the inflate() method?
In fact, after understanding this, we can go back and look at the code written in the past. For example, everyone must have used Fragment. We usually write this when loading a layout in Fragment:
public class MyFragment extends Fragment {

    @Nullable
    @Override
    public View onCreateView(@NonNull LayoutInflater inflater,
                             @Nullable ViewGroup container,
                             @Nullable Bundle savedInstanceState) {
        return inflater.inflate(R.layout.fragment_layout, container, false);
    }
}
I wonder if you have ever thought about why the last parameter of the inflate() method must pass in false?
So now you can think about it. If you look at the relevant source code of Fragment, you will find that it will add the View returned in onCreateView() method to a Container:
void addViewToContainer() {
    // Ensure that our new Fragment is placed in the right index
    // based on its relative position to Fragments already in the
    // same container
    int index = mFragmentStore.findFragmentIndexInContainer(mFragment);
    mFragment.mContainer.addView(mFragment.mView, index);
}
This situation is very similar to our previous example, that is, the subsequent Fragment will have an addView operation. If we pass the third parameter of the inflate() method to true, we will directly add the inflated layout to the parent layout. In this way, when you addView again, you will find that it already has a parent layout, and throw the same crash information as above.
If you don't believe it, you can try it yourself.
Besides Fragment, as like as two peas, the usage of LayoutInflater in RecyclerView is based on the same reason.
I hope that after reading this article, you can have some new understanding of layoutinflator.
If you want to learn Kotlin and the latest Android knowledge, you can refer to my new book first line of code version 3, Click here for details.
Pay attention to my technical official account. Every day, there are high-quality technical articles.
Wechat can pay attention by scanning the QR code below: