catalogue
II. Common LVM management commands
Conditions for implementing disk quotas
preface
We often encounter A dilemma, that is, how to accurately evaluate and allocate the disk capacity. For example, hard disk A and hard disk B have 10G remaining capacity. At this time, I want to put in A file larger than 10G and how to use the remaining capacity without adding A new hard disk. This is the LVM we want to grasp.
1, LVM overview
LVM is a logical mechanism for disk partition management in Linux system. It is built on the hard disk partition, which can dynamically adjust the disk capacity and improve the flexibility of the disk while keeping the existing data unchanged.
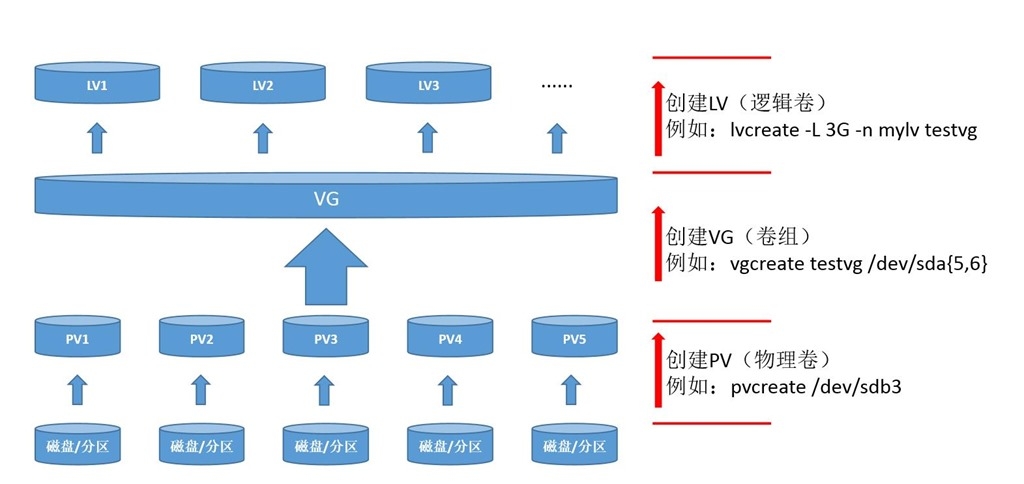
Before understanding LVM, you must know several terms
PV (physical volume)
Physical volume is the basic storage device of LVM mechanism, usually corresponding to partition or hard disk. When creating a physical volume, a reserved block will be created in the partition or hard disk head to record LVM attributes, and the storage space will be divided into basic units (PE S) with a default size of 4M to form a physical volume.
VG (volume group)
A whole composed of multiple physical volumes is called a volume group, in which physical volumes can be dynamically added or removed.
LV (logical volume)
The logical volume is built on the volume group and has no direct relationship with the physical volume. For the logical volume, each volume group is a whole. A small space is cut out in the whole, and this space is the logical volume.
The specific relationship is shown in the figure
II. Common LVM management commands
| function | Physical volume PV | Volume group VG | Logical volume LV |
| Scan scan | pvscan | vgscan | lvscan |
| Create create | pvcreate | vgcreate | lvcreate |
| Display display | pvdisaplay | vgdisplay | lvdisplay |
| Remove remove | pvremove | vgremove | lvremove |
| Extend extension | vgextend | lvextend | |
| Reduce | vgreduce | lvreduce |
3, Create LVM
Experimental environment centosc7 4 system, add two 20G disks, set the partition, and modify the partition type ID to 8e
 equipment Boot      Start         End      Blocks   Id  System
/dev/sdb1            2048    41943039    20970496   8e  Linux LVM
 equipment Boot      Start         End      Blocks   Id  System
/dev/sdc1            2048    41943039    20970496   8e  Linux LVM
We create physical volumes from these two partitions

[root@localhost ~]# pvcreate /dev/sdb1 /dev/sdc1
                              Partition to create
 After completion[root@localhost ~]# pvdisplay view
--- NEW Physical volume ---
  PV Name               /dev/sdb1
  VG Name
  PV Size               <20.00 GiB
  Allocatable           NO
  PE Size               0
  Total PE              0
  Free PE               0
  Allocated PE          0
  PV UUID               wwtSNy-24ex-Brof-5KBr-eiXE-6CcS-GBOGOx

  "/dev/sdc1" is a new physical volume of "<20.00 GiB"
  --- NEW Physical volume ---
  PV Name               /dev/sdc1
  VG Name
  PV Size               <20.00 GiB
  Allocatable           NO
  PE Size               0
  Total PE              0
  Free PE               0
  Allocated PE          0
  PV UUID               PzwPUp-WAjf-XK1i-cWdO-wB5N-GsEN-egDs5n
The next step is to merge the two partitions into a physical volume
[root@localhost ~]# vgcreate zhang /dev/sdb1 /dev/sdc1
zhang              : Represents the name of the physical volume
/dev/sdb1 /dev/sdc1: Represents the two partitions that need to be merged
 After completion[root@localhost ~]# vgdisplay view

 --- Volume group ---
  VG Name               zhang        Physical volume name
  System ID
  Format                lvm2
  Metadata Areas        2
  Metadata Sequence No  1
  VG Access             read/write
  VG Status             resizable
  MAX LV                0
  Cur LV                0
  Open LV               0
  Max PV                0
  Cur PV                2
  Act PV                2
  VG Size               39.99 GiB    Combined size
  PE Size               4.00 MiB
  Total PE              10238
  Alloc PE / Size       0 / 0
  Free  PE / Size       10238 / 39.99 GiB
  VG UUID               lUyHcT-svfx-lalM-qNO1-LTW1-undV-d3D7a3
 Our physical volume has been created
The next step is to divide the logical volume
[root@localhost ~]# lvcreate -L 30G -n shiyan zhang
-L 30G     : The size of the created logical volume is 30 G
-n shiyan  : Defines the name of the logical volume
zhang      : Select which physical volume to divide the logical volume from

complete root@localhost ~]# lvdisplay view my logical volumes
LV Path                /dev/zhang/shiyan
  LV Name                shiyan                                       Logical volume name
  VG Name                zhang                                        From which physical volume
  LV UUID                gt7PBu-e5Ql-L6h6-AHfo-zMnB-1fIe-4NLhVH
  LV Write Access        read/write
  LV Creation host, time localhost.localdomain, 2021-08-15 20:04:48 +0800
  LV Status              available
  # open                 0
  LV Size                30.00 GiB                                    Logical volume capacity
  Current LE             7680
  Segments               2
  Allocation             inherit
  Read ahead sectors     auto
  - currently set to     8192
  Block device           253:2
Next, define the file system as xfs format
[root@localhost ~]# mkfs.xfs /dev/mapper/zhang-shiyan
meta-data=/dev/mapper/zhang-shiyan isize=512    agcount=4, agsize=1966080 blks
         =                       sectsz=512   attr=2, projid32bit=1
         =                       crc=1        finobt=0, sparse=0
data     =                       bsize=4096   blocks=7864320, imaxpct=25
         =                       sunit=0      swidth=0 blks
naming   =version 2              bsize=4096   ascii-ci=0 ftype=1
log      =internal log           bsize=4096   blocks=3840, version=2
         =                       sectsz=512   sunit=0 blks, lazy-count=1
realtime =none                   extsz=4096   blocks=0, rtextents=0
We know that the disks in the Linux system are mounted. We need to mount the newly created logical volume to the required directory before we can use it
[root@localhost /]# mount /dev/mapper/zhang-shiyan KGC,
Mount my logical volume to KGC Directory
 Note: This is only a temporary mount, and there is no restart. If you want to permanently mount, you can go back to my previous blog


use df -h see
/dev/mapper/zhang-shiyan   30G   33M   30G    1% /KGC
 This logical volume is ready for use
4, Extend logical volume
The steps are basically the same as above
1 First, the partition type to be extended ID Set to 8 e
2 pvcreate [New partition]                       Create a new partition as a physical volume
 Example: pvcreate /dev/sdb2
3 vgextend [The name of the volume group that needs to be extended] [New physical volume]    Extend new physical volumes to volume groups
 Example: vgextend zhang /dev/sdb2
4 lvextend -L +20G /dev/Volume group name/Logical volume name        Select the capacity and name of the extended logical volume
 Example: lvextend -L +20G /dev/zhang/shiyan
5 xfs_growfs /dev/mapper/Physical volume-Logical volume      Enter the logical volume mount directory and refresh the logical volume online
 Example: xfs_growfs /dev/mapper/zhang-shiyan
6 df -h View expanded capacity
5, Disk quota
In linux system, because it is a multi-user and multi task environment, if a few users use a lot of disk space, it will lead to the normal use of other users. Therefore, it is necessary to manage and limit the disk space of each user.
Conditions for implementing disk quotas
Install xfsprogs and quota packages
Disk quota features
Scope: for the specified file system
Restricted object: user account, group account
Limit type: disk capacity, number of files
Restriction method: soft restriction, hard restriction
Disk quota overview
1 mount the file system in a way that supports the quota function
2. Edit the quota settings of user and group accounts
3. Verify disk quota function
4 view disk quota usage
Disk quota process
1 check whether xfsprogs and quota packages are installed first
[root@localhost /]# rpm -q xfsprogs
xfsprogs-4.5.0-12.el7.x86_64
[root@localhost /]# rpm -q quota
quota-4.01-14.el7.x86_64
2 add support quota function mount
[root@localhost ~]# vim /etc/fstab for editing
/dev/mapper/zhang-shiyan      /KGC       xfs     defaults,usrquota,grpquota 0 0


/dev/mapper/zhang-shiyan    Represents mounted physical and logical volumes
 /KGC                       Represents the mounted directory
xfs                         Represents the file format
defaults,usrquota,grpquota  Parameters representing quota mount
0 0                         Representative does not verify
3. Edit the quota settings of user and group accounts
Common parameters
-x: Indicates that the expert mode is started. In the current mode, the quota system is allowed to modify management commands
-c: Indicates that the administrator command is called directly
-u: Specify user account object
-g: Specify group account object
bsoft: Set disk limit value
bhard: Set hard disk limit value
isoft: Set the soft limit for the number of disk files
ihard: Set the hard limit on the number of disk files
Type this command
 xfs_quota -x -c 'limit -u bsoft=80M bhard=100M isoft=5 ihard=8 fang' /KGC/
-x,-c,-u The meaning is in the front picture
limit       : limit
bsoft=80M   : The soft limit is 80 M call the police
bhard=100M  : The hard limit is 100 M  Cannot create more than 100 M File
isoft=5     : File node, create 5 file alarms by value
ihard=8     : The maximum number of file nodes to be created is 8
fang        : Restricted user name
/KGC/       : Mounted directory
4 verify disk quota function
chmod 777 /KGC   Set the mounted directory permissions to maximum
su -fang         Login restricted users
Enter this command
[fang@localhost KGC]$ dd if=/dev/zero of=/KGC/kcg.txt bs=10M count=12
 It's worth me to KGC Create 12 directories with a size of 10 M Fake file
dd: write in"/KGC/kcg.txt" error: Disk quota exceeded
 Recorded 11+0 Read in
 Ten were recorded+0 Writing

Due to my previous limit, the maximum number of files created is no more than 8, and the maximum number is no more than 100 M Capacity, so it cannot be created here
5 view quota usage
Enter the root user and enter xfs_quota -x -c 'report -aibh'
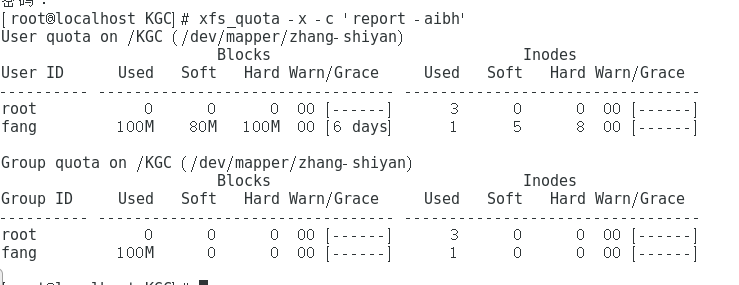
You can see the quota usage, user name, file node and quota capacity at a glance.
Other quota commands
xfs_ quota -x -c 'limit -u bsoft=80M bhard=100M fang' /KGC/
Limit disk capacity only
xfs_ quota -x -c 'limit -u isoft=5 ihard=10 fang' /KGC/
Limit disk files only
xfs_ quota -c 'quota -uv fang' /KGC/
see fang User's disk capacity limit
xfs_ quota -c 'quota -i fang' /KGC/
see fang User file limit
summary
In the production environment, we use disks more strictly. In the face of massive log files and multi-user operations every day, we need to allocate the use of disks more reasonably and restrict different users.