Reference material:
LVM Details - Junma Jinlong - Blog Garden
How to reduce the size of an LVM partition formatted with xfs filesystem on CentOS7?
Brother Junma's blog will go a little deeper, and he is based on ext filesystem to demonstrate expansion and scaling, while I use xfs filesystem.
Basic concepts
Traditional disk partitioning, after partitioning, the size of partition can not be changed, and can not dynamically increase or reduce the size of partition.
To solve this problem, the method of LVM (Logical Volume Management) was born.
LVM implementation in Linux is based on device mapper (dm) framework of Linux kernel, which is also the basis of soft RAID and LVM snapshot. The corresponding software name is also called LVM (Logical Volume Manager).
Next, I will introduce some terminology about LVM: LVM, LVM, LVM, LVM, LVM, LVM, LVM, LVM, LVM, LVM, LVM, LVM
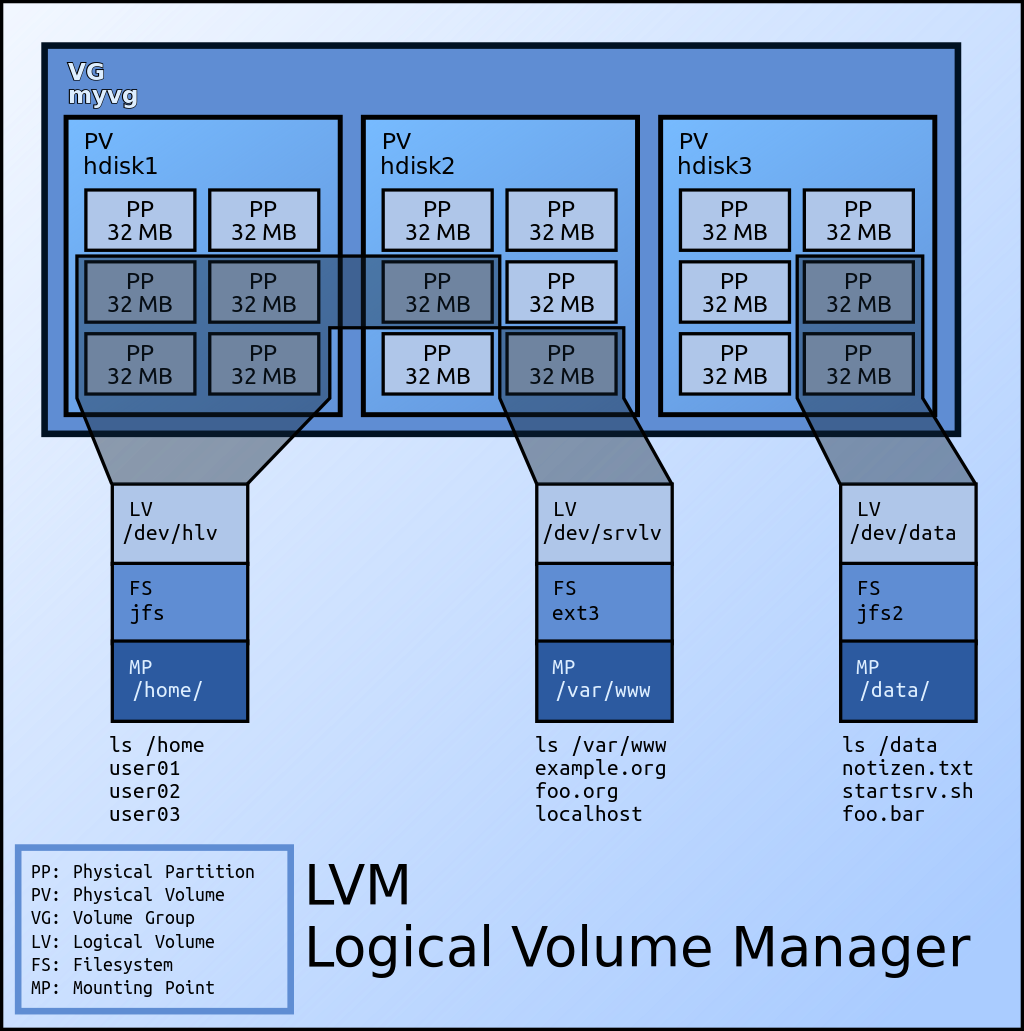
- PV: Physical Volume, Physical Volume. That is to say, the most difference between the disk partition we know and the ordinary partition is that the type of disk partition as PV must be Linux LVM partition with ID of 8e.
- VG: Volume Group, Volume Group. A combination of multiple PV s is similar to a virtual disk (self-proclaimed) composed of multiple partitions. While creating VG, the PE size in the VG is also determined.
- PE: Physical Extent, can be understood as a physical storage unit. Similar to the concept of block, chunk, or cluster in a file system. Generally speaking, the size of PE can not be changed after VG is created. The default is 4MB.
- LV: Logical Volume, Logical Volume. VG is equivalent to virtual disk, while LV is a virtual partition based on virtual disk. When creating LV, it can be based on partition size or the number of PE in VG. After LV is created, it can be formatted and used as a traditional partition.
- LE: Logical Extent, can be understood as a logical storage unit. Essentially equivalent to the concept of PE, when PV joins VG, it is divided into multiple PE. The process of dividing LV from VG is a process of dividing PE. After LV is created, PE is called LE. The mapping relationship between PE in PV and LE in LV can be viewed by "pvdisplay-m".
The path of LV
After LV is created, its block device path is / dev/dm-N (N is a number), with two character link files pointing to it.
/dev/mapper/VG_NAME-LV_NAME --> /dev/dm-N
/dev/VG_NAME/LV_NAME --> /dev/dm-N
Icon
Pictures from the Internet, infringement please contact.
Realization
Environmental Science
CentOS 7.5
The system has its own lvm2 package
Preliminary use of LVM
First, add a disk to the virtual machine, which is 7GB in size. Create three partitions of LVM type, namely 3GB, 2GB and 1GB.
Note: The size of disk is larger than the sum of partitions. The main concern is that there may be insufficient partition capacity due to conversion and other problems.
   Device Boot      Start         End      Blocks   Id  System
/dev/sdb1            2048     6293503     3145728   8e  Linux LVM
/dev/sdb2         6293504    10487807     2097152   8e  Linux LVM
/dev/sdb3        10487808    12584959     1048576   8e  Linux LVM
Create the LVM formats of / dev/sdb1 and / dev/sdb2 as PV s. / dev/sdb3 is reserved for expansion at the back.
[root@C7 ~]# pvcreate /dev/sdb{1,2}
  Physical volume "/dev/sdb1" successfully created.
  Physical volume "/dev/sdb2" successfully created.
You can view the brief information of the existing PV on the system through the pvs command.
[root@C7 ~]# pvs
  PV         VG     Fmt  Attr PSize   PFree
  /dev/sda2  centos lvm2 a--  <19.00g    0
  /dev/sdb1         lvm2 ---    3.00g 3.00g
  /dev/sdb2         lvm2 ---    2.00g 2.00g
Note that the PV / dev/sda2 was created when the CentOS 7 series system was installed by default.
The PV name is the path name of the partition, such as "/ dev / sdb1".
[root@C7 ~]# pvdisplay /dev/sdb{1,2}
  "/dev/sdb2" is a new physical volume of "2.00 GiB"
  --- NEW Physical volume ---
  PV Name               /dev/sdb2
  VG Name               # Since we haven't added PV to VG yet, the field is empty.
  PV Size               2.00 GiB
  Allocatable           NO # No VG is added, no allocation.
  PE Size               0 # The size of PE in PV is determined after adding VG, and the PE size of VG can not be changed after VG is created. Similarly, VG was not added, so PE was 0.
  Total PE              0
  Free PE               0
  Allocated PE          0
  PV UUID               OlFvnr-rarx-ebCa-pG3L-qJBe-V8d1-aYkXB2

  "/dev/sdb1" is a new physical volume of "3.00 GiB"
  --- NEW Physical volume ---
  PV Name               /dev/sdb1
  VG Name
  PV Size               3.00 GiB
  Allocatable           NO
  PE Size               0
  Total PE              0
  Free PE               0
  Allocated PE          0
  PV UUID               o7uiiy-kXEr-eZee-e0aP-cFKQ-dyjf-oQRvB9
After creating the PV, we can create the VG and add the two newly created PVs to the VG.
[root@C7 ~]# vgcreate myvg /dev/sdb{1,2}
  Volume group "myvg" successfully created
Check out the VG's brief and detailed information.
[root@C7 ~]# vgs myvg
  VG   #PV #LV #SN Attr   VSize VFree
  myvg   2   0   0 wz--n- 4.99g 4.99g
[root@C7 ~]# vgdisplay myvg
  --- Volume group ---
  VG Name               myvg
  System ID
  Format                lvm2
  Metadata Areas        2
  Metadata Sequence No  1
  VG Access             read/write
  VG Status             resizable
  MAX LV                0
  Cur LV                0
  Open LV               0
  Max PV                0
  Cur PV                2
  Act PV                2
  VG Size               4.99 GiB
  PE Size               4.00 MiB # The default PE size is 4MB.
  Total PE              1278 # When dividing LV, the number of PE in VG can be based on the number of PE.
  Alloc PE / Size       0 / 0
  Free  PE / Size       1278 / 4.99 GiB
  VG UUID               XKP0mV-zWAx-nscs-jXiT-jLxm-5MgE-aDU8fU
When PV joins VG, check PV information again.
[root@C7 ~]# pvs /dev/sdb{1,2}
  PV         VG   Fmt  Attr PSize  PFree
  /dev/sdb1  myvg lvm2 a--  <3.00g <3.00g # When PV joins VG, it should create some metadata in PV, so the size here is added with a less than sign.
  /dev/sdb2  myvg lvm2 a--  <2.00g <2.00g
[root@C7 ~]# pvdisplay /dev/sdb{1,2}
  --- Physical volume ---
  PV Name               /dev/sdb1
  VG Name               myvg
  PV Size               3.00 GiB / not usable 4.00 MiB
  Allocatable           yes
  PE Size               4.00 MiB # After adding VG, PV has the concept of PE.
  Total PE              767
  Free PE               767
  Allocated PE          0
  PV UUID               o7uiiy-kXEr-eZee-e0aP-cFKQ-dyjf-oQRvB9

  --- Physical volume ---
  PV Name               /dev/sdb2
  VG Name               myvg
  PV Size               2.00 GiB / not usable 4.00 MiB
  Allocatable           yes
  PE Size               4.00 MiB
  Total PE              511
  Free PE               511
  Allocated PE          0
  PV UUID               OlFvnr-rarx-ebCa-pG3L-qJBe-V8d1-aYkXB2
Create all the space of the current VG as an LV.
[root@C7 ~]# lvcreate -L 5GB -n mylv myvg
  Volume group "myvg" has insufficient free space (1278 extents): 1280 required.
Creating LV based on size failed because the capacity required to create 5GB required 1280 PE (default 4MB), which was calculated in 1024 feed rate.
But the 5GB we created when we created the partition might be based on the 1000-bit rate. It's like hard drives or U drives sold on the market, almost all expressed in terms of 1000-bit rate.
In the use of Linux tools, when you use 5GB, 5gb, 5G and 5g, they may indicate 1000-bit rate, or 1024-bit rate, which requires the user to check the man manual for each tool.
And partitioning/file systems generally reserve some space for metadata storage. Therefore, in general, the capacity is almost enough, and there is no need to be too entangled.
PS: It's also said "1024" on the Internet, but I think "1024" may be more accurate.
Since it is impossible to create a LV based on size, we create it based on the number of PE in VG, and use all PE to create an LV.
[root@C7 ~]# lvcreate -l 1278 -n mylv myvg
  Logical volume "mylv" created.
View LV information. Note: When viewing LV information, the command parameters of lvs and lvdisplay should be the path of LV (/ dev/mapper/myvg-mylv or / dev/myvg/mylv) or the name of VG, not the name of LV.
[root@C7 ~]# lvs myvg
  LV   VG   Attr       LSize Pool Origin Data%  Meta%  Move Log Cpy%Sync Convert
  mylv myvg -wi-a----- 4.99g
[root@C7 ~]# lvdisplay myvg
  --- Logical volume ---
  LV Path                /dev/myvg/mylv
  LV Name                mylv
  VG Name                myvg
  LV UUID                43nlG8-EGra-1jfQ-2K2n-3kxA-s5SW-aR1R3I
  LV Write Access        read/write
  LV Creation host, time C7, 2019-04-10 17:25:26 +0800
  LV Status              available
  # open                 0
  LV Size                4.99 GiB
  Current LE             1278 # PE, originally in VG, changed its name to LE after it was assigned to LV.
  Segments               2
  Allocation             inherit
  Read ahead sectors     auto
  - currently set to     8192
  Block device           253:2
After LV is created, the mapping relationship between PE in PV and LE in LV is viewed through "pvdisplay-m".
[root@C7 ~]# pvdisplay -m /dev/sdb{1,2}
  --- Physical volume ---
  PV Name               /dev/sdb1
  VG Name               myvg
  PV Size               3.00 GiB / not usable 4.00 MiB
  Allocatable           yes (but full)
  PE Size               4.00 MiB
  Total PE              767
  Free PE               0
  Allocated PE          767
  PV UUID               o7uiiy-kXEr-eZee-e0aP-cFKQ-dyjf-oQRvB9

  --- Physical Segments ---
  Physical extent 0 to 766:
    Logical volume    /dev/myvg/mylv
    Logical extents    0 to 766

  --- Physical volume ---
  PV Name               /dev/sdb2
  VG Name               myvg
  PV Size               2.00 GiB / not usable 4.00 MiB
  Allocatable           yes (but full)
  PE Size               4.00 MiB
  Total PE              511
  Free PE               0
  Allocated PE          511
  PV UUID               OlFvnr-rarx-ebCa-pG3L-qJBe-V8d1-aYkXB2

  --- Physical Segments ---
  Physical extent 0 to 510:
    Logical volume    /dev/myvg/mylv
    Logical extents    767 to 1277
LVM device path view.
[root@C7 ~]# ls -l /dev/mapper/myvg-mylv
lrwxrwxrwx 1 root root 7 Apr 10 17:25 /dev/mapper/myvg-mylv -> ../dm-2
[root@C7 ~]# ls -l /dev/myvg/mylv
lrwxrwxrwx 1 root root 7 Apr 10 17:25 /dev/myvg/mylv -> ../dm-2
[root@C7 ~]# ls -l /dev/dm-2
brw-rw---- 1 root disk 253, 2 Apr 10 17:25 /dev/dm-2
[root@C7 ~]# file /dev/dm-2
/dev/dm-2: block special
Next, you can format it, mount it and use it, add it to boot mount.
[root@C7 ~]# mkfs -t xfs /dev/myvg/mylv
...
//ellipsis
...
[root@C7 ~]# mount /dev/myvg/mylv /lvm_mount_point/
[root@C7 ~]# cat /etc/fstab
...
/dev/mapper/myvg-mylv    /lvm_mount_point    xfs    defaults    0 0
Expansion with LVM
Expansion is the most common use of LVM, and it is also to solve the problem of traditional disk partition capacity exhaustion.
The principle of expansion is to divide the idle PE in VG into LV, or increase the idle PE in VG by adding PV, and then divide it into LV.
Create the remaining partitions / dev/sdb3 as PV and add VG.
[root@C7 ~]# pvcreate /dev/sdb3
  Physical volume "/dev/sdb3" successfully created.
[root@C7 ~]# vgextend myvg /dev/sdb3
  Volume group "myvg" successfully extended
Check the number of PE added by VG.
[root@C7 ~]# vgdisplay myvg
  --- Volume group ---
  VG Name               myvg
  System ID
  Format                lvm2
  Metadata Areas        3
  Metadata Sequence No  3
  VG Access             read/write
  VG Status             resizable
  MAX LV                0
  Cur LV                1
  Open LV               1
  Max PV                0
  Cur PV                3
  Act PV                3
  VG Size               <5.99 GiB
  PE Size               4.00 MiB
  Total PE              1533
  Alloc PE / Size       1278 / 4.99 GiB
  Free  PE / Size       255 / 1020.00 MiB
  VG UUID               XKP0mV-zWAx-nscs-jXiT-jLxm-5MgE-aDU8fU
Extend all the PE additions to the previously created LV, mylv.
[root@C7 ~]# lvextend -l +255 /dev/myvg/mylv
  Size of logical volume myvg/mylv changed from 4.99 GiB (1278 extents) to <5.99 GiB (1533 extents).
  Logical volume myvg/mylv successfully resized.
Check the expanded LV.
[root@C7 ~]# lvdisplay /dev/myvg/mylv
  --- Logical volume ---
  LV Path                /dev/myvg/mylv
  LV Name                mylv
  VG Name                myvg
  LV UUID                43nlG8-EGra-1jfQ-2K2n-3kxA-s5SW-aR1R3I
  LV Write Access        read/write
  LV Creation host, time C7, 2019-04-10 17:25:26 +0800
  LV Status              available
  # open                 1
  LV Size                <5.99 GiB
  Current LE             1533
  Segments               3
  Allocation             inherit
  Read ahead sectors     auto
  - currently set to     8192
  Block device           253:2
Although LV has been successfully expanded, the file system has not been expanded, even if it is re-mounted.
[root@C7 ~]# df -hT | grep "mylv"
/dev/mapper/myvg-mylv   xfs       5.0G   33M  5.0G   1% /lvm_mount_point
The reason is that the filesystem has not been expanded. The ext filesystems use resize2fs command, where XFS filesystem is used, so xfs_growfs is used.
[root@C7 ~]# xfs_growfs /dev/mapper/myvg-mylv
...
//ellipsis
...
[root@C7 ~]# df -hT | grep "mylv"
/dev/mapper/myvg-mylv   xfs       6.0G   33M  6.0G   1% /lvm_mount_point
In addition to using the remaining space of the original disk, the expansion can also use the new disk.
Later, I created a 1GB virtual disk, created a LVM partition, created PV, added VG, and then extended LV, it is also possible.
[root@C7 ~]# pvcreate /dev/sdc1
[root@C7 ~]# vgextend myvg /dev/sdc1
[root@C7 ~]# lvextend -l +255 /dev/myvg/mylv
[root@C7 ~]# xfs_growfs /dev/myvg/mylv
[root@C7 ~]# df -hT
...
/dev/mapper/myvg-mylv   xfs       7.0G   33M  7.0G   1% /lvm_mount_point
...
Using LVM scaling
First look at the size of the LV before the zoom, and then compare it conveniently.
[root@C7 ~]# lvdisplay /dev/myvg/mylv
  --- Logical volume ---
  LV Path                /dev/myvg/mylv
  LV Name                mylv
  VG Name                myvg
  LV UUID                43nlG8-EGra-1jfQ-2K2n-3kxA-s5SW-aR1R3I
  LV Write Access        read/write
  LV Creation host, time C7, 2019-04-10 17:25:26 +0800
  LV Status              available
  # open                 1
  LV Size                6.98 GiB
  Current LE             1788
  Segments               4
  Allocation             inherit
  Read ahead sectors     auto
  - currently set to     8192
  Block device           253:2
Confirm the size of the required files hosted on LV. There is only one 521 byte file (less than one PE) in the experimental environment, so as long as the scaled LV has only one PE, the file is still available.
[root@C7 ~]# ls -lh /lvm_mount_point/fstab
-rw-r--r-- 1 root root 521 Apr 10 17:35 /lvm_mount_point/fstab
Assuming that the capacity we want to shrink is just / dev/sdb3 and / dev/sdc1, check the PE number of its PV.
[root@C7 ~]# pvdisplay /dev/sd{b3,c1} | grep -iE "pv name|pe"
  PV Name               /dev/sdb3
  PE Size               4.00 MiB
  Total PE              255
  Free PE               0
  Allocated PE          255
  PV Name               /dev/sdc1
  PE Size               4.00 MiB
  Total PE              255
  Free PE               0
  Allocated PE          255
The process of scaling and expanding is exactly the opposite. First, we need to do scaling operations on the file system.
If it is an ext series file system:
- Stop services provided by file systems that need to be uninstalled (such as nginx, MySQL, etc.).
- Use the umount command to uninstall the file system.
- Mandatory detection of file systems using "e2fsck-f".
- Use resize2fs command to adjust file system capacity.
- Use the lvreduce command to reduce the capacity of LV. In fact, the LV's shrinkage has been completed, if the capacity of the shrinkage is greater than or equal to a certain number of PVs, you can consider releasing PV from the VG.
- Use the pvdisplay command to see if PE in PV is completely idle. If not, use the pvmove command to remove the non-idle PE.
- Use the vgreduce command to remove the completely idle PV from the VG, and use the pvremote command to delete its PV status.
The file system used in this paper is XFS.
xfs file system does not support scaling( Disadvantages of XFS File System To achieve similar scaling functions, you can use backup (xfsdump) and restore (xfsrestore).
Back up the XFS file system. Users need to input 2 label s and fill in the test.
[root@C7 ~]# xfsdump -f /tmp/lvm_mount_point.xfsdump /lvm_mount_point
xfsdump: using file dump (drive_simple) strategy
xfsdump: version 3.1.7 (dump format 3.0) - type ^C for status and control

 ============================= dump label dialog ==============================

please enter label for this dump session (timeout in 300 sec)
 -> test
session label entered: "test"

 --------------------------------- end dialog ---------------------------------

xfsdump: level 0 dump of C7:/lvm_mount_point
xfsdump: dump date: Wed Apr 17 14:19:47 2019
xfsdump: session id: e2cfa0fa-d73d-4e94-8f55-cb3f2c581c08
xfsdump: session label: "test"
xfsdump: ino map phase 1: constructing initial dump list
xfsdump: ino map phase 2: skipping (no pruning necessary)
xfsdump: ino map phase 3: skipping (only one dump stream)
xfsdump: ino map construction complete
xfsdump: estimated dump size: 25216 bytes

 ============================= media label dialog =============================

please enter label for media in drive 0 (timeout in 300 sec)
 -> test
media label entered: "test"

 --------------------------------- end dialog ---------------------------------

xfsdump: creating dump session media file 0 (media 0, file 0)
xfsdump: dumping ino map
xfsdump: dumping directories
xfsdump: dumping non-directory files
xfsdump: ending media file
xfsdump: media file size 22384 bytes
xfsdump: dump size (non-dir files) : 1056 bytes
xfsdump: dump complete: 58 seconds elapsed
xfsdump: Dump Summary:
xfsdump:   stream 0 /tmp/lvm_mount_point.xfsdump OK (success)
xfsdump: Dump Status: SUCCESS
When backing up the XFS file system, you must maintain the mount state. If you uninstall it first and then backup it, you will report an error.
xfsdump: ERROR: /dev/{dm-2,mapper/myvg-mylv,myvg/mylv} does not identify a file system
If the backup command parameter fills in the mount point and slashes at the end of the mount point, the error will also be reported, that is, "/ lvm_mount_point/" will report an error and "/ lvm_mount_point" will not.
When the backup is complete, uninstall the file system.
[root@C7 ~]# umount /lvm_mount_point/
Shrink volume LV.
[root@C7 ~]# lvreduce -l -510 /dev/myvg/mylv
  WARNING: Reducing active logical volume to 4.99 GiB.
  THIS MAY DESTROY YOUR DATA (filesystem etc.)
Do you really want to reduce myvg/mylv? [y/n]: y
  Size of logical volume myvg/mylv changed from 6.98 GiB (1788 extents) to 4.99 GiB (1278 extents).
  Logical volume myvg/mylv successfully resized.
Caution means that shrinkage may destroy data, because the capacity after shrinkage is larger than our data capacity, so it will not affect our data. This is the advantage of LVM shrinkage. But the prerequisite is that the file system has been pre-scaled, because we use the XFS file system, can not achieve the file system scaling, so in fact, this operation should be destroyed the data, we will see later.
After zooming out, check the LV size again.
[root@C7 ~]# lvdisplay /dev/myvg/mylv
  --- Logical volume ---
  LV Path                /dev/myvg/mylv
  LV Name                mylv
  VG Name                myvg
  LV UUID                43nlG8-EGra-1jfQ-2K2n-3kxA-s5SW-aR1R3I
  LV Write Access        read/write
  LV Creation host, time C7, 2019-04-10 17:25:26 +0800
  LV Status              available
  # open                 0
  LV Size                4.99 GiB
  Current LE             1278
  Segments               2
  Allocation             inherit
  Read ahead sectors     auto
  - currently set to     8192
  Block device           253:2
Because our capacity is just 2 PV PE, and these two PVs are the last two to join VG. So the scaled PE is exactly the two PVs we want to remove, which greatly reduces the difficulty of scaling.
[root@C7 ~]# pvdisplay /dev/sd{b3,c1}
  --- Physical volume ---
  PV Name               /dev/sdb3
  VG Name               myvg
  PV Size               1.00 GiB / not usable 4.00 MiB
  Allocatable           yes
  PE Size               4.00 MiB
  Total PE              255
  Free PE               255
  Allocated PE          0
  PV UUID               yazajZ-jt1o-rqLY-L0RB-ASzf-gBxT-smDm4j

  --- Physical volume ---
  PV Name               /dev/sdc1
  VG Name               myvg
  PV Size               1023.00 MiB / not usable 3.00 MiB
  Allocatable           yes
  PE Size               4.00 MiB
  Total PE              255
  Free PE               255
  Allocated PE          0
  PV UUID               DURMQf-UVgh-Mjtz-MKqY-emaY-zWFl-QSWFKh
Note: Whether PE in PV is idle depends on whether PE is classified into LV, not whether PE stores data.
If it's not just right, users need to use the pvmove command to move non-idle PE from the PV to other PVs.
Now you can remove the two unwanted PVs from the VG and delete the PV.
[root@C7 ~]# vgreduce myvg /dev/sdb3 /dev/sdc1
  Removed "/dev/sdb3" from volume group "myvg"
  Removed "/dev/sdc1" from volume group "myvg"
[root@C7 ~]# pvremove /dev/sdb3 /dev/sdc1
  Labels on physical volume "/dev/sdb3" successfully wiped.
  Labels on physical volume "/dev/sdc1" successfully wiped.
[root@C7 ~]# pvs
  PV         VG     Fmt  Attr PSize   PFree
  /dev/sda2  centos lvm2 a--  <19.00g    0
  /dev/sdb1  myvg   lvm2 a--   <3.00g    0
  /dev/sdb2  myvg   lvm2 a--   <2.00g    0
Now that LV has been successfully condensed, it can be mounted for use.
Because we use the XFS file system, the file system can not be scaled, so when we scale LV, the metadata of the file system has been destroyed.
[root@C7 ~]# mount /dev/myvg/mylv /lvm_mount_point/
mount: /dev/mapper/myvg-mylv: can't read superblock
However, as mentioned above, we use the mechanism of backup and restore to achieve "shrinkage" in disguise.
We just need to reformat LV to XFS file system, mount and restore the backup file using file system.
[root@C7 ~]# mkfs -t xfs /dev/myvg/mylv
mkfs.xfs: /dev/myvg/mylv appears to contain an existing filesystem (xfs).
mkfs.xfs: Use the -f option to force overwrite.
[root@C7 ~]# mkfs -t xfs -f /dev/myvg/mylv
...
//ellipsis
...
[root@C7 ~]# mount /dev/myvg/mylv /lvm_mount_point/
[root@C7 ~]# xfsrestore -f /tmp/lvm_mount_point.xfsdump /lvm_mount_point/
xfsrestore: using file dump (drive_simple) strategy
xfsrestore: version 3.1.7 (dump format 3.0) - type ^C for status and control
xfsrestore: searching media for dump
xfsrestore: examining media file 0
xfsrestore: dump description:
xfsrestore: hostname: C7
xfsrestore: mount point: /lvm_mount_point
xfsrestore: volume: /dev/mapper/myvg-mylv
xfsrestore: session time: Wed Apr 17 14:19:47 2019
xfsrestore: level: 0
xfsrestore: session label: "test"
xfsrestore: media label: "test"
xfsrestore: file system id: b7c9c46e-0d54-4ee3-a3e0-e1964799f47d
xfsrestore: session id: e2cfa0fa-d73d-4e94-8f55-cb3f2c581c08
xfsrestore: media id: 57ba6b11-c688-486c-9a73-0e09a1ecd287
xfsrestore: using online session inventory
xfsrestore: searching media for directory dump
xfsrestore: reading directories
xfsrestore: 1 directories and 1 entries processed
xfsrestore: directory post-processing
xfsrestore: restoring non-directory files
xfsrestore: restore complete: 0 seconds elapsed
xfsrestore: Restore Summary:
xfsrestore:   stream 0 /tmp/lvm_mount_point.xfsdump OK (success)
xfsrestore: Restore Status: SUCCESS
[root@C7 ~]# ls -l /lvm_mount_point/
total 4
-rw-r--r-- 1 root root 521 Apr 10 17:35 fstab
[root@C7 ~]# cat /lvm_mount_point/fstab

#
# /etc/fstab
# Created by anaconda on Thu Sep 27 15:49:45 2018
#
# Accessible filesystems, by reference, are maintained under '/dev/disk'
# See man pages fstab(5), findfs(8), mount(8) and/or blkid(8) for more info
#
/dev/mapper/centos-root /                       xfs     defaults        0 0
UUID=9d2e5bb3-799f-4056-a6bd-6ff2d7f55254 /boot                   xfs     defaults        0 0
/dev/mapper/centos-swap swap                    swap    defaults        0 0
/dev/mapper/myvg-mylv    /lvm_mount_point    xfs    defaults    0 0