1, LVS
LVS (Linux Virtual Server), namely Linux virtual server, is a virtual server system, which realizes the load balancing Cluster function on unix/Linux platform. LVS is a Cluster technology, which adopts IP load balancing technology and content-based request distribution technology. The scheduler has good throughput, transfers requests evenly to different servers for execution, and automatically shields server failures, so as to form a group of servers into a high-performance and highly available virtual server. The structure of the whole server Cluster is transparent to customers, and there is no need to modify the client and server programs. Therefore, the transparency, scalability, high availability and manageability of the system need to be considered in the design.
according to different LVS working modes, the real server will choose different ways to send the data required by the user to the end user. LVS working modes are divided into NAT (Network Address Translation), Tun (tunnel) and DR(Direct Routing).
DR mode sends the request to the real server by rewriting the target MAC address of the request message, and the processing result after the response of the real server is directly returned to the client user. The scheduler LB and the real server RS are required to have a network card connected to the same physical network segment and must be in the same LAN environment. DR mode is a mode used more by the Internet.
4th floor load Balance
Scheduling algorithm: WRR/WLC, etc
Working mode: NAT/DR/TUNNEL
Transmission protocol:
2, Load balancing using DR mode
Experimental environment configuration
server1 is the scheduler responsible for traffic balancing, and server2 and server3 are real server nodes
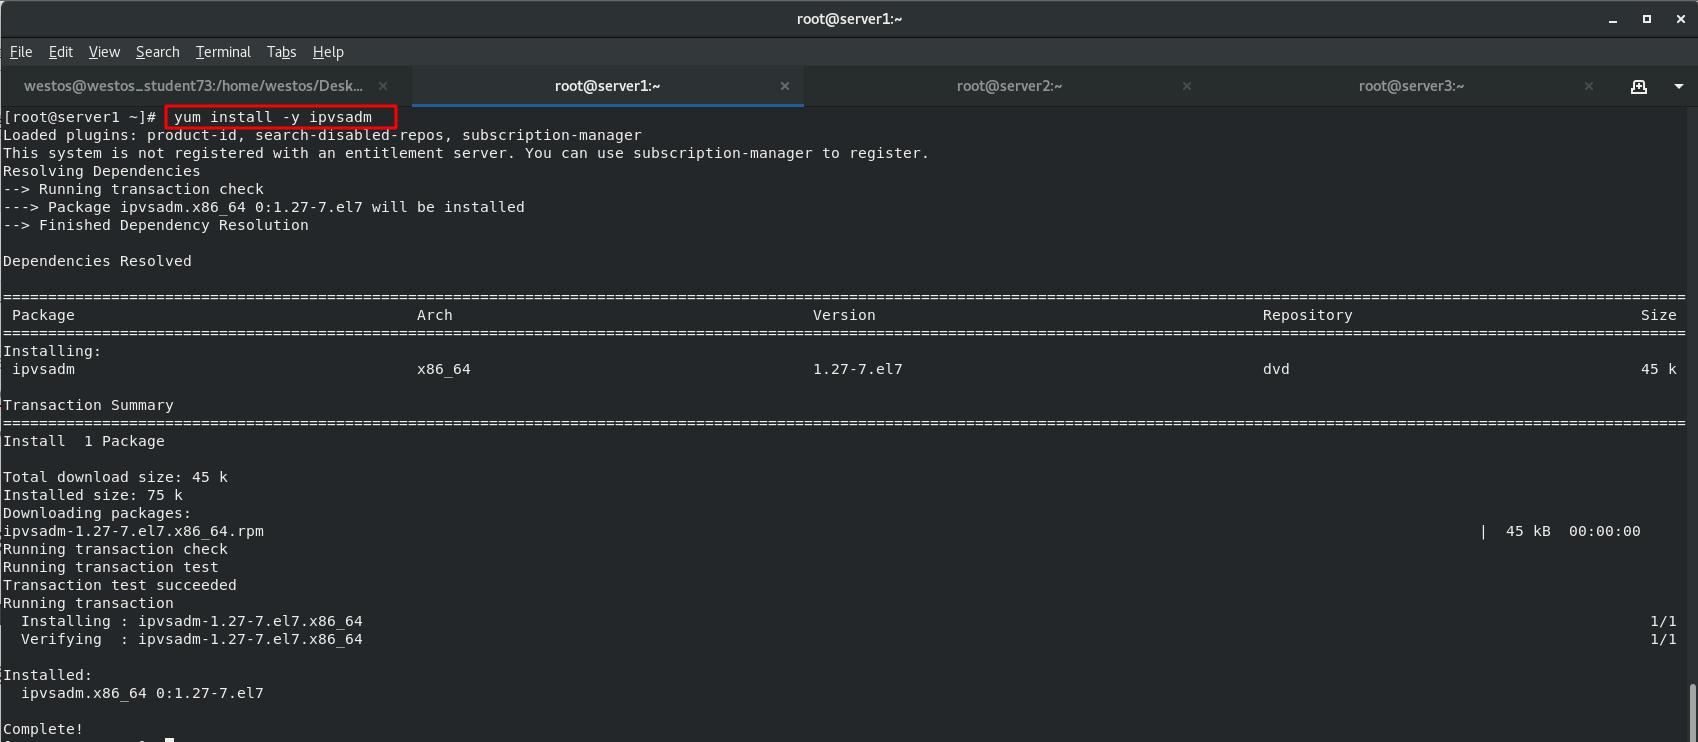
server1 install ipvsadm (policy rules for scheduler node management LVS)
[root@server1 ~]# yum install -y ipvsadm
server1 add policy
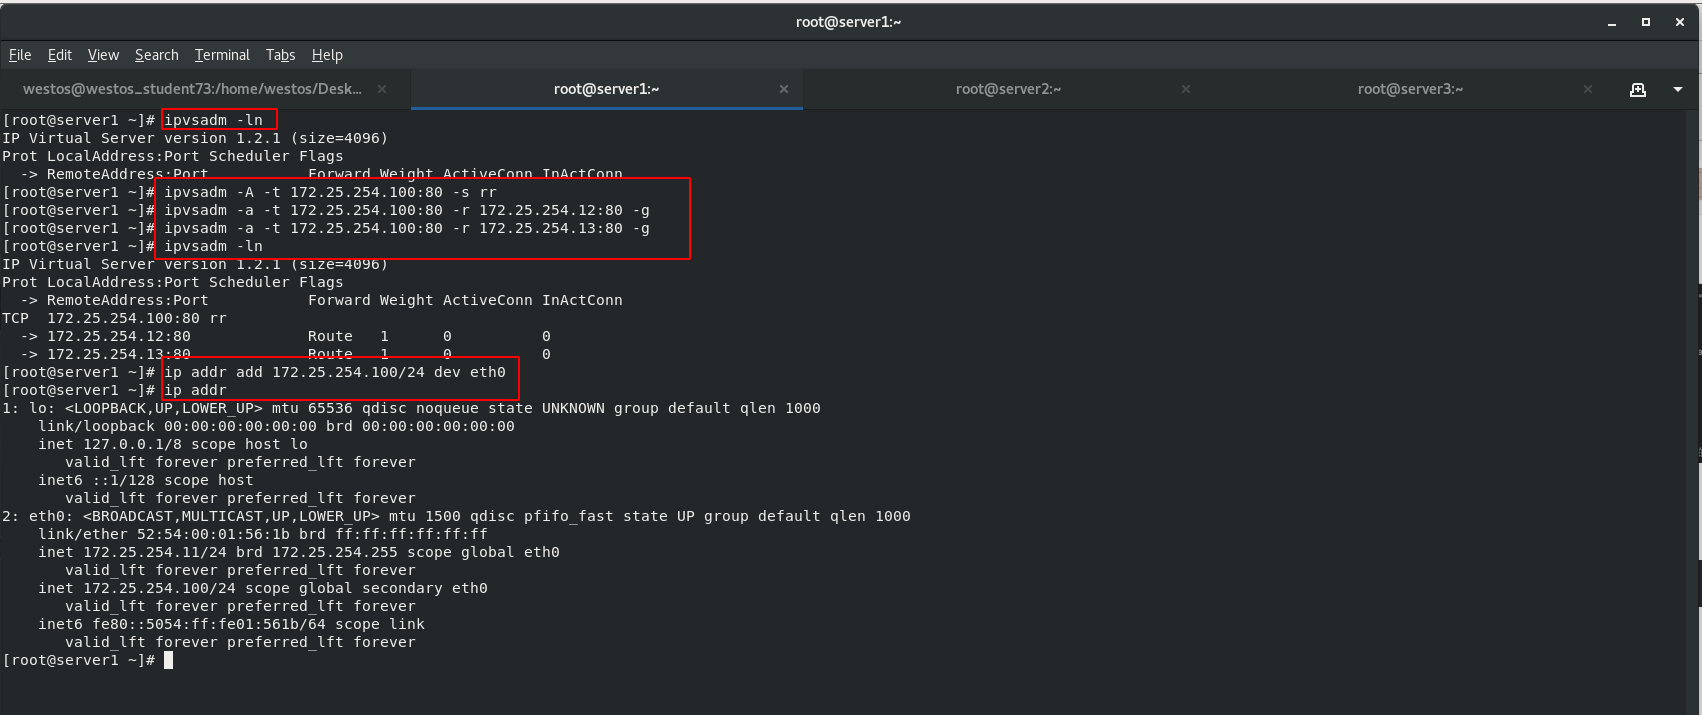
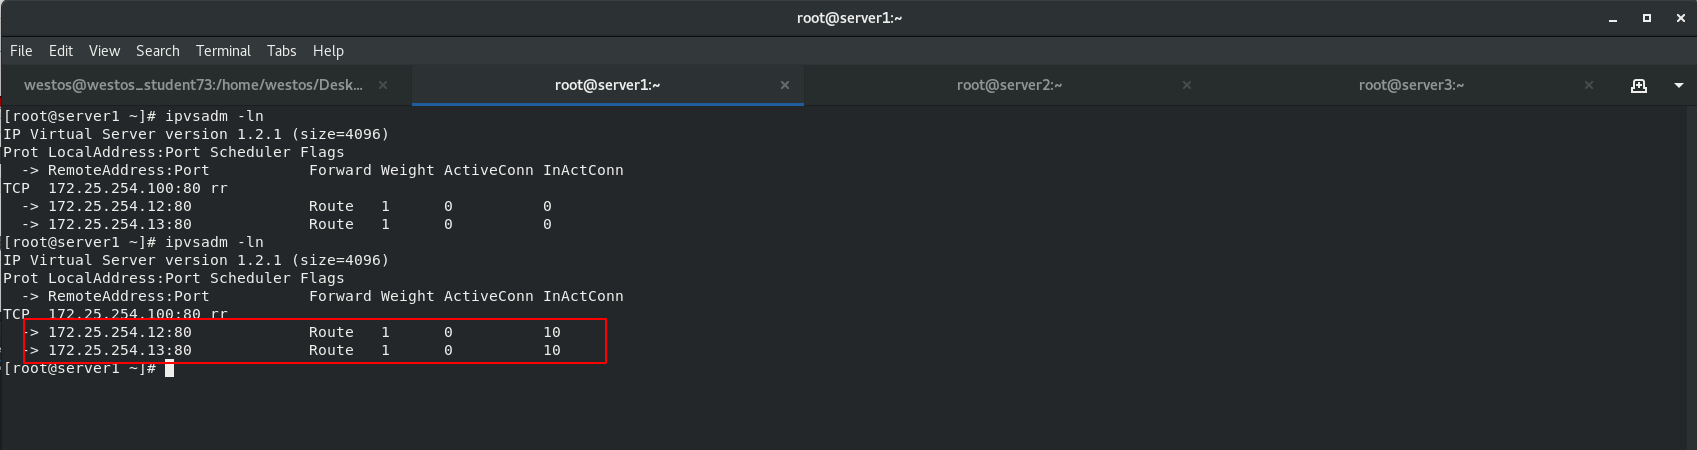
 ipvsadm -A Add services;-t tcp Service 172.25.254.100:80 appoint tcp Services;-s Select scheduling algorithm (there are ten scheduling algorithms by default);
 rr Polling scheduling( Round Robin abbreviation'RR')
 -a towards tcp Virtual service add
 -r (real server) Real backend server
 -g Direct connection, DR pattern
 ipvsadm -ln:View the policy, which is behind the firewall, that is, after the data packet comes in through the network card. (-ln No parsing,-l (will be parsed)
[root@server1 ~]# ipvsadm -ln
[root@server1 ~]# ipvsadm -A -t 172.25.254.100:80 -s rr
[root@server1 ~]# ipvsadm -a -t 172.25.254.100:80 -r 172.25.254.12:80 -g
[root@server1 ~]# ipvsadm -a -t 172.25.254.100:80 -r 172.25.254.13:80 -g

add to vip
 stay server1 Add a virtual server for external access on ip:172.25.254.100(vip),That is, providing virtual services ip Address.
[root@server1 ~]# ip addr add 172.25.254.100/24 dev eth0
[root@server1 ~]# ip addr
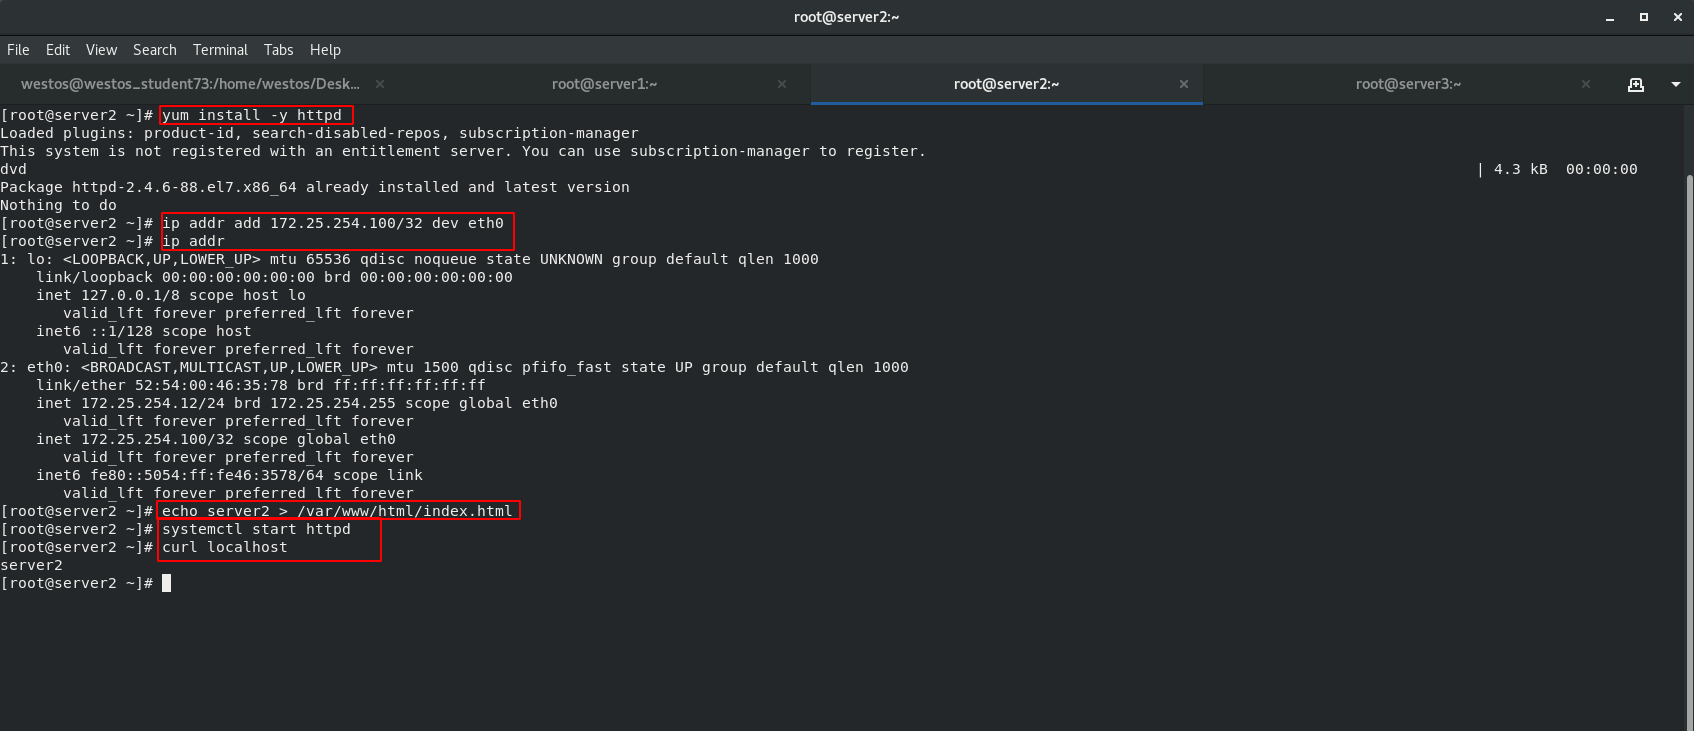
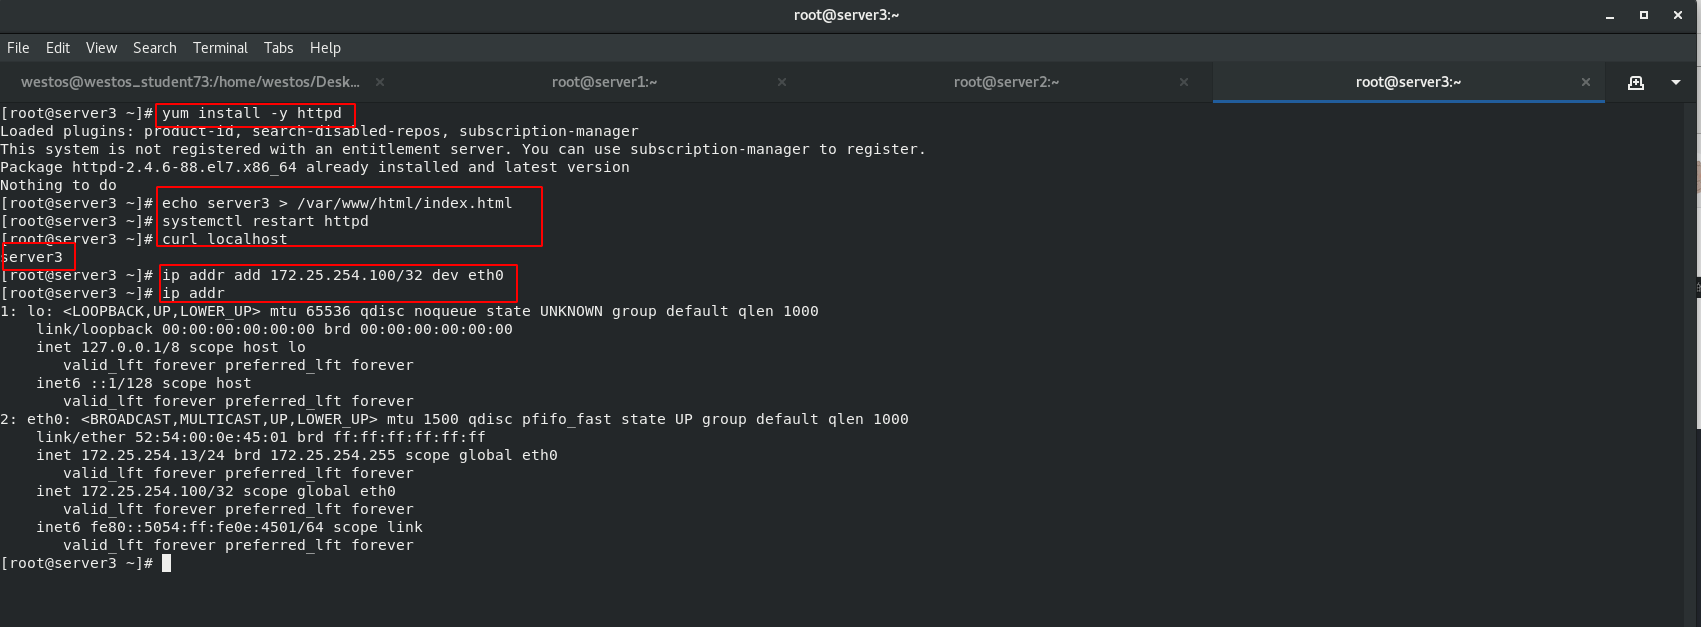
 Real server side: install http service, write default access interface, and start httpd service.
Add vip 172.25.254.100/32 to server1 and server2 respectively
server2
[root@server2 ~]# yum install -y httpd
[root@server2 ~]# echo server2 > /var/www/html/index.html
[root@server2 ~]# systemctl start httpd
[root@server2 ~]# curl localhost
[root@server2 ~]# ip addr add 172.25.254.100/32 dev eth0
[root@server2 ~]# ip addr

server3
[root@server3 ~]# yum install -y httpd
[root@server3 ~]# echo server3 > /var/www/html/index.html
[root@server3 ~]# systemctl restart httpd
[root@server3 ~]# curl localhost
[root@server3 ~]# ip addr add 172.25.254.100/32 dev eth0
[root@server3 ~]# ip addr
The working mechanism of LVS scheduler is to directly forward data packets to real server2 and real server3 through the scheduling algorithm at the layer-2 data link layer. This is why data packets can be directly forwarded to the back-end server at the layer-2 link layer in a wlan because data packets cannot be routed. Because of the tcp three-time handshake, if there is no vip on the real server, the packet will be discarded by the Linux kernel.
ARP (Address Resolution Protocol) is a TCP/IP protocol that obtains the physical address according to the IP address. That is, a protocol that maps an IP address to a MAC address, which is implemented using ARP request and ARP response messages.
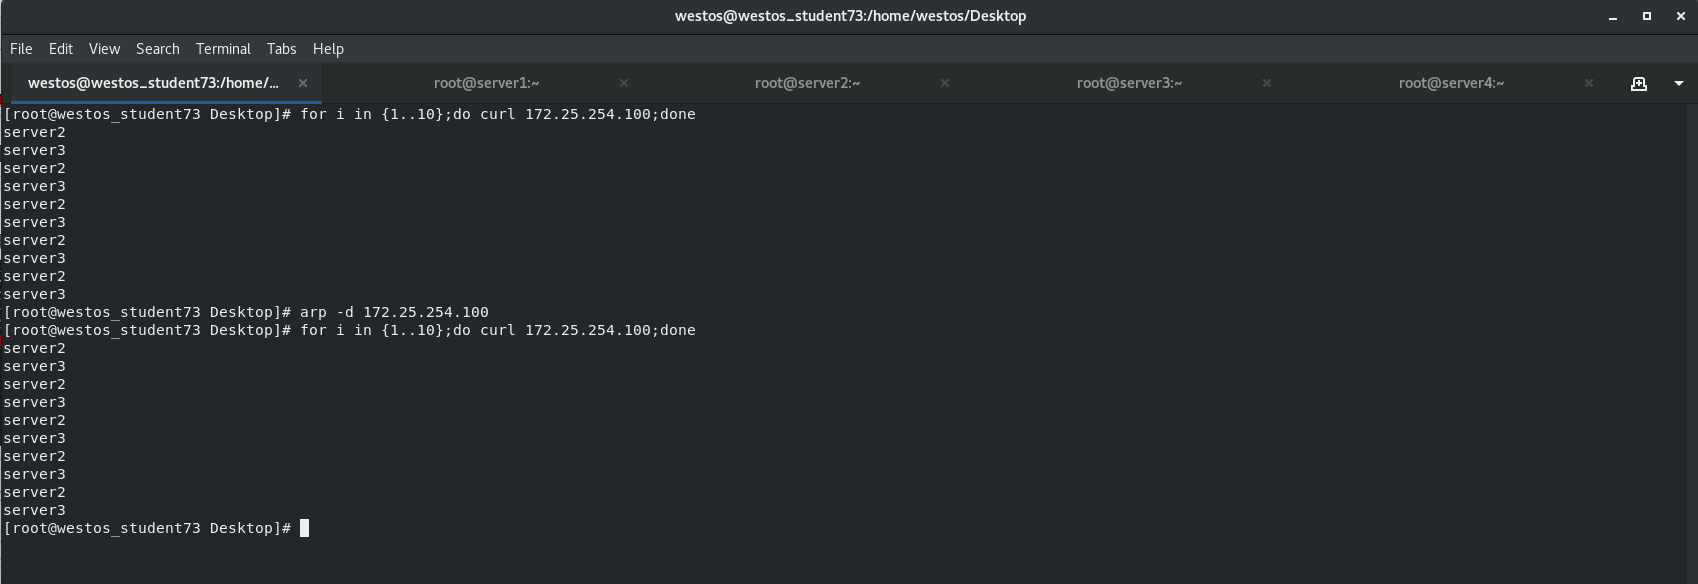
Use "arp -an" to view the MAC address corresponding to 172.25.254.100 of the local ARP cache. Execute "arp -d 172.25.254.100" to delete the ARP cache of the virtual IP. After ping ing again, you can get the Mac, but not necessarily the IP address of the scheduler. Whoever responds first will cache whose mac address first.
[root@westos_student73 Desktop]# arp -an | grep 100
[root@westos_student73 Desktop]# arp -d 172.25.254.100
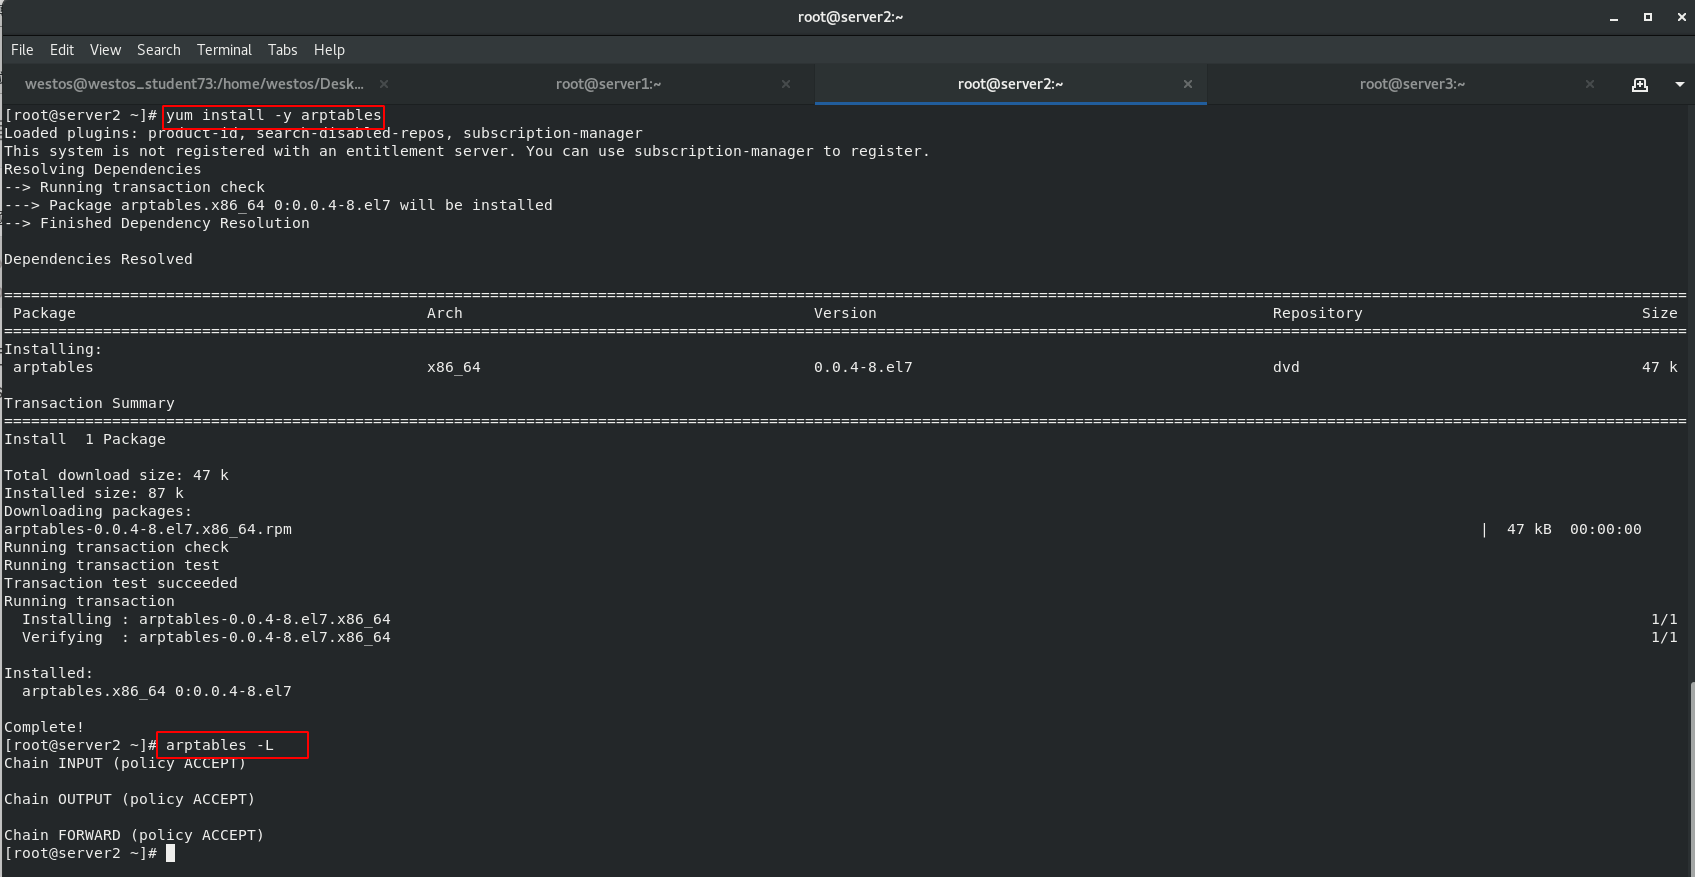
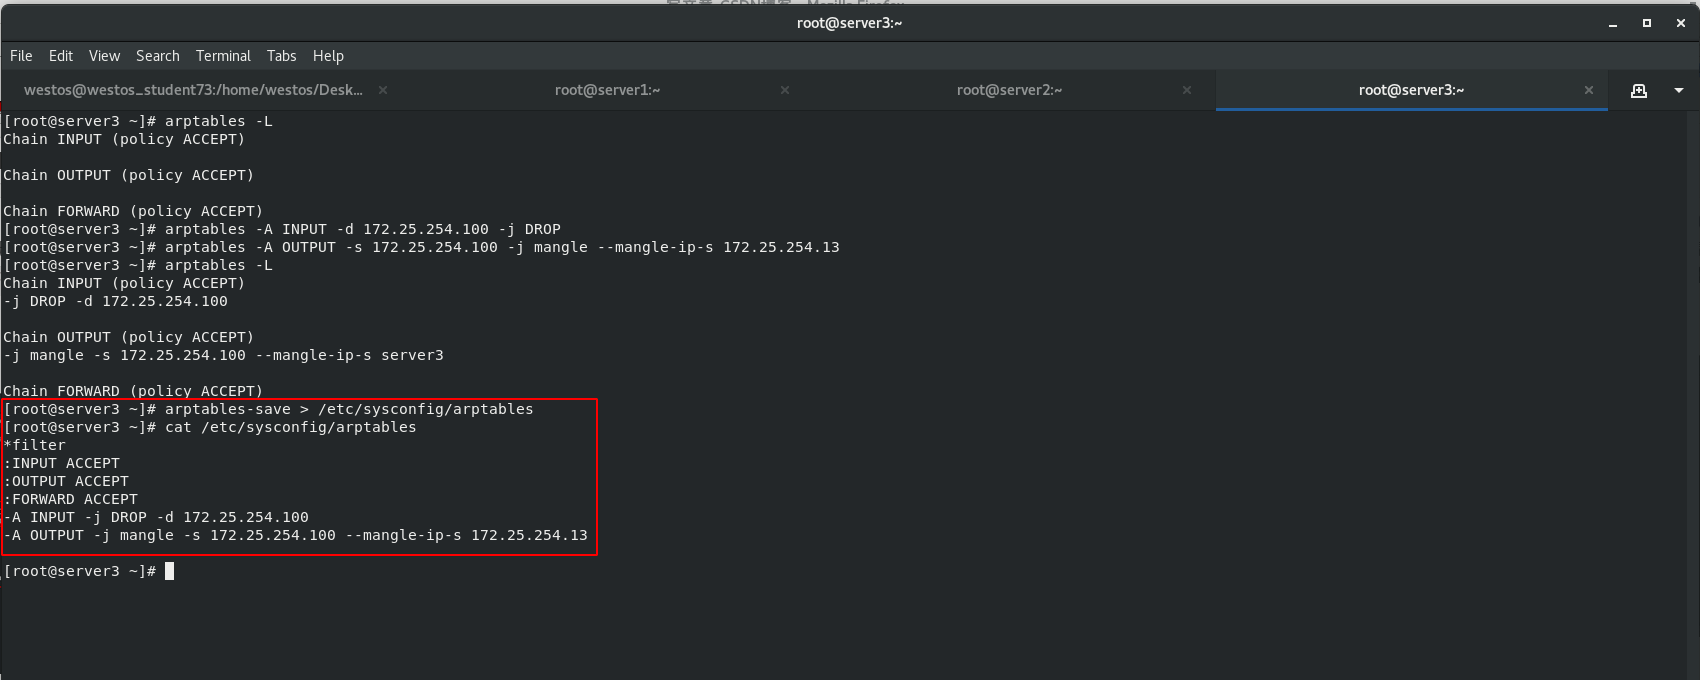
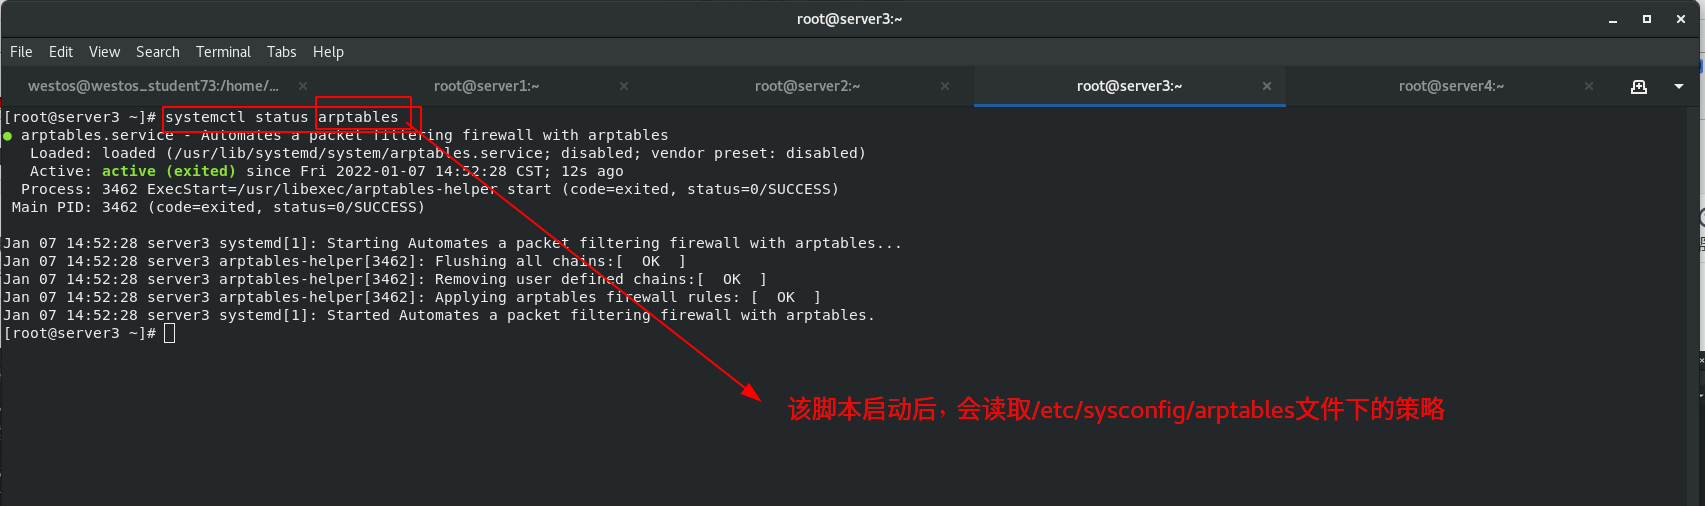
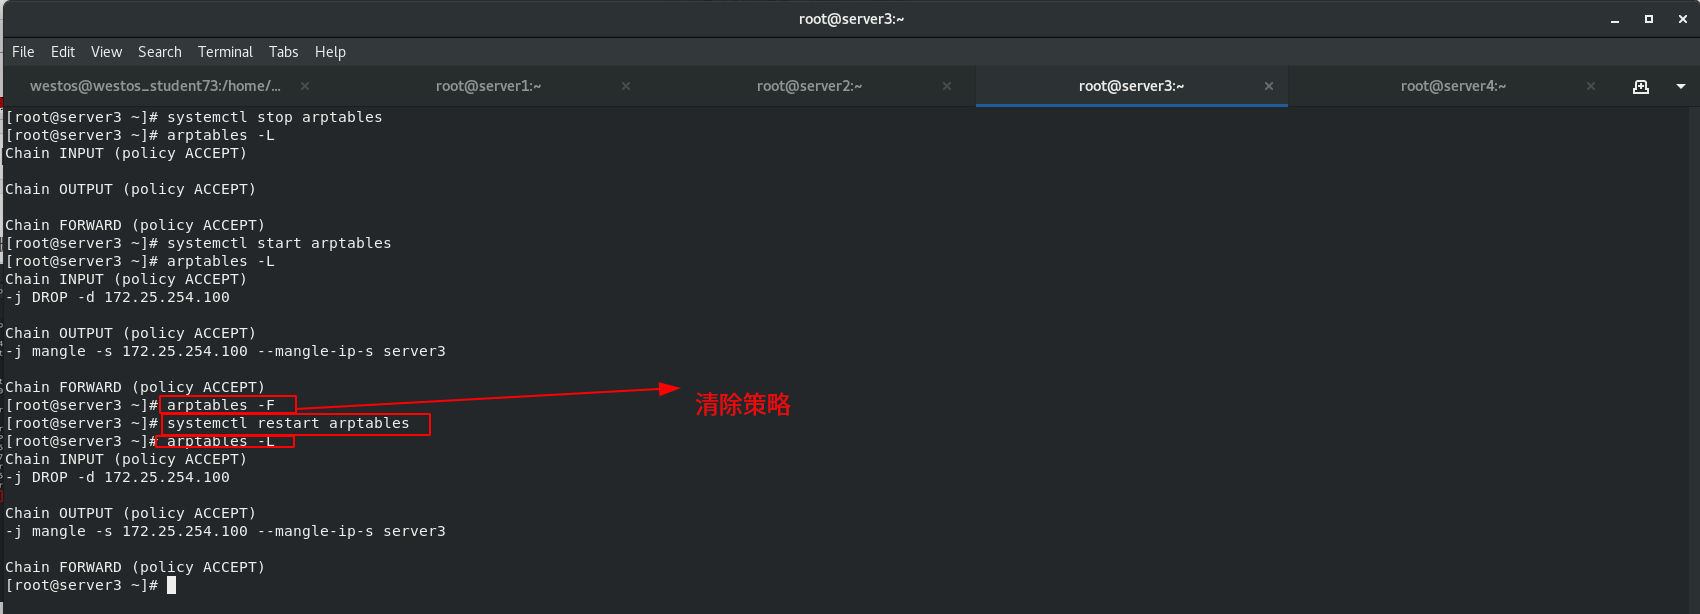
 In order to solve the problem that the MAC address of the client ARP cache is not necessarily the IP address of the scheduling server host, install ARP firewall arptables (used to manage the ARP packet filtering rule table in the kernel) for the back-end servers RS: server2 and server3
You can also modify the linux kernel parameter "sysctl -a" of the real server to shield the arp information.
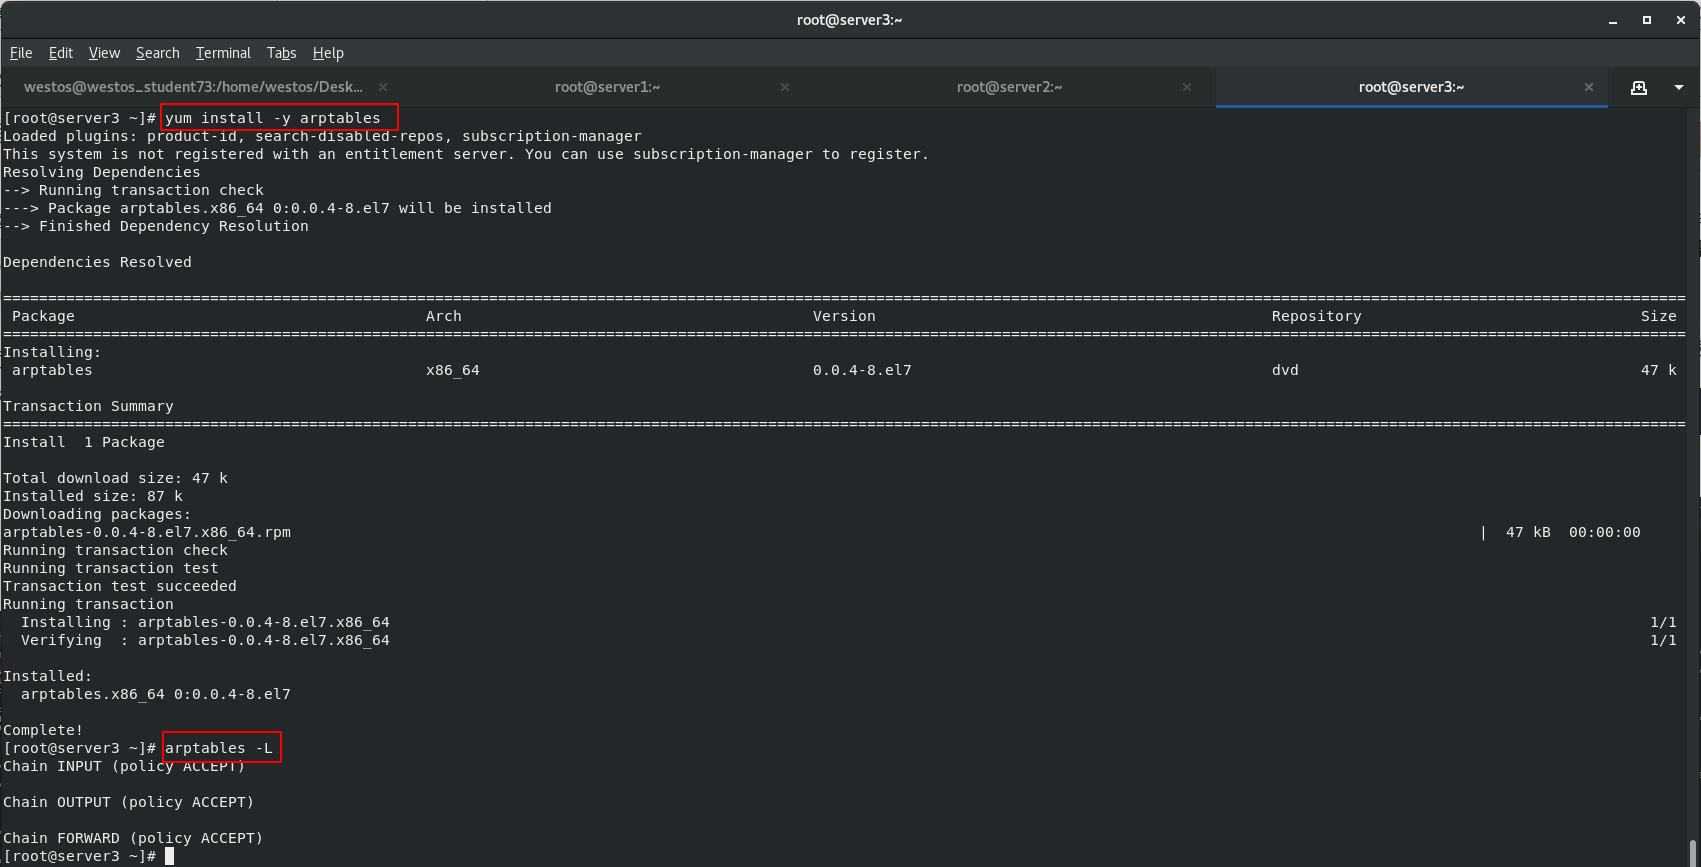
[root@server2 ~]# yum install -y arptables
[root@server2 ~]# arptables -L

[root@server3 ~]# yum install -y arptables
[root@server3 ~]# arptables -L
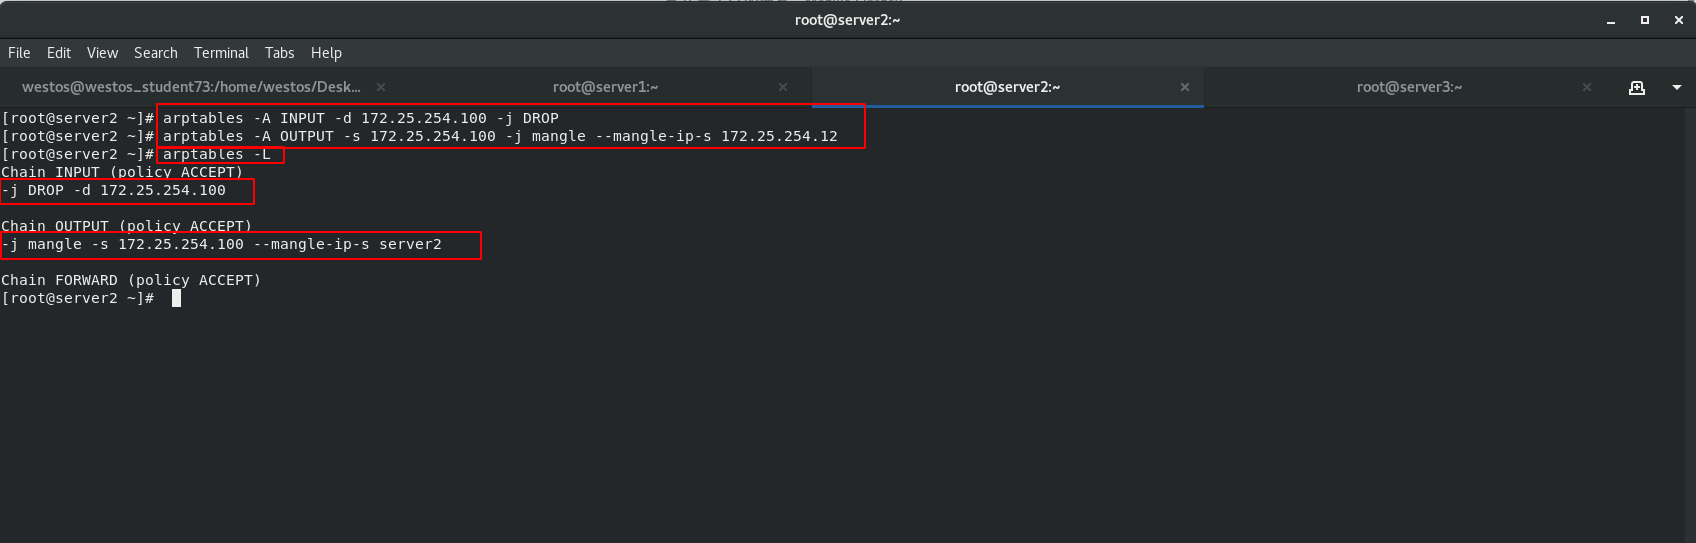
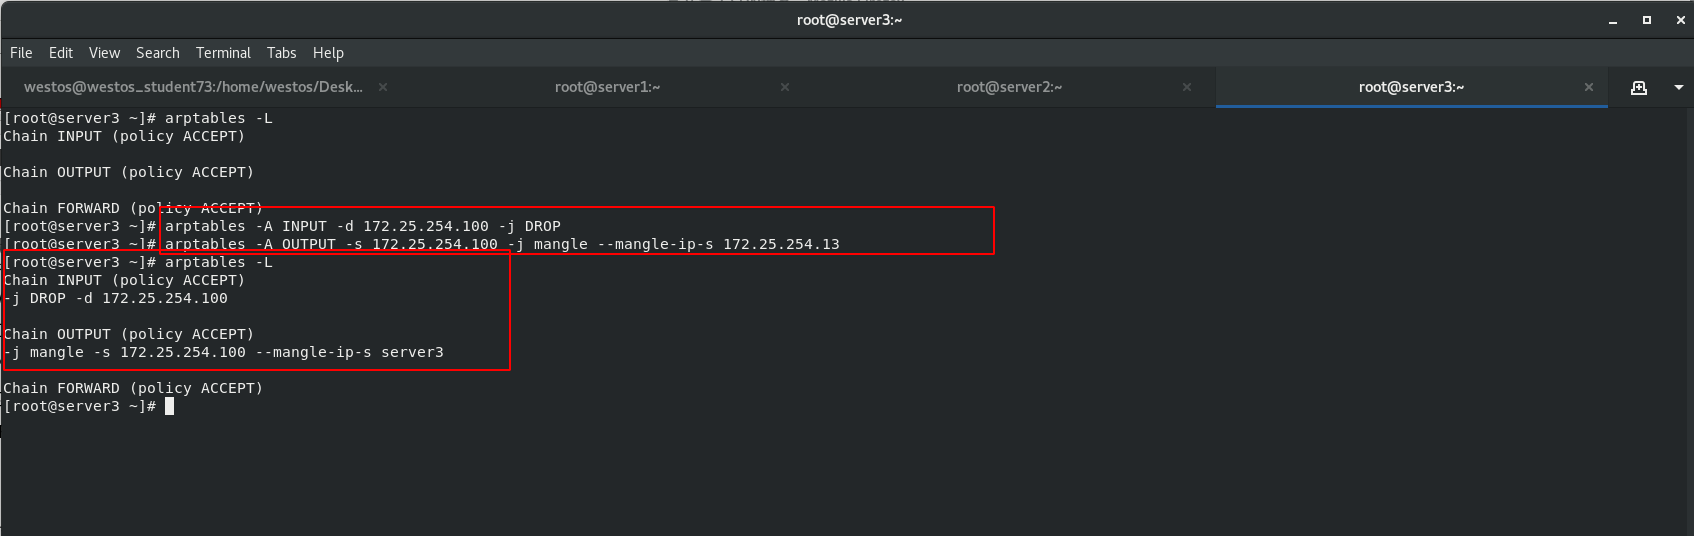
 Set ARPP configuration rules. The DR mode requires that the back-end server node should prohibit ARP responses from dropping devices.
arptables Only for arp agreement
arptable_filter There is only one table filter,Not specified-t The default table name is filter Watch.
filter A table has three chains. One is INPUT,It means it came in from outside ARP Package; The other is OUTPUT,Indicates a message sent by the machine ARP Package; The third is FORWARD,forward ARP Bag.
-A:Add rules to the rule chain;
-d:Specify to match ARP Wrapped IP Address;
-j:Specify the action to be performed when the added rule is satisfied;
-s:Out of this machine ARP The source address of the packet;
When packets are directly connected to the real server through vip, they are directly discarded.
When the source IP address of the packet sent from the local machine is 100, mangle converts the packet source address. server2 disguises the source IP as 172.25.254.12 and Server3 disguises the source IP as 172.25.254.13

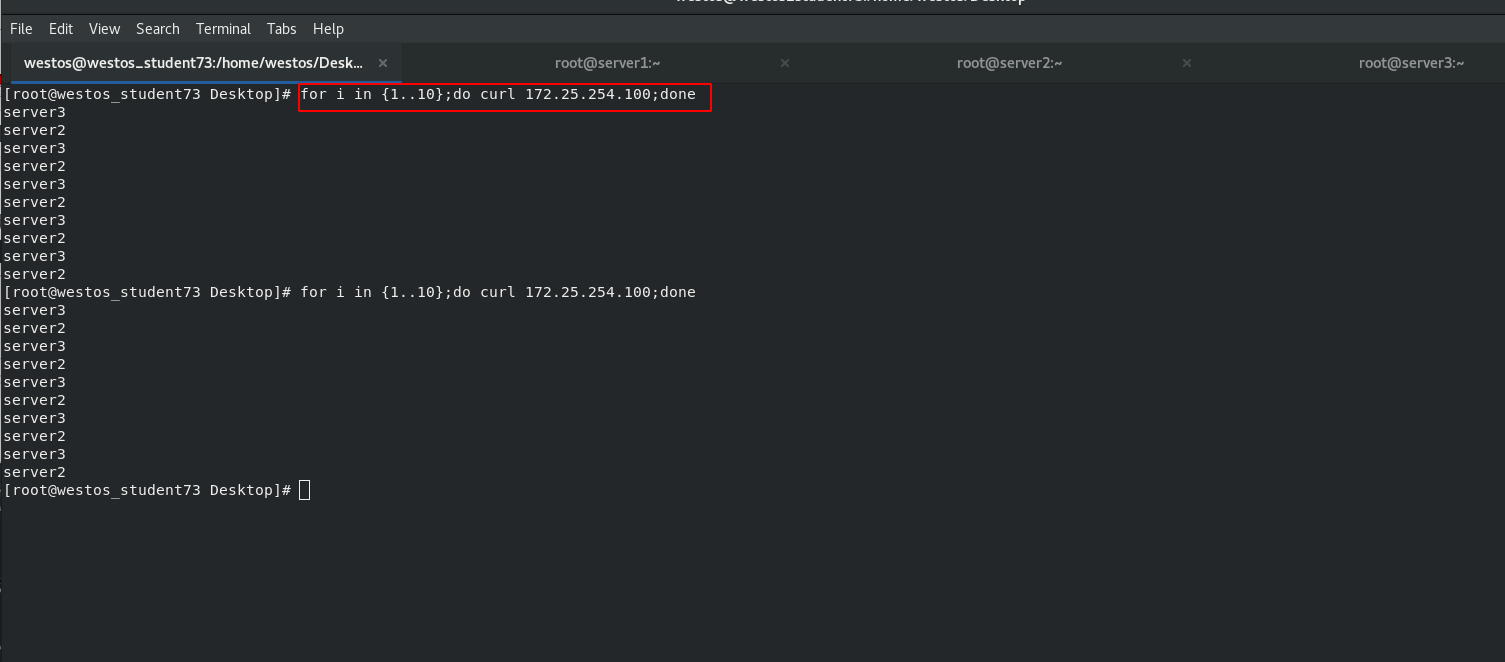
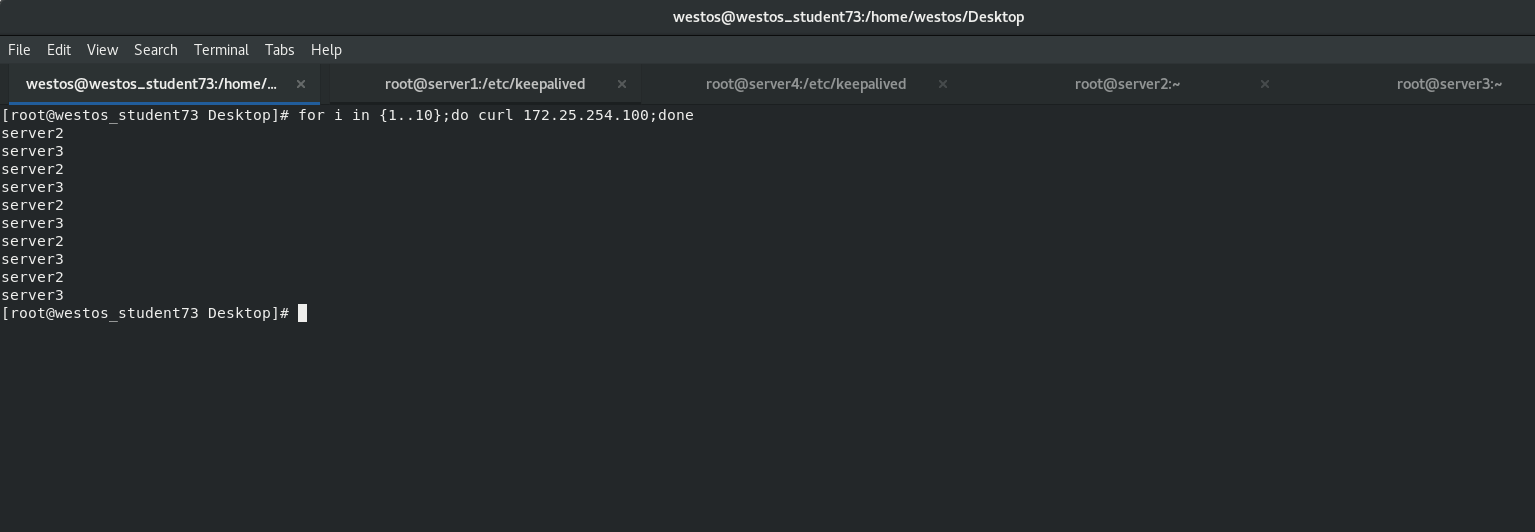
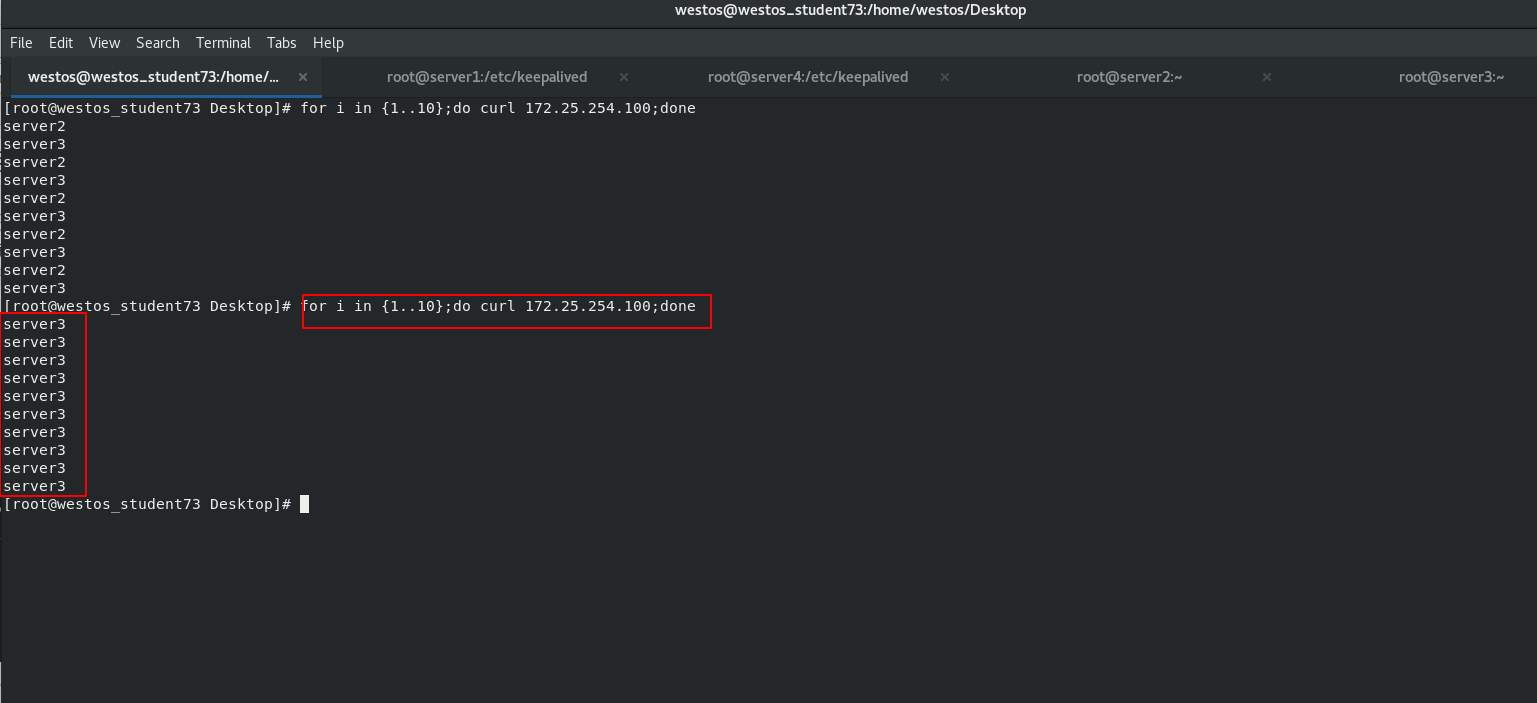
Test access on client
[root@westos_student73 Desktop]# for i in {1..10};do curl 172.25.254.100;done
3, High availability load balancing cluster
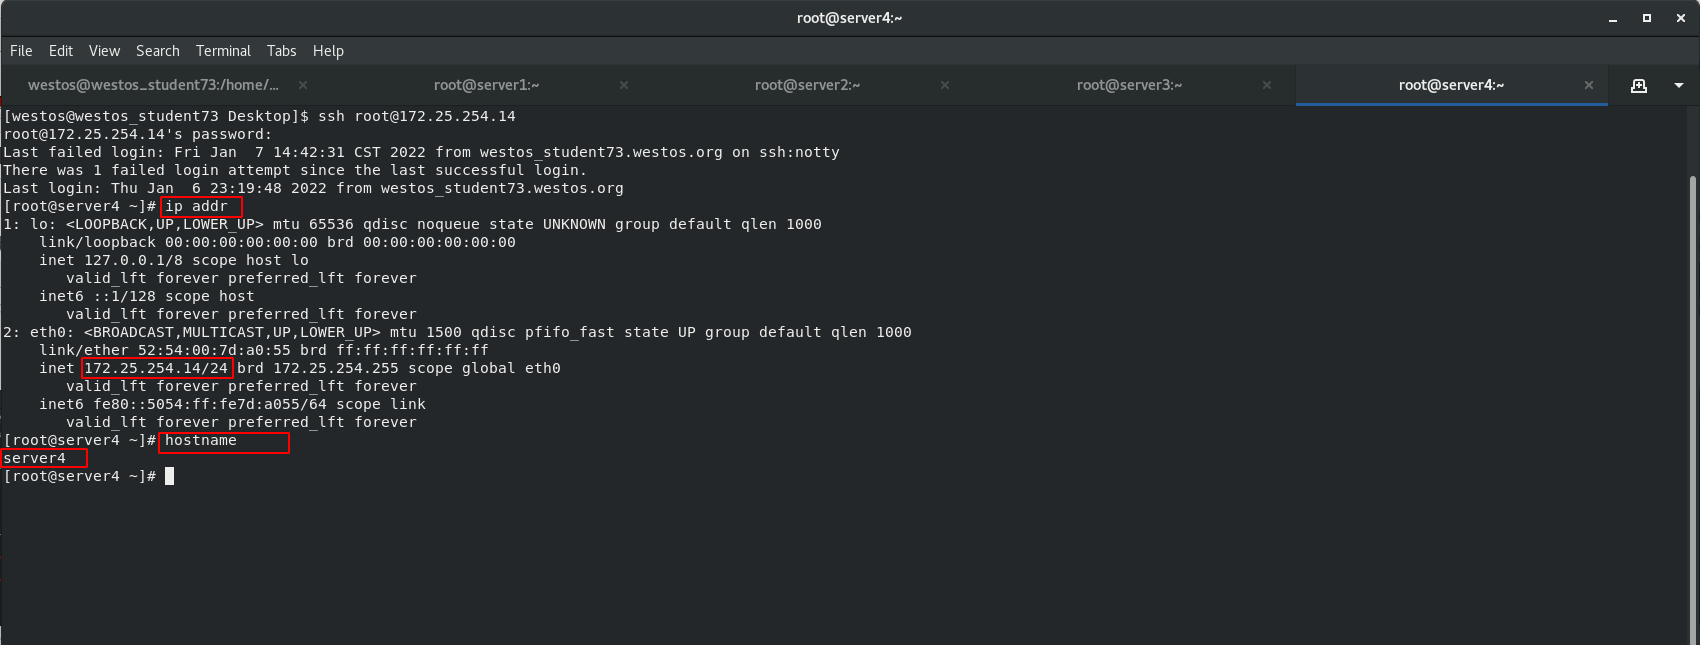
Create the virtual machine test4, set the host name server4, set the IP to 172.25.254.14, and use server4 as the standby scheduler node to work when server1 hangs up.
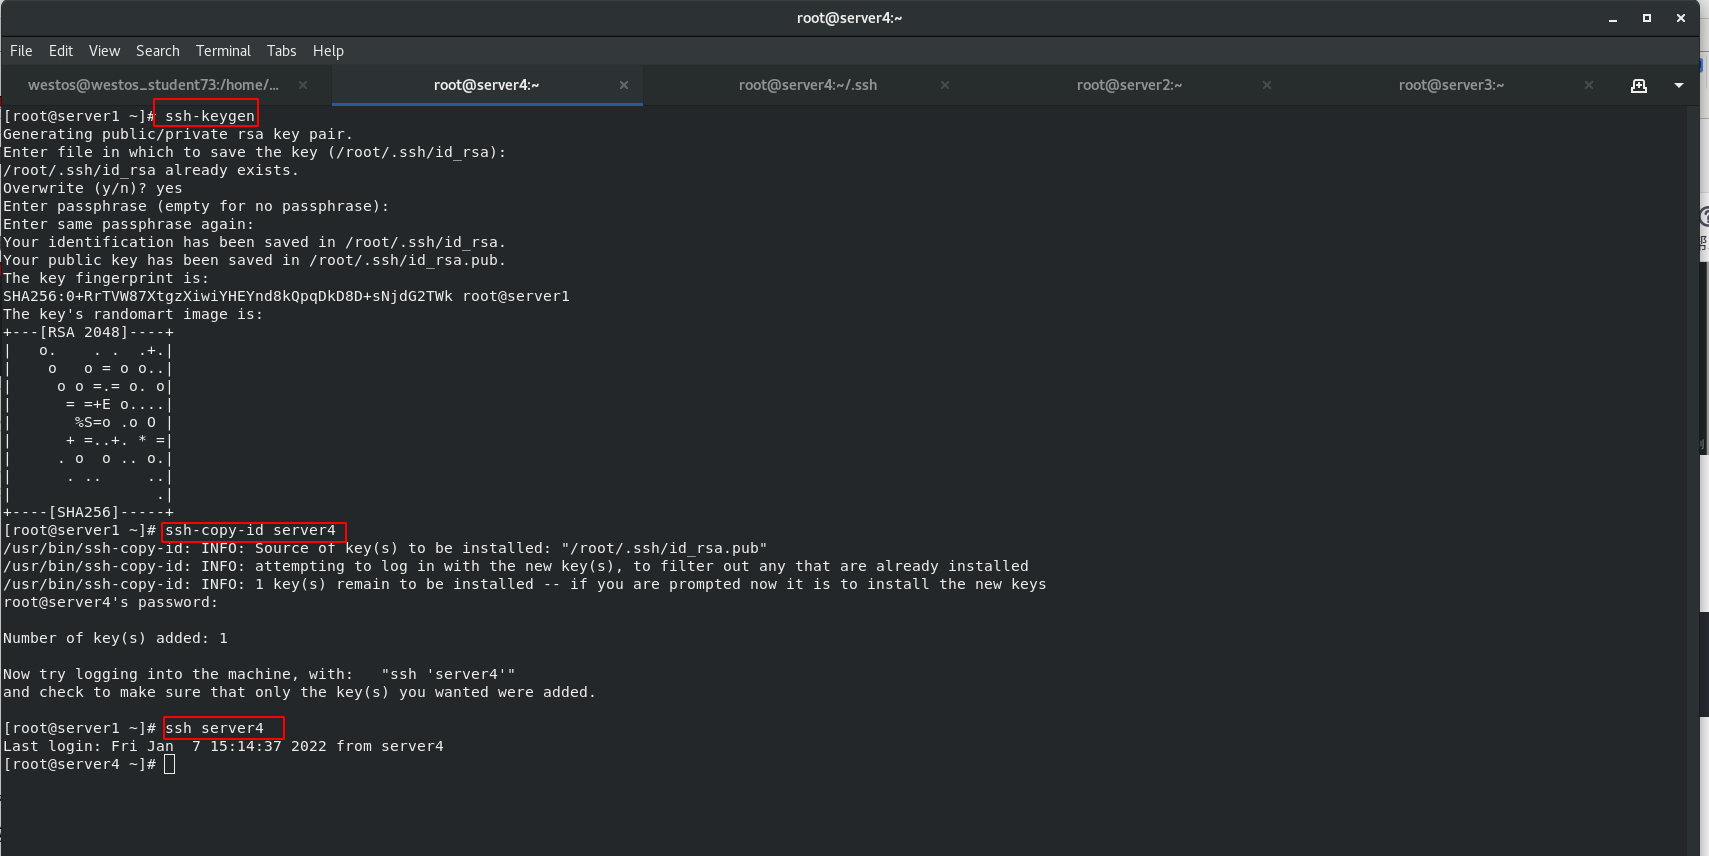
 SSH key authentication is used to connect secret free authentication, which is convenient for server1 and server2 to transfer files.
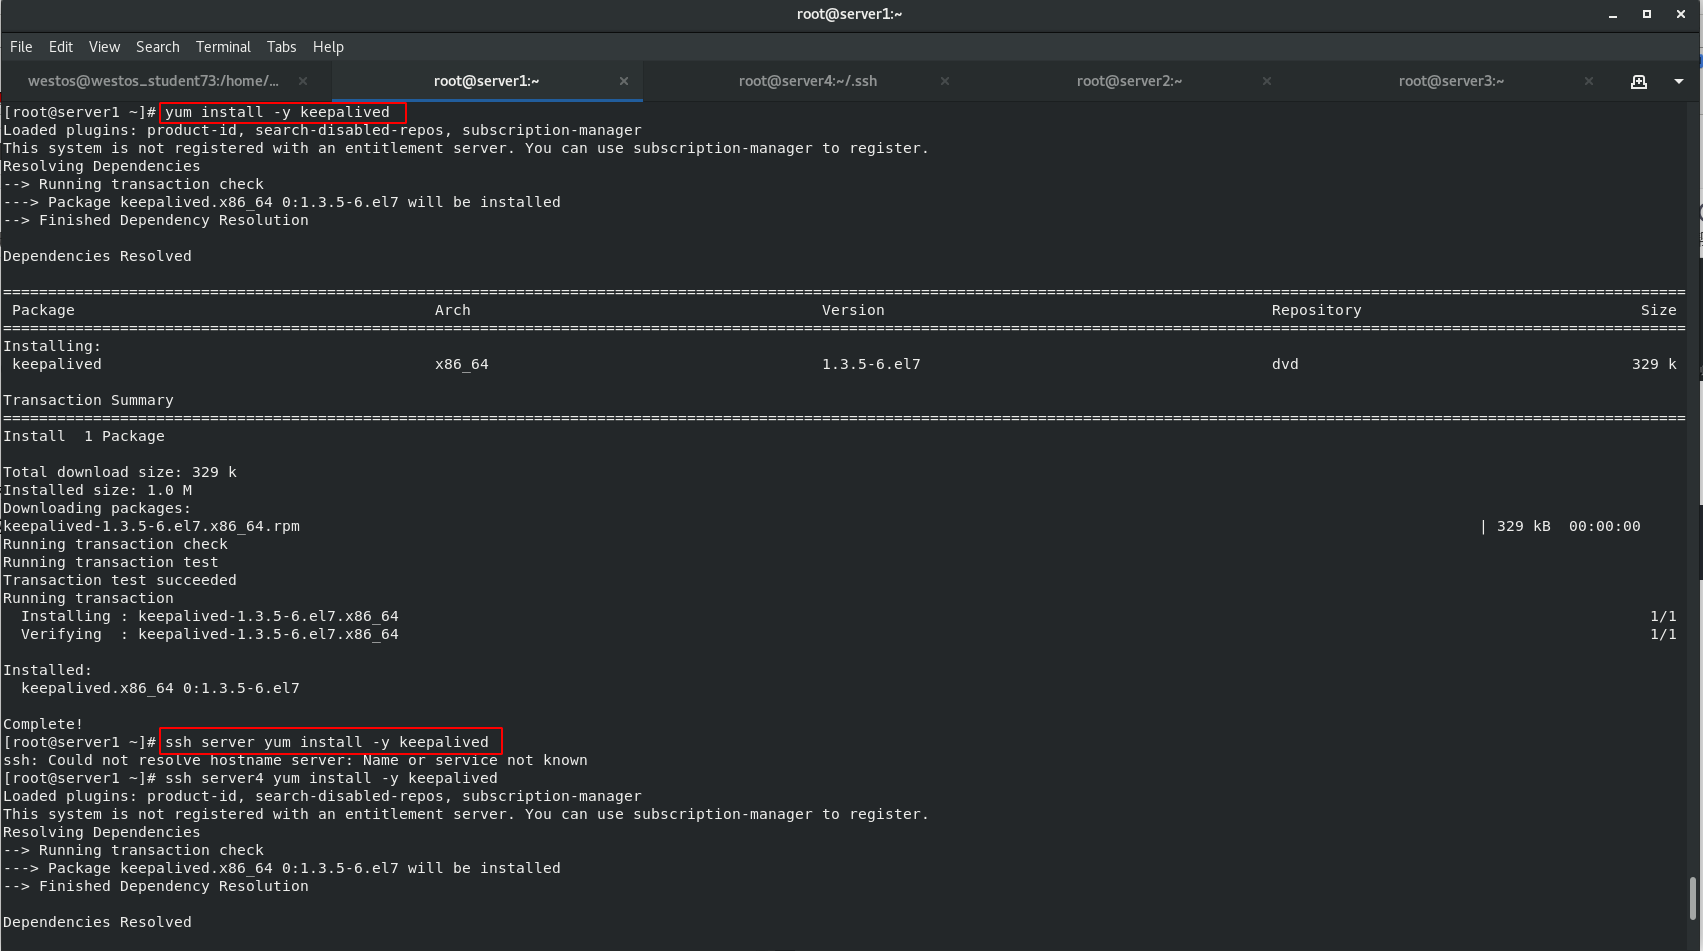
1. Install keepalived
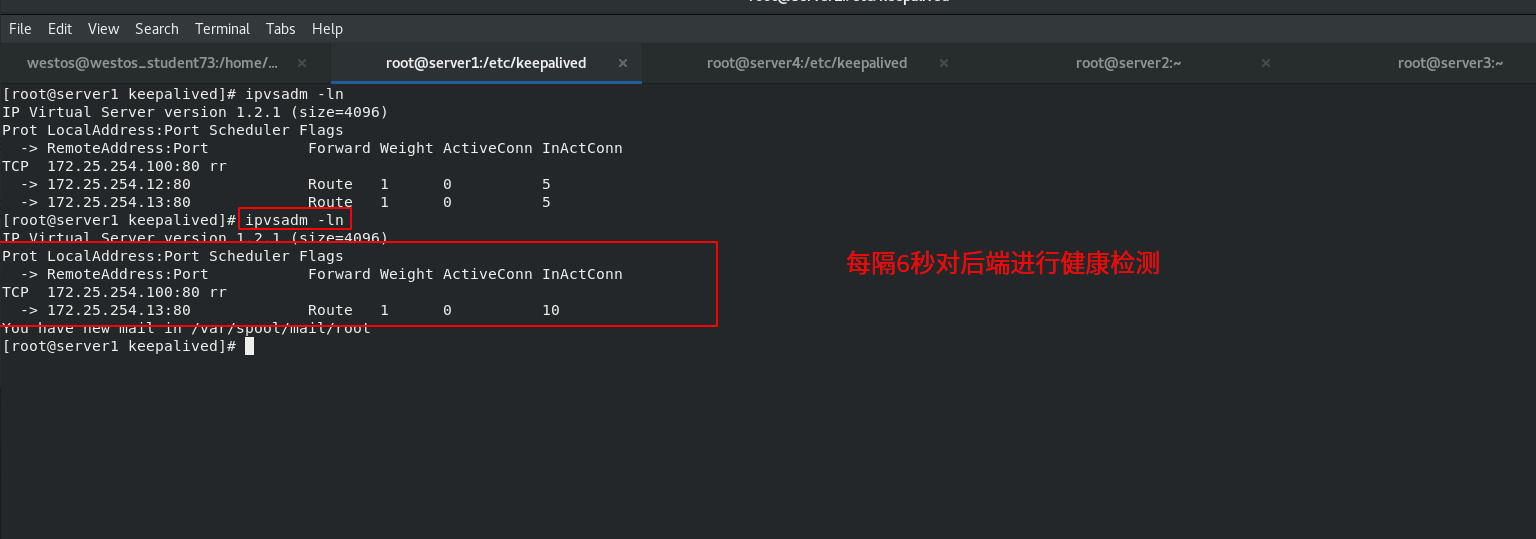
ipvsadm No health detection function, when the background server down If it cannot be detected in time, the user request will be dispatched to the server.
In order to check whether the corresponding back-end service in the policy is normal, it needs to be installed keepalived
[root@server1 ~]# yum install -y keepalived
[root@server1 ~]# ssh server yum install -y keepalived
[root@server1 ~]#  yum install  -y mail
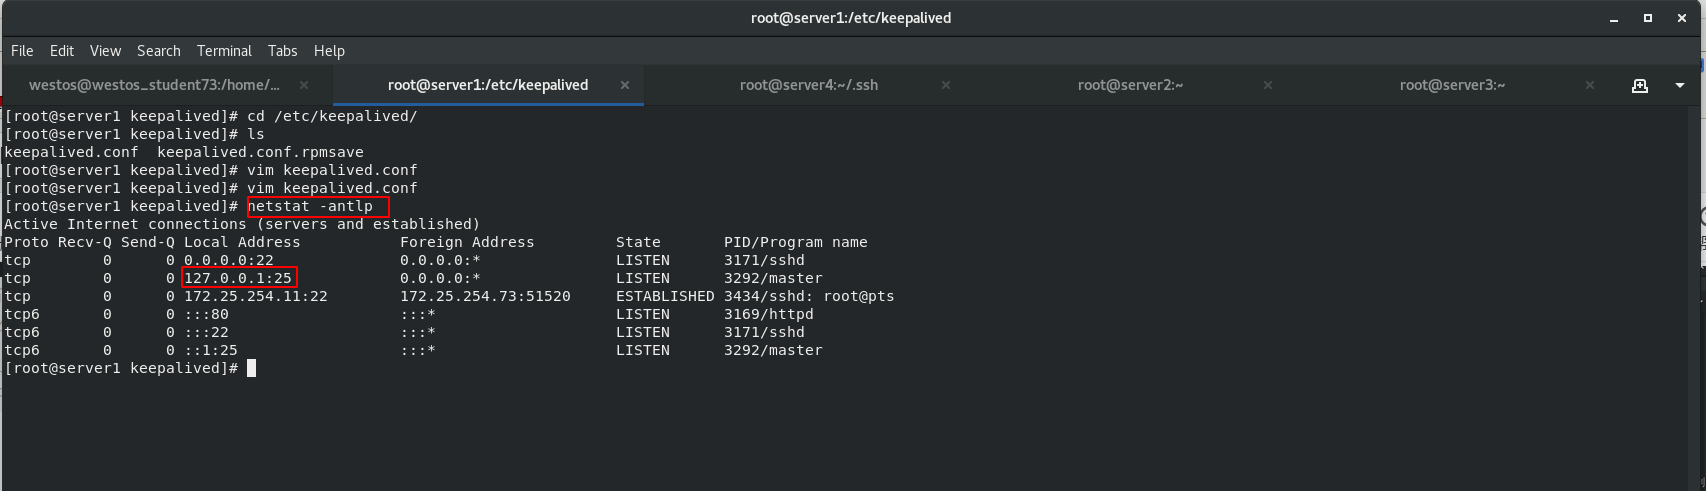
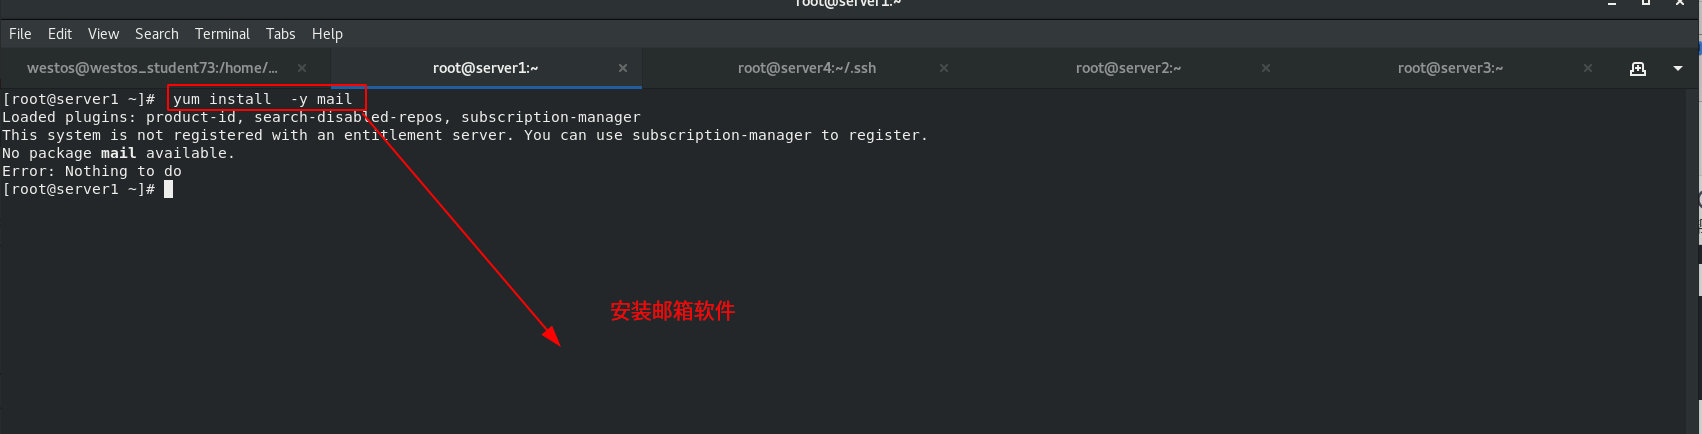 This machine has a mail service, which only listens to port 25 of this machine and only listens to the loopback of this machine.
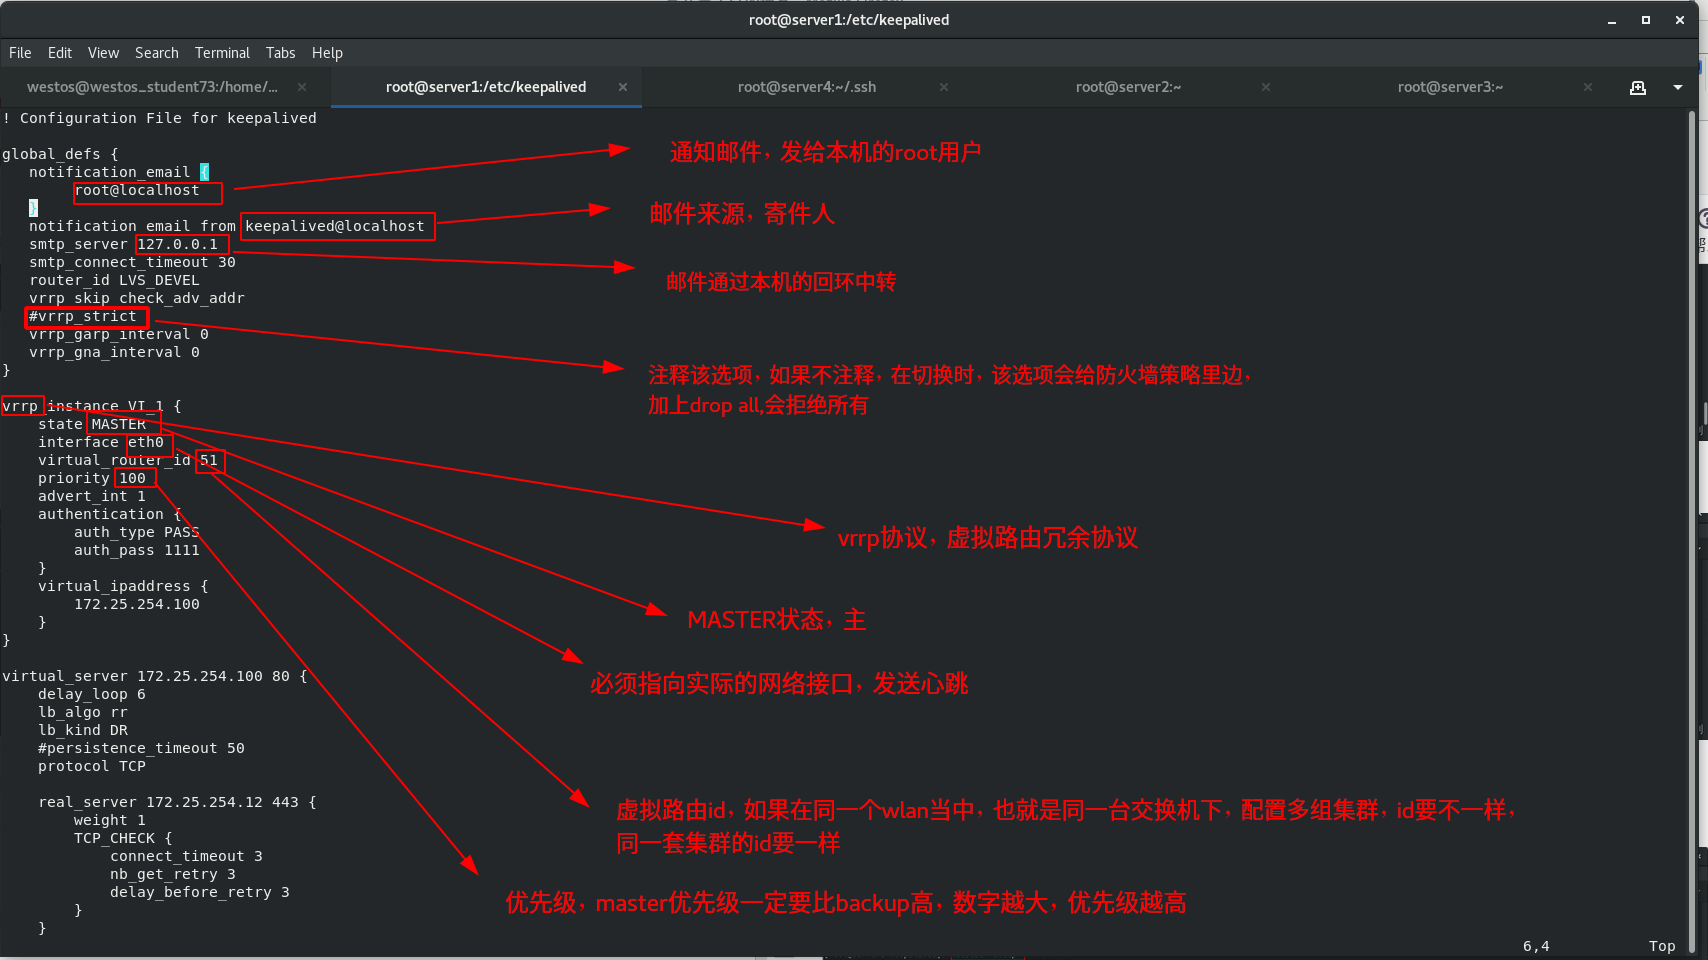
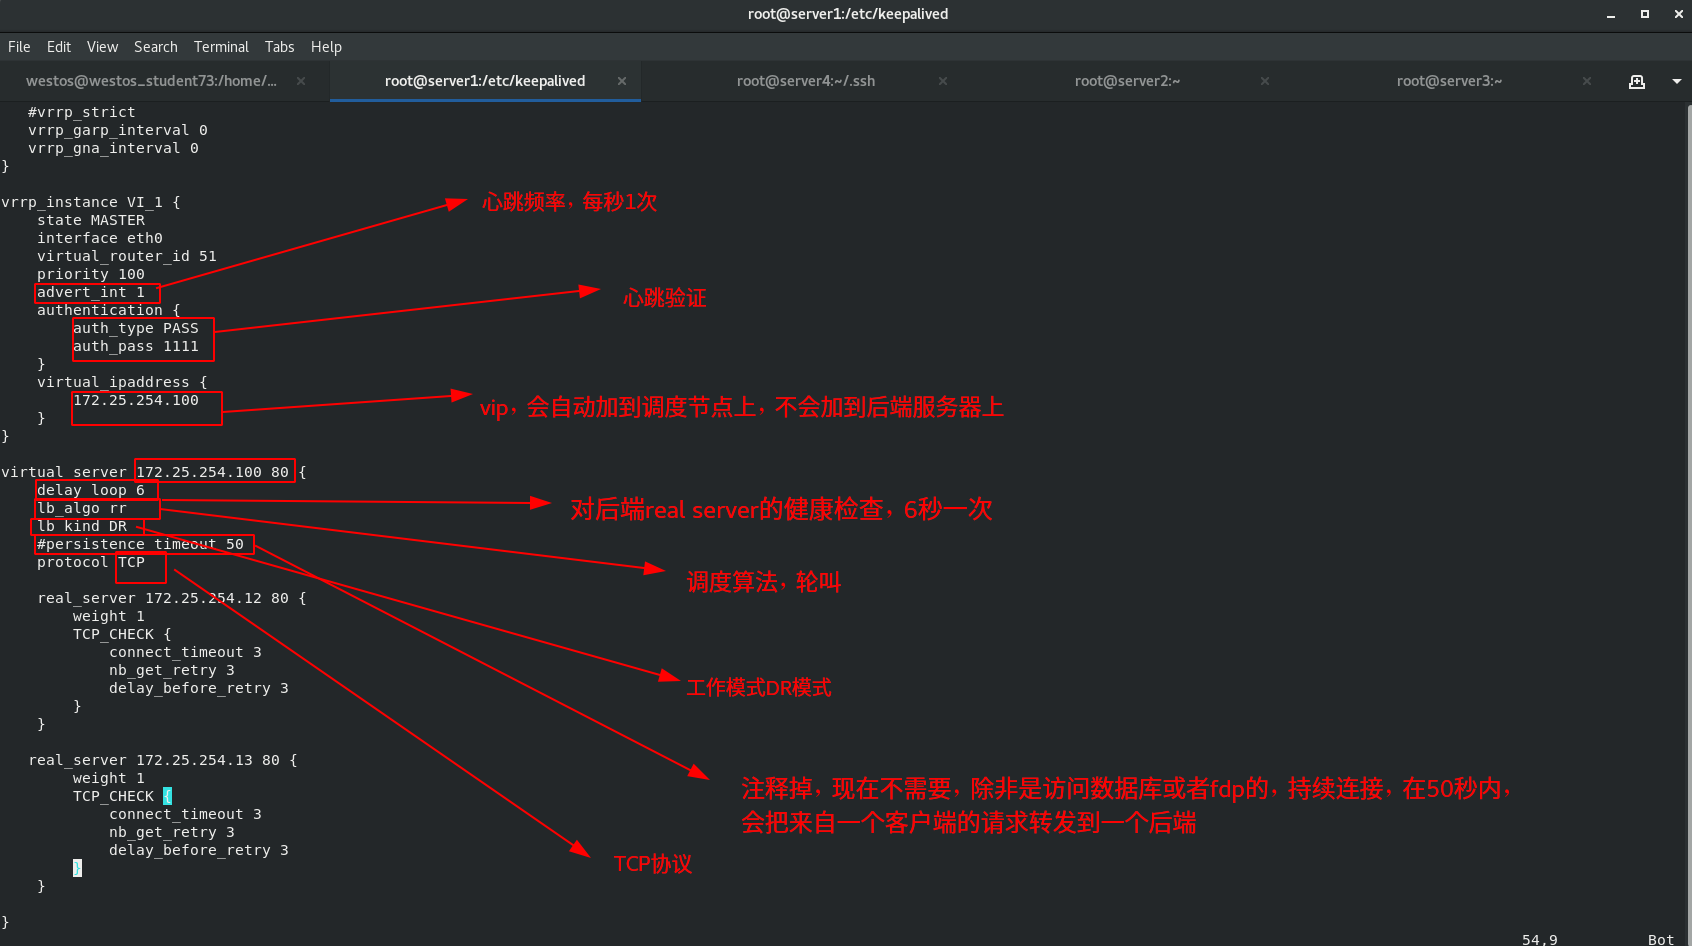
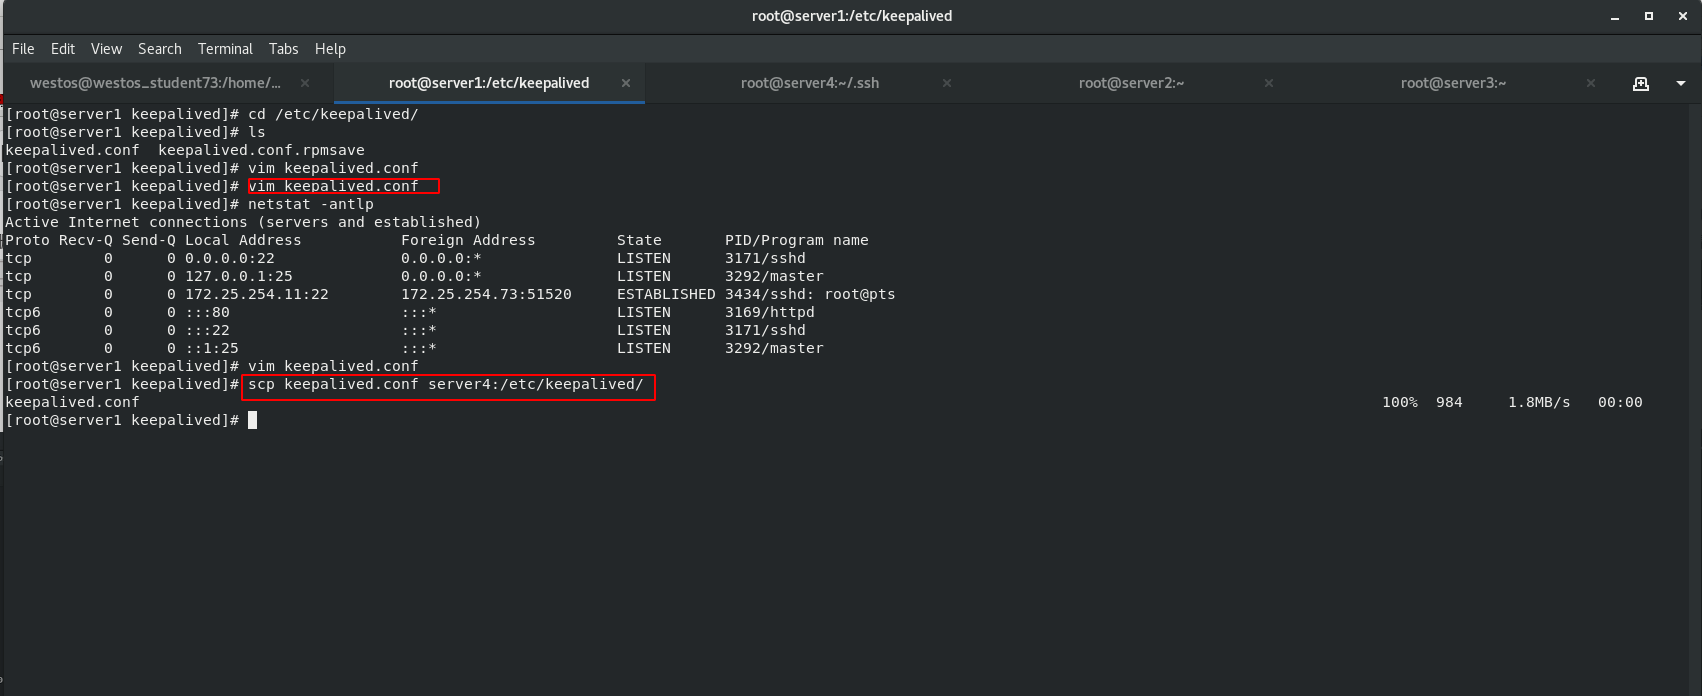
2. Write a keepalived configuration file in Server1
! Configuration File for keepalived
global_defs {
notification_email {
root@localhost
}
notification_email_from keepalived@localhost
smtp_server 127.0.0.1
smtp_connect_timeout 30
router_id LVS_DEVEL
vrrp_skip_check_adv_addr
#vrrp_strict
vrrp_garp_interval 0
vrrp_gna_interval 0
}
vrrp_instance VI_1 {
state MASTER
interface eth0
virtual_router_id 51
priority 100
advert_int 1
authentication {
auth_type PASS
auth_pass 1111
}
virtual_ipaddress {
172.25.254.100
}
}
virtual_server 172.25.254.100 80 {
delay_loop 6
lb_algo rr
lb_kind DR
#persistence_timeout 50
protocol TCP
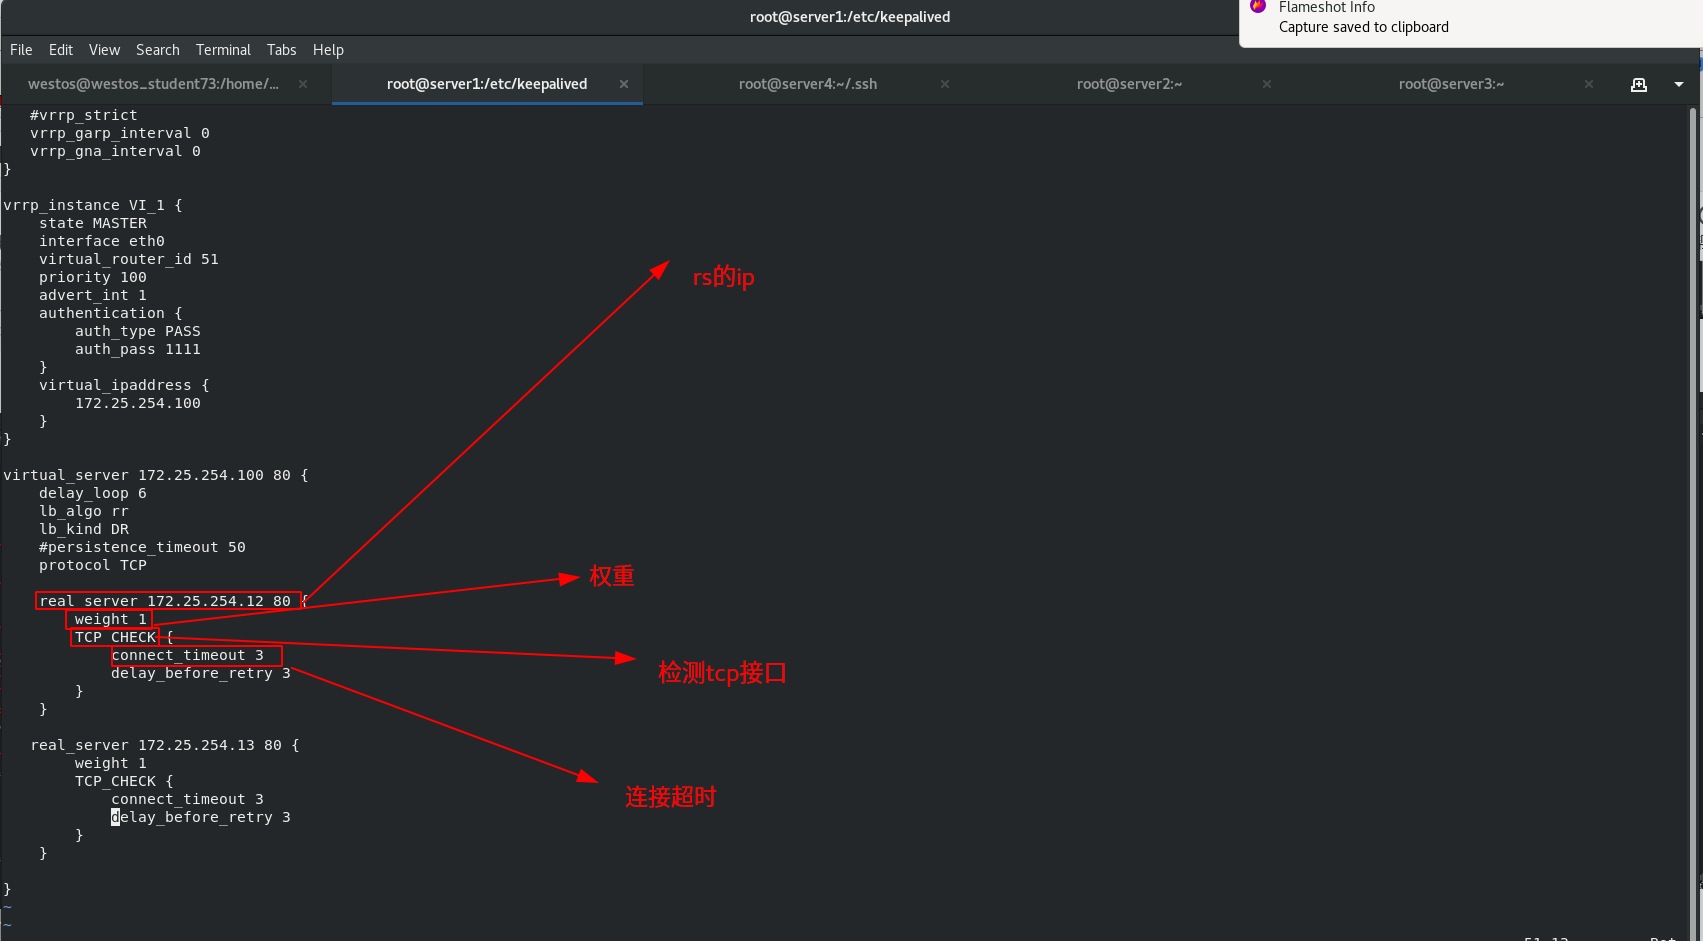
real_server 172.25.254.12 80 {
weight 1
TCP_CHECK {
connect_timeout 3
delay_before_retry 3
}
}
real_server 172.25.254.13 80 {
weight 1
TCP_CHECK {
connect_timeout 3
delay_before_retry 3
}
}
}
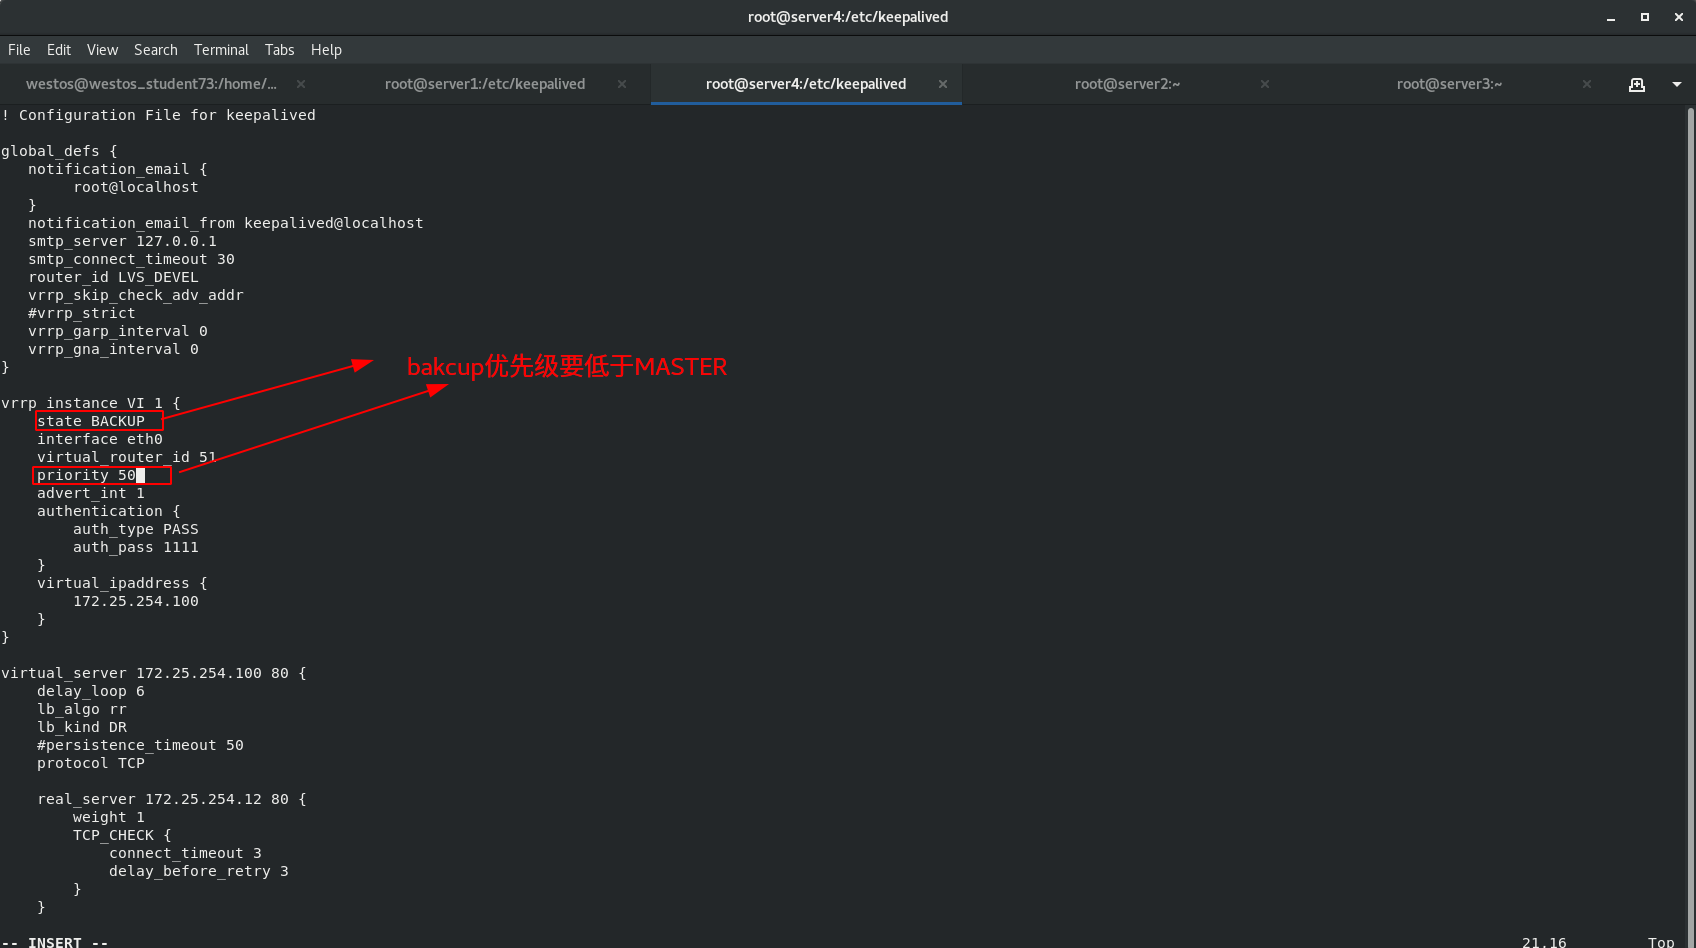
 server4 configuration
[root@server4 .ssh]# cd /etc/keepalived/
[root@server4 keepalived]# ls
keepalived.conf
[root@server4 keepalived]# vim keepalived.conf

! Configuration File for keepalived

global_defs {
   notification_email {
        root@localhost
   }
   notification_email_from keepalived@localhost
   smtp_server 127.0.0.1
   smtp_connect_timeout 30
   router_id LVS_DEVEL
   vrrp_skip_check_adv_addr
   #vrrp_strict
   vrrp_garp_interval 0
   vrrp_gna_interval 0
}

vrrp_instance VI_1 {
    state BACKUP
    interface eth0
    virtual_router_id 51
    priority 50
    advert_int 1
    authentication {
        auth_type PASS
        auth_pass 1111
    }
    virtual_ipaddress {
        172.25.254.100
    }
}

virtual_server 172.25.254.100 80 {
    delay_loop 6
    lb_algo rr
    lb_kind DR
    #persistence_timeout 50
    protocol TCP

    real_server 172.25.254.12 80 {
        weight 1
        TCP_CHECK {
            connect_timeout 3
            delay_before_retry 3
        }
    }
    real_server 172.25.254.12 80 {
        weight 1
        TCP_CHECK {
            connect_timeout 3
            delay_before_retry 3
        }
    }

   real_server 172.25.254.13 80 {
        weight 1
        TCP_CHECK {
            connect_timeout 3
            delay_before_retry 3
        }
    }

}
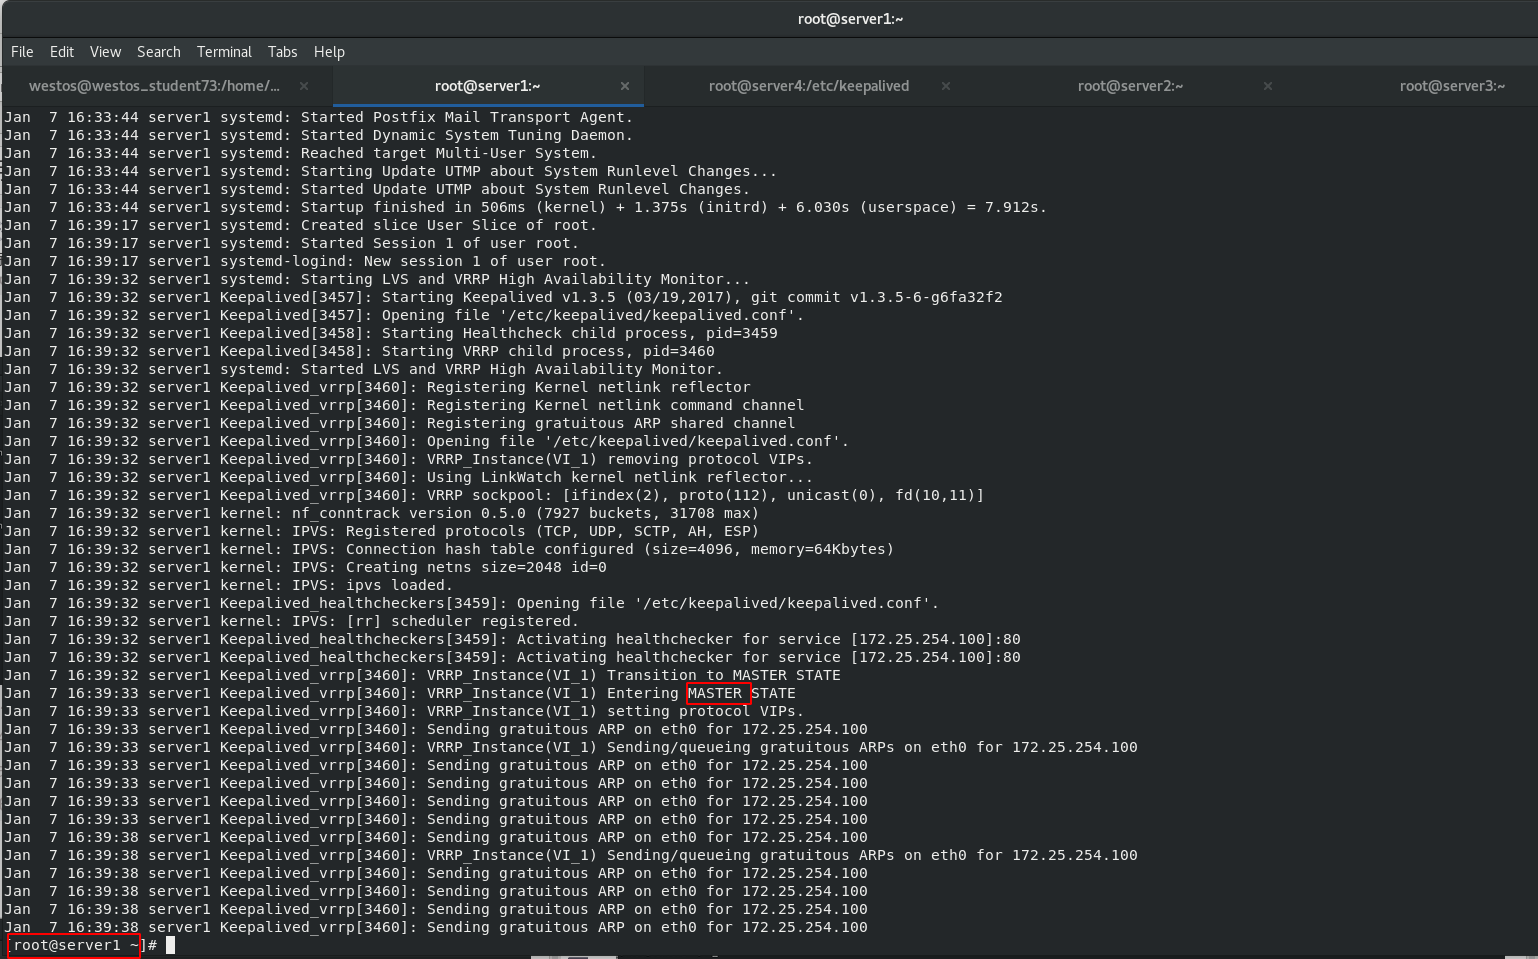
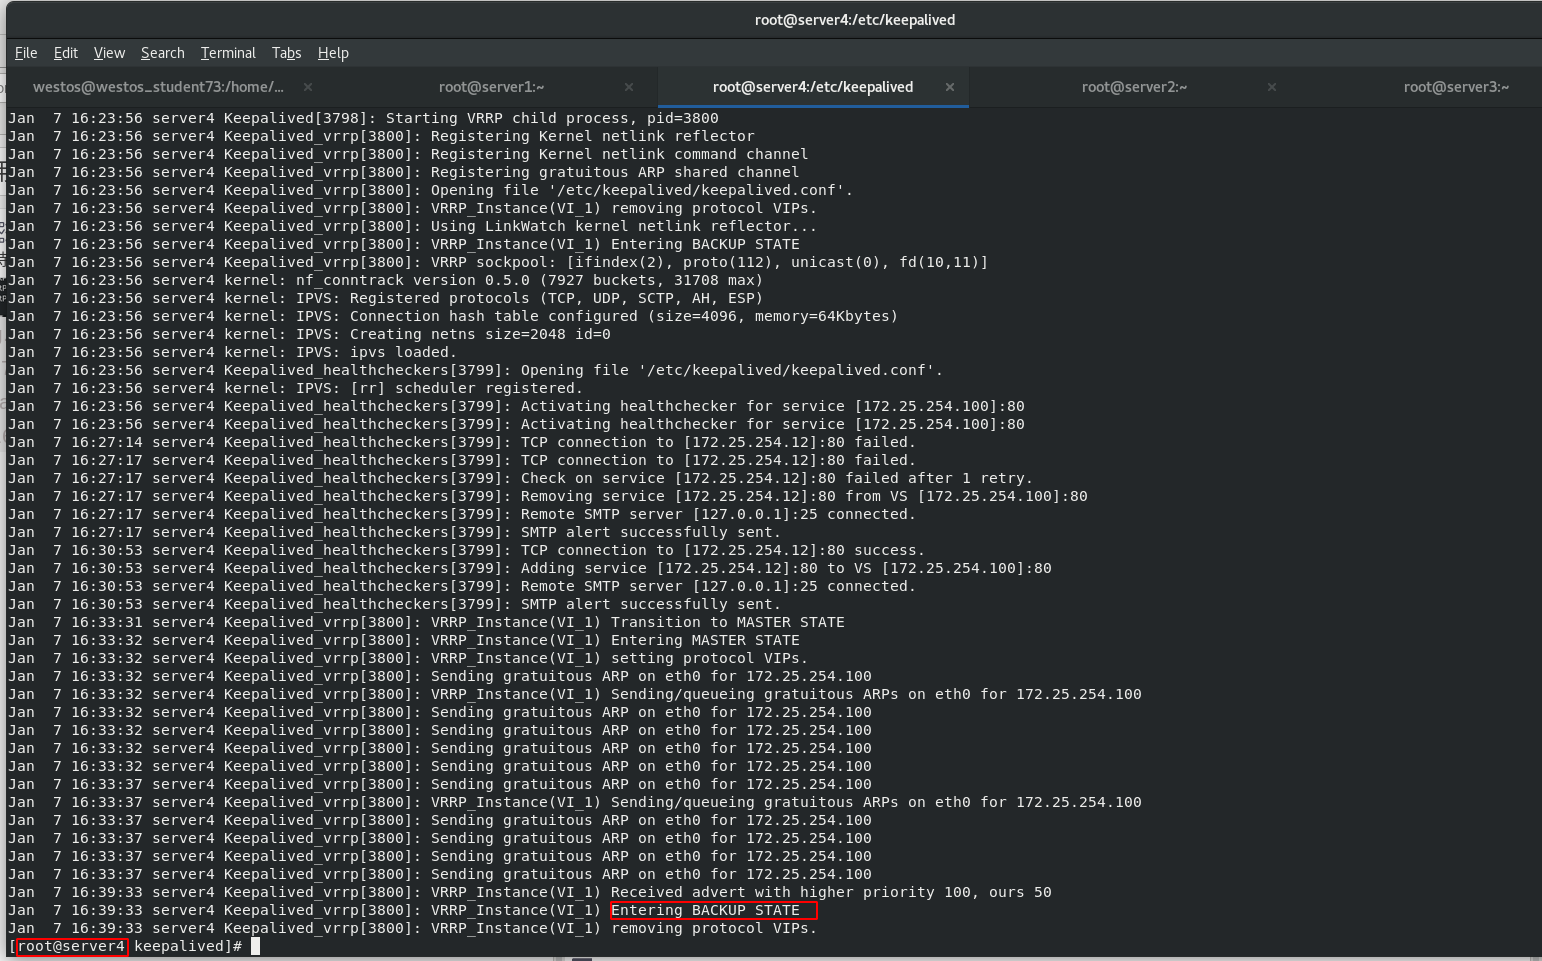
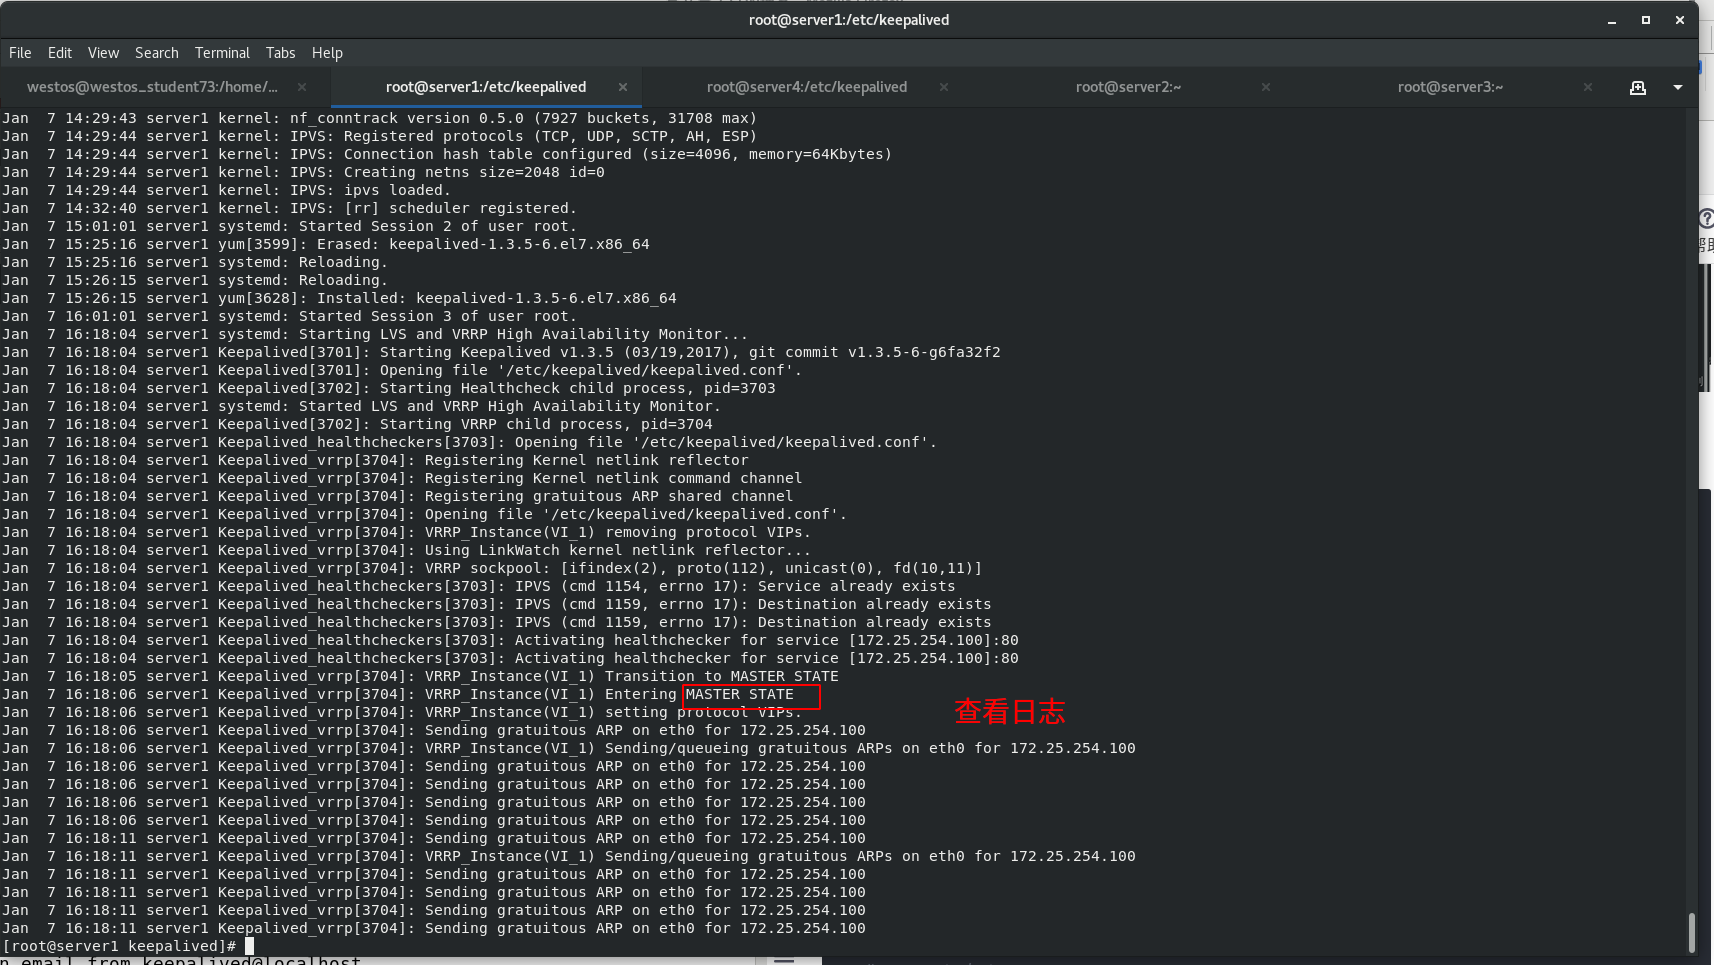
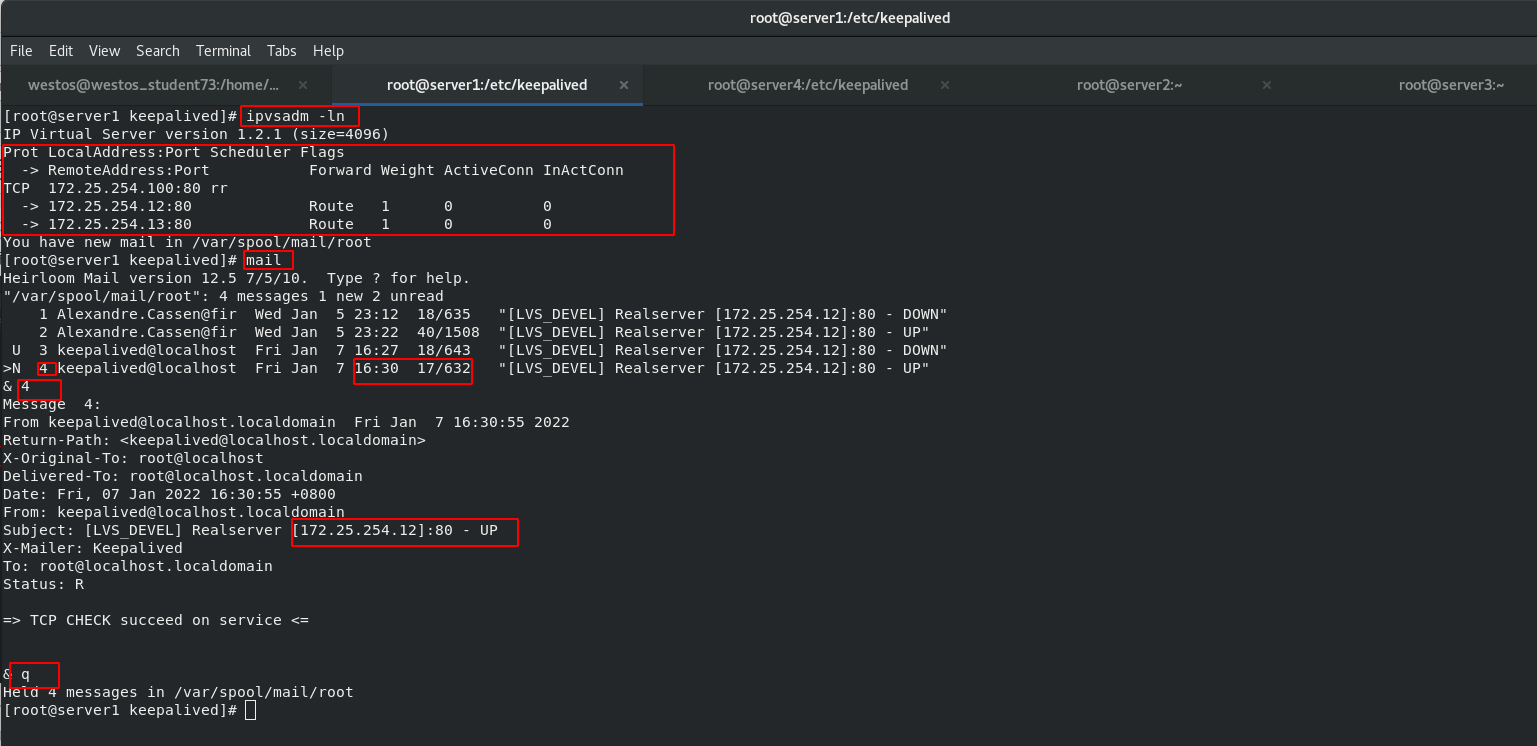
 Start the keepalived service of server1 and view the log
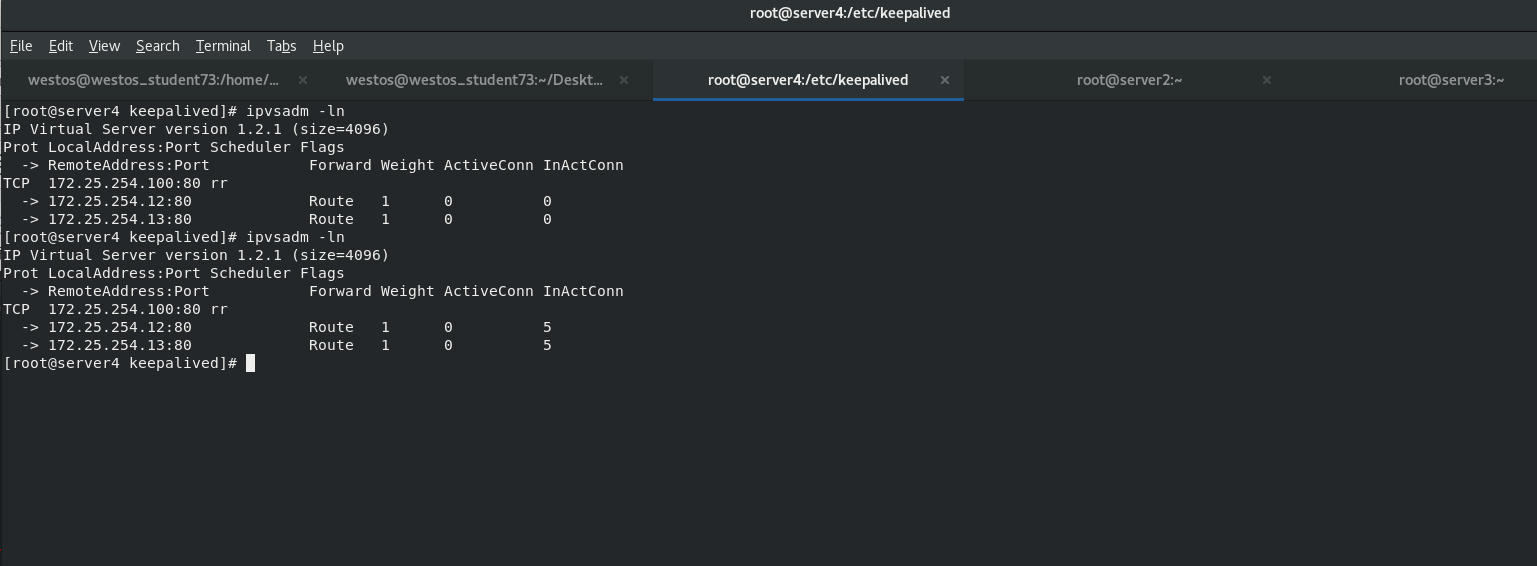
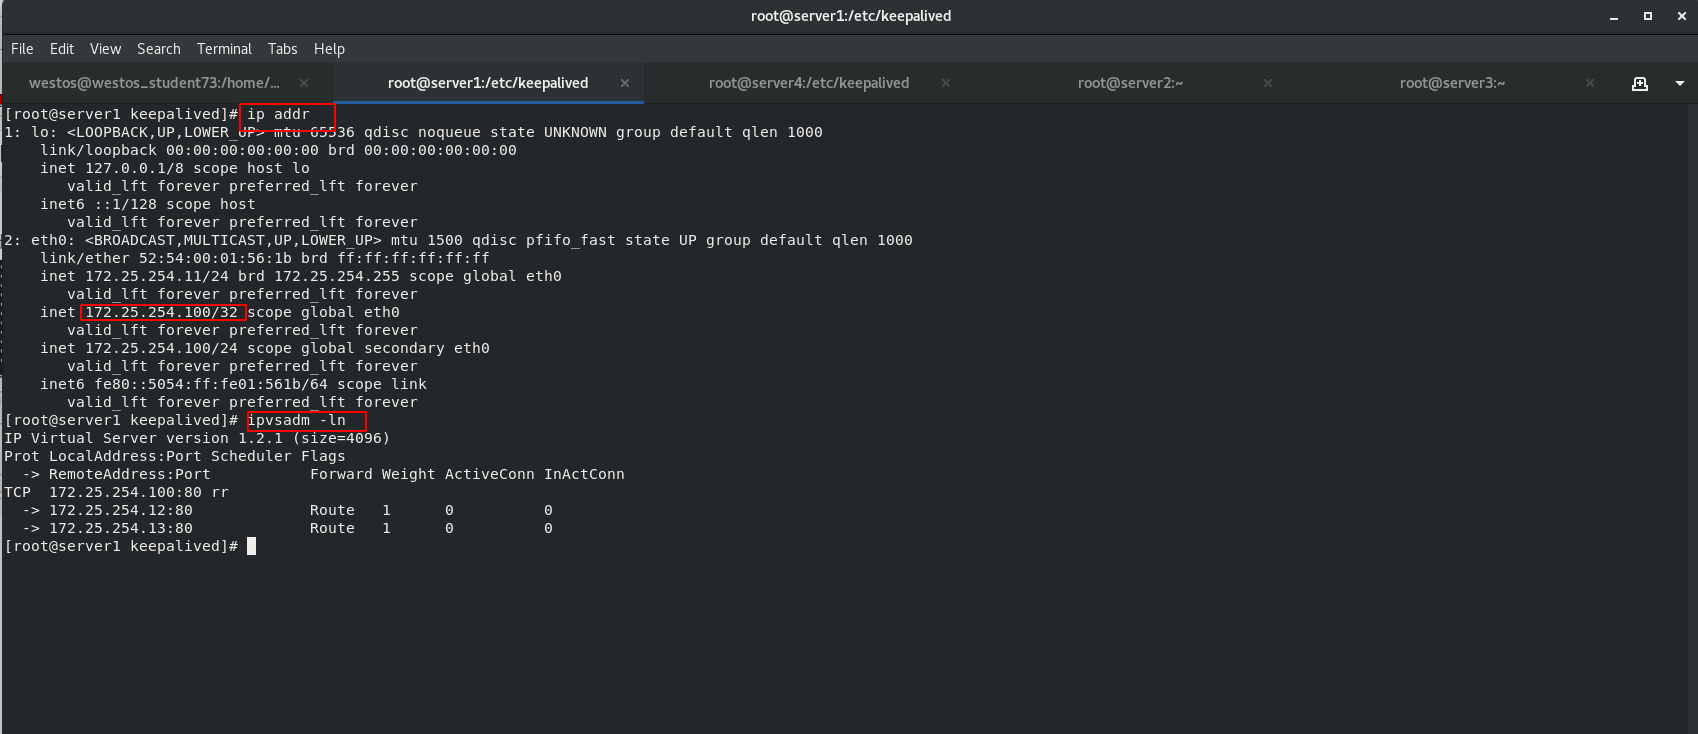
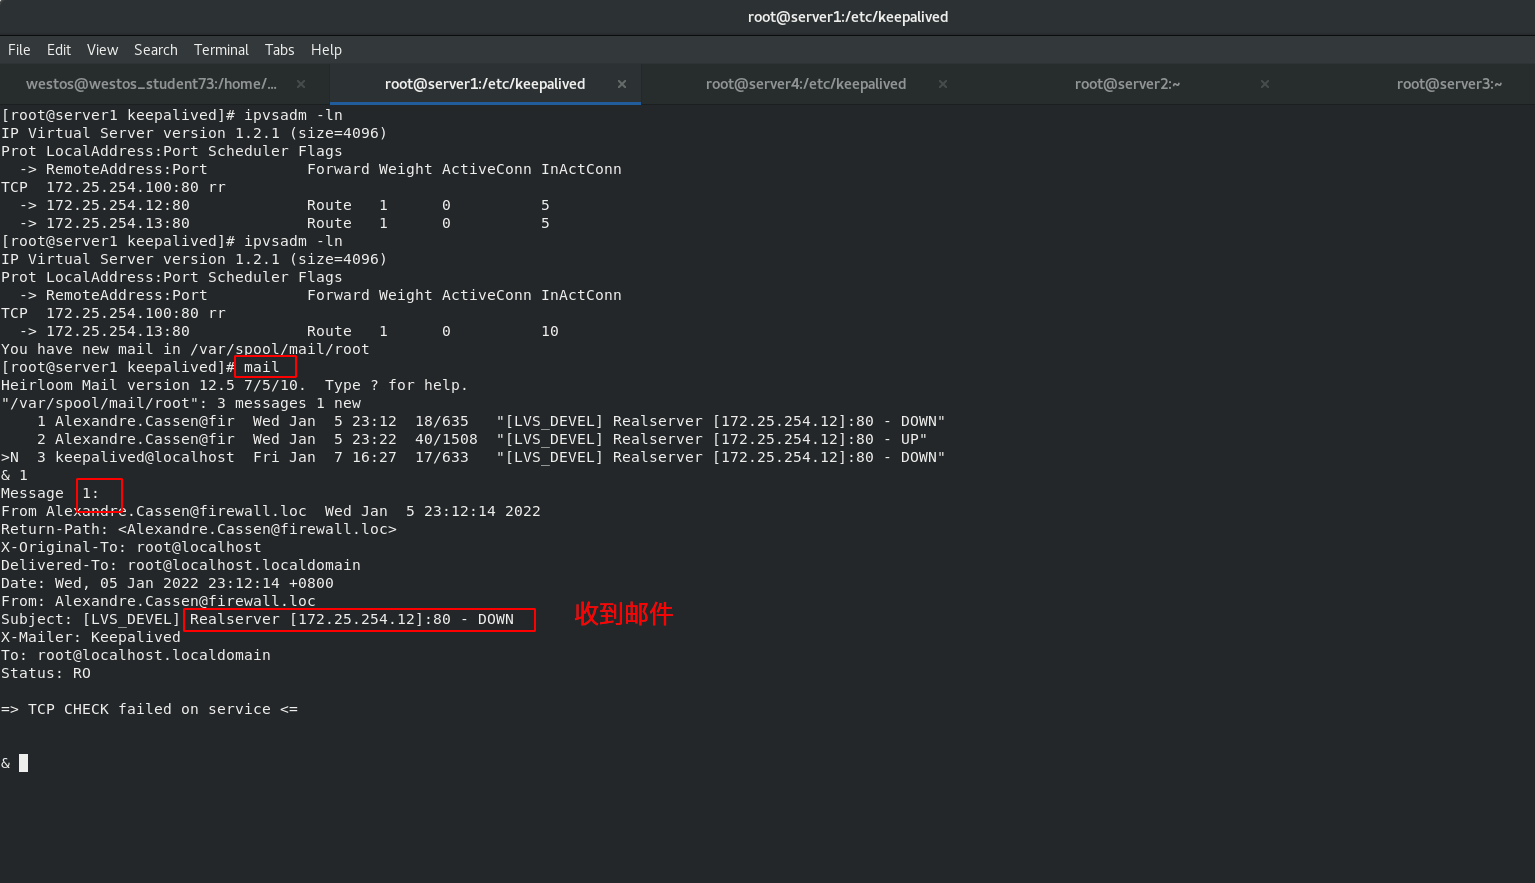
[root@server1 keepalived]# cat /var/log/messages
[root@server1 keepalived]# cat /var/log/messages
[root@server1 keepalived]# ip addr
[root@server1 keepalived]# ipvsadm -ln
! [insert picture description here]( https://img-blog.csdnimg.cn/1774749bad1a4302a8532cb4a9f34301.png?x -oss-process=image/watermark,type_ d3F5LXplbmhlaQ,shadow_ 50,text_ Q1NETiBA5aSa5LqO5bCR55qE5Yy65Yir,size_ 20,color_ FFFFFF,t_ 70,g_ se,x_ sixteen
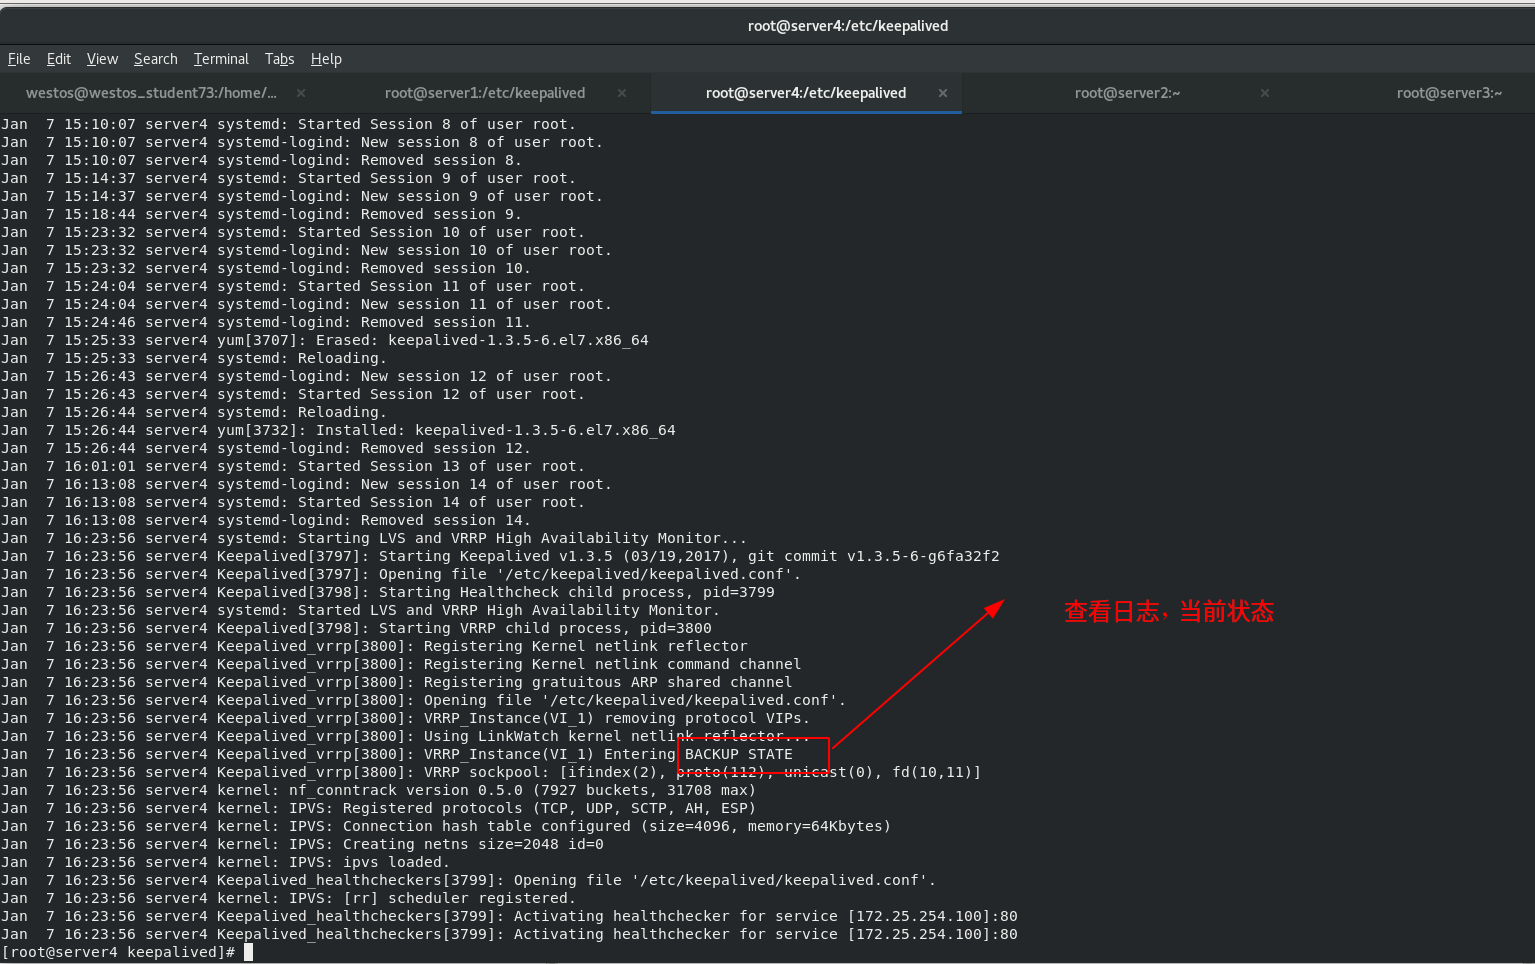
Start the keepalived of the standby scheduler node
 test
test
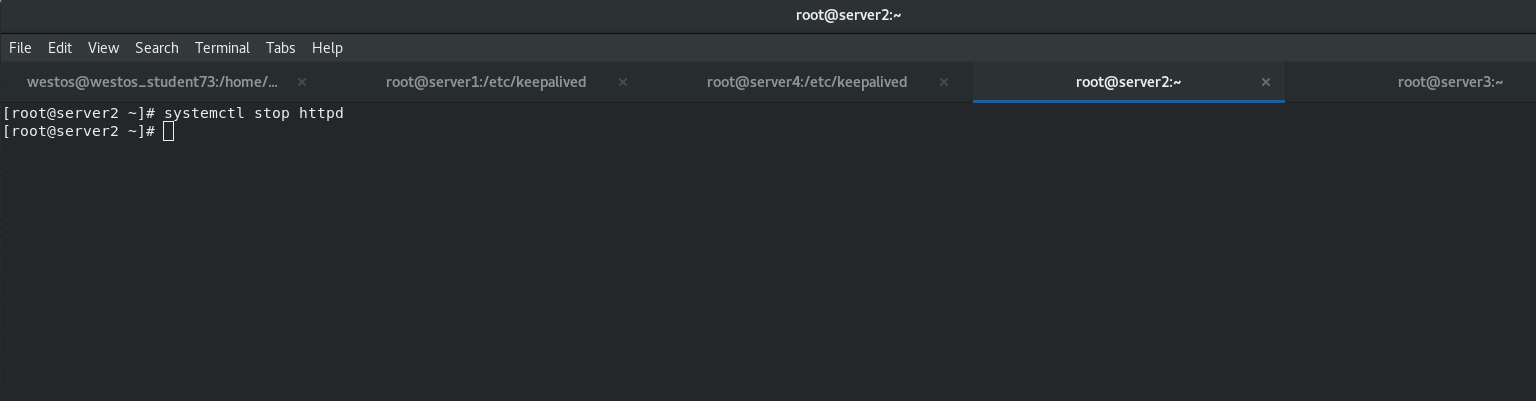
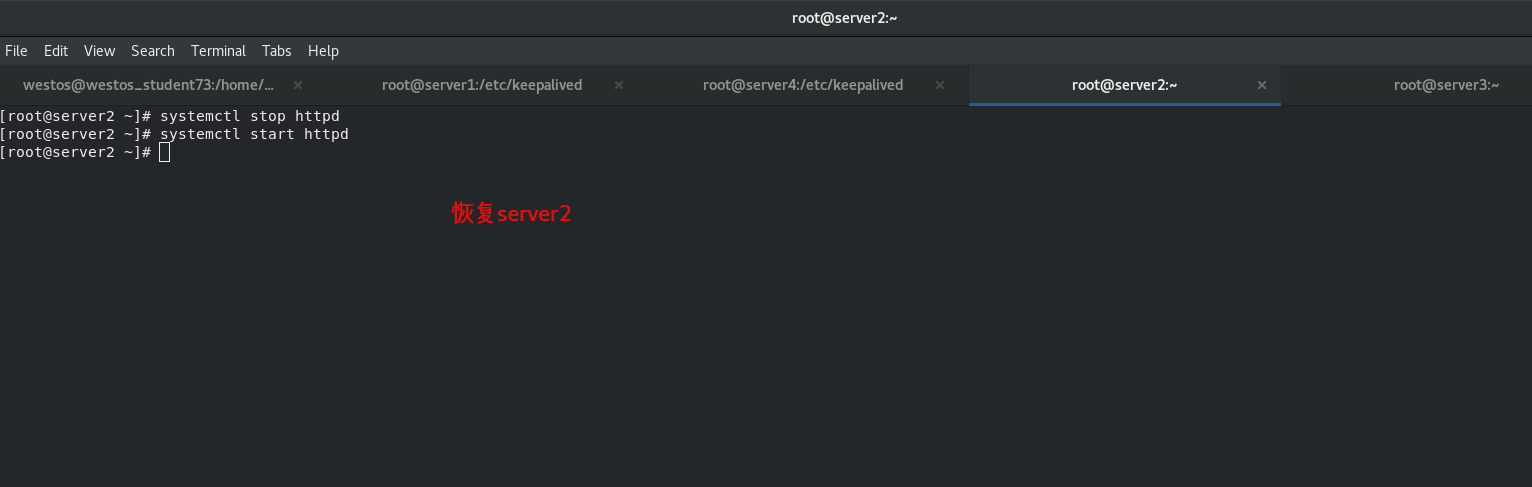
 When the backend server server2down
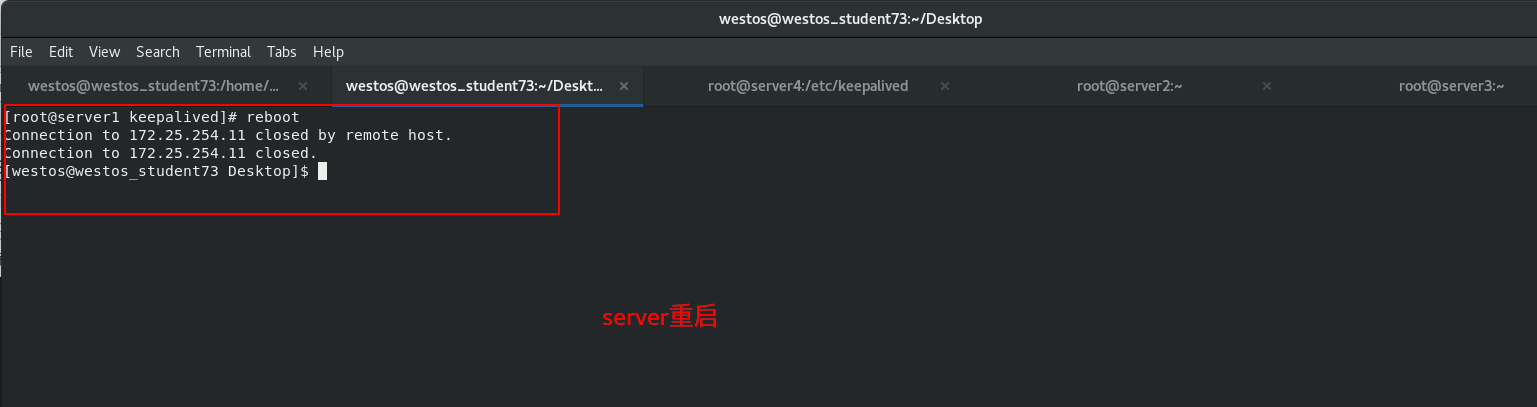
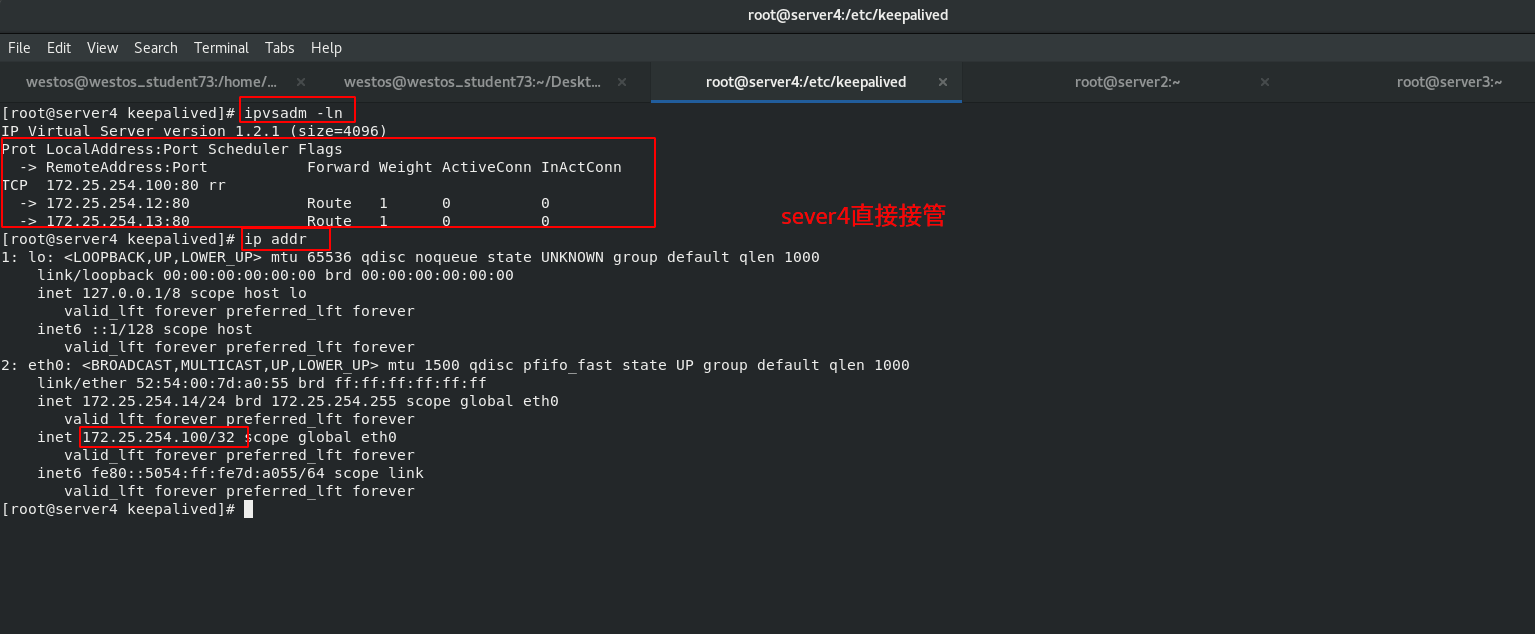
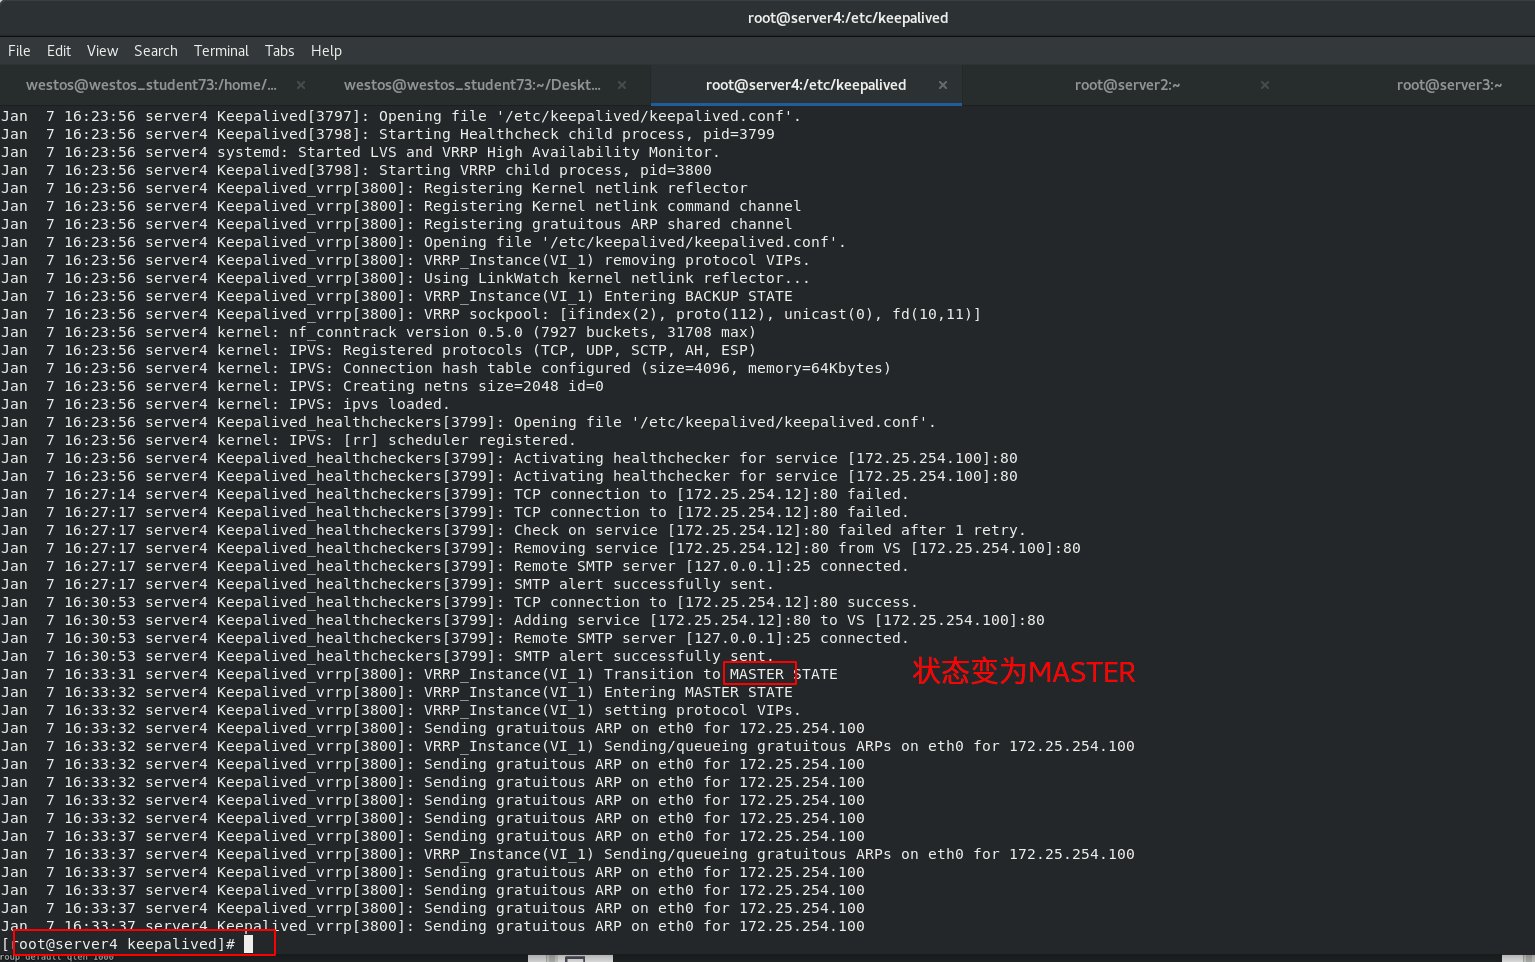
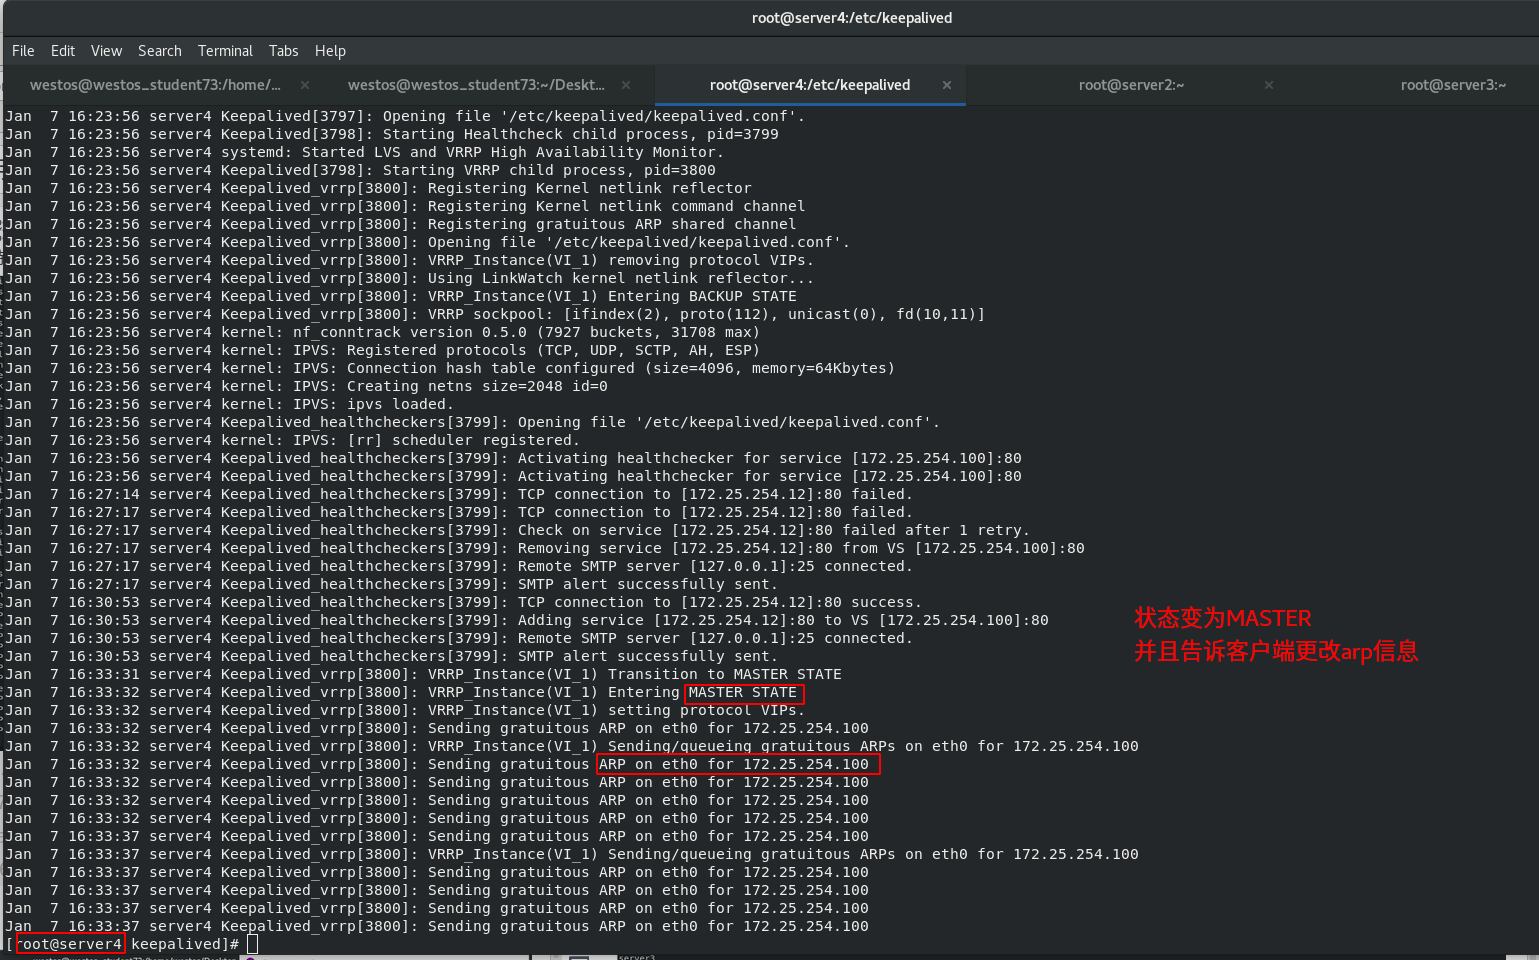
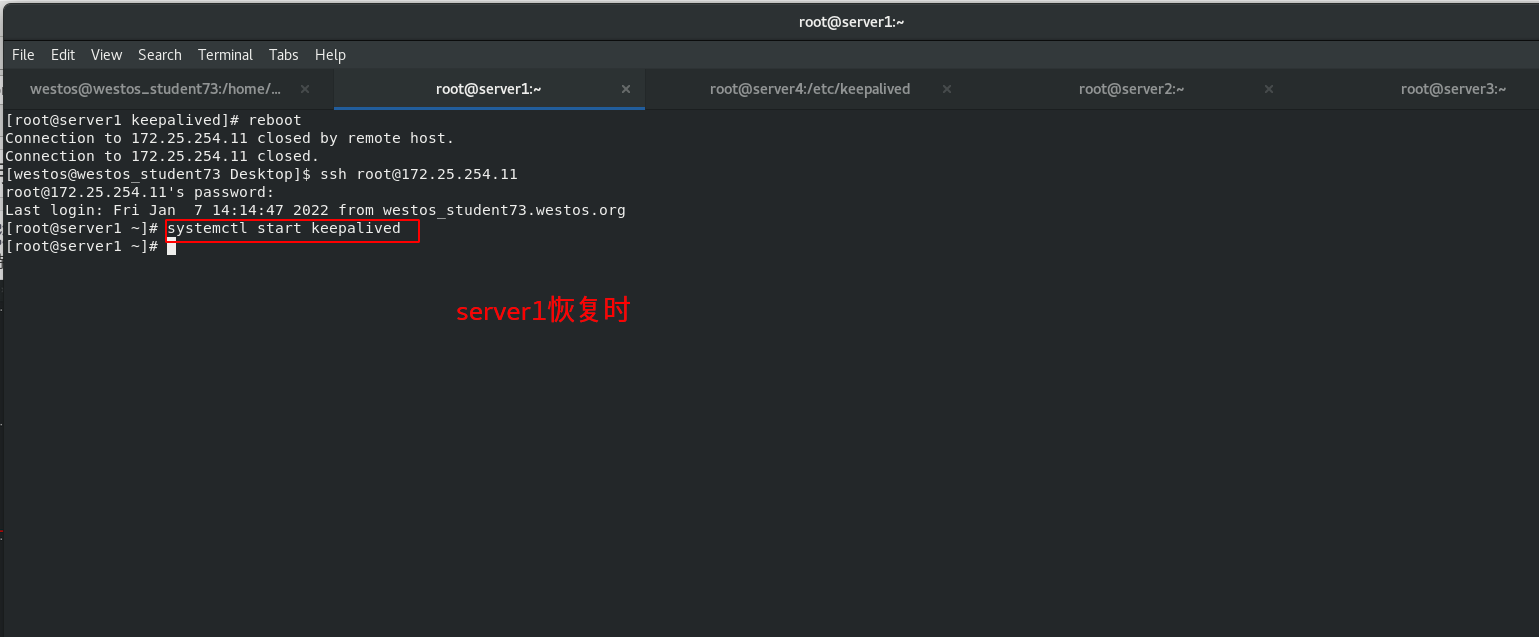
 When the scheduler server1down