background
Recently, OpenCV, a code related to image recognition, has been studied. To facilitate debugging, a debugging environment for debugging c++ programs on Mac has to be set up.I'm running away. Share it with you.

Environmental Science
- Mac OS 10.14.5
- xcode-select v2354
- Visual Studio code 1.35.1
- OpenCV 3.4.5
- Clang 1001.0.46.4
- CMake 3.14.5
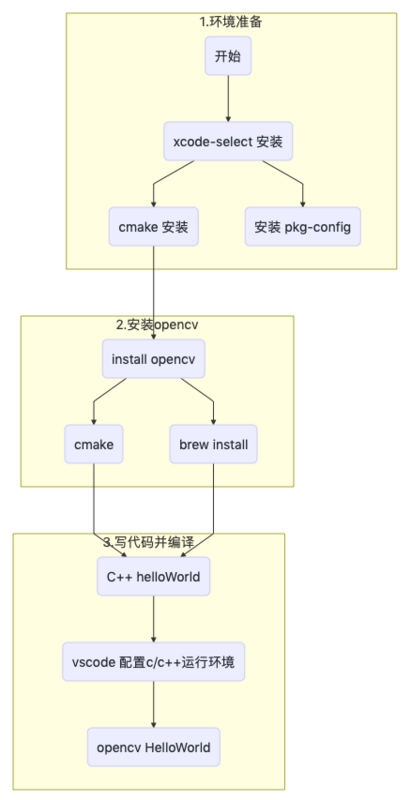
Step description
- Compile Environment Preparation
- Install OpenCV
- Install VScode Plugin
- VScode Project Configuration
- OpenCV HelloWorld
Environmental preparation
Mac comes with a C/C++ environment, so let's not go into it.
Xcode Command Line Tools are required to trigger the installer from the command line or download the installation.
Command Install xcode-select
sudo xcode-select --install
Download xcode-select installation

Select the download file and note the version number prompted here!
The command line installation is slow and has a high failure rate. It is recommended to install by downloading dmg files
CMake Preparation

cmake is used when compiling OpenCV.It can also be installed through homebrew or download.
CMake installed by download, cmake executable in/Applications/CMake.app/Contents/bin/cmake.
CMake is not required if you install opencv in homebrew mode.
pkg-config installation
Compiling c/c++ code that references the open CV library requires many parameters to inform include path, libs, and so on. Compiling parameters can be simplified using pkg-config.
brew install pkg-config
Install OpenCV
There are two ways to install.
brew install
## A command installed opencv3
brew install opencv3
It's easy to install with homebrew, because it takes a long time to install (I used a big day).python-opencv will also be installed.
Compile Installation
click Download the source code.Here I chose Sources 3.4.5
After unzipping, enter the directory
cd <opencv Unzipped directory>
mkdir release
cd release
cmake -D CMAKE_BUILD_TYPE=RELEASE -D CMAKE_INSTALL_PREFIX=/usr/local
make
sudo make install
The release directory created here will place the results of the cmake command.The directory of the CMAKE_INSTALL_PREFIX configuration stores the results of the make command.
If there are no errors here, the installation will succeed.
Normally, there will be no problem, and you will not necessarily succeed in a virtual environment.
Reference from Compile and install opencv
Write a C++ Hello World
First try writing a C++ code that only references the standard library.
/// ./main.cpp
#include <stdio.h>
#include <iostream>

int main(int argc, const char * argv[]) {
    std::cout << "Hello, World!\n";
    return 0;
}
The results are as follows.
Continue trying to introduce OpenCV libraries into your code without any problems.
pkg-config environment configuration
Once installed, configure an environment variable.
PKG_CONFIG_PATH="~/opencv Unzip directory/release/unix-install"
When configured, execute the command:
pkg-config opencv --libs --cflags opencv
The display is roughly as follows, and this is the configuration inside opencv.pc.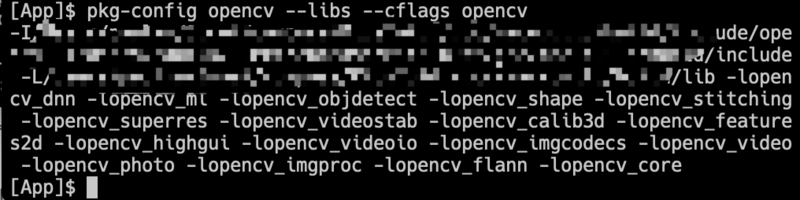
This environment variable is designed so that pkg-config can find the file opencv.pc.
Write an OpenCV Demo
Okay, the point is, most people get stuck here
Write an OpenCV HellowWorld to try, open an empty VScode project, and create
File test.cpp
#include "opencv2/imgproc/imgproc.hpp"
#include "opencv2/highgui/highgui.hpp"
#include <iostream>
#include <stdlib.h>
#include <stdio.h>

using namespace std;
using namespace cv;

Mat src, dst, src_gray;

char* window_name = "Demo";

/**
 * @Principal function
 */
int main( int argc, char** argv )
{

    ///Read a picture without changing the color type of the picture itself (read in DOS mode)
    src = imread(argv[1], 1 );

    ///Convert pictures to grayscale pictures
    cvtColor(src, src_gray, CV_RGB2GRAY);

    namedWindow(window_name, CV_WINDOW_AUTOSIZE);

    imshow(window_name, src_gray);

    while(true) {
        int c;
        c = waitKey(20);
        if (27 == (char) c) {
            break;
        }
    }
}
Enter the command line environment
## Compile Test Program
g++ `pkg-config opencv --libs --cflags opencv` ./test.cpp -o ./test.o
## run the test
./test.o ~/Downloads/opencv-logo.png
pkg-config This command introduces a class library for compiling open CV test code.
You can see the results below. Congratulations on your success.
You can refer to the link at the end: Compile a self-test program
Actual debugging code that doesn't stop compiling and running types a lot of commands, so let's try to put this work in VScode.Install some plug-ins for VScode first
- C/C++
- C++ Intellisense
- C++ Clang Command Adapter
Create a.vocode folder in the root directory and create three more files.
- .vscode/launch.json
- .vscode/tasks.json
- .vscode/c_cpp_properties.json
File.vscode/tasks.json
{
    "tasks": [
        {
            "type": "shell",
            "label": "g++ build active file",
            "command": "/usr/bin/g++",
            "args": [
                "-g",
                "${file}",
                "-o",
                "${fileDirname}/${fileBasenameNoExtension}.o",
                "`pkg-config",
                "--libs",
                "--cflags",
                "opencv`"
            ],
            "options": {
                "cwd": "/usr/bin"
            },
            "group": {
                "kind": "build",
                "isDefault": true
            },
            "problemMatcher": []
        }
    ],
    "version": "2.0.0"
}
File.vscode/launch.json
{
    // Use IntelliSense to learn about possible attributes.
    // Hover to view descriptions of existing attributes.
    // For more information, visit: https://go.microsoft.com/fwlink/?linkid=830387
    "version": "0.2.0",
    "configurations": [
        {
            "name": "g++ build and debug active file",
            "type": "cppdbg",
            "request": "launch",
            "program": "${fileDirname}/${fileBasenameNoExtension}.o",
            "args": [
                "~/Downloads/opencv-logo.png"
            ],
            "stopAtEntry": false,
            "cwd": "${fileDirname}",
            "environment":  [
                {"name": "PKG_CONFIG_PATH", "value": "opencv Unzip directory/release/unix-install"},   // This is a unix-install in the release directory created after the opencv is decompressed. Make sure there is an opencv.pc file in that directory
                {"name": "DYLD_LIBRARY_PATH", "value": "/usr/local/opencv/build/lib"}   // This is the directory you specified when you compiled opencv make`CMAKE_INSTALL_PREFIX`
                // {"DYLD_LIBRARY_PATH": "/usr/local/opencv/build/lib"} //This configuration is incorrect!
            ],
            "externalConsole": true,         // This switch opens to indicate that a new command line window is opened and the program is running.
            "MIMode": "lldb",
            "preLaunchTask": "g++ build active file"         // The contents of this line should be the same as those of the `tasks'->`label'field of the previous file `.vscode/tasks.json'!
        }
    ]
}
File.vscode/c_cpp_properties.json
{
    "configurations": [
        {
            "name": "Mac",
            "includePath": [
                "/usr/local/include",
                "/Library/Developer/CommandLineTools/SDKs/MacOSX10.14.sdk/usr/include",
                "/usr/local/opencv/include",        // This is the directory you specified when you compiled opencv make`CMAKE_INSTALL_PREFIX`
                "${workspaceFolder}"
            ],
            "browse": {
                "limitSymbolsToIncludedHeaders": true,
                "databaseFilename": "",
                "path": [
                    "/usr/local/include",
                    "/Library/Developer/CommandLineTools/SDKs/MacOSX10.14.sdk/usr/include",
                    "/usr/local/opencv/include",     // This is the directory you specified when you compiled opencv make`CMAKE_INSTALL_PREFIX`
                    "${workspaceFolder}"
                ]
            },
            "intelliSenseMode": "clang-x64",
            "macFrameworkPath": [
                "/System/Library/Frameworks",
                "/Library/Frameworks"
            ],
            "compilerPath": "/usr/bin/g++",
            "cStandard": "c11",
            "cppStandard": "c++17"
        }
    ],
    "version": 4
}
Click on the VScode menu bar Debug > Start Debugging to run as follows: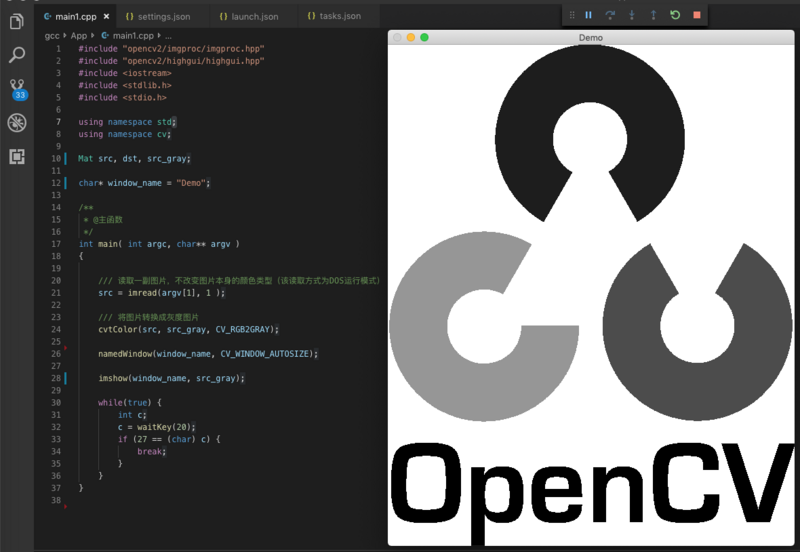
For debugging purposes, I set launch.json's externalConsole to true, which will open a new terminal runner outside of vscode, possibly with a popup box authorized to do so.
Common problem
- Error caused by incorrect configuration of pkg-config
Package opencv was not found in the pkg-config search path.
Perhaps you should add the directory containing `opencv.pc'
to the PKG_CONFIG_PATH environment variable
No package 'opencv' found
test.cpp:1:10: fatal error: 'opencv2/imgproc/imgproc.hpp' file not found
#include "opencv2/imgproc/imgproc.hpp"
         ^~~~~~~~~~~~~~~~~~~~~~~~~~~~~
1 error generated.
[Finished in 0.4s with exit code 1]
Solution:
Run the command to add a path
export PKG_CONFIG_PATH="/opencv Unzip directory/release/unix-install":"$PKG_CONFIG_PATH"
- dyld Package Dependency Problem
dyld: Library not loaded: @rpath/libopencv_dnn.3.4.dylib
  Referenced from: ~/App/test
  Reason: image not found
bash: line 1: 18912 Abort trap: 6           ~/App/test
[Finished in 1.0s with exit code 134]
Solution:
if you want to solve error on terminal you can use export DYLD_LIBRARY_PATH=your/lib:$DYLD_LIBRARY_PATH if you want to solve error on Xcode in build page , go to "Runpath Search Paths" add you lib path
Run the command to add a path
export DYLD_LIBRARY_PATH=/usr/include/opencv/build/lib:$DYLD_LIBRARY_PATH
Encountered problems, welcome to leave a message
Text Link .No reload support!