Reprint: https://www.mayi888.com/archives/60604
Character detection is a very important link in the process of character recognition. The main goal of character detection is to detect the position of the character area in the picture for later character recognition. Only when the text area is found can its content be recognized.
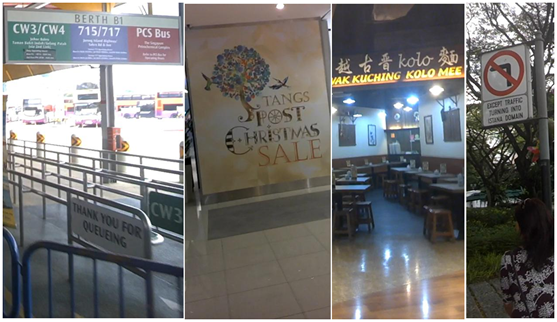
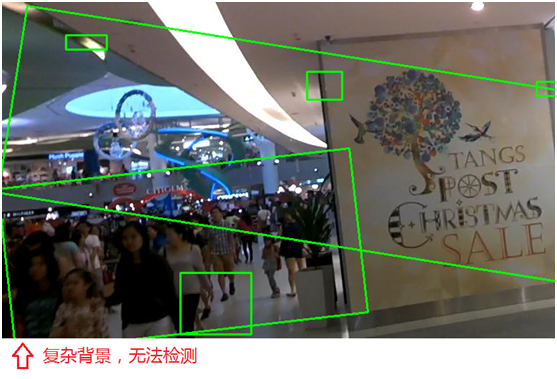
Text detection scenes are mainly divided into two types, one is simple scene, the other is complex scene. Among them, the text detection of simple scenes is relatively simple, such as book scanning, screen shots, or high-definition and regular photos; Complex scenes mainly refer to natural scenes. The situation is relatively complex, such as billboards on the street, product packaging boxes, instructions on equipment, trademarks, etc. there are various situations, such as complex background, light flickering, angle inclination, distortion, lack of clarity, and so on. Text detection is more difficult. As shown below:
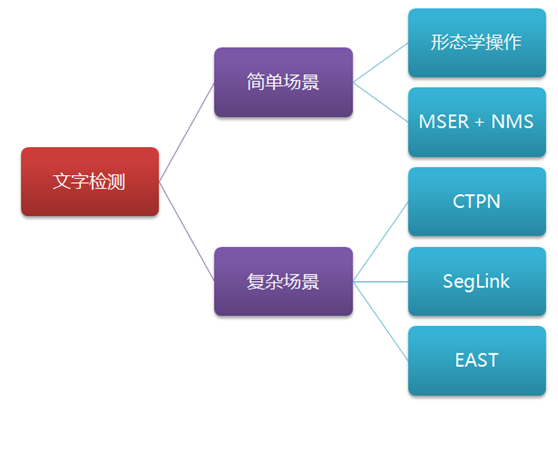
This paper will introduce the commonly used text detection methods in simple scenes and complex scenes, including morphological operation, MSER+NMS, CTPN, SegLink, EAST and other methods, and mainly introduce how to use these methods with ICDAR scene text and picture data set, as shown in the following figure:
1. Simple scene: morphological operation
By using the image morphological operations in computer vision, including the basic operations of expansion and corrosion, the text detection of simple scenes can be realized, such as detecting the position of the text area in the screenshot, as shown in the following figure:

Among them, "expansion" is to expand the highlighted part of the image to make more white areas; "Corrosion" is that the highlighted part of the image is eroded, making more black areas. Through a series of operations of expansion and corrosion, the outline of the text area can be highlighted, and some border lines can be eliminated, and then the position of the text area can be calculated by finding the outline. The main steps are as follows:
- Read the picture and convert it to grayscale
- Image binarization, or noise reduction first and then binarization, so as to simplify processing
- Expansion and corrosion operation, highlighting the outline and eliminating the border line
- Find the outline and remove the border that does not meet the characteristics of the text
- Returns the border result of text detection
The above process can be easily realized through OpenCV. The core code is as follows:
# -*- coding: utf-8 -*-

import cv2
import numpy as np

# Read picture
imagePath = '/data/download/test1.jpg'
img = cv2.imread(imagePath)

# Convert to grayscale image
gray = cv2.cvtColor(img, cv2.COLOR_BGR2GRAY)

# Generating binary graph by Sobel edge detection
sobel = cv2.Sobel(gray, cv2.CV_8U, 1, 0, ksize=3)
# Binarization
ret, binary = cv2.threshold(sobel, 0, 255, cv2.THRESH_OTSU + cv2.THRESH_BINARY)

# Expansion and corrosion
element1 = cv2.getStructuringElement(cv2.MORPH_RECT, (30, 9))
element2 = cv2.getStructuringElement(cv2.MORPH_RECT, (24, 6))

# Expand once to highlight the contour
dilation = cv2.dilate(binary, element2, iterations=1)

# Corrode once and remove the details
erosion = cv2.erode(dilation, element1, iterations=1)

# Expand again to make the outline more obvious
dilation2 = cv2.dilate(erosion, element2, iterations=2)

#  Find outline and filter text area
region = []
contours, hierarchy = cv2.findContours(dilation2, cv2.RETR_TREE, cv2.CHAIN_APPROX_SIMPLE)
for i in range(len(contours)):
    cnt = contours[i]

    # Calculate the contour area and filter out those with small area
    area = cv2.contourArea(cnt)
    if (area < 1000): continue # Find the smallest rectangle rect = cv2.minAreaRect(cnt) print ("rect is: ") print (rect) # box Is the coordinates of four points box = cv2.boxPoints(rect) box = np.int0(box) # Calculate height and width height = abs(box[0][1] - box[2][1]) width = abs(box[0][0] - box[2][0]) # Filter those too thin rectangles according to the text features, leaving flat if (height > width * 1.3):
        continue

    region.append(box)

# Draw outline
for box in region:
    cv2.drawContours(img, [box], 0, (0, 255, 0), 2)

cv2.imshow('img', img)
cv2.waitKey(0)
cv2.destroyAllWindows()
The image processing process is shown in the following figure:
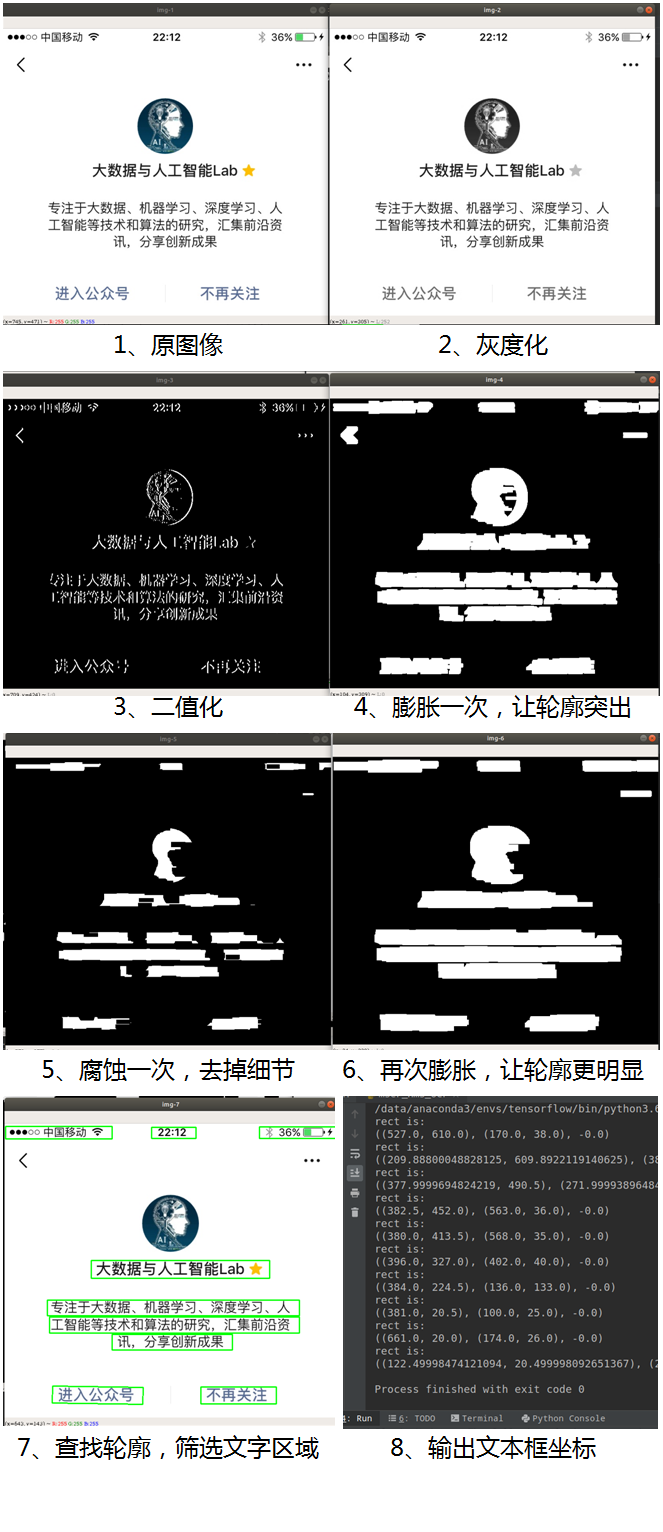
We can see that the text area in the image is finally successfully detected.
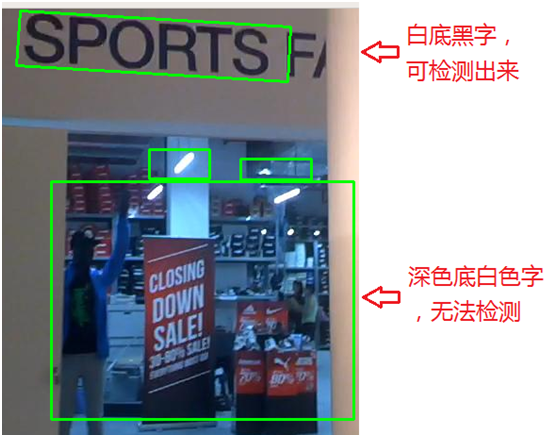
This method is characterized by simple calculation and fast processing, but its application scene in text detection is very limited. For example, if the picture is taken, the light is bright or dark, or the angle is inclined, the paper is deformed, etc., the method needs to be constantly readjusted to detect, and the effect will not be very good, as shown in the following figure. For example, the code described above is for the detection of black words on a white background. If it is white words on a dark background, you need to readjust the code.
2. Simple scenario: MSER+NMS detection method
MSER (maximum stable extreme regions) is a popular traditional method of text detection (compared with AI text detection based on deep learning). It is widely used in traditional OCR and is fast and accurate in some scenes.
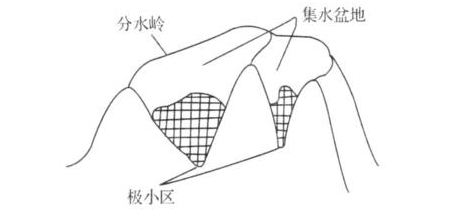
MSER algorithm was proposed in 2002, which is mainly based on the idea of watershed. The idea of watershed algorithm comes from topography. The image is regarded as a natural landform. The gray value of each pixel in the image represents the altitude of the point. Each local minimum and area is called a catchment basin, and the boundary between the two catchment basins is a watershed, as shown in the following figure:
The processing process of MSER is as follows: take different thresholds for binarization processing of a gray image, and the threshold increases from 0 to 255. This increasing process is like the continuous rise of the water surface on a piece of land. With the continuous rise of the water level, some lower areas will be gradually submerged. From the aerial view of the sky, the earth will become two parts of land and water, And the water area is expanding. In the process of "flooding", some connected regions in the image change little or even no change, then this region is called the maximum stable extreme region. On an image with text, because the color (gray value) of the text area is consistent, it will not be "submerged" at first in the process of continuous growth of the horizontal plane (threshold), and will not be "submerged" until the threshold increases to the gray value of the text itself. The algorithm can be used to roughly locate the position of the text area in the image.
It sounds like this processing process is very complex. Fortunately, the MSER algorithm has been built in OpenCV, which can be called directly, greatly simplifying the processing process.
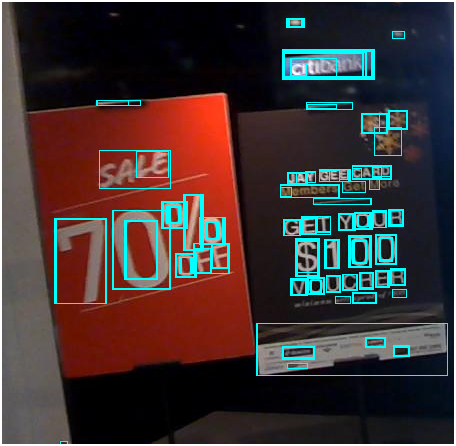
The detection effect is shown in the figure below:

The result of detection is that there are various irregular shapes of detection frames, which are transformed into rectangular frames by reprocessing the coordinates of these frames. As shown below:
The core code is as follows:
# Read picture
imagePath = '/data/download/test2.jpg'
img = cv2.imread(imagePath)
# Grayscale
gray = cv2.cvtColor(img, cv2.COLOR_BGR2GRAY)
vis = img.copy()
orig = img.copy()
# Call MSER algorithm
mser = cv2.MSER_create()
regions, _ = mser.detectRegions(gray) # Get text area
hulls = [cv2.convexHull(p.reshape(-1, 1, 2)) for p in regions] # Draw text area
cv2.polylines(img, hulls, 1, (0, 255, 0))
cv2.imshow('img', img)
# The irregular detection box is processed into a rectangular box
keep = []
for c in hulls:
x, y, w, h = cv2.boundingRect(c)
keep.append([x, y, x + w, y + h])
cv2.rectangle(vis, (x, y), (x + w, y + h), (255, 255, 0), 1)
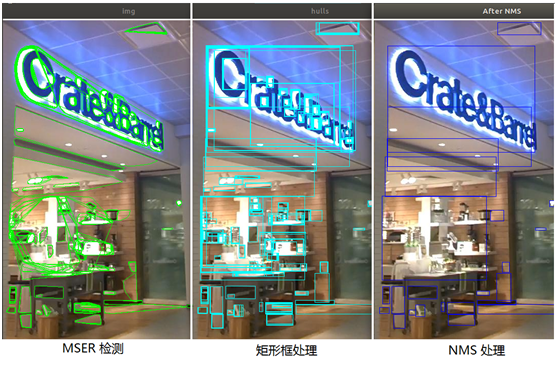
cv2.imshow("hulls", vis)As can be seen from the above figure, many detection boxes overlap. There are small boxes in the large box, and there are intersections between the boxes. Some boxes only circle the side of Chinese characters or some strokes, but we expect to circle the outer frame of characters, so as to facilitate subsequent character recognition. In order to deal with many overlapping size boxes, NMS method (Non Maximum Suppression) is generally used, that is, to suppress non maximum elements, that is, to suppress the box that is not the maximum size is equivalent to removing the small box contained in the large box, so as to remove the duplicate area and find the best detection position.
The main flow of NMS algorithm is as follows:
- Sort all frames by confidence score (if the frame has no confidence score, it can also be sorted by coordinates)
- Take the box with the highest score
- Traverse the overlapping area (IoU) of this box and other boxes
- Delete the box where IoU is greater than a certain threshold (the threshold can be set as required, such as 0.3, 0.5, 0.8, etc.)
- Take down the box with the highest score and repeat the above process
After the above steps, the last thing left is the text detection box without overlapping parts. The core code is as follows:
# NMS method (Non Maximum Suppression)
def nms(boxes, overlapThresh):
    if len(boxes) == 0:
        return []

    if boxes.dtype.kind == "i":
        boxes = boxes.astype("float")

    pick = []

    # Take four coordinate arrays
    x1 = boxes[:, 0]
    y1 = boxes[:, 1]
    x2 = boxes[:, 2]
    y2 = boxes[:, 3]

    # Calculated area array
    area = (x2 - x1 + 1) * (y2 - y1 + 1)

    # Sort by score (if there is no confidence score, sort by coordinates from small to large, such as the coordinates in the lower right corner)
    idxs = np.argsort(y2)

    # Start traversal and delete duplicate boxes
    while len(idxs) > 0:
        # Put the bottom right box into the pick array
        last = len(idxs) - 1
        i = idxs[last]
        pick.append(i)

        # Find the maximum and minimum coordinates in the remaining boxes
        xx1 = np.maximum(x1[i], x1[idxs[:last]])
        yy1 = np.maximum(y1[i], y1[idxs[:last]])
        xx2 = np.minimum(x2[i], x2[idxs[:last]])
        yy2 = np.minimum(y2[i], y2[idxs[:last]])

        # Calculate the proportion of overlapping area in the corresponding box, i.e. IoU
        w = np.maximum(0, xx2 - xx1 + 1)
        h = np.maximum(0, yy2 - yy1 + 1)
        overlap = (w * h) / area[idxs[:last]]

        # Delete if IoU is greater than the specified threshold
        idxs = np.delete(idxs, np.concatenate(([last], np.where(overlap > overlapThresh)[0])))

    return boxes[pick].astype("int")
The test results after NMS processing are as follows:

It can be seen from the above figure that the text area can be well detected and circled after MSER+NMS.
MSER+NMS detection method is widely used in traditional OCR applications, and the detection speed is also very fast, which can meet a certain character recognition scene. However, in complex natural scenes, especially those with complex backgrounds, the detection effect is not satisfactory, and some irrelevant factors will be detected, as shown in the following figure:
[here comes the point]
The next method to be introduced is AI text detection method based on deep learning, which can be applied to complex natural scenes.
3. Complex scene: CTPN detection method
CTPN (Detecting Text in Natural Image with Connectionist Text Proposal Network) is a text detection method based on convolutional neural network and cyclic neural network. Its basic method is to generate a series of text proposals with appropriate size for text line detection. The schematic diagram is as follows, Please refer to the previous article (article: Classical model of Dahua text detection: CTPN)

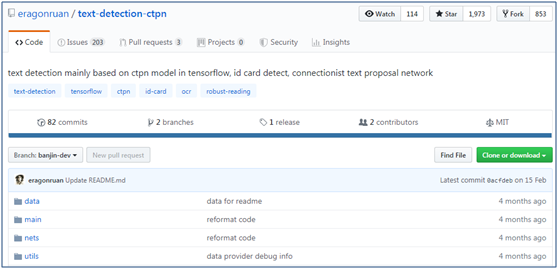
Ctpn detection method can adapt to more complex natural scenes. It is one of the common methods of composition word detection in deep learning. The original author of ctpn provides the source code of the algorithm( https://github.com/tianzhi0549/CTPN ), which is based on caffe deep learning framework. You may be more familiar with tensorflow, so someone provided the tensorflow version of ctpn program on GitHub( https://github.com/eragonruan/text-detection-ctpn ), the following describes how to use this program for text detection.
(1) Download source code and model
① First, download the CTPN source code of tensorflow version, which can be directly downloaded into zip package or git clone
② Next, compile and install
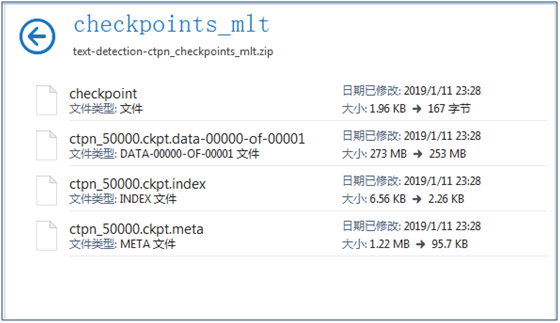
③ Download the pre trained model at https://pan.baidu.com/s/1BNHt_9fiqRPGmEXPaxaFXw , the downloaded compressed file is checkpoints_mlt.zip, create a new directory text detection ctpn, and unzip it to checkpoints_ The MLT folder is placed in the text detection ctpn directory
(2) CTPN text detection capability test
Put the pictures in the data/demo directory (there are test pictures by default. If you want to detect your own pictures, put your own pictures in the data/demo directory), and then execute the following command to use CTPN for text detection
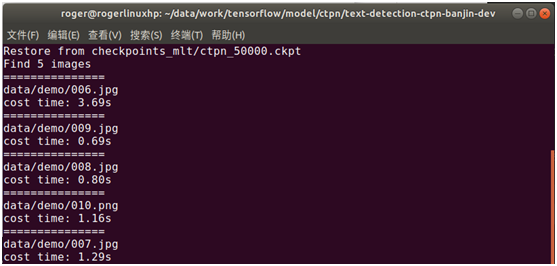
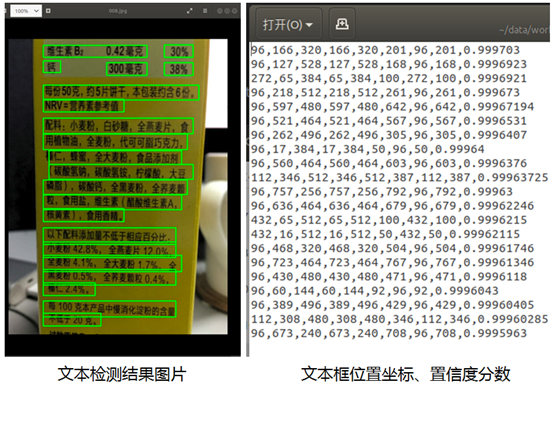
The test results are stored in the data/res directory. The test results are composed of pictures, test frame position and confidence score information, as shown in the following figure:
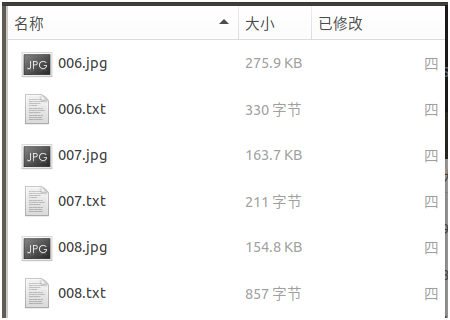
After opening the file, as shown in the figure below, it can be seen that the text has been well detected:
When you open other pictures, you can see the test results as follows. The test effect is good, as shown in the following figure:
(3) CTPN text detection capability encapsulation
Through the main / demo Py program is slightly modified to encapsulate the CTPN detection capability and provide it to other programs. The core code is as follows:
# Text detection method based on CTPN
# Input: picture
# Return: text box position and confidence score
def text_detect(image):

    with tf.get_default_graph().as_default():
        # Model parameter definition
        input_image = tf.placeholder(tf.float32, shape=[None, None, None, 3], name='input_image')
        input_im_info = tf.placeholder(tf.float32, shape=[None, 3], name='input_im_info')

        global_step = tf.get_variable('global_step', [], initializer=tf.constant_initializer(0), trainable=False)

        bbox_pred, cls_pred, cls_prob = model.model(input_image)

        variable_averages = tf.train.ExponentialMovingAverage(0.997, global_step)
        saver = tf.train.Saver(variable_averages.variables_to_restore())

        with tf.Session(config=tf.ConfigProto(allow_soft_placement=True)) as sess:
            # Loading model
            ckpt_state = tf.train.get_checkpoint_state(checkpoint_dir)
            model_path = os.path.join(checkpoint_dir, os.path.basename(ckpt_state.model_checkpoint_path))
            saver.restore(sess, model_path)

            # Predicted text box position
            img = image
            h, w, c = img.shape
            im_info = np.array([h, w, c]).reshape([1, 3])
            bbox_pred_val, cls_prob_val = sess.run([bbox_pred, cls_prob],
                                                   feed_dict={input_image: [img],
                                                              input_im_info: im_info})

            textsegs, _ = proposal_layer(cls_prob_val, bbox_pred_val, im_info)
            scores = textsegs[:, 0]
            textsegs = textsegs[:, 1:5]

            textdetector = TextDetector(DETECT_MODE='H')
            boxes = textdetector.detect(textsegs, scores[:, np.newaxis], img.shape[:2])
            boxes = np.array(boxes, dtype=np.int)

    return boxes,scores
From the above detection results, CTPN detection method has better detection effect in complex natural scenes.
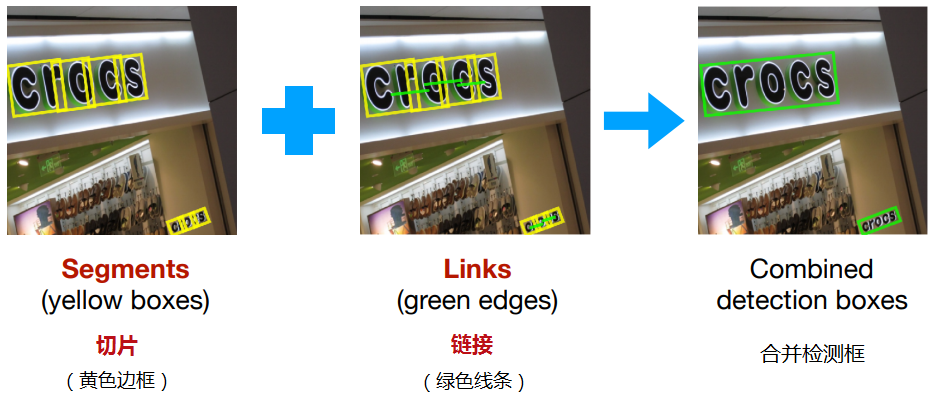
4. Complex scene: SegLink detection method
Although the text detection effect of CTPN in natural scenes is good, the detection effect of CTPN is based on horizontal direction, which is not good for non-horizontal text detection. In natural scenes, there are a lot of text information with a certain rotation and tilt angle, such as billboards on the street. The SegLink detection method introduced next can realize the multi angle detection of rotating text. The model mainly realizes the detection of text through Segment and Link. The schematic diagram is as follows. See the previous article for the specific technical principle (article: Classic model of Dahua text detection: SegLink)
The following describes how to use SegLink to detect text.
(1) Download source code and model
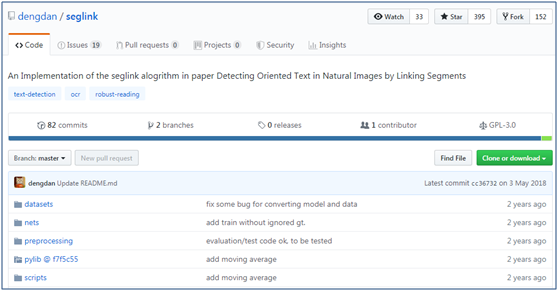
① First, download the tensorflow version of SegLink source code on GitHub( https://github.com/dengdan/seglink ), which can be directly downloaded into zip package or git clone
git clone https://github.com/dengdan/seglink.git
② Download pylib. The download path is https://github.com/dengdan/pylib/tree/f7f5c5503fbb3d9593e6ac3bbf0b8508f53ee1cf After decompression, put the util file in src under the pylib directory, and then add it to the environment variable in test_seglink.py preceded by
import sys
sys.path.append('/data/PycharmProjects/tensorflow/ocr/seglink/util')
Or execute the following command in the current window, or in / etc/profile, ~ / Add the following command to the bashrc file
export PYTHONPATH=xx:$PYTHONPATH
③ Download the pre trained model (based on SynthText and IC15 data sets), and the author provides two pre trained models seglink-384 (based on 384 × 384), seglink-512 (based on 512 × 512), the download address is https://pan.baidu.com/s/1slqaYux
④ Install dependent packages
conda install -c cachemeorg setproctitle
#Or the following commands
#pip install setproctitle
⑤ If python uses python 3, you need to make the following modifications (if python 2.x is used, please ignore)
- Modify test_seglink.py line 69, line 133, line 139, line 144, line 145, line 146, put parentheses after print
- Modify pylib / util / io_ Py, modify line 11, and change import cPickle as pkl to import pickle as pkl
- Modify pylib / util / io_ Py, modify line 12 and change import commands to import subprocess as commands
- Modify pylib / util / caffe_ Py, modify lines 29, 46, 47 and 50, and add parentheses after print
- Modify pylib / util / TF Py, modify line 41 and change xrange to range
- Modify config Py, modify line 129 and change xrange to range
- Modify tf_extended/seglink.py, modify lines 337, 625, 626, 759 and 761, and change xrange to range
- Modify test_seglink.py, line 153, comment out print(util.cmd.cmd(cmd))
⑥ Modification/ tf_extended/seglink.py, line 808, opencv3 has no cv Boxpoints() function, modified as follows:
# points = cv2.cv.BoxPoints(bbox) #opencv2.4.9
points = cv2.boxPoints(bbox) #opencv3.1.0
(2) SegLink detection Text Test (text box coordinates)
Test by running the following command
./scripts/test.sh 0 GPU_ID CKPT_PATH DATASET_DIR
The command consists of three parameters. The first represents GPU, the second represents model path, and the third represents data directory. For example, we use the seglink-384 pre training model we just downloaded to put the pictures to be detected into the specified directory for testing (we can use our own pictures or use the scene text picture data set ICDAR2015 for testing, and the download address is http://rrc.cvc.uab.es/?ch=4&com=downloads ), the executed script is as follows:
./scripts/test.sh 0 ./models/seglink-512/model.ckpt-217867 ./dataset/ICDAR2015 /ch4_test_images
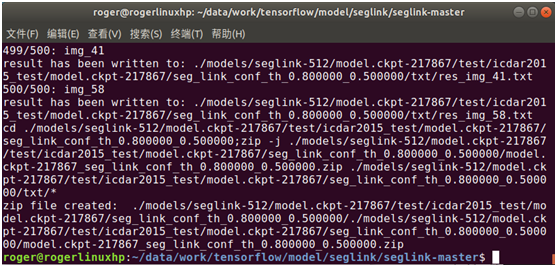
After detection, the text box position (8 coordinate points) detected by the picture is generated and stored in txt file, as shown in the following figure:
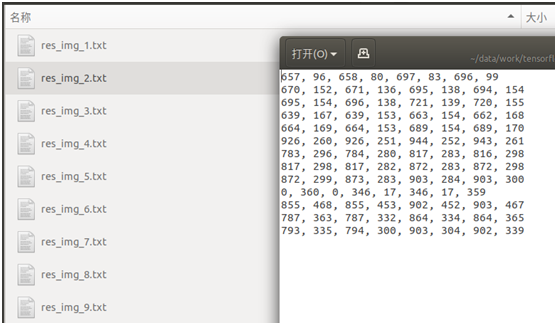
From the text box position results of these tests, they are not explicit, and we don't know the actual detection effect in the picture.
(3) SegLink detection Text Test (explicit results)
In order to display the picture results of text detection explicitly, you can display them through the following command in the format of
 python visualize_detection_result.py \
--image = directory of detected pictures
 --det = tested_ seglink. Py detects the position coordinates of the output text box
--Output = Specifies the output directory where the text box position is drawn on the picture
The command consists of three parameters. The first represents the input image, the second represents the text information of the output detection result, and the third represents the image of the output detection result
① In visualize_detection_result.py add environment variable
import sys
sys.path.append('/data/PycharmProjects/tensorflow/ocr/seglink/util')
② If Python uses python3, use visualize_detection_result.py line 65, put parentheses after print
python visualize_detection_result.py \ –image=./dataset/ICDAR2015/ ch4_test_images/ \ –det=./models/seglink-512/model.ckpt-217867/test/icdar2015_test/model.ckpt-217867/seg_link_conf_th_0.800000_0.500000/txt \ –output=./dataset/output
Visually display the test result information just output. The command called is as follows (take ICDAR2015 test picture set as an example. If you want to use your own photos, please replace the picture directory):
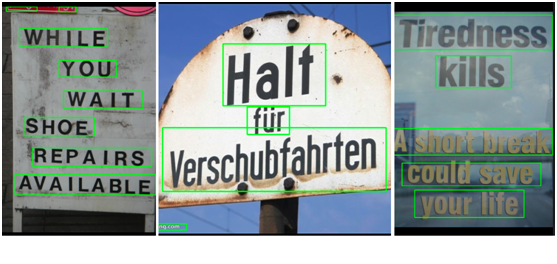
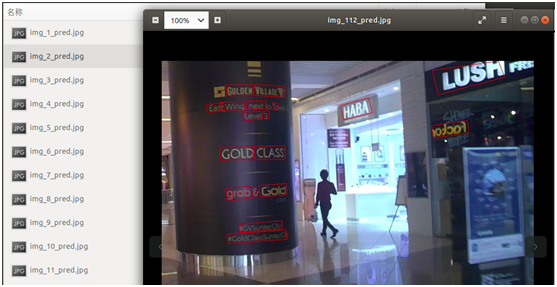
After execution, you can see that the image of the test result is directly output, as shown in the following figure:
Open other pictures and the detection effect is as follows:
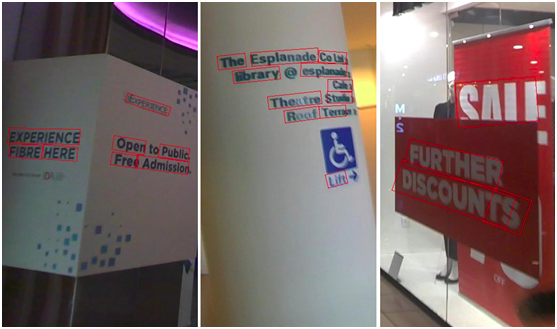
From the above detection results, we can better detect the text in the natural scene, especially some text with a certain tilt or rotation angle.
(4) SegLink text detection capability encapsulation
In order to facilitate the detection of SegLink in other programs, test_seglink.py, visualize_detection_result.py code can encapsulate the detection capability of seglink and provide it to other program calls
5. Complex scene: EAST detection method
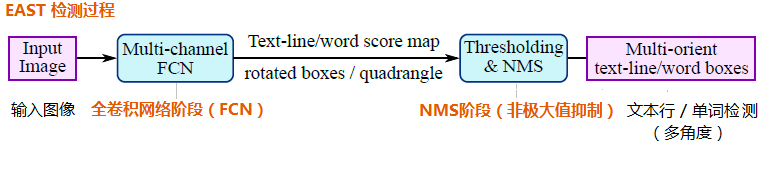
CTPN detection method and SegLink detection method realize the detection of text by predicting proposals and segment s, and then regression and merging. The intermediate process is relatively lengthy. The EAST detection method introduced next reduces the intermediate process to only two stages: FCN (full convolution network) and NMS (non maximum suppression), and the output results support multiple angle detection of text lines and words, which is efficient and accurate, and can adapt to a variety of natural application scenarios, as shown in the figure below. See the previous article (article: Classic model of Dahua text detection: EAST)
The following describes how to use EAST to detect text.
(1) Download source code and model
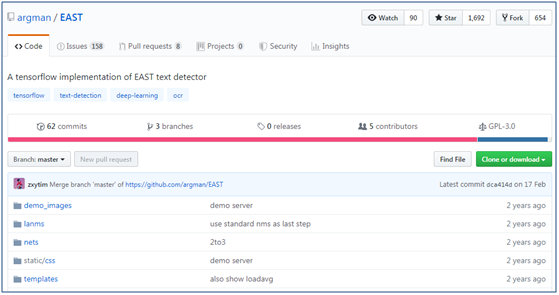
① First, download the source code of East on GitHub( https://github.com/argman/EAST ), which can be directly downloaded into zip package or git clone
② Download the pre trained model files (based on ICDAR 2013 and ICDAR 2015 data sets) on Baidu online disk at http://pan.baidu.com/s/1jHWDrYQ
③ To install shapely dependency package, execute the following command
(2) EAST detection Text Test (demo page)
Enter the East master directory and execute the following command to start the demo page
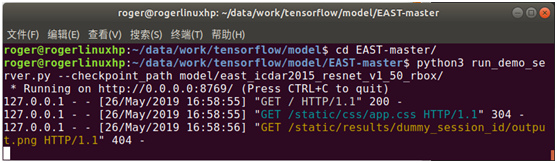
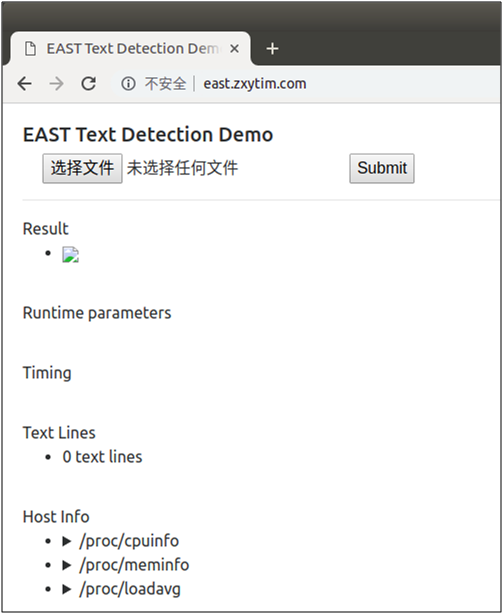
The page will load the output result picture by default. There is no result output when loading for the first time, so 404 will be prompted, which will not affect the later use.
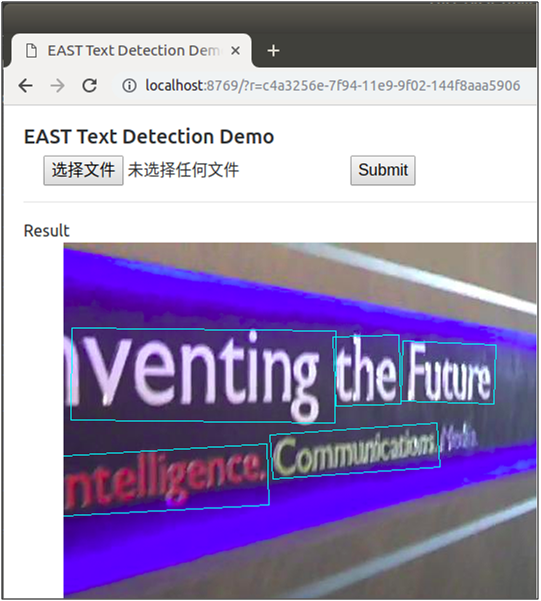
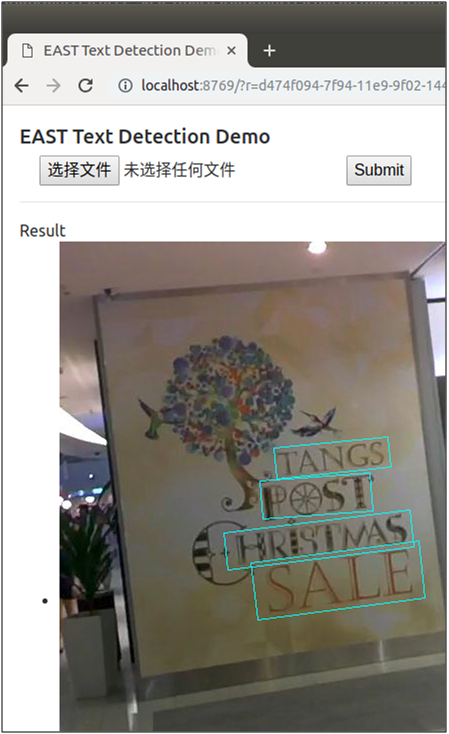
After entering the command in the browser, you can start the web service http://localhost:8769 , open the demo page, as shown below:
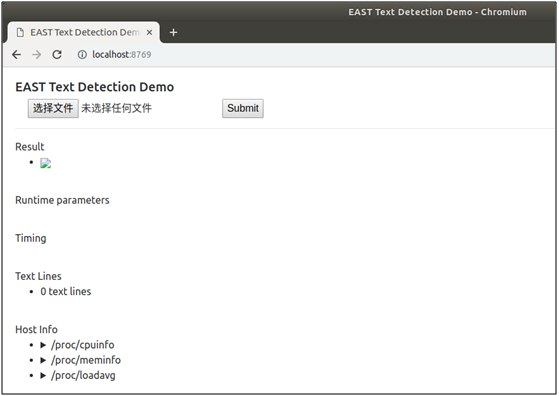
Click "select file" to select the pictures to be tested, and click "Submit" to Submit for testing. After testing, the tested pictures will be returned and displayed on the page, and three of them are randomly selected. The testing effect is as follows:

The author also kindly provides the online demo page, so that users can experience it directly. The use method is the same as the above demo page. The website link is http://east.zxytim.com/
(3) EAST Test Text Test (batch test)
You can call a batch of pictures through the command line to detect the text in batch, or use the ICDAR picture data set just now to detect (if you want to detect your own pictures, please replace the data directory). The commands are as follows:

After executing this command, the pictures will be read in batch for detection, and the detection results will be output, including the position of the text box detected in the picture and the picture after the detection result frames the text, as shown in the following figure:
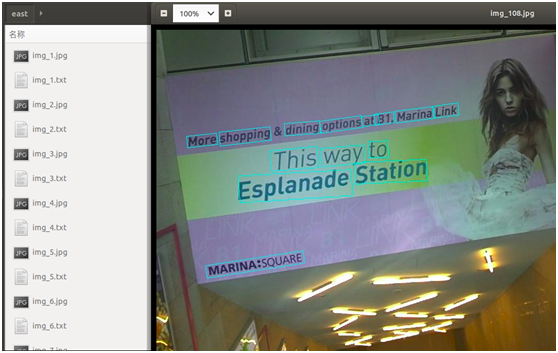
It can also be seen from the above figure that EAST can also better detect the text of natural scenes, and some text with rotation angle can also be accurately detected.
(4) EAST text detection capability encapsulation
In order to facilitate the provision of EAST to other code calls, eval Py to encapsulate the method of EAST text detection, which can be directly called by other codes. The codes are as follows:
# Text detection method based on SegLink
# Input: picture
# Return: text box position
def text_detect(img):
    with tf.name_scope('eval'):
        with tf.variable_scope(tf.get_variable_scope(),reuse=True):
            # model parameter
            image = tf.placeholder(dtype=tf.int32, shape=[None, None, 3])
            image_shape = tf.placeholder(dtype=tf.int32, shape=[3, ])
            # Preprocessing picture
            processed_image, _, _, _, _ = ssd_vgg_preprocessing.preprocess_image(image, None, None, None, None,
                                                                                 out_shape=config.image_shape,
                                                                                 data_format=config.data_format,
                                                                                 is_training=False)
            b_image = tf.expand_dims(processed_image, axis=0)
            b_shape = tf.expand_dims(image_shape, axis=0)
            # Prediction text box
            net = seglink_symbol.SegLinkNet(inputs=b_image, data_format=config.data_format)
            bboxes_pred = seglink.tf_seglink_to_bbox(net.seg_scores, net.link_scores,
                                                     net.seg_offsets,
                                                     image_shape=b_shape,
                                                     seg_conf_threshold=config.seg_conf_threshold,
                                                     link_conf_threshold=config.link_conf_threshold)

    sess_config = tf.ConfigProto(log_device_placement=False, allow_soft_placement=True)
    sess_config.gpu_options.allow_growth = True

    saver = tf.train.Saver()
    if util.io.is_dir(checkpoint_dir):
        checkpoint = util.tf.get_latest_ckpt(checkpoint_dir)
    else:
        checkpoint = checkpoint_dir

    with tf.Session(config=sess_config) as sess:
        # Loading model
        saver.restore(sess, checkpoint)
        # Prediction text box
        image_data = img
        image_bboxes = sess.run([bboxes_pred], feed_dict={image: image_data, image_shape: image_data.shape})
        bboxes = image_bboxes[0]

    return bboxes
For the convenience of introduction, when the text detection capabilities of CTPN, SegLink and EAST are encapsulated, the loading model, text box prediction, picture drawing text box and other codes are written together. In actual production and use, they are generally separated. When the OCR service capability is started in the background, the model is loaded in advance, and then the core text detection and recognition capabilities are provided, Whether the output result will draw the text box on the picture depends on the specific demand scenario.