1. redis master-slave replication
1.1 problems
Specific requirements are as follows:
- Configure the host 192.168.4.51 as the master server
- Configure the host 192.168.4.52 as the slave server of 192.168.4.51
- Test configuration
1.2 scheme
Deploy the redis master-slave replication structure and the host role, as shown in figure-1:
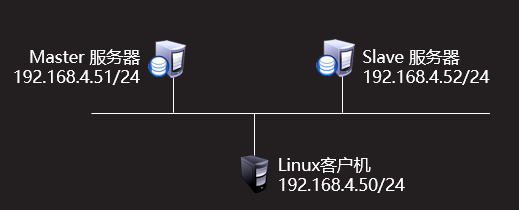
Figure-1
1.3 steps
To implement this case, you need to follow the following steps.
Step 1: configure the host 192.168.4.51 as the master server
1) Each redis server is the primary server by default; Therefore, the primary server does not need to be configured.
[root@redisA ~]# redis-cli -h 192.168.4.51 –p 6351
192.168.4.51:6351> info replication        //View replication information
# Replication
role:master            //master server
connected_slaves:0    //Count zero from server
master_replid:eaa14478158a71c41f947eaea036658c2087e8f2
master_replid2:0000000000000000000000000000000000000000
master_repl_offset:0
second_repl_offset:-1
repl_backlog_active:0
repl_backlog_size:1048576
repl_backlog_first_byte_offset:0
repl_backlog_histlen:0
192.168.4.51:6351>
Step 2: configure the host 192.168.4.52 as the slave server of 192.168.4.51
1) Command line configuration (effective immediately)
[root@redisB ~]# redis-cli -h 192.168.4.52 –p 6352
192.168.4.52:6352> slaveof  192.168.4.51  6351  //Specify the primary server ip address and port
OK
192.168.4.52:6352> info replication   //View replication information
# Replication
role:slave  //from server
master_host:192.168.4.51        //Primary server ip address
master_port:6351 //Primary server port
master_link_status:up //Connection status on
master_last_io_seconds_ago:3
master_sync_in_progress:0
2) Permanent configuration (still valid after redis service is restarted)
[root@redisB ~]# vim /etc/redis/6379.conf
slaveof  192.168.4.51  6351    //It can be added at the end of the file or modified on the original configuration item
:wq
3) Viewing replication information on the primary server
[root@redisA ~]# redis-cli -h 192.168.4.51 –p 6351
192.168.4.51:6351> info replication  //View replication information
# Replication
role:master
connected_slaves:1 //Number of slave servers: 1
slave0:ip=192.168.4.52,port=6352,state=online,offset=14,lag=1    //From server information
master_replid:db7932eb0ea4302bddbebd395efa174fb079319f
master_replid2:0000000000000000000000000000000000000000
master_repl_offset:14
second_repl_offset:-1
repl_backlog_active:1
repl_backlog_size:1048576
repl_backlog_first_byte_offset:1
repl_backlog_histlen:14
192.168.4.51:6351>
Step 3: test configuration
1) The client connects to the master server to store data
[root@client50 ~]# redis-cli -h 192.168.4.51 –p 6351
192.168.4.51:6351> set x  9
OK
192.168.4.51:6351> set y  8
OK
192.168.4.51:6351> set z  7
OK
192.168.4.51:6351>
2) Log in locally from the server to view the data (consistent with the data of the primary server)
[root@redisB ~]#     redis-cli -h 192.168.4.52 –p 6352
192.168.4.52:6352> keys  *
1)"x"
2)"y"
3)"z"
192.168.4.52:6352>
2. Configure master-slave replication with authentication
2.1 problems
- Specific requirements are as follows:
- Configuration based on case 1
- Set master server 192.168.4.51 set connection password 123456
- Configure slave server 192.168.4.52
2.2 steps
To implement this case, you need to follow the following steps.
Step 1: set the master server 192.168.4.51 and set the connection password 123456
1) Modify the configuration file of the master server and set the password.
[root@redisA ~]# vim +501 /etc/redis/6379.conf
requirepass  123456   //Set password
:wq
[root@redisA ~]# vim +43  /etc/init.d/redis_6379 / / modify script
$CLIEXEC -h 192.168.4.51 -p 6351 -a 123456  shutdown //Add password
:wq
[root@redisA ~]# /etc/init.d/redis_6379 stop / / stop the service
[root@redisA ~]# /etc/init. d/redis_ 6379 start / / start the service
Starting Redis server...
[root@redisA ~]#
[root@redisA ~]# Netstat - utnlp | grep: 6351 / / view port
tcp        0      0 192.168.4.51:6351       0.0.0.0:*               LISTEN      11523/redis-server
Step 2: configure slave server 192.168.4.52
1) Modify the configuration file and set the primary server connection password.
[root@redisB ~]# /etc/init.d/redis_6379 stop / / stop the service
[root@redisB ~]# vim +289 /etc/redis/6379.conf
masterauth  123456   //Set password
:wq
[root@redisA ~]# /etc/init. d/redis_ 6379 start / / start the service
Starting Redis server...
[root@redisA ~]#
[root@redisA ~]# Netstat - utnlp | grep: 6351 / / view port
tcp        0      0 192.168.4.51:6351       0.0.0.0:*               LISTEN      11523/redis-server
2) When connecting to the service locally from the server, view the replication information
[root@redisB ~]# redis-cli -h 192.168.4.52 –p 6352
192.168.4.52:6352> info replication   //View replication information
# Replication
role:slave  //from server
master_host:192.168.4.51        //Primary server ip address
master_port:6351 //Primary server port
master_link_status:up //Connection status on
master_last_io_seconds_ago:3
master_sync_in_progress:0
......
......
192.168.4.52:6352>
3. Sentinel services
3.1 problems
- Specific requirements are as follows:
- Case based 2 configuration
- Configure sentinel service
- Test configuration
3.2 scheme
The role planning is shown in figure-1:
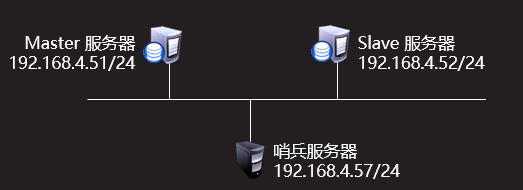
Figure-1
3.3 steps
To implement this case, you need to follow the following steps.
Step 1: configure sentinel service (192.168.4.57)
1) Install the source software redis without initialization configuration.
[root@redis57 redis]# yum -y install gcc
[root@redis57 redis]# tar -zxf redis-4.0.8.tar.gz
[root@redis57 redis]# cd redis-4.0.8/
[root@redis1 redis-4.0.8]# make
[root@redis1 redis-4.0.8]# make install
2) Edit Master profile
[root@redis57 redis]# vim  /etc/sentinel.conf / / create the main configuration file
sentinel   monitor   server51   192.168.4.51   6351   1 //Monitor master server
bind  0.0.0.0    //Sentinel service address (representing all local network interfaces)
sentinel auth-pass  server51   123456   //Master server password
:wq
3) Start sentinel service
[root@redis57 redis]# redis-sentinel /etc/sentinel.conf / / start sentinel service
25371:X 28 Sep 11:16:54.993 # +sdown master redis51 192.168.4.51 6351
25371:X 28 Sep 11:16:54.993 # +odown master redis51 192.168.4.51 6351 #quorum 1/1
25371:X 28 Sep 11:16:54.993 # +new-epoch 3
25371:X 28 Sep 11:16:54.993 # +try-failover master redis51 192.168.4.51 6351
25371:X 28 Sep 11:16:54.994 # +vote-for-leader be035801d4d48eb63d8420a72796f52fc5cec047 3
...
25371:X 28 Sep 11:16:55.287 * +slave slave 192.168.4.51:6351 192.168.4.51 6351 @ redis51 192.168.4.52 6351
25371:X 28 Sep 11:17:25.316 # +sdown slave 192.168.4.51:6379 192.168.4.51 6379 @ redis51 192.168.4.52 6352
Step 2: test configuration
1) Stop the redis service of the primary server 51
[root@redisA ~]#     /etc/init.d/redis_6379 stop
Stopping ...
Waiting for Redis to shutdown ...
Redis stopped
[root@redisA ~]#
2) On the server 52 host, view the replication information
 [root@redisB ~]# redis-cli -h 192.168.4.52 -p 6352
192.168.4.52:6352> info replication
# Replication
role:master  //The role is master
connected_slaves:0
......
......
4. Recover data using RDB files
4.1 problems
- The requirements are as follows:
- Enable RDB
- Set the save interval to 120 seconds, and 10 key s change the data to save automatically
- Backing up RDB files
- Delete data
- Recovering data using RDB files
4.2 steps
To implement this case, you need to follow the following steps.
Step 1: recover data using RDB files
RDB introduction:
Redis database file, full name: Reis database
One of the ways of data persistence
Writes a dataset snapshot in memory to the hard disk within a specified time interval
The term is Snapshot snapshot
During recovery, read the snapshot file directly into memory
Related configuration parameters
file name
dbfilename "dump.rdb" filename
How often data is saved from memory to hard disk
Save 900 seconds and 1 key changed
Save 300 seconds with 10 key s changed
Save takes 60 seconds and 10000 key s are changed
[root@redisA ~]# vim /etc/redis/6379.conf
dbfilename dump.rdb
save 900 1
#save 300 10 / / comment on the original settings
save 120 10 //The time is modified to 120 seconds
save 60 10000
: wq
[root@redisA ~]#     /etc/init.d/redis_6379 stop / / stop the service
Stopping ...
Waiting for Redis to shutdown ...
Redis stopped
[root@redisA ~]#
[root@redisA ~]# rm – RF / var / lib / redis / 6379 / * / / clear the database directory
[root@redisA ~]# /etc/init.d/redis_6379 start / / start the service
Starting Redis server...
[root@redisA ~]#
[root@redisA ~]# ls /var/lib/redis/6379 / / at this time, check that there is no dump in the database directory RDB file
[root@redisA ~]#
[root@redisA ~]# Redis cli - H 192.168.4.51 - P 6351 - a 123456 / / connect to the service, store 10 variables in 200 seconds, and dump will be automatically created in the database directory RDB file
192.168.4.51:6351> set v1 k1
OK
192.168.4.51:6351> set v2 k1
OK
192.168.4.51:6351> set v3 k1
OK
192.168.4.51:6351> set v4 k1
OK
192.168.4.51:6351> set v45 k1
OK
192.168.4.51:6351> set v46 k1
OK
192.168.4.51:6351> set v7 k1
OK
192.168.4.51:6351> set v8 k1
OK
192.168.4.51:6351> set v9 k1
OK
192.168.4.51:6351> set v10 k1
OK
192.168.4.51:6351> keys *
 1) "v2"
 2) "v9"
 3) "v10"
 4) "v45"
 5) "v4"
 6) "v1"
 7) "v46"
 8) "v8"
 9) "v7"
10) "v3"
192.168.4.51:6351>exit
[root@redisA ~]# ls /var/lib/redis/6379 / / at this time, check the database directory for dump RDB file
dump.rdb
[root@redisA ~]#
Backup data
[root@redisA ~]# cd /var/lib/redis/6379/
[root@redisA 6379]# ls
dump.rdb
[root@redisA 6379]# cp dump.rdb  /tmp/dump.rdb / / backup dump RDB file
[root@redisA 6379]# scp  /tmp/dump. rdb   root@192.168.4.56 : / root / / pass the backup file to the target host
Delete data (56 host simulation mistakenly delete data)
[root@redis56 ~]# Redis cli - H 192.168.4.56 – p 6356 / / connect to the service
192.168.4.56:6356> flushall
OK
192.168.4.51:6379> keys *        //There is no data
(empty list or set)
192.168.4.56:6356> exit
[root@redis56 ~]#
Recover data (56 hosts recover data using backup files)
[root@redis56 ~]# /etc/init.d/redis_6379 stop / / stop the service
Stopping ...
Waiting for Redis to shutdown ...
Redis stopped
[root@redis56 ~]#
[root@redis56 ~]# RM - RF / var / lib / redis / 6379 / * / / clear the database directory
[root@redis56 ~]# cp  /tmp/dump. RDB / var / lib / redis / 6379 / / / copy the backup file to the database directory
[root@redis56 ~]# /etc/init. d/redis_ 6379 start / / start the service
Starting Redis server...
[root@redis56 ~]# Redis cli - H 192.168.4.56 – p 6356 / / accessing the service
192.168.4.56:6356> keys *  //View data
 1) "v7"
 2) "v46"
 3) "v45"
 4) "v8"
 5) "v4"
 6) "v2"
 7) "v1"
 8) "v3"
 9) "v9"
10) "v10"
192.168.4.56:6356>
5. Recover data using AOF files
5.1 problems
- Specific requirements are as follows:
- Enable AOF
- Backup AOF files
- Delete data
- Recovering data using AOF files
5.2 steps
To implement this case, you need to follow the following steps.
Step 1: restore data using AOF files
1) Modify profile
[root@redisA ~]# Redis cli - H 192.168.4.51 – p 6351 -a 123456 / / connect to the service
192.168.4.51:6351>config  set   appendonly yes     //Enable aof, default no
192.168.4.51:6351> config  rewrite //Write into configuration file
192.168.4.51:6351> save
192.168.4.51:6351> exit
[root@redisA ~]# Ls / var / lib / redis / 6379 / / / appendonly.exe will appear Aof file
appendonly.aof  dump.rdb
[root@redisA ~ ]#
2) Backup AOF files
[root@redisA ~]# cd /var/lib/redis/6379/
[root@redisA 6379]# cp appendonly.aof /tmp/appendonly.aof
[root@redisA 6379]# scp /tmp/appendonly. aof   root@192.168.4.57 : / root / / pass the backup file to the target host
3) Delete data (in 57 host, the default data is deleted by mistake)
[root@redis57 ~]# Redis cli - H 192.168.4.57 - P 6357 / / connect to the service
192.168.4.57:6357> flushall  //Clear data
OK
192.168.4.57:6357> keys * //View data
(empty list or set)
192.168.4.57:6357> exit
[root@redis57  ~ ]#
- Recovering data using AOF files
[root@redis57 ~]# vim +673 /etc/redis/6379.conf
appendonly  yes  //Enable AOF
:wq
[root@redis57 ~]#
[root@redis57 ~]# /etc/init.d/redis_6379 stop / / stop the service
Stopping ...
Waiting for Redis to shutdown ...
Redis stopped
[root@redis57 ~]#
[root@redis57 ~]#  /etc/init. d/redis_ 6379 start / / start the service
Starting Redis server...
[root@redis57 ~]#
[root@redis57 ~]# RM - RF / var / lib / redis / 6379 / * / / delete files without data
[root@redis57 ~]# cp  /root/appendolny.aof /var/lib/redis/6379 / / / copy files
[root@redis57 ~]# /etc/init. d/redis_ 6379 start / / start the service
Starting Redis server...
[root@redis57 ~]# Redis cli - H 192.168.4.57 - P 6357 / / connect to the service
192.168.4.57:6357> keys *  //View data
 1) "v9"
 2) "v5"
 3) "v8"
 4) "v2"
 5) "v1"
 6) "v4"
 7) "v10"
 8) "v6"
 9) "v7"
10) "v3"
192.168.4.57:6357>
6. Character type
6.1 problems
- Practice using commands as follows:
set getrange strlen append setbit bitcount
decr decrby incr incrby incrbyfloat
6.2 steps
To implement this case, you need to follow the following steps.
Step 1: string
Set the key and value. The expiration time can be in seconds or milliseconds
setrange key offset value
192.168.4.56:6356> set  x 9 ex 10 //Unit second
OK
192.168.4.56:6356>
192.168.4.56:6356> set  y 29 px 10 //Unit: ms
OK
192.168.4.56:6356>
192.168.4.56:6356> set  y 39 NX //No assignment exists
OK
192.168.4.56:6356> get y //The variable value does not change
"39"
192.168.4.56:6356>
192.168.4.56:6356> set  y 49 xx //There is an assignment to the variable
OK
192.168.4.56:6356> get y //The variable has changed
"49"
192.168.4.56:6356>
- Copy the specific location value of the key from the offset
192.168.4.51:6351> set  first  "hello world"
OK
192.168.4.51:6351> setrange  first  6  "Redis"     //Rewrite to hello Redis
(integer) 11
192.168.4.51:6351> get first
"hello Redis"
- strlen key, statistics string length
192.168.4.51:6379> strlen first
(integer) 11
- append key value: if it exists, append; if it does not exist, create key and value, and return the key length
192.168.4.51:6379> append myname jacob
(integer) 5
- setbit key offset value sets or clears the bit on a specific offset for the string stored by the key. The value value can be 1 or 0, and the offset is between 0 and 2 ^ 32. If the key does not exist, a new key will be created
192.168.4.51:6379> setbit  bit  0  1          //Set bit 0 to 1
(integer) 0
192.168.4.51:6379> setbit  bit  1  0          //Set bit 1 to 0
(integer) 0
- bitcount key counts the number of bits set to 1 in the string
192.168.4.51:6379> setbit  bits 0 1        //0001
(integer) 0
192.168.4.51:6379> setbit  bits 3 1        //1001
(integer) 0
192.168.4.51:6379> bitcount  bits            //The result is 2
(integer) 2
Record the online frequency of website users, such as how many days user A has been online, and other similar data. If the user is online on A certain day, use setbit, take the user name as the key, set the online date of the website as offset, and set 1 on the offset. Finally, when calculating the total online times of users, use the bitcount user name, so that even if the website has been running for 10 years, Each user only occupies 10 * 365 bits, i.e. 456 bytes
192.168.4.51:6379> setbit  peter  100  1        //The website has been online for 100 days, and the user has logged in once
(integer) 0
192.168.4.51:6379> setbit  peter  105  1        //The website has been online for 105 days, and the user has logged in once
(integer) 0
192.168.4.51:6379> bitcount  peter
(integer) 2
- decr key reduces the value in the key by 1. If the key does not exist, it is initialized to 0 and then reduced by 1
192.168.4.51:6379> set z 10
OK
192.168.4.51:6379> decr z
(integer) 9
192.168.4.51:6379> decr z
(integer) 8
192.168.4.51:6379> decr bb
(integer) -1
192.168.4.51:6379> decr bb
(integer) -2
- By key decrement subtracts the decrement from the value in the key
192.168.4.51:6379> set count 100
OK
192.168.4.51:6379> DECRBY cc 20    //Define each reduction of 20 (steps)
(integer) -20
192.168.4.51:6379> DECRBY cc 20
(integer) -40
- getrange key start end returns the substring in the string value. The interception range is start and end. The negative offset represents counting from the end, - 1 represents the last character and - 2 represents the penultimate character
192.168.4.51:6379> set x 123456789
OK
192.168.4.51:6379> getrange x -5 -1
"56789"
192.168.4.51:6379> getrange x 0 4
"12345"
- incr key adds 1 to the value of the key. If the key does not exist, it is initially 0 and then 1. It is mainly used as a counter
192.168.4.51:6379> set page 20
OK
192.168.4.51:6379> incr page
(integer) 21
- incrby key increment increases the value of the key by increment
192.168.4.51:6379> set x 10
OK
192.168.4.51:6379> incr x
(integer) 11
192.168.4.51:6379> incr x
(integer) 12
- incrbyfloat key increment is the value stored in the key plus the floating point increment increment
192.168.4.51:6379> set num 16.1
OK
192.168.4.51:6379> incrbyfloat num 1.1
"17.2"
13) Character type practice
Redis has no mandatory requirements for key naming, but a better practice is to name a key with "object type: object ID: object attribute". For example, use the key [user:1:friends] to store the friend list of the user with ID 1.
Example: if you are writing a blog website, a common function of the blog is to count the number of visits to articles. We can use a key named [post: Article ID:page.view] for each article to record the number of visits to articles. Each time we visit an article, use the INCR command to increase the corresponding key value.
# If a user accesses a blog with Article ID No. 42, the access count will be increased by 1
127.0.0.1:6379> INCR post:42:page.view
(integer) 1
127.0.0.1:6379> GET post:42:page.view
"1"
127.0.0.1:6379> INCR post:42:page.view
(integer) 2
127.0.0.1:6379> GET post:42:page.view
"2"
7. list
7.1 problems
Practice using commands as follows:
lpush llen lrange lpop
lindex lset rpush rpop
7.2 steps
To implement this case, you need to follow the following steps.
Step 1: list
- lpush key value [value...] insert one or more values into the header of the list key. If the key does not exist, create the key
192.168.4.51:6379> lpush list a b c        //The list values are c b a in turn
(integer) 3
- lrange key start stop reads the value of the key from the start position to the end of stop
192.168.4.51:6379> lrange list 0 2        //Start with bit 0 and read to bit 2
1) "c"
2) "b"
3) "a"
192.168.4.51:6379> lrange list 0 -1    //From beginning to end
1) "c"
2) "b"
3) "a"
192.168.4.51:6379> lrange list 0 -2        //Read the penultimate value from the beginning
1) "c"
2) "b"
- lpop key removes and returns the list header element data. If the key does not exist, it returns nil
192.168.4.51:6379> lpop list        //Deleting a header element can be performed multiple times
"c"
192.168.4.51:6379>  LPOP list
"b"
- Len key returns the length of the list key
192.168.4.51:6379>  llen list
(integer) 1
- lindex key index returns the index value in the list
192.168.4.51:6379> lindex  list  1
"c"
- lset key index value modifies the value of the index position in the key to value
192.168.4.51:6379> lpush list a b c d
(integer) 5
192.168.4.51:6379> lset list 3 test        //Change the third value in the list to test
OK
- rpush key value [value...] inserts value at the end of the key
192.168.4.51:6379> rpush list3  a b c    //list3 value is a b c
(integer) 3
192.168.4.51:6379> rpush list3 d    //Insert d at the end
(integer) 4
- rpop key deletes and returns the value at the end of the key
192.168.4.51:6379> RPOP list3
"d"
9) List type practice record of the latest 10 blog posts
127.0.0.1:6379> LPUSH posts:list 11 12 13
(integer) 3
127.0.0.1:6379> LRANGE posts:list 0 -1
1) "13"
2) "12"
3) "11"
8. Hash type
8.1 problems
Practice using commands as follows:
hset hmset hgetall hkeys hvals
hget hmget hdel
8.2 steps
To implement this case, you need to follow the following steps.
Step 1: hash table
1) hset key field value sets the field value in the hash table to value
192.168.4.51:6379> hset site google 'www.g.cn'
(integer) 1
192.168.4.51:6379> hset site baidu 'www.baidu.com'
(integer) 1
- hget key filed gets the value of the field in the hash table
192.168.4.51:6379> hget site google
"www.g.cn"
- hmset key field value [field value...] assigns values to multiple fields in the hash table at the same time
192.168.4.51:6379> hmset site google www.g.cn  baidu www.baidu.com
OK
- hmget key field [field...] returns the values of multiple fields in the hash table
192.168.4.51:6379> hmget site google baidu
1) "www.g.cn"
2) "www.baidu.com"
- hkeys key returns the names of all field s in the hash table
192.168.4.51:6379> hmset site google www.g.cn baidu www.baidu.com
OK
192.168.4.51:6379> hkeys  site
1) "google"
2) "baidu"
- hgetall key returns the list of all key names and corresponding values in the hash table
192.168.4.51:6379> hgetall site
1) "google"
2) "www.g.cn"
3) "baidu"
4) "www.baidu.com"
- hvals key returns the values of all keys in the hash table
192.168.4.51:6379> hvals site
1) "www.g.cn"
2) "www.baidu.com"
- hdel key field [field...] deletes the values of multiple fields in the hash table. If they do not exist, they are ignored
192.168.4.51:6379> hdel  site  google  baidu
(integer) 2
9) Hash type practice
Store the article with Article ID No. 10 in Redis as a hash
127.0.0.1:6379> HSET post:10 title Example solution Python
(integer) 1
127.0.0.1:6379> HGETALL post:10
1) "title"
2) "\xe4\xbe\x8b\xe8\xa7\xa3Python"
127.0.0.1:6379> HSET post:10 author ZhangZhiGang
(integer) 1
127.0.0.1:6379> HMSET post:10 date 2021-05-01 summary 'Python Programming'
OK
127.0.0.1:6379> HGETALL post:10
1) "title"
2) "\xe4\xbe\x8b\xe8\xa7\xa3Python"
3) "author"
4) "ZhangZhiGang"
5) "date"
6) "2021-05-01"
7) "summary"
9. Set type
9.1 problems
9.2 steps
To implement this case, you need to follow the following steps.
Step 1: practice the unordered set type command
127.0.0.1:6379> SADD letters a b c(integer) 3127.0.0.1:6379> SADD letters b c d(integer) 1127.0.0.1:6379> SMEMBERS letters1) "d"2) "b"3) "a"4) "c"127.0.0.1:6379> SREM letters a c(integer) 2127.0.0.1:6379> SMEMBERS letters1) "d"2) "b" 127.0.0.1:6379> SISMEMBER letters a(integer) 0127.0.0.1:6379> SISMEMBER letters b(integer) 1 127.0.0.1:6379> SADD s1 a b c(integer) 3127.0.0.1:6379> SADD s2 b c d(integer) 3127.0.0.1:6379> SINTER s1 s21) "b"2) "c"127.0.0.1:6379> SUNION s1 s21) "a"2) "c"3) "b"4) "d"127.0.0.1:6379> SDIFF s1 s21) "a" 127.0.0.1:6379> SCARD letters(integer) 2 # In collection s1 Two different elements are taken out at random. one hundred and twenty-seven.0.0.1:6379> SRANDMEMBER s1 21) "b"2) "c"# Two potentially identical elements are randomly extracted from the set S1. 127.0.0.1:6379> SRANDMEMBER s1 -21) "c"2) "c"127.0.0.1:6379> SRANDMEMBER s1 -21) "a"2) "b" 127.0.0.1:6379> SPOP s1"a"127.0.0.1:6379> SMEMBERS s11) "b"2) "c" 127.0.0.1:6379> SADD post:10:tags python redis nginx(integer) 3127.0.0.1:6379> SMEMBERS post:10:tags1) "python"2) "nginx"3) "redis" ··· **Step 2: practice the ordered set type command** explain: ```shell 127.0.0.1:6379> ZADD scores 88 tom 90 jerry 75 bob 92 alice(integer) 4127.0.0.1:6379> ZRANGE scores 0 -11) "bob"2) "tom"3) "jerry"4) "alice"127.0.0.1:6379> ZRANGE scores 0 -1 WITHSCORES1) "bob"2) "75"3) "tom"4) "88"5) "jerry"6) "90"7) "alice"8) "92"127.0.0.1:6379> ZADD scores 85 jerry(integer) 0127.0.0.1:6379> ZRANGE scores 0 -1 WITHSCORES1) "bob"2) "75"3) "jerry"4) "85"5) "tom"6) "88"7) "alice"8) "92" 127.0.0.1:6379> ZSCORE scores tom"88" 127.0.0.1:6379> ZRANGEBYSCORE scores 80 90 WITHSCORES1) "jerry"2) "85"3) "tom"4) "88" 127.0.0.1:6379> ZINCRBY scores 3 bob"78"127.0.0.1:6379> ZSCORE scores bob"78" 127.0.0.1:6379> ZCARD scores(integer) 4 127.0.0.1:6379> ZCOUNT scores 80 90(integer) 2 127.0.0.1:6379> ZREM scores bob(integer) 1 127.0.0.1:6379> ZRANK scores tom # obtain tom Ranking of(integer) 1 # Sort in ascending order, counting from 0127.0.0.1:6379> ZREVRANK scores alice # obtain alice Ranking of(integer) 0 # Sort in descending order, counting from 0 127.0.0.1:6379> ZADD posts:page.view 0 post:10:page.view(integer) 1127.0.0.1:6379> ZINCRBY posts:page.view 1 post:10:page.view"1"127.0.0.1:6379> ZRANGE posts:page.view 0 -1 WITHSCORES1) "post:10:page.view"2) "1" ··· # Exercise ## 1. Briefly describe the working principle of redis master-slave replication 1)slave towards master send out sync command 2)master Start the background save process and collect all commands to modify data 3)master After completing the background save, transfer the whole data file to slave 4)slave Receive the data file and load it into memory to complete the first full synchronization 5) When new data is generated later, master Continue to pass the modification commands collected by the new data to the slave,Complete synchronization ## 2. Briefly describe the persistence methods supported by redis 1)RDB((default) 2)AOF RDB introduce: Redis Database file, full name Redis DataBase One of the ways of data persistence Writes a dataset snapshot in memory to the hard disk at a specified time interval AOF Introduction: Append Only File record redis Service all writes Constantly append new write operations to the end of the file use cat Command to view the contents of the file ## 3. Briefly describe the default save settings for RDB persistence save 900 1 //Within 15 minutes and 1 key change is automatically saved save 300 10 //Within 5 minutes and 10 key changes are saved automatically save 60 10000 //10000 key changes are automatically saved within 1 minute ## 4 briefly describe the method of AOF file record writing appendfsync always //Record from time to time and complete disk synchronization appendfsync everysec //Record once per second and complete disk synchronization appendfsync no //Write aof without disk synchronization ## 5. Briefly describe the data type of redis. Redis Common data types: string character list list hash surface > In case of infringement, please contact the author to delete