In order to understand a large number of concurrent visits in large websites, it is far from enough to achieve distributed load balancing in websites. To the data business layer and data access layer, if the traditional data structure is still used, or only one server is used to handle so many database connection operations, the database will inevitably collapse, especially if the data is lost, the consequences will be even more unthinkable. At this time, we will consider how to reduce the connection of the database. Let's move on to today's topic.
The master-slave database is used to realize the separation of reading and writing, thus sharing the pressure of the master database. mysql is deployed on multiple servers, one of which is considered as the master database, while the other is considered as the slave database to achieve master-slave synchronization. The main database is responsible for the operation of writing, while the slave database is only responsible for the operation of reading, which can largely avoid the problem of data loss, but also reduce the connection of the database, reduce the load of the main database.
There are several ways of master-slave synchronous replication:
(1)
This paper describes the master-slave synchronization configuration of MySQL 5.7 database on centos 7 system, so as to realize the read-write separation operation.
1. Install mysql 5.7 on two centos 7 systems
Detailed installation steps can be found in this link. https://blog.csdn.net/qq_15092079/article/details/81629238.
The IP addresses of the two servers in this paper are the master server (192.168.17.130) and the slave server (192.168.17.132).
Create test databases on these two servers for later testing.
2 master master master server configuration
2.1 Configuration File my.cnf Modification
#According to the previous article, edit my.cnf file
[root@localhost mysql]# vim /etc/my.cnf

#In [mysqld], add:
server-id=1
log_bin=master-bin
log_bin_index=master-bin.index
binlog_do_db=test
#Remarks:
#server-id server unique identity.
#log_bin starts MySQL binary logs.
#binlog_do_db specifies the database that records binary logs, that is, the name of the database that needs to be replicated. If you replicate multiple databases, you can set this option repeatedly.
#binlog_ignore_db specifies a database that does not record binary logs, that is, the name of the database does not need to be replicated. If there are multiple databases, set this option repeatedly.
#It should be noted that binlog_do_db and binlog_ignore_db are mutually exclusive options, generally only one is needed.
2.2 Create users and privileges from the server
#Enter mysql database
[root@localhost mysql]# mysql -uroot -p
Enter password:

#Create master backup users and privileges from the database
mysql> grant replication slave on *.* to masterbackup@'192.168.17.%' identified by '123456';
#Remarks
#192.168.17.% wildcards, indicating that 0-255 IP can access the primary server, the formal environment, please configure the designated slave server IP.
#If 192.168.17%. is changed to 192.168.17%. then any ip can access the primary server as its slave database.

#Quit mysql
mysql> exit;
2.3 Restart mysql service
[root@localhost mysql]# service mysql restart
Shutting down MySQL.... SUCCESS!
Starting MySQL. SUCCESS!
2.4 View the status of the primary server
#Enter mysql database
[root@localhost mysql]# mysql -uroot -p
Enter password:

#View the status of the primary server
mysql> show master status;
+-------------------+----------+--------------+------------------+-------------------+
| File              | Position | Binlog_Do_DB | Binlog_Ignore_DB | Executed_Gtid_Set |
+-------------------+----------+--------------+------------------+-------------------+
| master-bin.000001 |      154 | test         |                  |                   |
+-------------------+----------+--------------+------------------+-------------------+
1 row in set (0.00 sec)
3 slave slave server configuration
3.1 Modification of my.cnf configuration file
#According to the previous article, edit my.cnf file
[root@localhost mysql]# vim /etc/my.cnf

#In [mysqld], add:
server-id=2
relay-log=slave-relay-bin
relay-log-index=slave-relay-bin.index
#replicate-do-db=test
#Remarks:
#Server-id server unique identity. If there are multiple slave servers, the server-id of each server can not be repeated. It is the same as IP. If you do not set server-id or 0, the slave server will not connect to the primary server.
#Reay-log starts MySQL binary logs, which can be used for data backup and crash recovery, or the master server hangs up and uses the slave server as the master server of other slave servers.
#replicate-do-db specifies a synchronized database. If you replicate multiple databases, set this option repeatedly. If binlog-do-db is not specified on the master side, replication-do-db can be used to filter on the slave side.
#replicate-ignore-db does not need a synchronized database. If there are multiple databases, set this option repeatedly.
#It should be noted that replicate-do-db and replicate-ignore-db are mutually exclusive options, generally only one is needed.
3.2 Restart mysql service
[root@localhost mysql]# service mysql restart
Shutting down MySQL.... SUCCESS!
Starting MySQL. SUCCESS!
3.3 Connect master Master Server
#Enter mysql database
[root@localhost mysql]# mysql -uroot -p
Enter password:

#Connect to master master master server
mysql> change master to master_host='192.168.17.130',master_port=3306,master_user='masterbackup',master_password='123456',master_log_file='master-bin.000001',master_log_pos=154;
#Remarks:
#master_host corresponds to the IP address of the primary server.
#master_port corresponds to the port of the primary server.
#master_log_file corresponds to the File column displayed by show master status: master-bin.000001.
#master_log_pos corresponds to the Position column displayed by show master status: 154.
3.4 Start slave data synchronization
#Start slave data synchronization
mysql> start slave;

#Stop slave data synchronization (if necessary)
mysql> stop slave;
3.5 View slave information
mysql> show slave status\G;
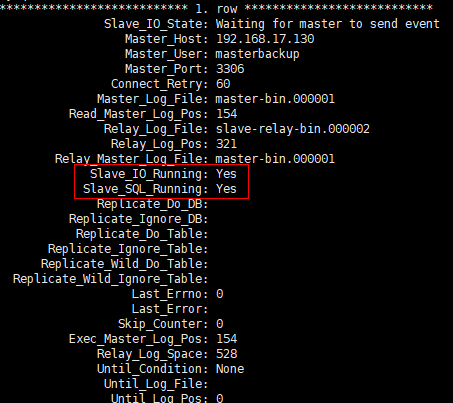
Slave_IO_Running and Slave_SQL_Running are yes, indicating successful synchronization.
4 test
(1) login mysql on the main server, enter the test database, create the test table, and insert a piece of data
Tip: It's better to use database management tools (such as nacicat) to operate here.
#Create the tb_test table
create table tb_test(ID varchar(36) primary key comment 'Primary key ID',MEMO varchar(500) not null comment 'information');
#Insert a piece of data
insert into tb_test(ID,MEMO) values('1','one test');
#Submission
commit;
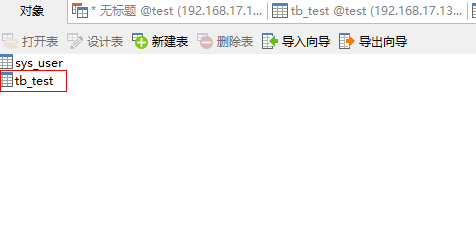
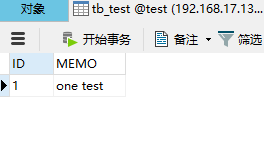
(2) login mysql from the server and enter the test database
You will find that there is also a tb_test table from the database, and there is one test data in the table, which proves that synchronization data is successful.
5. Solving errors
If one of the statements fails to synchronize in the process of master-slave synchronization and an error is reported, then the following statements can not be synchronized successfully.
So far, the master-slave synchronization of mysql database has been completed. As for the separation of reading and writing, we can achieve it by program. Here, we briefly explain the idea of implementation.
We can create a database user in the main server (for security, according to the needs of the corresponding permissions) mainly for write operations, in the program through this user to connect to the main database only for write operations, not read operations.
Creating a database user from the server (for security, only the right to read select) is mainly used for reading operations. In the program, the user can connect from the database.