During my recent internship in the company, I came to share my technology again. After reading what you shared before, I couldn't think of what to share for the moment. I was worried
I suddenly remembered that I was asked about axios during my first internship, so I came to study systematically to see if there was anything I could share.
1, What is axios
axios is a promise based HTTP network request library, which can act on browsers and node JS. It is isomorphic, that is, the same set of code can run in browser and node JS.
On the server side, it uses the native node The HTTP module of JS sends HTTP requests.
On the client side (browser side), use XMLHttpRequests to send a request to the server to obtain data.
GitHub address: https://github.com/axios/axio
Chinese documents: https://www.axios-http.cn/docs/intro
2, Characteristics
- Create XMLHttpRequests from browser
- From node JS create http request
- Promise API supported
- Intercept requests and responses
- Transform request and response data
- Cancel request
- Automatically convert JSON data
- Client support defense XSRF
3, Installation
Using npm:
npm install axios
Using bower:
bower install axios
Using yarn:
yarn add axios
Using jsDelivr CDN:
<script src="https://cdn.jsdelivr.net/npm/axios/dist/axios.min.js"></script>
Use cdpkung:
<script src="https://unpkg.com/axios/dist/axios.min.js"></script>
4, Basic use
After installing axios or introducing CDN, it can be used.
You can pass the relevant configuration to axios() to create the request. The following shows how to use axios(config) to send get, post, put and delete requests respectively.
For example, get data with get request:
axios({
    //Request type
    method: 'GET',
    //URL, fill in the URL according to your own needs
    url: 'http://localhost:3000/posts/2',
}).then(response => {
    console.log(response);
});
For example, use post to request new data:
axios({
    //Request type
    method: 'POST',
    //URL, fill in the URL according to your own needs
    url: 'http://localhost:3000/posts',
    //Set the request body and fill it in according to your own needs
    data: {
        title: "I'm a title"
    }
}).then(response => {
    console.log(response);
});
For example, update data with put request:
axios({
    //Request type
    method: 'PUT',
    //URL, fill in the URL according to your own needs
    url: 'http://localhost:3000/posts/3',
    //Set the request body and fill it in according to your own needs
    data: {
        title: "I'm the updated title"
    }
}).then(response => {
    console.log(response);
});
For example, use delete to delete data:
axios({
    //Request type
    method: 'DELETE',
    //URL, fill in the URL according to your own needs
    url: 'http://localhost:3000/posts/3',
}).then(response => {
    console.log(response);
});
5, axios common syntax
-
axios(config): a general / essential way to send any type of request
-
axios(url[, config]): you can only specify the url to send a get request
-
axios.request(config): equivalent to axios(config)
-
axios.get(url[, config]): send get request
-
axios.post(url[, data, config]): Send a post request
-
axios.put(url[, data, config]): Send a put request
-
axios.delete(url[, config]): Send a delete request
-
axios.defaults.xxx: requested default global configuration
-
axios.interceptors.request.use(): add request interceptor
-
axios.interceptors.response.use(): add a response interceptor
-
axios.create([config]): create a new Axios (it does not have the following functions)
-
axios.Cancel(): the error object used to create the cancel request
-
axios.CancelToken(): a token object used to create a cancellation request
-
axios.isCancel(): is it an error to cancel the request
-
axios.all(promises): used to execute multiple asynchronous requests in batch
-
axios.spread(): used to specify the method of callback function to receive all successful data
6, Request configuration
These are the configuration options you can use when creating a request, where only url is required. If no method is specified, the request will use the GET method by default.
{
  // `URL ` is the server URL for the request
  url: '/user',

  // `Method ` is the method used when creating the request
  method: 'get', // Default value

  // `baseURL 'will be automatically added before' URL ', unless' URL' is an absolute URL.
  // It can set a 'baseURL' to facilitate the delivery of relative URL s for axios instance methods
  baseURL: 'https://some-domain.com/api/',

  // `transformRequest ` allows you to modify the request data before sending it to the server
  // It can only be used for 'PUT', 'POST' and 'PATCH' request methods
  // The last function in the array must return a string, a Buffer instance, ArrayBuffer, FormData, or Stream
  // You can modify the request header.
  transformRequest: [function (data, headers) {
    // Arbitrarily convert the sent data

    return data;
  }],

  // `transformResponse ` it is allowed to modify the response data before passing it to then/catch
  transformResponse: [function (data) {
    // Arbitrarily convert the received data

    return data;
  }],

  // Custom request header
  headers: {'X-Requested-With': 'XMLHttpRequest'},

  // `params ` is the URL parameter sent with the request
  // Must be a simple object or URLSearchParams object
  params: {
    ID: 12345
  },

  // `paramsSerializer ` is an optional method, which is mainly used to serialize ` params`
  // (for example: https://www.npmjs.com/package/qs)
  paramsSerializer: function (params) {
    return Qs.stringify(params, {arrayFormat: 'brackets'})
  },

  // `Data ` is the data sent as the request body
  // Only 'PUT', 'POST', 'DELETE' and 'PATCH' request methods are applicable
  // If 'transformRequest' is not set, it must be one of the following types:
  // - string, plain object, ArrayBuffer, ArrayBufferView, URLSearchParams
  // -Browser specific: FormData, File, Blob
  // -Node exclusive: Stream, Buffer
  data: {
    firstName: 'Fred'
  },

  // Optional syntax for sending request body data
  // Request method post
  // Only value will be sent, and key will not
  data: 'Country=Brasil&City=Belo Horizonte',

  // `The number of milliseconds the request timed out.
  // If the request time exceeds the value of 'timeout', the request will be interrupted
  timeout: 1000, // The default value is' 0 '(never timeout)

  // `withCredentials ` indicates whether credentials are required for cross domain requests
  withCredentials: false, // default

  // `adapter ` allows custom processing of requests, which makes testing easier.
  // Returns a promise and provides a valid response.
  adapter: function (config) {
    /* ... */
  },

  // `auth` HTTP basic authentication
  auth: {
    username: 'janedoe',
    password: 's00pers3cret'
  },

  // `responseType ` indicates the data type that the browser will respond to
  // Options include: 'arraybuffer', 'document', 'json', 'text', 'stream'
  // Browser exclusive: 'blob'
  responseType: 'json', // Default value

  // `responseEncoding ` indicates the encoding used to decode the response (exclusive to Node.js)
  // Note: ignore the value of 'responseType' as' stream ', or the client request
  responseEncoding: 'utf8', // Default value

  // `Xsrfcookie name ` is the value of xsrf token and is used as the name of the cookie
  xsrfCookieName: 'XSRF-TOKEN', // Default value

  // `xsrfHeaderName ` is the name of the http request header with xsrf token value
  xsrfHeaderName: 'X-XSRF-TOKEN', // Default value

  // `onUploadProgress ` allows processing progress events for uploads
  // Browser exclusive
  onUploadProgress: function (progressEvent) {
    // Handling native progress events
  },

  // `onDownloadProgress ` allows processing progress events for downloads
  // Browser exclusive
  onDownloadProgress: function (progressEvent) {
    // Handling native progress events
  },

  // `maxContentLength ` defines node The maximum number of bytes of HTTP response content allowed in JS
  maxContentLength: 2000,

  // `maxBodyLength ` (Node only) defines the maximum number of bytes of http request content allowed
  maxBodyLength: 2000,

  // `validateStatus ` defines whether to resolve or reject the given HTTP status code.
  // If 'validateStatus' returns' true' (or set to 'null' or 'undefined'),
  // Then the promise will be resolved, otherwise it will be rejected.
  validateStatus: function (status) {
    return status >= 200 && status < 300; // Default value
  },

  // `maxRedirects ` is defined in node The maximum number of redirects to follow in JS.
  // If set to 0, no redirection occurs
  maxRedirects: 5, // Default value

  // `socketPath ` is defined in node JS.
  // e.g. '/var/run/docker.sock 'sends a request to the docker daemon.
  // Only 'socketPath' or 'proxy' can be specified.
  // If both are specified, use 'socketPath'.
  socketPath: null, // default

  // `httpAgent 'and' httpsAgent 'are defined in node JS to be used when executing http and https requests respectively. This allows you to add options that are not enabled by default, such as' keepAlive '.
  httpAgent: new http.Agent({ keepAlive: true }),
  httpsAgent: new https.Agent({ keepAlive: true }),

  // `Proxy ` defines the host name, port and protocol of the proxy server.
  // You can use regular ` http_proxy ` and ` https_proxy ` environment variable.
  // Use 'false' to disable the proxy function, and the environment variables will be ignored.
  // `Auth ` indicates that HTTP Basic auth should be used to connect to the proxy and provide credentials.
  // This will set a 'proxy authorization' request header, which will overwrite the existing custom 'proxy authorization' request header in 'headers'.
  // If the proxy server uses https, the protocol must be set to 'https'`
  proxy: {
    protocol: 'https',
    host: '127.0.0.1',
    port: 9000,
    auth: {
      username: 'mikeymike',
      password: 'rapunz3l'
    }
  },

  // `cancelToken ` specifies the cancellation token that can be used to cancel the request
  cancelToken: new CancelToken(function (cancel) {
  }),

  // `decompress ` indicates whether the response body should be decompressed automatically. If set to 'true', the 'content encoding' header will also be deleted from the response objects of all decompressed responses
  // -Nodes only (XHR cannot turn off decompression)
  decompress: true // Default value
}
7, Default configuration
After specifying the default configuration, it will act on each request. All the contents in the above request configuration can be configured by default.
1. Global axios default
For some duplicate configurations, the global default configuration can be proposed, such as the method baseURL in the following example.
//Set the default request type to GET
axios.defaults.method = 'GET';
//Set base URL
axios.defaults.baseURL = 'http://localhost:3000';
axios.defaults.headers.common['Authorization'] = AUTH_TOKEN;
axios.defaults.headers.post['Content-Type'] = 'application/x-www-form-urlencoded';
2. Custom instance defaults
// Configure defaults when creating instances
const instance = axios.create({
  baseURL: 'https://api.example.com'
});

// Modify default values after instance creation
instance.defaults.headers.common['Authorization'] = AUTH_TOKEN;
3. Priority of configuration
The merge will be configured by priority.
First, it will be in lib / defaults JS, then the defaults attribute of the instance, and finally the config parameter of the request.
The priority of the latter is higher than that of the former, that is, finding the latter will overwrite the former. Examples are as follows:
// Create an instance using the default configuration provided by the library. At this time, the default value of timeout configuration is ` 0`
const instance = axios.create();

// Override the default timeout value of the library. Now, all requests using this instance will wait 2.5 seconds before timeout
instance.defaults.timeout = 2500;

// Override the timeout for this request because it takes a long time
instance.get('/longRequest', {
  timeout: 5000
});
8, Response structure
{
  // `config is the configuration information requested by 'axios', which contains the request type, request URL, request body, etc.
  config: {},

  // `data ` the response provided by the server, that is, the result returned by the server.
  data: {},

  // `headers ` is the server response header
  // All header names are lowercase and can be accessed using square bracket syntax
  // For example: ` response headers['content-type']`
  headers: {},

  // `Request ` is the request that generated this response
  // In node JS, which is the last instance of ClientRequest (in redirects),
  // In the browser is the XMLHttpRequest instance
  request: {}

  // `Status ` HTTP status code from the server response
  status: 200,

  // `statusText ` HTTP status information from the server response
  statusText: 'OK',
}
When used When then, it will receive the following response, and then carry out its own logical processing according to the response result.
axios.get('/user/12345')
  .then(function (response) {
    console.log(response.data);
    console.log(response.status);
    console.log(response.statusText);
    console.log(response.headers);
    console.log(response.config);
  });
When using catch or passing a rejection callback as the second parameter of then, you can use the response through the error object, as shown below:
axios.get('/user/12345')
  .catch(function (error) {
    if (error.response) {
      // The request was successfully issued and the server responded to the status code, but the status code is out of the range of 2xx
      console.log(error.response.data);
      console.log(error.response.status);
      console.log(error.response.headers);
    } else if (error.request) {
      // The request was successfully initiated, but no response was received
      // `error.request ` is an instance of XMLHttpRequest in the browser, but in node JS is http Instance of clientrequest
      console.log(error.request);
    } else {
      // There was a problem sending the request
      console.log('Error', error.message);
    }
    console.log(error.config);
  });
Using the validateStatus configuration option, you can customize the HTTP code that throws errors. As shown below.
For the validateStatus configuration option, see the explanation in the request configuration.
axios.get('/user/12345', {
  validateStatus: function (status) {
    return status < 500; // Handle cases where the status code is less than 500
  }
})
Use toJSON to get more information about HTTP errors. As follows:
axios.get('/user/12345')
  .catch(function (error) {
    console.log(error.toJSON());
  });
9, Interceptor
Intercept requests / responses before they are processed by then /catch.
1. Classification
Interceptors are divided into two categories: request interceptors and response interceptors.
- axios.interceptors.request.use(): add request interceptor
- axios.interceptors.response.use(): add a response interceptor
The function of the request interceptor is to intercept the call before the request is sent. We can process and detect the parameters or contents of the request. For example, add a token to each request body. After unified processing, it is relatively easy to change later.
The function of response interceptor is to preprocess the result before processing it when the server returns the result. For example, when the server returns to the login status and fails and needs to log in again, jump to the login page.
The request interceptor passes config and the response interceptor passes response.
If the request interceptor is set, any request will call the request interceptor method; If a response interceptor is set, the response interceptor is invoked after any response is received.
2. Basic use
The request interceptor and response interceptor are as follows. You can see that the use function passes in two callbacks, one is successful and the other is failed. It is obviously related to Promise. You can see my blog about Promise: https://blog.csdn.net/qq_43652492/article/details/112461823
The reason why config is returned here is that the request interceptor needs to pass down the parameter configuration object after checking and processing.
// Add request interceptor
axios.interceptors.request.use(function (config) {
    // What to do before sending the request
    return config;
  }, function (error) {
    // What to do about request errors
    return Promise.reject(error);
  });


// Add response interceptor
axios.interceptors.response.use(function (response) {
    // Status codes within 2xx range will trigger this function.
    // Do something about the response data
    return response;
  }, function (error) {
    // This function is triggered by status codes that are outside the 2xx range.
    // Do something about response errors
    return Promise.reject(error);
  });
You can add interceptors to custom axios instances, as shown below:
const instance = axios.create();
instance.interceptors.request.use(function () {});
instance.interceptors.response.use(function () {});
3. Remove interceptor
If you need to remove the interceptor, you can operate as follows:
const myInterceptor = axios.interceptors.request.use(function () {});
axios.interceptors.request.eject(myInterceptor);
4. Execution sequence
The execution sequence after setting the interceptor is: request interceptor = > send request = > response interceptor = > response callback. These parts are connected through Promise's chain call to form the whole process of sending request, getting data and processing.
However, after setting multiple interceptors, what is the order?
// Set request interceptor
axios.interceptors.request.use(function (config) {
    console.log('Request interceptor succeeded No. 1');
    // Config configuration object, where you can change config
    return config;
}, function (error) {
    console.log('Request interceptor failed No.1');
    return Promise.reject(error);
});

axios.interceptors.request.use(function (config) {
    console.log('Request interceptor successful No. 2');
    // Config configuration object, where you can change config
    return config;
}, function (error) {
    console.log('Request interceptor failed No.2');
    return Promise.reject(error);
});

// Set response interceptor
axios.interceptors.response.use(function (response) {
    console.log('Response interceptor success No.1');
    // Response response result. In this position, you can process the response result, such as return response data;
    return response;
}, function (error) {
    console.log('Response interceptor failed No.1')
    return Promise.reject(error);
});

axios.interceptors.response.use(function (response) {
    console.log('Response interceptor success 2')
    // Response response result. In this position, you can process the response result, such as return response data;
    return response;
}, function (error) {
    console.log('Response interceptor failed No.2')
    return Promise.reject(error);
});

//Send request
axios({
    method: 'GET',
    url: 'http://localhost:3000/posts'
}).then(response => {
    console.log('Custom successful callback');
    // console.log(response);
}).catch(reason =>{
    console.log('Custom failure callback');
});

As shown in the above example, it can be found that the execution order is: request interceptor 2 = > request interceptor 1 = > send request = > response interceptor 1 = > response interceptor 2 = > callback of request. Why?
You can find the answer after reading the source code.
promise uses the shift method of the array when traversing and executing, and takes out two functions (successful callback and failed callback) from it for execution at a time.
Before traversal, we need to press the request callback and response callback of the interceptor into an array before traversal.
When adding the request interceptor function to the array, according to the execution order of axios requests, the request interceptor should be executed before sending the request, so it should be added in front of the sending request function. Therefore, the unshift method of the array is used, that is, header addition, so the request interceptor added later is always placed in the header.
Therefore, the request interceptor 2 requests interceptor 1 first and then.
So what method is the response interceptor used in the source code? It uses the push method of the array.
When adding a request interceptor function to the array, according to the execution order of axios requests, the response interceptor should be executed after sending the request, so it should be added after the sending request function. Therefore, the push method of the array is used, that is, adding at the end, so the added response interceptor is always placed at the end.
Therefore, response interceptor 1 responds to interceptor 2 first and then.
See the source code for details.
Later, I wrote a blog about the simulation implementation of axios source code. Part of it simulates the process. If you are interested, you can have a look = > axios source code simulation implementation
10, Cancel request
In the above axios common syntax, several are used to cancel the request operation.
- axios.Cancel(): the error object used to create the cancel request
- axios.CancelToken(): a token object used to create a cancellation request
- axios.isCancel(): is it an error to cancel the request
You can use canceltoken The source factory method generates a cancellation token token and a cancellation method cancel, and then cancels a request using the cancel token. As follows:
const CancelToken = axios.CancelToken;
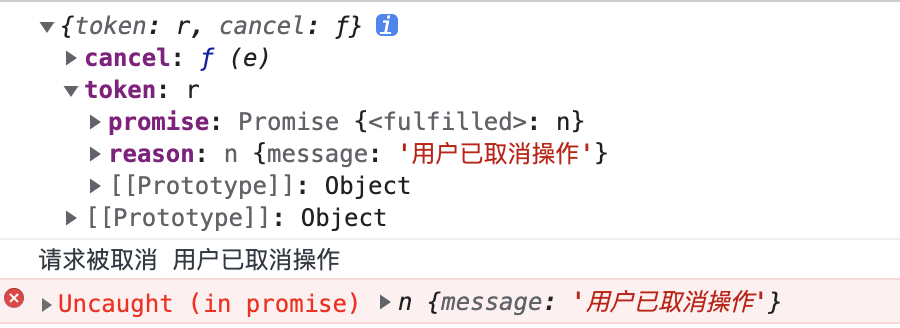
// You can print source to see what this is. The print result of the original code can be seen in the result diagram under the code
// source is an object that contains two fields, {token, cancel}
// cancel is a method that cancels the request for token injection when called
// Token represents a request, which is of Promise type. If the message parameter is passed in when the cancel() function is executed, as at the bottom of this code, the token will also contain the reason field, which is an object with message
const source = CancelToken.source();
console.log(source);
axios.get('/user/12345', {
// Inject token into the request
cancelToken: source.token
}).catch(function (thrown) {
// Judge whether it is an active cancellation request
if (axios.isCancel(thrown)) {
console.log('Request cancelled', thrown.message);
} else {
// Processing error
console.error(thrown);
}
});
axios.post('/user/12345', {
name: 'new name'
}, {
cancelToken: source.token
})
// Active cancellation request (message parameter is optional)
// The cancel method will cancel the same request method of the injected token, so the above get and post requests will be cancelled
// You can use the same cancel token to cancel multiple requests
source.cancel('The operation was cancelled by the user');
In the above code, we can see that in the get request, cancelToken is placed in the second parameter; In the post request, cancelToken is placed in the third parameter.
In the above code, we can also see that it uses axios We can make nothing of it by calling CancelToken (source) and generating token and cancel. The purpose of this is how to implement it internally. We can not know the content of this part.
Later, I wrote a blog about the simulation implementation of axios source code. Part of it simulates the process. If you are interested, you can have a look = > axios source code simulation implementation
In the Chinese document of axios, we can see that it provides another way to cancel the request operation. That is, cancel token is created by passing an executor function to the constructor of CancelToken, as shown in the following example:
const CancelToken = axios.CancelToken;
let cancel;

axios.get('/user/12345', {
  cancelToken: new CancelToken(function executor(c) {
    // The executor function takes a cancel function as an argument
    cancel = c;
  })
});

// Cancel request
cancel();
At this point, the basic knowledge of axios is over. We mainly study by watching documents and videos. After learning the source code of axios, we will stick and transfer links. Ha ha.
Let me paste the link: axios source code simulation implementation