RabbitMQ is an open source message broker software (also known as message oriented middleware) that implements the advanced message queuing protocol (AMQP)
Message Oriented Middleware
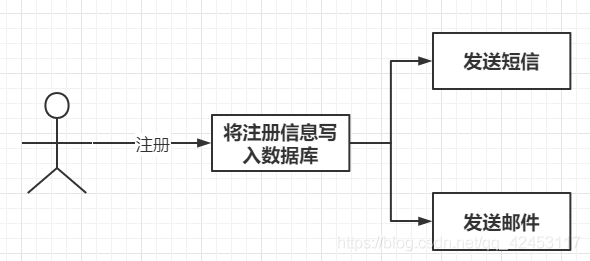
First, let's talk about what message oriented middleware is and what problems message oriented middleware can help us solve. Message middleware is a supporting software system based on queue and message passing technology to provide synchronous or asynchronous and reliable message transmission for application systems in the network environment. In short, message middleware can provide asynchronous processing capability for our system. For example, a system requires users to register before use. After registration, users need to send SMS and e-mail to remind users of successful registration. If they follow the synchronous process, it should be like this:

But there is a problem. After the user is registered successfully, do we need to wait for the system to send SMS and email before allowing the user to execute the next process? In fact, it is unnecessary. After successful registration, users can directly enter the next process, and the operations of sending SMS and sending email can be processed asynchronously:
The two operations are divided into two asynchronous tasks for execution. Although the overall execution efficiency is improved, users still have to wait for the operation that takes the longest time to complete. Therefore, we can introduce message middleware:
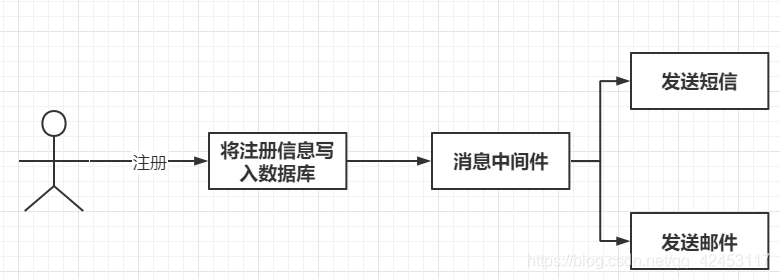
At this time, the user only needs to wait for the system to put the message into the message middleware. As for sending SMS and e-mail, the message middleware will automatically complete it, which will greatly improve the efficiency of registration and improve the user experience.
The function of message middleware is far more than that. It can also realize application decoupling. For example, after the user submits an order in an e-commerce system, the order service will call the interface provided by the inventory service to reduce inventory, as shown below:

Then the two services are coupled. When the interface of the inventory service changes, the order service must modify the code immediately, otherwise the program cannot run normally. If you want to solve this problem, you can add a message middleware in the service. The order service only needs to write the message to the middleware and the inventory service subscribes to the message, As follows:

Message oriented middleware can also be used to realize flow control, such as the familiar second kill service. When the second kill activity starts, the flow is very huge. In order to prevent a large number of requests from directly crushing the system, they can be written into the message queue in order, and then the system can slowly obtain the requests for processing:

Some concepts
I believe that through some usage scenarios of message oriented middleware, you can already have your own understanding of it. Here are some concepts of message oriented middleware, which are of great benefit to subsequent learning.
First, there are two very important concepts in message oriented middleware:
- Message broker
- destination
Message agent refers to the server with message middleware installed. The message sender will send the message to the message agent first, and then the message agent will deliver the message to the specified destination. As for the destination of the message, it is divided into two types:
- Queue: queue refers to the peer-to-peer (P2P) mode, in which a message can only be consumed by one consumer
- Topic: topic refers to the publish / subscribe mode, in which a message may be consumed by multiple consumers
In this article, RabbitMQ will be used as the implementation product of message middleware. There are also several concepts in RabbitMQ that need to be introduced:
- Message: a message consists of a message header and a message body
- Message producer (Publisher): the producer of messages and the client that publishes messages to RabbitMQ
- Message Consumer: the Consumer of the message, the client that consumes the message from RabbitMQ
- Exchange: the exchange is used to receive messages sent by message producers and route these messages to the message queue in RabbitMQ
- Message Queue: used to save messages produced by message producers
- Binding: used for binding between an exchange and a message queue
- Channel: an independent bidirectional data flow channel in a multiplexed connection
The execution flow of RabbitMQ is as follows:

First, the message producer establishes a long connection with the message broker. Because there are many producers who need to send messages, the message is transmitted through the channel. Students who have learned the channel multiplexing technology in network accounting should be able to understand why they do so; The message contains a message header and a message body. The message header contains a very important attribute, route key; The message will be kept by the message agent first. The message agent transmits the message to the switch, which is similar to the switch in the network. The switch can distribute the data in the network to any node connected to the switch by connecting to the external network. The same is true for the switch in RabbitMQ, which will distribute the message to a message queue, There is also a binding relationship between the switch and the message queue. When the routing key matches a binding relationship, the switch will distribute the message to the specified message queue. The message consumer will also establish a long connection with the message agent and listen to a message queue through channel multiplexing When a message is generated, the consumer can perceive and consume it.
Installing RabbitMQ
Next, install RabbitMQ. First, download the image:
docker pull rabbitmq:management
Run after downloading:
docker run -d --name rabbitmq -p 5671:5671 -p 5672:5672 -p 4369:4369 -p 25672:25672 -p 15671:15671 -p 15672:15672 rabbitmq:management
Now we can access the background of RabbitMQ through port 15672:
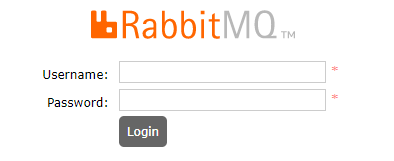
Both user name and password are guest.
Exchange
Focus on the switch. In the execution process of RabbitMQ, it can be found that messages must pass through the switch to enter the message queue, so the message delivered by the switch to the message queue can be divided into several situations, corresponding to several types of switches:
- direct
- fanout
- topic
- headers
Direct refers to the direct switch, which will accurately match the message according to the routing key in the message and deliver the message to a matched message queue; fanout is a fan out switch. It does not process routing keys, but gives messages to all message queues bound to the switch; Topic is a topic switch. It will perform pattern matching according to the routing key and deliver messages to some matched message queues. That is, the binding relationship between the switch and the message queue can be a pattern, such as test #. At this time, messages with routing keys of test, test1, test12, etc. will be delivered to the message queue by the switch; headers is the header switch. It does not process routing keys, but matches the message header in the message with the request header when receiving the message.
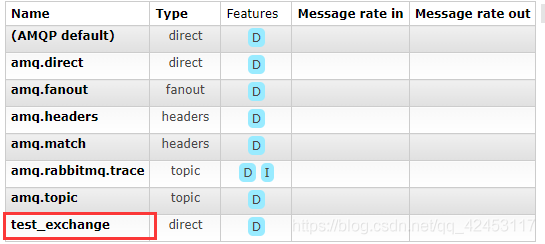
When RabbitMQ starts, it will automatically create 7 switches for us:
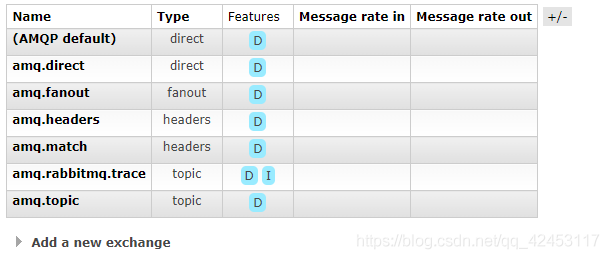
To create another exchange, click Add a new exchange below:
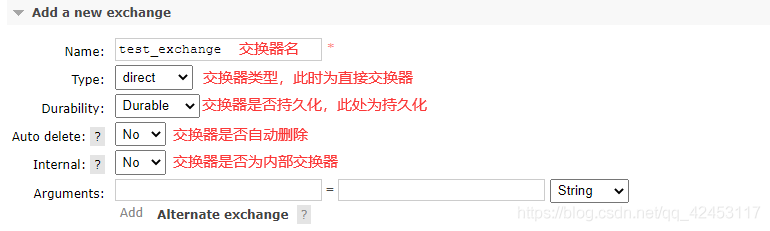
Whether the switch is automatically deleted. If Yes is set, it will be automatically deleted when the switch is not bound to any message queue; Whether the switch is an internal switch. If Yes is set, the client will not be able to send messages to the switch, which is equivalent to being invisible to the outside. After the switch is created, it must be bound to the message queue to work normally, so you also need to create a message queue:
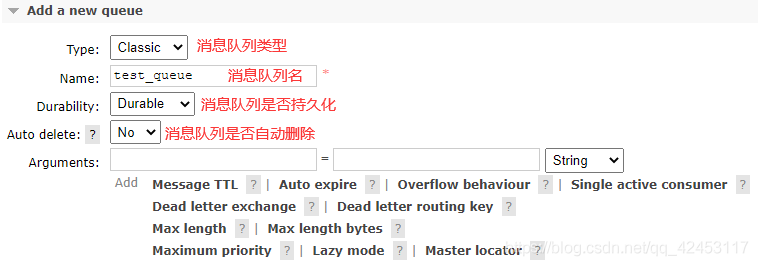
If Auto delete is set to Yes for the message queue, it will be automatically deleted when no client listens to the message queue.
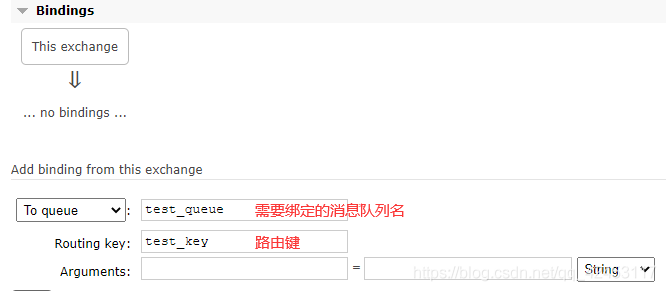
The switch and message queue are ready. Next, you need to establish a binding relationship between them. Click to enter the newly created switch:
Set binding relationship:
At this time, messages can be sent under the specified switch:
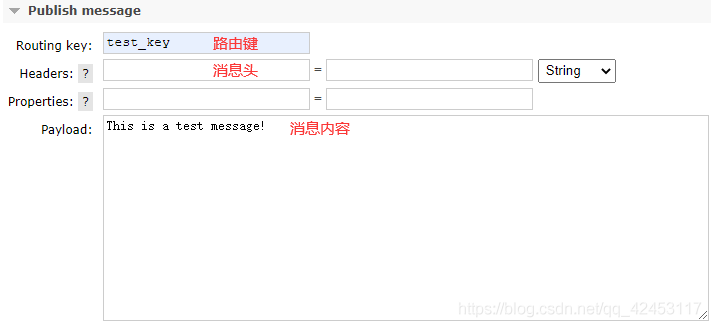
The direct switch will match exactly according to the routing key. When the routing key in the message and the routing key in the binding relationship between the switch and the message queue are exactly the same, the message will enter the message queue:

A message already exists in the message queue and is waiting for consumption. Enter the message queue to see the details of the message:

The same is true for other exchanger operations.
SpringBoot integrates RabbitMQ
Next, how to integrate RabbitMQ into SpringBoot applications is our focus. First, create a SpringBoot application and introduce dependencies:
<dependency>
  <groupId>org.springframework.boot</groupId>
  <artifactId>spring-boot-starter-amqp</artifactId>
</dependency>
Configure RabbitMQ:
spring:
  rabbitmq:
    host: 192.168.66.10 # Host address
    port: 5672 # Port number
    virtual-host: / # Virtual host, default to/
Finally, add the @ EnableRabbit annotation on the startup class.
So how to use code to create switches, message queues, send messages, and so on? RabbitMQ provides an AmqpAdmin class to add, delete, modify and query switches and message queues. The code is as follows:
@SpringBootTest
@EnableRabbit
class RabbitMqDemoApplicationTests {

    @Autowired
    private AmqpAdmin amqpAdmin;

    @Test
    void contextLoads() {
        // Create direct exchanger
        Exchange directExchange = new DirectExchange("direct-exchange");
        amqpAdmin.declareExchange(directExchange);
        // Create queue
        Queue queue = new Queue("test-queue");
        amqpAdmin.declareQueue(queue);
        // Establish binding relationship
        Binding binding = new Binding("test-queue",
                Binding.DestinationType.QUEUE,
                "direct-exchange",
                "test-key",
                null);
        amqpAdmin.declareBinding(binding);
    }
}
There are multiple overloaded construction methods for creating switches. The construction methods of all parameters are as follows:
public DirectExchange(String name, boolean durable, boolean autoDelete, Map<String, Object> arguments) {
    super(name, durable, autoDelete, arguments);
}
The meanings of parameters in the method are:
- Name: switch name
- durable: whether to persist. The default value is true; If false, it will not be persisted and will be deleted after RabbitMQ is restarted
- autoDelete: whether to delete automatically. The default value is false; If true, it will be automatically deleted when no message queue is bound to it
- arguments: specify parameters
There are also multiple overloaded methods for creating message queues. The construction method of all parameters is as follows:
public Queue(String name, boolean durable, boolean exclusive, boolean autoDelete, @Nullable Map<String, Object> arguments) {
    super(arguments);
    Assert.notNull(name, "'name' cannot be null");
    this.name = name;
    this.actualName = StringUtils.hasText(name) ? name : Base64UrlNamingStrategy.DEFAULT.generateName() + "_awaiting_declaration";
    this.durable = durable;
    this.exclusive = exclusive;
    this.autoDelete = autoDelete;
}
Parameter meaning:
- Name: message queue name
- durable: whether to persist. The default value is true
- Exclusive: exclusive or not. The default value is false; If true, when a client is connected to the message queue, other clients will not be able to connect to the queue
- autoDelete: whether to delete automatically. The default value is false
- arguments: specify parameters
There is only one construction method to create a binding relationship:
public Binding(String destination, DestinationType destinationType, String exchange, String routingKey,
               @Nullable Map<String, Object> arguments) {

    super(arguments);
    this.destination = destination;
    this.destinationType = destinationType;
    this.exchange = exchange;
    this.routingKey = routingKey;
}
Parameter meaning:
- Destination: destination, switch name or message queue name
- destinationType: destination type. You can select an exchange and message queue
- Exchange: the name of the exchange to be bound
- routingKey: routing key
- arguments: specify parameters
Here, the exchange and message queue are created, and the binding relationship is established. You can check the background for verification:

Next, try sending a message:
@SpringBootTest
@EnableRabbit
class RabbitMqDemoApplicationTests {

    @Autowired
    private RabbitTemplate rabbitTemplate;

    @Test
    void sendMessage(){
        // send message
        rabbitTemplate.convertAndSend("direct-exchange","test-key","hello rabbitmq!");
    }
}
When the message is sent successfully, it will enter the queue for consumption. Let's see how to consume the messages in the queue:
@Service
public class MessageServiceImpl implements MessageService {

    @RabbitListener(queues = {"test-queue"})
    @Override
    public void receiveMessage(Message message) {
        // Get message body
        byte[] body = message.getBody();
        // Get the property information of the message header
        MessageProperties messageProperties = message.getMessageProperties();
        System.out.println(new String(body));
        System.out.println(messageProperties);
    }
}
Add @ RabbitListener annotation on a business method with the value of the message queue name to be listened to, and then start the project. At this time, the method will listen to the test queue. When a message is generated in the queue, it will consume the message immediately and encapsulate the message into the method's input parameters. The output result is:
hello rabbitmq!
MessageProperties [headers={}, contentType=text/plain, contentEncoding=UTF-8, contentLength=0, receivedDeliveryMode=PERSISTENT, priority=0, redelivered=false, receivedExchange=direct-exchange, receivedRoutingKey=test-key, deliveryTag=1, consumerTag=amq.ctag-2Y8tYT5SDk0tartAFys6tg, consumerQueue=test-queue]
However, when you send the JSON data of an object, you also need to use the JSON tool to convert it into an object after obtaining the message content. Therefore, Spring helps us simplify this process. You can directly get the object by passing the object type into the method as a parameter:
@RabbitListener(queues = {"test-queue"})
@Override
public void receiveMessage(Message message,Person peson) {
    System.out.println(peson);
}