1. why
The server of the configuration center in the previous article can pull the real-time changed configuration from the remote warehouse, but the client cannot directly update the configuration. It needs to send a post request to the client to refresh the configuration (/ Actor / refresh). When there are few client microservices, it can accept them. Once there are hundreds of client microservices, It is impossible for the operation and maintenance engineer to send a post request to each client to manually refresh the configuration. Then, can a large-scale automatic refresh through a broadcast technology realize a notification and take effect everywhere? That is the message bus technology I want to write below
2. What is a message bus
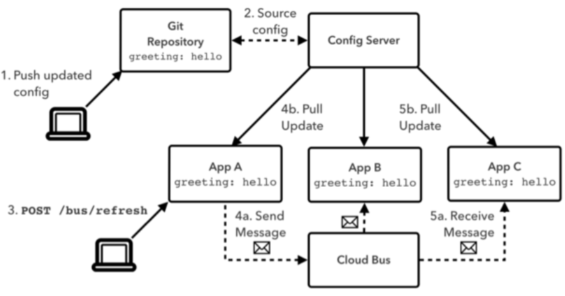
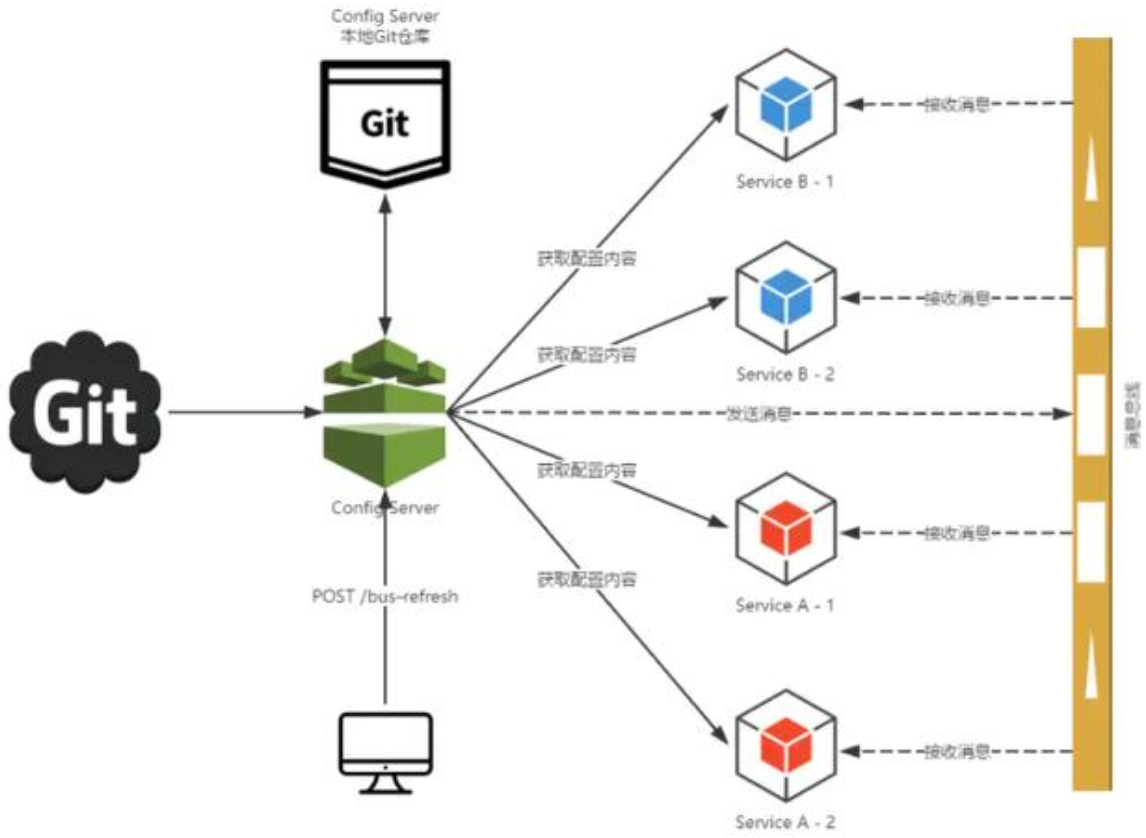
In microservice architecture systems, lightweight message brokers are usually used to build a common message topic and connect all microservice instances in the system. Since the messages generated in this topic will be monitored and consumed by all instances, it is called message bus. Each instance on the bus can easily broadcast some messages that need to be known by other instances connected to the subject.
What is a message broker?
Message broker is an architecture mode of message verification, transmission and routing. It is mainly used to receive and distribute messages, and forward them to the correct application according to the set message processing flow. It plays the role of communication scheduling between micro services and reduces the dependence between services.
Spring Cloud Bus can be used with Spring Cloud Config to dynamically refresh the configuration.
Basic principles
ConfigClient instances listen to the same Topic in MQ (springcloudbus by default). When a service refreshes the data, it will put this information into the Topic, so that other services listening to the same Topic can be notified, and then update their own configuration.
3. What is SpringCloud Bus
Official information → SpringCloud Bus
Spring Cloud Bus is a message bus within the Spring Cloud system, which is used to connect all nodes of the distributed system. A framework dedicated to solving the problem of connecting nodes of distributed system with lightweight message system, which integrates the event processing mechanism of Java and the function of message middleware.
Spring Cloud Bus connects distributed nodes with lightweight message brokers (currently only RibbitMQ and Kafka message queues are supported). The message broker can broadcast changes to configuration files, or communication between services, or can be used for monitoring. It solves the problem of timely synchronization of microservice data changes.


4. Environmental planning
- RabbitMQ → RabbitMQ environment configuration
- atguigu-cloud-2020 polymerization project:
Version: SpringBoot 2.2.2.RELEASE, Spring Cloud Hoxton.SR1
Registration Center eureka01:7001
Registration Center eureka02:7002
Configuration center server cloud-config-center-3344
Configuration center client 1 cloud-config-client-3355
Configuration center client 2 cloud-config-client-3366
5. Best practices
5.1 RabbitMQ installation
The above gives the detailed process of installing RabbitMQ on Windows system. I won't elaborate here. I mainly talk about the process of installing RabbitMQ using docker. The following case is also RabbitMQ configuration using Linux environment
Use docker to install and run rabbmitMQ related commands
# Search rabbitMQ
docker search rabbitmq:management
# Download rabbitMQ image
docker pull rabbitmq:management
# Run rabbitMQ container
docker run --name rabbitmq -p 5671:5671 -p 5672:5672 -p 15671:15671 -p 15672:15672 -p 4369:4369 -p 25672:25672 rabbitmq:management
# View running containers
docker ps -a
# Stop rabbitMQ container
docker stop rabbitmq
# Start rabbitMq container
docker start rabbitmq
# Remove rabbitMQ container
docker rm rabbitmq
# Start docker
systemctl start docker
# Stop docker
systemctl stop docker
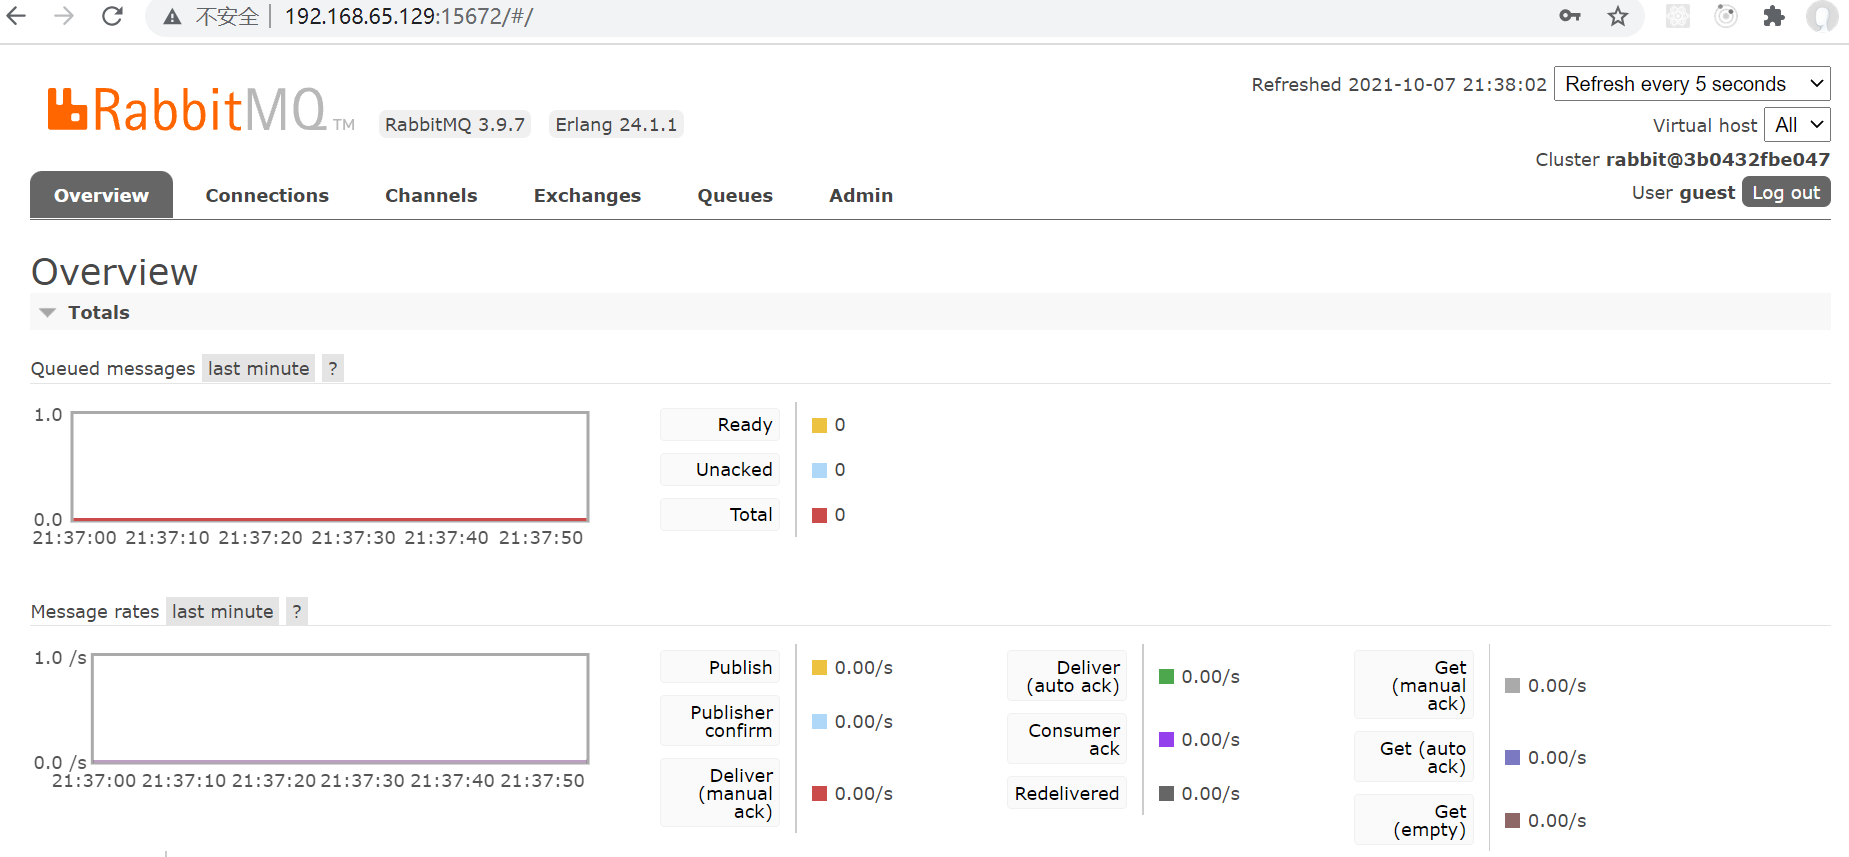
After rabbitMQ is started successfully, access http://192.168.65.129:15672/ View console

Enter the default user password guest/guest to enter the rabbitmq console

5.2 create parent project
Create the parent project [atguigu-cloud-2020], and use the dependency of the parent project to manage the version of spring boot, spring cloud and common components
<?xml version="1.0" encoding="UTF-8"?>
<project xmlns="http://maven.apache.org/POM/4.0.0"
         xmlns:xsi="http://www.w3.org/2001/XMLSchema-instance"
         xsi:schemaLocation="http://maven.apache.org/POM/4.0.0 http://maven.apache.org/xsd/maven-4.0.0.xsd">
    <modelVersion>4.0.0</modelVersion>

    <groupId>com.atguigu.springcloud</groupId>
    <artifactId>atguigu-cloud-2020</artifactId>
    <version>1.0-SNAPSHOT</version>
    <modules>
        <module>cloud-eureka-server-7001</module>
        <module>cloud-eureka-server-7002</module>
        <module>cloud-config-center-3344</module>
        <module>cloud-config-client-3355</module>
        <module>cloud-config-client-3366</module>
    </modules>
    <packaging>pom</packaging>

    <!-- unified management  jar Package version -->
    <properties>
        <project.build.sourceEncoding>UTF-8</project.build.sourceEncoding>
        <maven.compiler.source>1.8</maven.compiler.source>
        <maven.compiler.target>1.8</maven.compiler.target>
        <junit.version>4.12</junit.version>
        <log4j.version>1.2.17</log4j.version>
        <lombok.version>1.16.18</lombok.version>
        <mysql.version>5.1.47</mysql.version>
        <druid.version>1.1.16</druid.version>
        <mybatis.spring.boot.version>1.3.0</mybatis.spring.boot.version>
    </properties>

    <!-- SpringCloud Official warehouse -->
    <!-- <repositories>
         <repository>
             <id>spring-snapshots</id>
             <name>Spring Snapshots</name>
             <url>https://repo.spring.io/snapshot</url>
             <snapshots>
                 <enabled>true</enabled>
             </snapshots>
         </repository>
         <repository>
             <id>spring-milestones</id>
             <name>Spring Milestones</name>
             <url>https://repo.spring.io/milestone</url>
             <snapshots>
                 <enabled>false</enabled>
             </snapshots>
         </repository>
     </repositories>-->

    <!-- After the sub module inherits, it provides the following functions: locking the version+son modlue Do not write groupId and version  -->
    <dependencyManagement>
        <dependencies>
            <!--spring boot 2.2.2-->
            <dependency>
                <groupId>org.springframework.boot</groupId>
                <artifactId>spring-boot-dependencies</artifactId>
                <version>2.2.2.RELEASE</version>
                <type>pom</type>
                <scope>import</scope>
            </dependency>
            <!--spring cloud Hoxton.SR1-->
            <dependency>
                <groupId>org.springframework.cloud</groupId>
                <artifactId>spring-cloud-dependencies</artifactId>
                <version>Hoxton.SR1</version>
                <type>pom</type>
                <scope>import</scope>
            </dependency>
            <!--spring cloud alibaba 2.1.0.RELEASE-->
            <dependency>
                <groupId>com.alibaba.cloud</groupId>
                <artifactId>spring-cloud-alibaba-dependencies</artifactId>
                <version>2.1.0.RELEASE</version>
                <type>pom</type>
                <scope>import</scope>
            </dependency>
            <dependency>
                <groupId>mysql</groupId>
                <artifactId>mysql-connector-java</artifactId>
                <version>${mysql.version}</version>
            </dependency>
            <dependency>
                <groupId>com.alibaba</groupId>
                <artifactId>druid</artifactId>
                <version>${druid.version}</version>
            </dependency>
            <dependency>
                <groupId>org.mybatis.spring.boot</groupId>
                <artifactId>mybatis-spring-boot-starter</artifactId>
                <version>${mybatis.spring.boot.version}</version>
            </dependency>
            <dependency>
                <groupId>junit</groupId>
                <artifactId>junit</artifactId>
                <version>${junit.version}</version>
            </dependency>
            <dependency>
                <groupId>log4j</groupId>
                <artifactId>log4j</artifactId>
                <version>${log4j.version}</version>
            </dependency>
            <dependency>
                <groupId>org.projectlombok</groupId>
                <artifactId>lombok</artifactId>
                <version>${lombok.version}</version>
                <optional>true</optional>
            </dependency>
        </dependencies>
    </dependencyManagement>

    <build>
        <plugins>
            <plugin>
                <groupId>org.springframework.boot</groupId>
                <artifactId>spring-boot-maven-plugin</artifactId>
                <configuration>
                    <fork>true</fork>
                    <addResources>true</addResources>
                </configuration>
            </plugin>
        </plugins>
    </build>
</project>
5.3 building a registration center
Create registration centers eureka01:7001 and eureka02:7002 clusters. The specific steps are not expanded
You can view the blog → Eureka cluster construction
5.4 create configuration center server
New configuration center server [cloud config center-3344]
5.4.1 pom dependency
<?xml version="1.0" encoding="UTF-8"?>
<project xmlns="http://maven.apache.org/POM/4.0.0"
         xmlns:xsi="http://www.w3.org/2001/XMLSchema-instance"
         xsi:schemaLocation="http://maven.apache.org/POM/4.0.0 http://maven.apache.org/xsd/maven-4.0.0.xsd">
    <parent>
        <artifactId>atguigu-cloud-2020</artifactId>
        <groupId>com.atguigu.springcloud</groupId>
        <version>1.0-SNAPSHOT</version>
    </parent>
    <modelVersion>4.0.0</modelVersion>

    <artifactId>cloud-config-center-3344</artifactId>

    <dependencies>
        <!--Add message bus RabbitMQ support-->
        <dependency>
            <groupId>org.springframework.cloud</groupId>
            <artifactId>spring-cloud-starter-bus-amqp</artifactId>
        </dependency>
        <!--spring-cloud-config Server-->
        <dependency>
            <groupId>org.springframework.cloud</groupId>
            <artifactId>spring-cloud-config-server</artifactId>
        </dependency>
        <dependency>
            <groupId>org.springframework.cloud</groupId>
            <artifactId>spring-cloud-starter-netflix-eureka-client</artifactId>
        </dependency>
        <dependency>
            <groupId>org.springframework.boot</groupId>
            <artifactId>spring-boot-starter-web</artifactId>
        </dependency>
        <dependency>
            <groupId>org.springframework.boot</groupId>
            <artifactId>spring-boot-starter-actuator</artifactId>
        </dependency>
        <dependency>
            <groupId>org.springframework.boot</groupId>
            <artifactId>spring-boot-devtools</artifactId>
            <scope>runtime</scope>
            <optional>true</optional>
        </dependency>
        <dependency>
            <groupId>org.projectlombok</groupId>
            <artifactId>lombok</artifactId>
            <optional>true</optional>
        </dependency>
        <dependency>
            <groupId>org.springframework.boot</groupId>
            <artifactId>spring-boot-starter-test</artifactId>
            <scope>test</scope>
        </dependency>
    </dependencies>
</project>
5.4.2 write configuration
Write the configuration using the application.yml or bootstrap.yml file
server:
  port: 3344
spring:
  application:
    name: cloud-config-center
  cloud:
    config:
      server:
        git:
          uri: https://gitee.com/wang-qz/springcloud-config.git
          search-paths: springcloud-config #search for directory
          default-label: master # Read branch
  rabbitmq:
    host: 192.168.65.129
    port: 5672
    username: guest
    password: guest
# eureka configuration
eureka:
  instance:
    hostname: localhost
    instance-id: cloud-config-center-3344
    prefer-ip-address: true
  client:
    register-with-eureka: true
    fetch-registry: true
    service-url:
      defaultZone: http://www.eureka01.com:7001/eureka,http://www.eureka02.com:7002/eureka
##rabbitmq related configuration, exposing the endpoint of bus refresh configuration
management:
  endpoints:
    web:
      exposure:
        include: 'bus-refresh'
5.4.3 write startup class
com.atguigu.springcloud.ConfigCenterApplication
package com.atguigu.springcloud;

import org.springframework.boot.SpringApplication;
import org.springframework.boot.autoconfigure.SpringBootApplication;
import org.springframework.cloud.config.server.EnableConfigServer;

/**
 * Class description: configuration center server startup class
 * @Author wang_qz
 * @Date 2021/11/21 21:49
 * @Version 1.0
 */
@SpringBootApplication
@EnableConfigServer
public class ConfigCenterApplication {
    public static void main(String[] args) {
        SpringApplication.run(ConfigCenterApplication.class);
    }
}
5.4.4 remote warehouse configuration
You can add a remote configuration repository on GitHub or gitee. I created the remote configuration repository [springcloud config] on gitee
A remote configuration config-dev.yml is added to the repository

The configuration reading method of the remote warehouse can be viewed Official website → Spring Cloud Config
5.4.5 verify the configuration center server
Start registry microservice

After starting the configuration center server micro service, access http://localhost:3344/config-dev.yml, successfully read the configuration of the remote warehouse

5.5 create configuration center client
New configuration center clients cloud-config-client-3355 and cloud-config-client-3366 are added. The two clients are used to test the fixed-point notification later. The configurations of the two clients are basically the same
5.5.1 pom dependency
<?xml version="1.0" encoding="UTF-8"?>
<project xmlns="http://maven.apache.org/POM/4.0.0"
         xmlns:xsi="http://www.w3.org/2001/XMLSchema-instance"
         xsi:schemaLocation="http://maven.apache.org/POM/4.0.0 http://maven.apache.org/xsd/maven-4.0.0.xsd">
    <parent>
        <artifactId>atguigu-cloud-2020</artifactId>
        <groupId>com.atguigu.springcloud</groupId>
        <version>1.0-SNAPSHOT</version>
    </parent>
    <modelVersion>4.0.0</modelVersion>

    <artifactId>cloud-config-client-3355</artifactId>

    <dependencies>
        <!--Add message bus RabbitMQ support-->
        <dependency>
            <groupId>org.springframework.cloud</groupId>
            <artifactId>spring-cloud-starter-bus-amqp</artifactId>
        </dependency>
        <!--spring-cloud-config client-->
        <dependency>
            <groupId>org.springframework.cloud</groupId>
            <artifactId>spring-cloud-starter-config</artifactId>
        </dependency>
        <dependency>
            <groupId>org.springframework.cloud</groupId>
            <artifactId>spring-cloud-starter-netflix-eureka-client</artifactId>
        </dependency>
        <dependency>
            <groupId>org.springframework.boot</groupId>
            <artifactId>spring-boot-starter-web</artifactId>
        </dependency>
        <dependency>
            <groupId>org.springframework.boot</groupId>
            <artifactId>spring-boot-starter-actuator</artifactId>
        </dependency>

        <dependency>
            <groupId>org.springframework.boot</groupId>
            <artifactId>spring-boot-devtools</artifactId>
            <scope>runtime</scope>
            <optional>true</optional>
        </dependency>
        <dependency>
            <groupId>org.projectlombok</groupId>
            <artifactId>lombok</artifactId>
            <optional>true</optional>
        </dependency>
        <dependency>
            <groupId>org.springframework.boot</groupId>
            <artifactId>spring-boot-starter-test</artifactId>
            <scope>test</scope>
        </dependency>
    </dependencies>
</project>
5.5.2 write configuration
Add configuration to the application.yml or bootstrap.yml file
server:
  port: 3355
spring:
  application:
    name: config-client
  cloud:
    #Config client configuration
    config:
      uri: http://localhost:3344 # configuration center address
      label: master #Branch name
      name: config #Profile name
      profile: dev #Read suffix name
      # The above three combinations: the config-dev.yml configuration file on the master branch is read http://localhost:3344/master/config-dev.yml
  rabbitmq:
    host: 192.168.65.129
    port: 5672
    username: guest
    password: guest

#eureka configuration
eureka:
  instance:
    hostname: localhost
    instance-id: config-client-3355
    prefer-ip-address: true
  client:
    register-with-eureka: true
    fetch-registry: true
    service-url:
      defaultZone: http://www.eureka01.com:7001/eureka,http://www.eureka02.com:7002/eureka
# Exposure monitoring endpoint
management:
  endpoints:
    web:
      exposure:
        include: "*"
5.5.3 write startup class
com.atguigu.springcloud.ConfigClientApplication
package com.atguigu.springcloud;

import org.springframework.boot.SpringApplication;
import org.springframework.boot.autoconfigure.SpringBootApplication;
import org.springframework.cloud.netflix.eureka.EnableEurekaClient;

/**
 * Class description: configuration center client startup class
 * @Author wang_qz
 * @Date 2021/11/21 22:08
 * @Version 1.0
 */
@SpringBootApplication
@EnableEurekaClient
public class ConfigClientApplication {
    public static void main(String[] args) {
        SpringApplication.run(ConfigClientApplication.class);
    }
}
5.5.4 writing controller
com.atguigu.springcloud.controller.ConfigClientController
package com.atguigu.springcloud.controller;

import org.springframework.beans.factory.annotation.Value;
import org.springframework.cloud.context.config.annotation.RefreshScope;
import org.springframework.web.bind.annotation.GetMapping;
import org.springframework.web.bind.annotation.RestController;

/**
 * Class description:
 * @Author wang_qz
 * @Date 2021/11/21 22:15
 * @Version 1.0
 */
@RestController
@RefreshScope
public class ConfigClientController {
    @Value("${config.info}")
    private String configInfo;

    @GetMapping("/configInfo")
    public String getConfigInfo() {
        return configInfo;
    }
}
5.5.5 verifying client read configuration
Start the configuration center client micro service and register with eureka

visit http://localhost:3355/configInfo And http://localhost:3366/configInfo , successfully read the configuration of the remote warehouse


So far, all environments have been prepared and the basic verification has passed. Part I Configuration center Spring Cloud Config This section describes in detail how to refresh the client configuration through post request / acuator/refresh
At the beginning of this article, we also talked about the disadvantages of refreshing the configuration by requesting the client. The following details how to refresh the client configuration by using the spring cloud bus broadcast notification
Personal blog
Welcome to personal blog: https://www.crystalblog.xyz/
Alternate address: https://wang-qz.gitee.io/crystal-blog/