1. Redis (CACHE)
1.1 Nosql
1.1.1 general
Single machine mysql era:
In the 1990s, the number of visits to a basic website will not be too large, and a single database is enough!
More use of static web pages html
Website bottleneck:
- The amount of data is too large for one machine
- The index of data can't fit into the memory of a machine
- Too many visits, mixed reading and writing, performance problems
Cache age:
Memcached + mysql + read write separation (vertical split)
80% of the website is reading. It's too troublesome to query the database every time. To reduce the pressure on the database, you can use Cache to ensure efficiency -- solve the problem of reading
Development process: optimize the underlying structure and index of Mysql – > file caching (IO operation) - > memcached was the most popular technology at that time!
Sub database and sub table + horizontal split + mysql Cluster:
With the development of technology and business, the technical requirements are becoming higher and higher
Essence: database (read, write)
Early years MyISAM: watch lock, affecting efficiency, high efficiency, and serious lock problems
Innodb in earlier years: row lock
Slowly use sub database and sub table to solve the pressure of writing! Not many companies use it
Mysql Cluster can well meet individual needs
Recent years:
2010-2020 rapid technological development (positioning, music, hot list)
Mysql and other relational databases are not enough. There is a lot of data and changes quickly
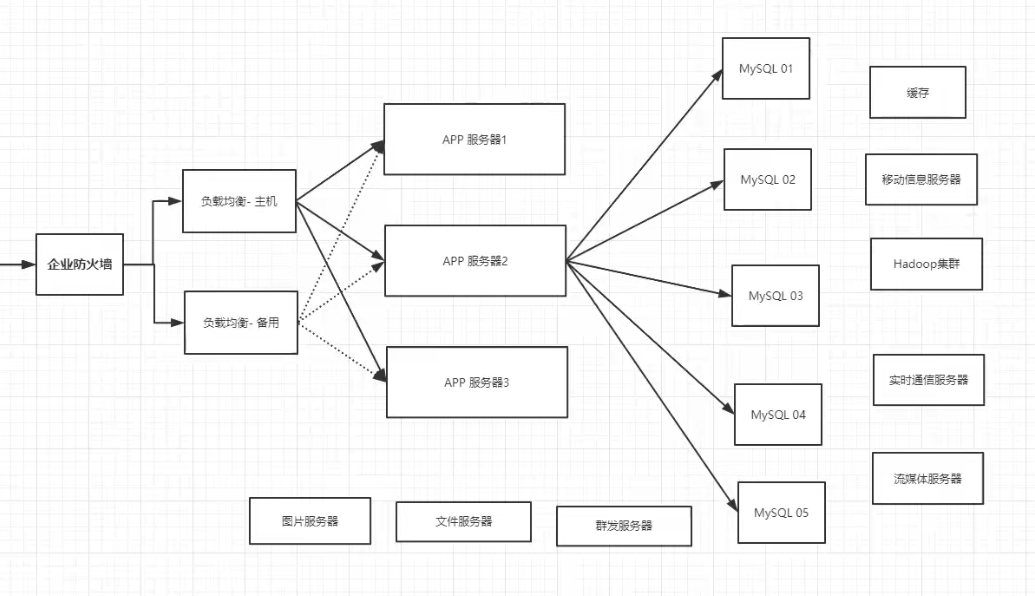
At present, there is a basic Internet Project:
Why use Nosql
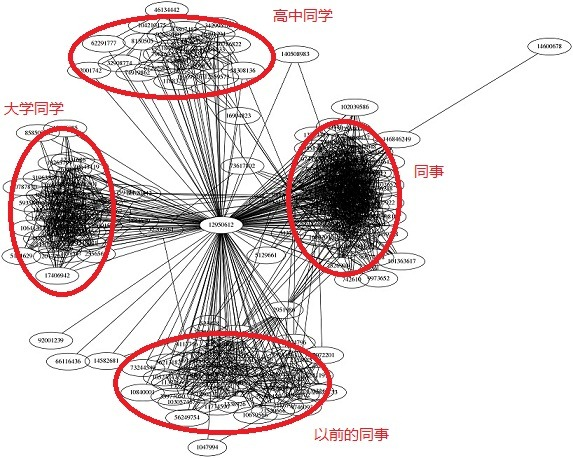
- Users' personal information, geographical location, social networks, data generated by users themselves, user logs and so on are growing explosively!
At this time, you can use Nosql database to deal with the above situation!
1.1.2 what is NoSQL
NoSQL
NoSQL=not only sql
SQL: table, row, column
Generally refers to non relational database, with web2 0 the birth of the Internet, the traditional relational database is difficult to deal with web2 0 era! Especially large-scale and highly concurrent communities!
NoSQL is developing rapidly in today's big data era, and REDIS is developing fastest
NoSQL features
-
Convenient expansion (no relationship between data, good expansion, no coupling)
-
High performance under large amount of data (redis can write 8W times and read 11w times per second. NoSQL cache level is a fine-grained cache, and the performance will be relatively high!)
-
Multiple types (no need to design the database in advance! Use as you go! If it is a table with a large amount of data, many people can't design it)
-
Traditional RDBM and NoSQL:
Structured organization
SQL
Data and relationships exist in separate tables
Data manipulation language, data definition language,
Strict consistency
Basic transaction
...
Not just data
There is no fixed query language
Key value pair storage, column storage, document storage, graphic database (social relationship)
Final consistency
CAP theorem, BASE (remote multi activity) junior architect!
Basic high performance, high availability and high scalability
...
Expansion: 3v and 3 high of big data
Describe the problem: massive, diverse and real-time
Program requirements: high concurrency, high availability and high performance
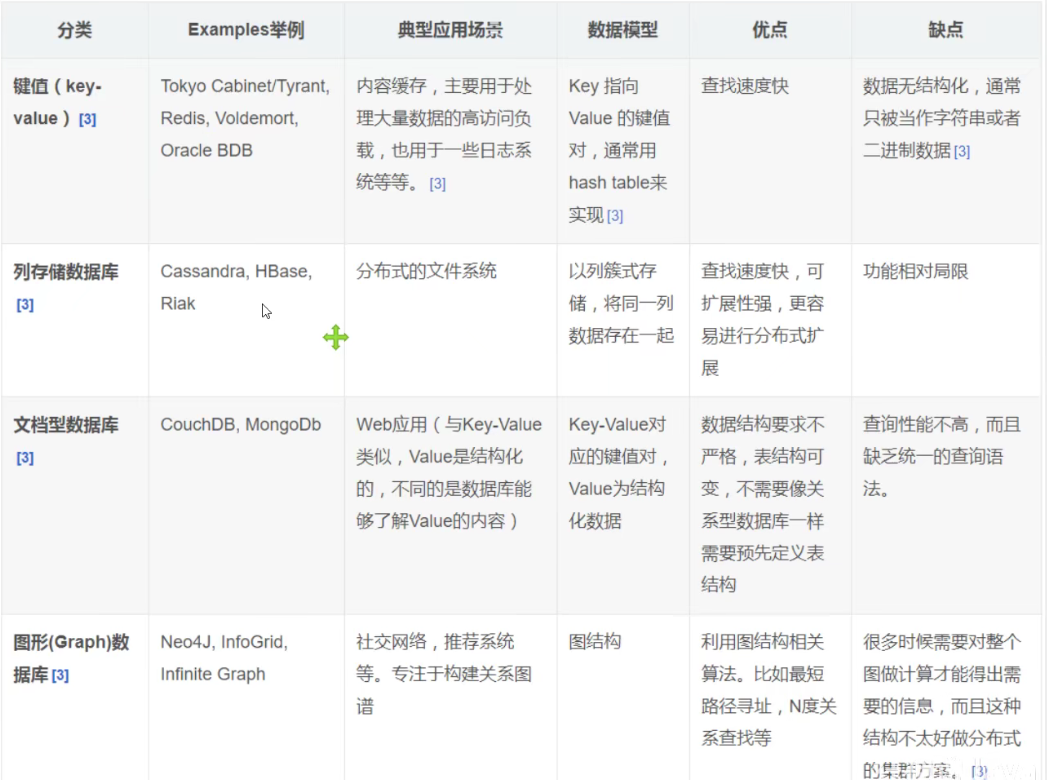
1.1.3 classification of NoSQL
KV key value pair
- Sina: redis
- Meituan: redis+Tair
- Alibaba, baidu: redis+memcache
Document database (json format)
-
MongoDB (generally required)
Database based on distributed file storage, written in C + +, processing a large number of documents!
It is a product between relational database and non relational database. It is the most functional and most like relational database in non relational database!
-
ConthDB
Column storage database
- HBase
- distributed file system
Graphical relational database
-
Not pictures, but relationships: circle of friends, social networks, advertising recommendations!
-
Ne04j, infoGrid
Comparison of NoSQL
1.1.4 Redis
redis–Remote Dictionary Server
Redis (Remote Dictionary Server), that is, remote dictionary service, is an open source log type and key value database written in ANSI C language, supporting network, memory based and persistent, and provides API s in multiple languages. Free and open source, one of the most popular NoSql
What can I do?
-
Memory storage and persistence. Memory is lost in case of power failure, so persistence is very important (rdb/aof)
-
Efficient and can be used for caching
-
Publish subscribe system
-
Map information analysis
-
Timer, counter (Views)
-
...
characteristic
- Diverse data types
- Persistence
- colony
- affair
- ...
Things needed in learning
- Official website
- Chinese network
- Download address: through the official website (it is not recommended to use windows development officially)
1.2 Redis installation
1.2.1 windows installation
-
Download installation package https://github.com/microsoftarchive/redis/releases/tag/win-3.2.100
-
Extract to a specific folder
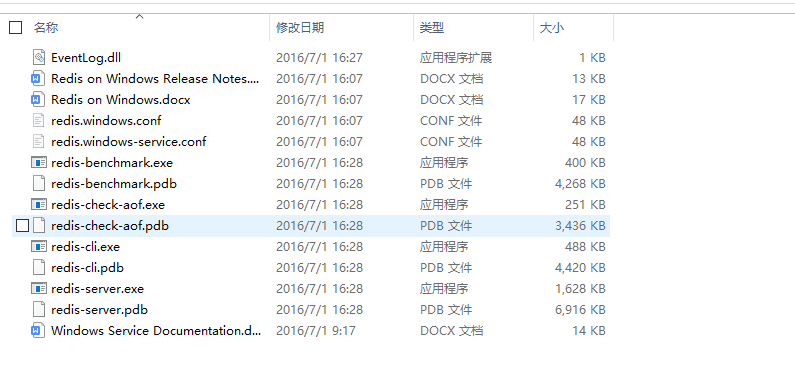
- Start Redis: double click to run the service (start in seconds)
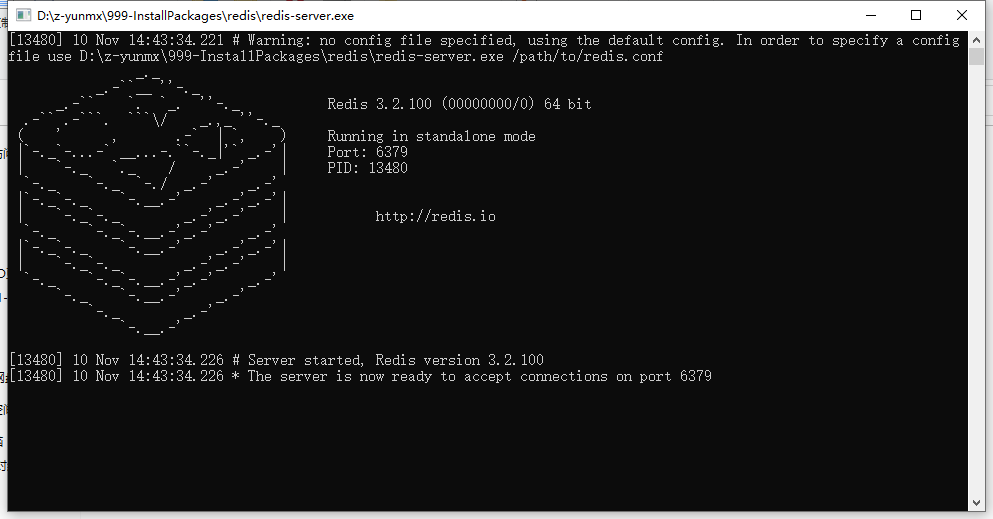
Default port: 6379
- Connect using Redis client
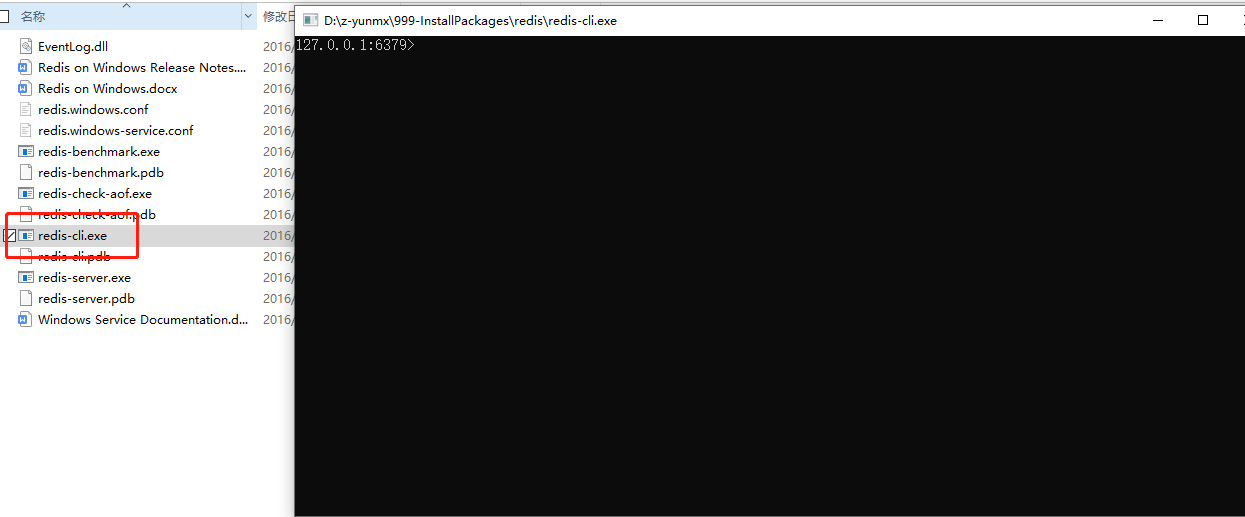
Test connection:
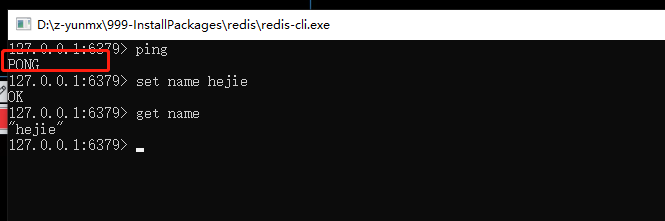
- ping test returns PONG
- Set a key value and get it
It is really easy to use under windows, but it is recommended to use linux for development
1.2.2 Linux Installation
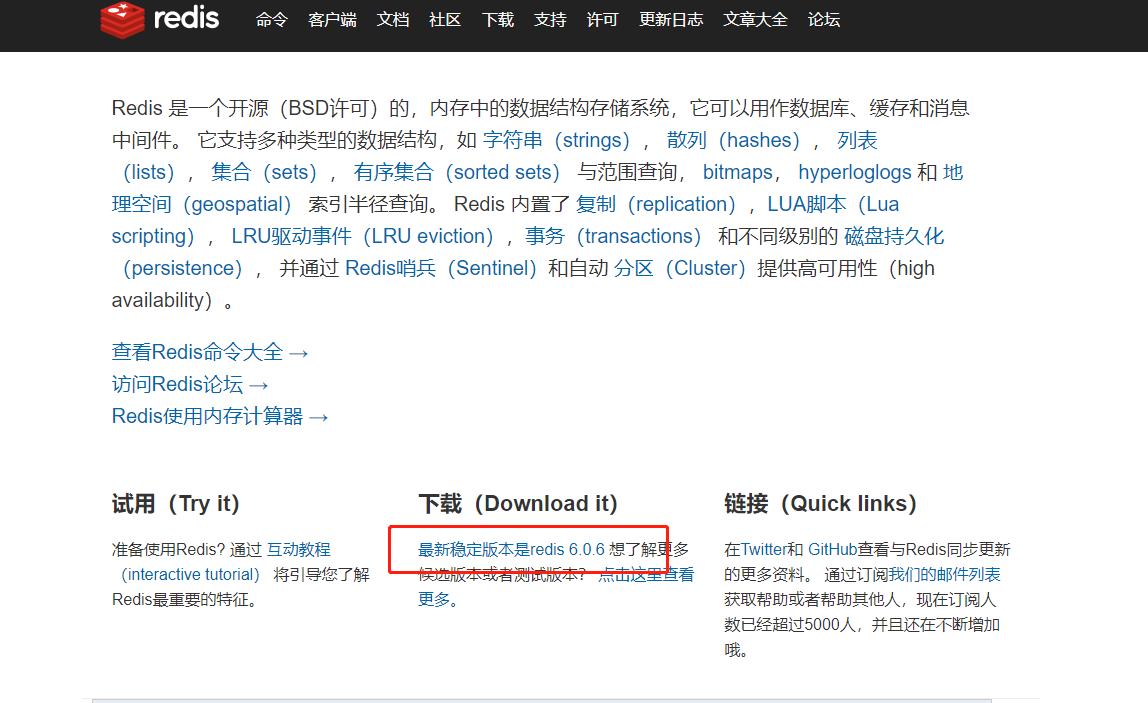
1.2.2.1 download installation package
redis-6.0.6.tar.gz

1.2.2.2 unzip the installation package
And enter
tar -zxvf redis-6.0.6.tar.gz
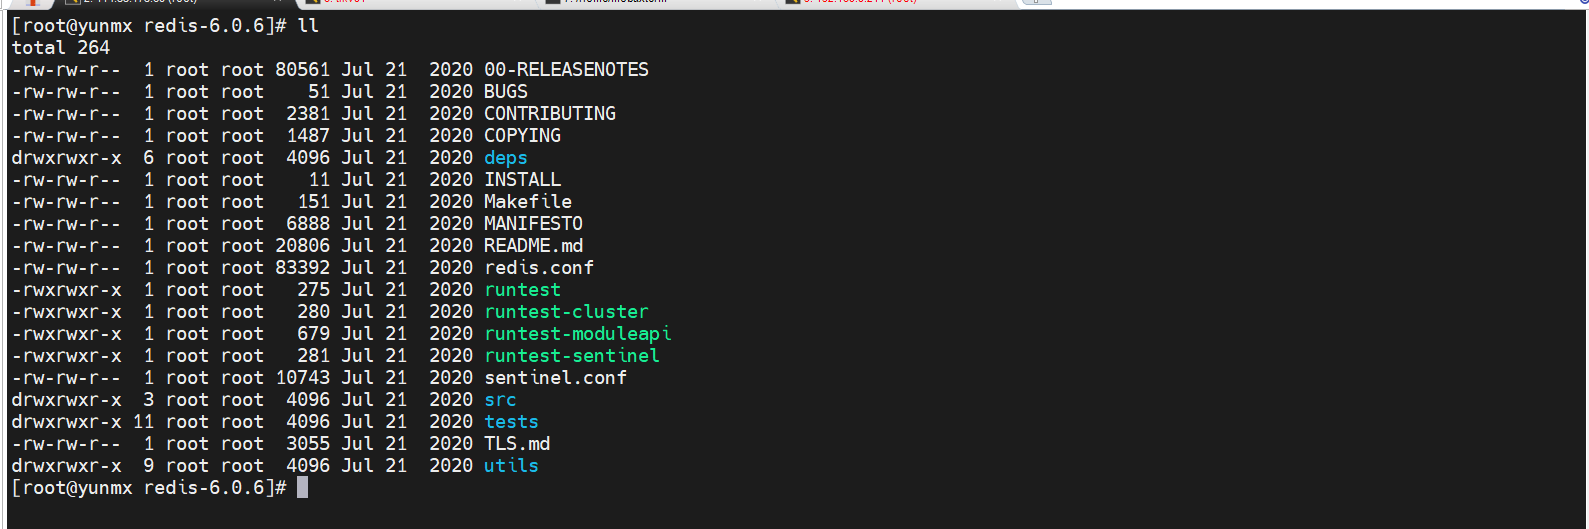
Profile: redis conf
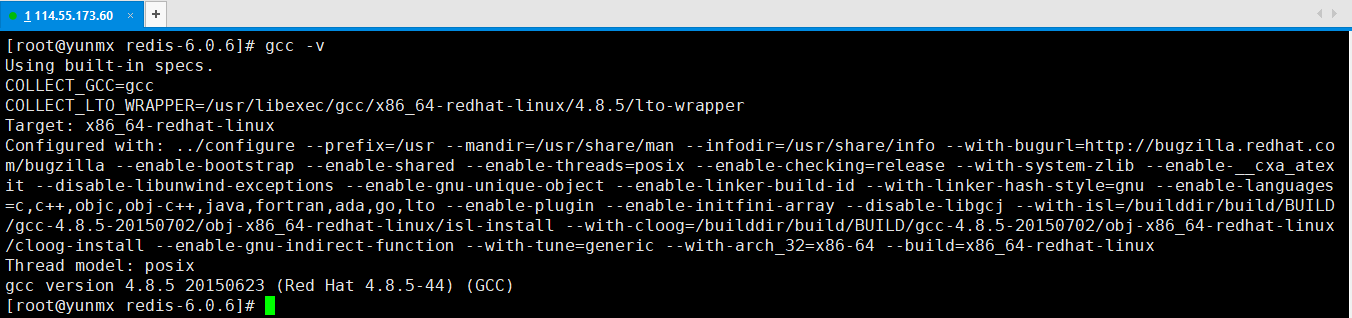
1.2.2.3 basic environment installation
-
yum install gcc-c++
-
gcc -v
- Make (it will take some time)
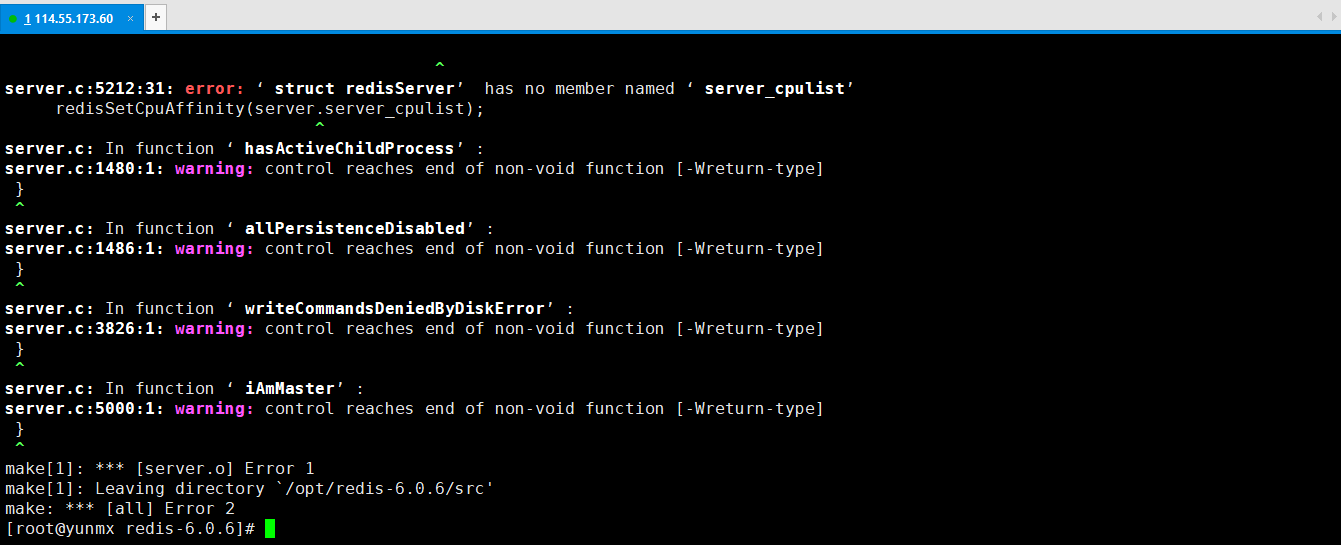
Error report, cause analysis: gcc version is too low, upgrade it
# Upgrade gcc version
$ yum -y install centos-release-scl
$ yum -y install devtoolset-9-gcc devtoolset-9-gcc-c++ devtoolset-9-binutils
$ scl enable devtoolset-9 bash
# View the next version after upgrading
$ gcc -v
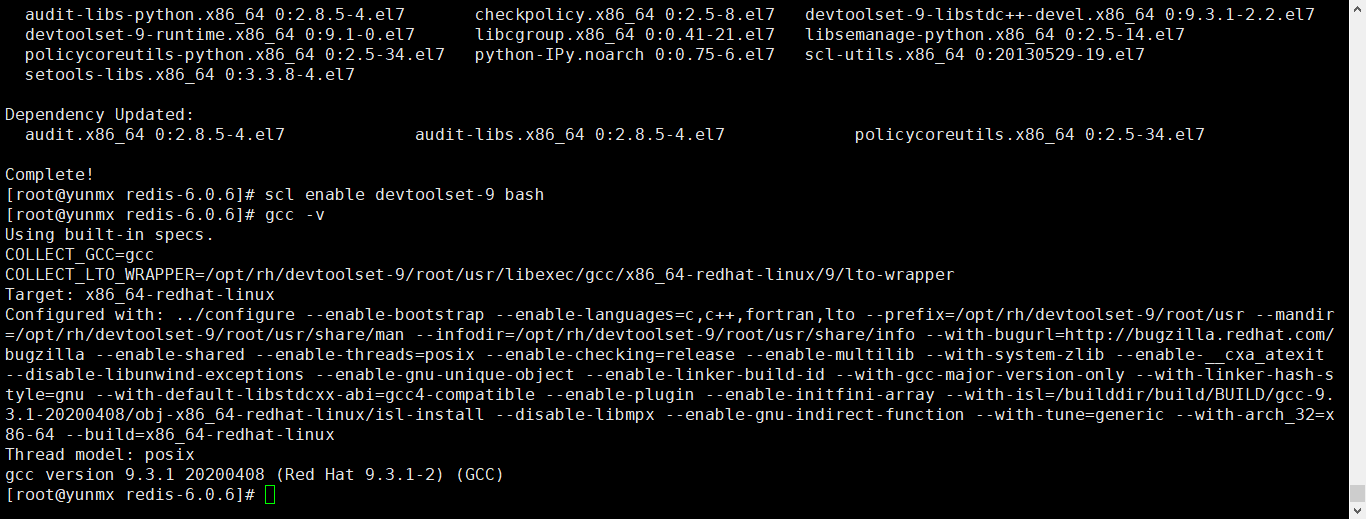
Re execute make
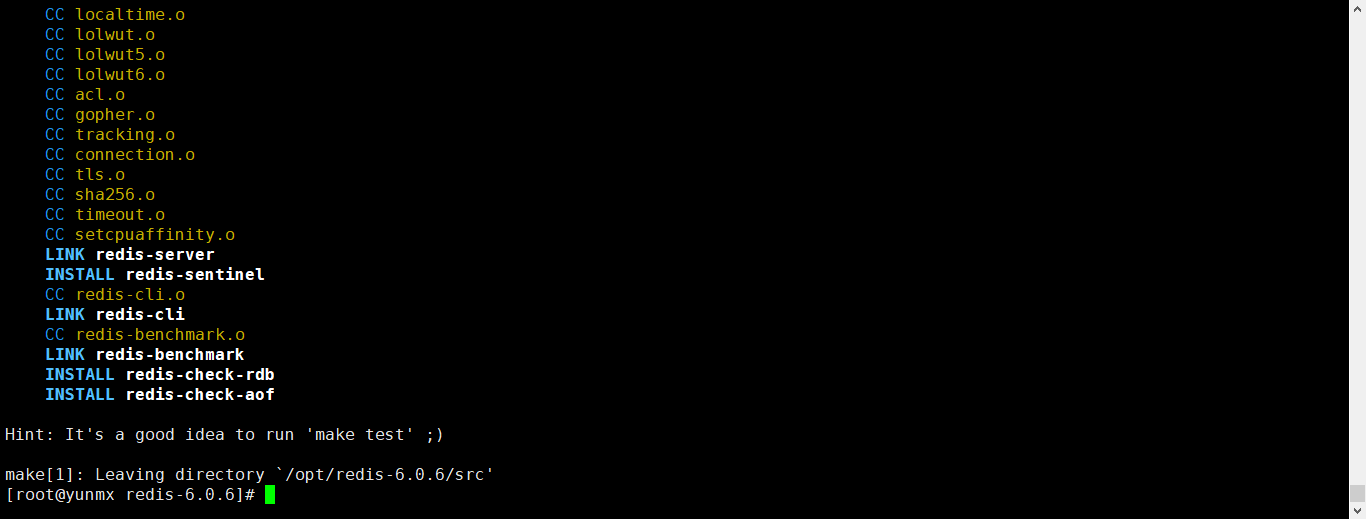
- make install (you can also confirm the installation without executing it)
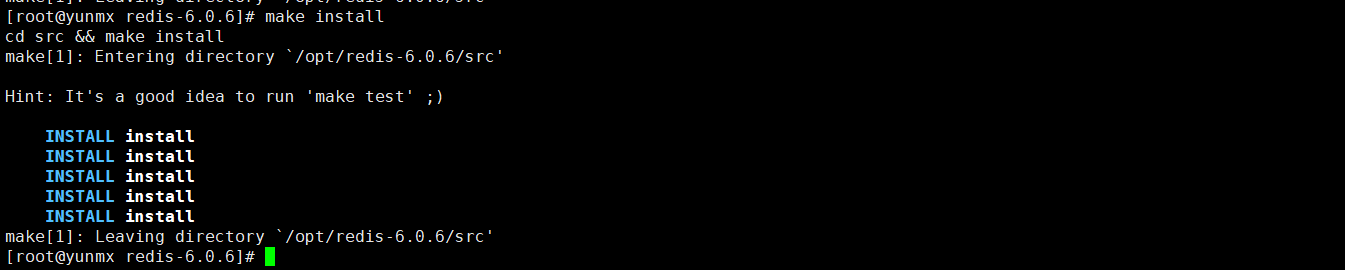
Everything has been installed
1.2.2.4 confirm the installation path
Redis default installation path: / usr/local/bin

1.2.2.5 copying configuration files
Copy Redis configuration file to current directory
# Create a profile folder and copy profiles
$ mkdir hconfig
$ cp /opt/redis-6.0.6/redis.conf hconfig

Then use this configuration file to start
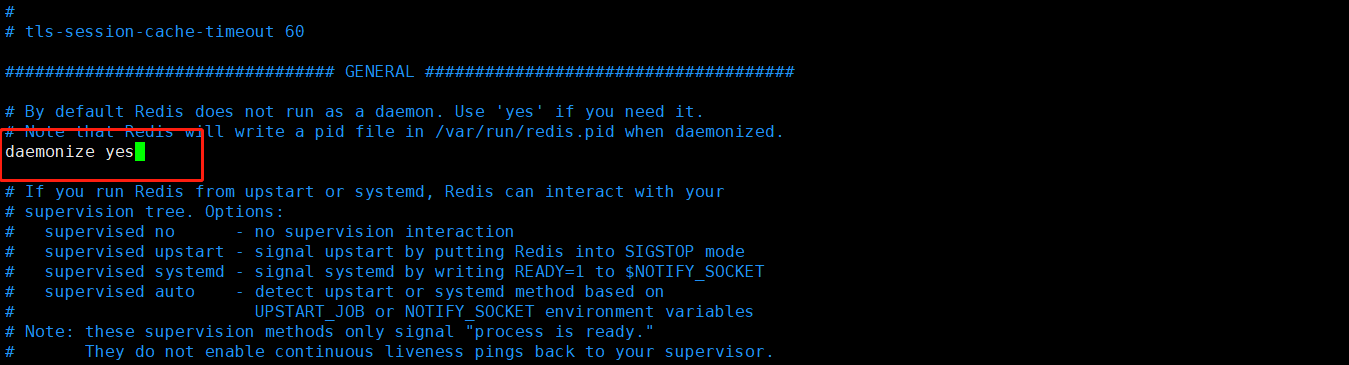
1.2.2.6 configure background startup
Redis is not started in the background by default, and the configuration file needs to be modified
# Modify the daemon to yes
$ vim redis.conf
1.2.2.7 start Redis service
Start Redis service
Start the service through the specified profile
redis-server hconfig/redis.conf

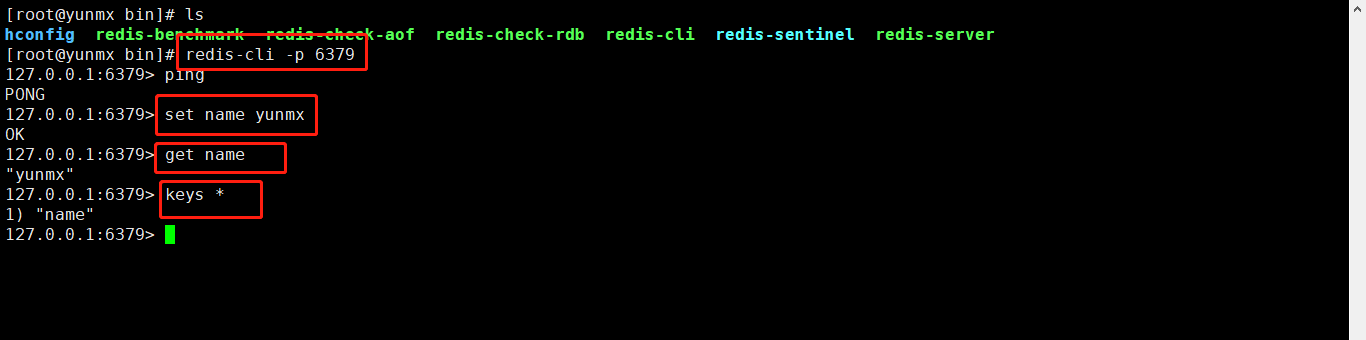
1.2.2.8 test connection
Test connection
Connect using Redis client
# connect
$ redis-cli -p 6379
127.0.0.1:6379> ping
PONG
127.0.0.1:6379> set name yunmx   # Set a key
OK
127.0.0.1:6379> get name		# Read a key
"yunmx"
127.0.0.1:6379> keys *			# Query all key s
1) "name"
127.0.0.1:6379>
9.2 viewing process
Check whether the Redis process is started
ps -ef |grep redis

1.2.2.10 turn off Redis service
Turn off redis service
shutdown
127.0.0.1:6379> ping
PONG
127.0.0.1:6379> shutdown
not connected> exit

1.3 Redis performance test tool
1.3.1 redis-benchmark
Official performance testing tool - >
redis-benchmark
Command parameters:
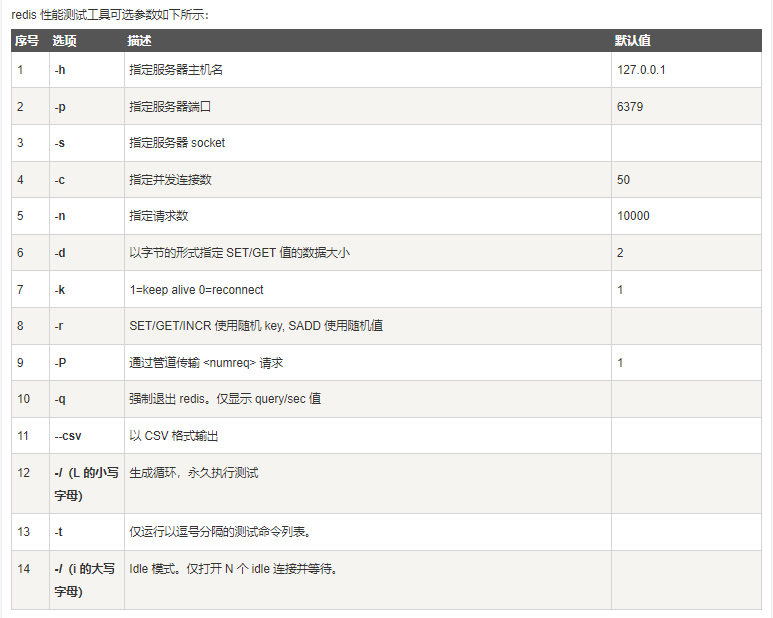
Simple test:
# Test 100 concurrent connections, each with 20 concurrent requests
$ redis-benchmark -h localhost -p 6379 -c 100 -n 20
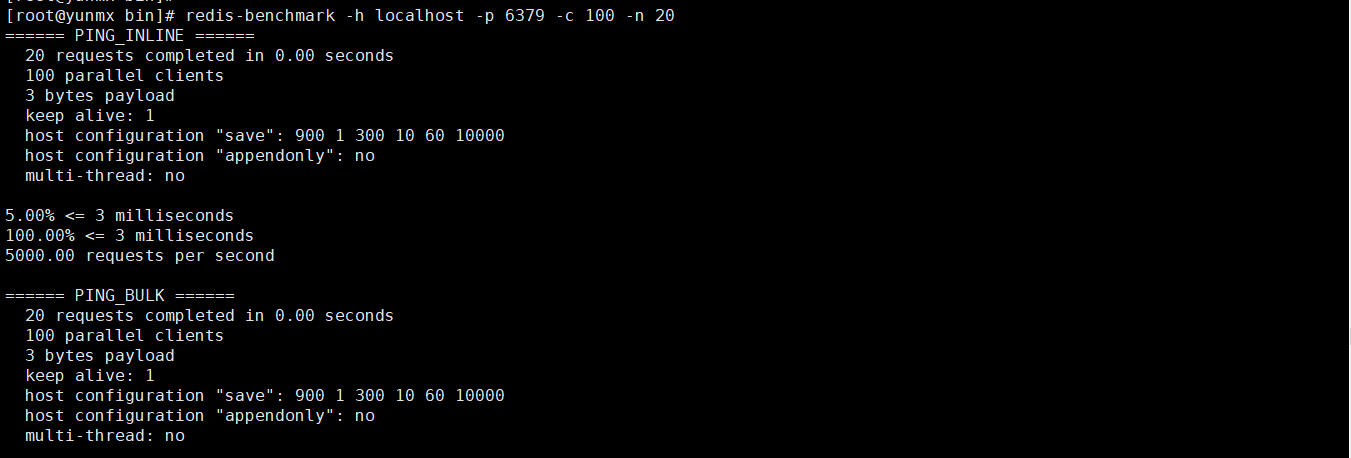
1.3.2 how to analyze
View analysis:
====== PING_INLINE ======
  100000 requests completed in 1.46 seconds   	# 100000 ping requests completed in 1.46s
  100 parallel clients							# Concurrency of 100
  3 bytes payload								# 3-byte data write
  keep alive: 1									# Ensure one server test (stand-alone performance)
  host configuration "save": 900 1 300 10 60 10000
  host configuration "appendonly": no
  multi-thread: no

0.00% <= 0.5 milliseconds						# 0 percent of requests completed in 0.5 milliseconds
1.37% <= 0.6 milliseconds
11.42% <= 0.7 milliseconds
23.22% <= 0.8 milliseconds
35.29% <= 0.9 milliseconds
47.60% <= 1.0 milliseconds
60.01% <= 1.1 milliseconds
72.40% <= 1.2 milliseconds
84.82% <= 1.3 milliseconds
94.78% <= 1.4 milliseconds
97.65% <= 1.5 milliseconds
98.50% <= 1.6 milliseconds
98.95% <= 1.7 milliseconds
99.28% <= 1.8 milliseconds
99.51% <= 1.9 milliseconds
99.67% <= 2 milliseconds
99.99% <= 3 milliseconds
100.00% <= 3 milliseconds						# 100% requests completed in 3 milliseconds (100000)
68587.11 requests per second					# Average number of requests completed per second
1.4 Redis Basics
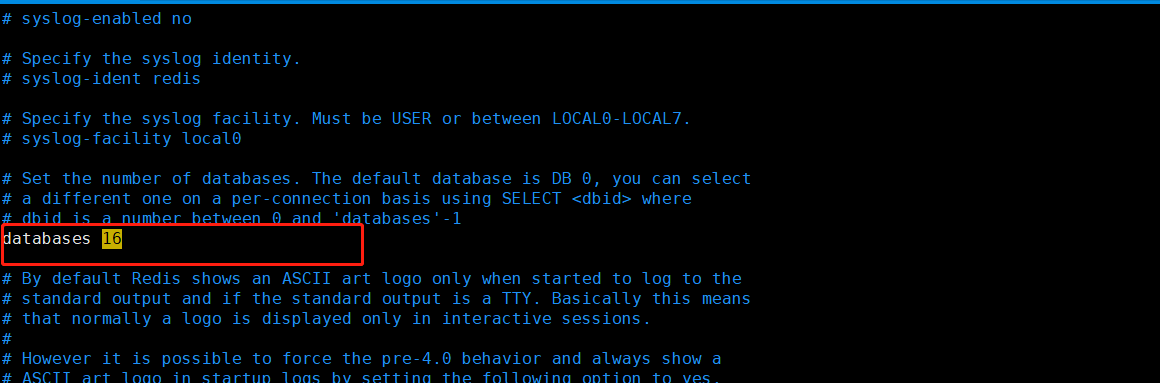
1.4.1 default database
The default number of Redis databases is 16, Redis The conf configuration file can be viewed, and the default database is 0

1.4.2 switching database
# Use the select command to switch
[root@yunmx bin]# redis-cli -p 6379
127.0.0.1:6379> select 1
OK
127.0.0.1:6379[1]> select 2
OK
127.0.0.1:6379[2]> select 16
(error) ERR DB index is out of range
127.0.0.1:6379[2]> select 15
OK
127.0.0.1:6379[15]>
1.4.3 viewing database size
# DBSIZE view database size
127.0.0.1:6379> set name hejie
OK
127.0.0.1:6379> DBSIZE
(integer) 1
127.0.0.1:6379> SET AGE NAN
OK
127.0.0.1:6379> DBSIZE
(integer) 2
127.0.0.1:6379>
1.4.4 view all key s
# Using keys*
127.0.0.1:6379> keys *
1) "AGE"
2) "name"
127.0.0.1:6379>
1.4.5 clearing the database
# Clear the current database flushdb
127.0.0.1:6379> keys *
1) "AGE"
2) "name"
127.0.0.1:6379> flushdb
OK
127.0.0.1:6379> keys *
(empty array)
127.0.0.1:6379>
# Empty all databases flush
127.0.0.1:6379> select 0
OK
127.0.0.1:6379> set name hejie
OK
127.0.0.1:6379> set key1 hejie1
OK
127.0.0.1:6379> set key2 hejie2
OK
127.0.0.1:6379> keys *
1) "key1"
2) "key2"
3) "name"
127.0.0.1:6379> select 1
OK
127.0.0.1:6379[1]> set name yunmx
OK
127.0.0.1:6379[1]> set key1 yunmx1
OK
127.0.0.1:6379[1]> set key2 yunmx2
OK
127.0.0.1:6379[1]> keys *
1) "key1"
2) "key2"
3) "name"
127.0.0.1:6379[1]> flushall
OK
127.0.0.1:6379[1]> keys *
(empty array)
127.0.0.1:6379[1]> select 0
OK
127.0.0.1:6379> keys *
(empty array)
127.0.0.1:6379>
1.4.6 determine whether the key exists
# Use exists to judge
127.0.0.1:6379> set name hejie
OK
127.0.0.1:6379> set age 1
OK
127.0.0.1:6379> keys *
1) "age"
2) "name"
127.0.0.1:6379> exists age
(integer) 1							# existence
127.0.0.1:6379> exists name
(integer) 1
127.0.0.1:6379> exists key1
(integer) 0							# non-existent
127.0.0.1:6379>
1.4.7 move a key
# Move move a key
127.0.0.1:6379> set key1 hejie
OK
127.0.0.1:6379> set key2 hejie1
OK
127.0.0.1:6379> set key3 hejie2
OK
127.0.0.1:6379> move key1 1      	# Move key1 to database 1
(integer) 1
127.0.0.1:6379> select 1
OK
127.0.0.1:6379[1]> keys *
1) "key1"
127.0.0.1:6379[1]>
1.4.8 setting the effective time of key
# EXPIRE sets the expiration time of a key. Unit time: s
# TTL view the expiration time of a key
127.0.0.1:6379> keys *
1) "key3"
2) "key2"
127.0.0.1:6379> get key3
"hejie2"
127.0.0.1:6379> EXPIRE key3 10     # Set Key3 to expire in 10 seconds
(integer) 1
127.0.0.1:6379> ttl key3
(integer) -2					   # Indicates that it has expired
127.0.0.1:6379> ttl key3
(integer) -2
127.0.0.1:6379> keys *
1) "key2"
127.0.0.1:6379>
1.4.9 Redis single thread
Why is single thread so fast?
Written in C language, it is officially said that the QPS per second is 100000 +. Based on memory operation, Redis's bottleneck is related to the server's memory and network bandwidth. Since it can be implemented by single thread, it can be implemented by single thread.
Misunderstanding:
High performance server must be multi-threaded?
Must multithreading be more efficient than single thread?
Core: Redis puts all data in memory, so using a single thread to operate is the most efficient, because multithreading will produce CPU context switching and time-consuming operations. For the memory system, without context switching, the efficiency is the highest, and multiple reads and writes are on one CPU
1.5 Redis data type
Five data types
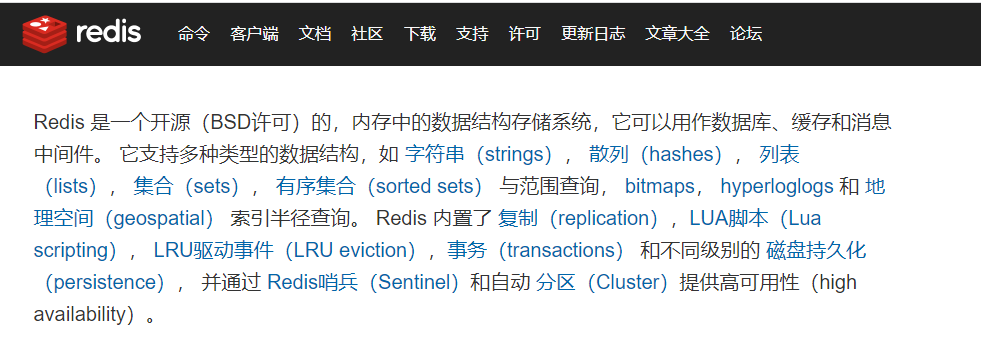
Redis is an open source (BSD licensed) in memory data structure storage system, which can be used as database, cache and message middleware. It supports many types of data structures, such as strings, hashes, lists, sets, sorted sets and range queries, bitmaps, hyperlogs and geospatial index radius queries. Redis has built-in replication, Lua scripting, LRU events, transactions and different levels of disk persistence, and provides high availability through redis Sentinel and Cluster.
Usage scenario: value can be not only a string, but also our number
- Counter
- Count the quantity of multiple units
- Number of fans
- Object cache storage
1.5.1 String
### Common usage
127.0.0.1:6379> set kye1 yunmx								# Set a key
OK
127.0.0.1:6379> get key1									# Get the value of a key
(nil)
127.0.0.1:6379> keys *										# View all keys in the current library and output the key name
1) "kye1"
127.0.0.1:6379> EXISTS kye1									# Determine whether the key exists
(integer) 1
127.0.0.1:6379> EXISTS key1
(integer) 0
127.0.0.1:6379> APPEND kye1 "helloworld"					# Add content to the key. If the key does not exist, set a key
(integer) 15
127.0.0.1:6379> get kye1
"yunmxhelloworld"
127.0.0.1:6379> STRLEN kye1 								# Get the length of a key
(integer) 15
127.0.0.1:6379>

### Self growth usage
127.0.0.1:6379> set count 0
OK
127.0.0.1:6379> get count
"0"
127.0.0.1:6379> incr count									# Self increment 1
(integer) 1
127.0.0.1:6379> get count
"1"
127.0.0.1:6379> incr count
(integer) 2
127.0.0.1:6379> get count
"2"
127.0.0.1:6379> decr count									# Self subtraction 1
(integer) 1
127.0.0.1:6379> get count
"1"
127.0.0.1:6379> decr count
(integer) 0
127.0.0.1:6379> get count
"0"
127.0.0.1:6379> incrby count 5								# Self increasing; Step 5
(integer) 5
127.0.0.1:6379> get count
"5"
127.0.0.1:6379> decrby count 5								# Self subtraction; Step 5
(integer) 0
127.0.0.1:6379> get count
"0"

### Get string range
127.0.0.1:6379> set key1 yunmxhejie							# Set a key
OK
127.0.0.1:6379> getrange key1 0 4							# Gets a string in the range from 0 to 4
"yunmx"
127.0.0.1:6379> getrange key1 0 -1							# Get all strings
"yunmxhejie"
127.0.0.1:6379>

### replace
127.0.0.1:6379> set key1 yunmx123456						# Set a key
OK
127.0.0.1:6379> SETRANGE key1 0 hejie						# Replace from the position with subscript 0
(integer) 11
127.0.0.1:6379> get key1
"hejie123456"
127.0.0.1:6379>

### Set expiration time
127.0.0.1:6379> setex key1 10 yunmx							# Set a key with an expiration time of 10 seconds
OK
127.0.0.1:6379> ttl key1									# View the expiration time of the key
(integer) 7
127.0.0.1:6379> ttl key1									# Returning - 2 means it has expired
(integer) -2
127.0.0.1:6379> keys *
(empty array)
127.0.0.1:6379>

### No settings exist (often used in distributed locks)
127.0.0.1:6379> setnx key2 redis							# setnx: create if there is no key value
(integer) 1
127.0.0.1:6379> setnx key2 mysql							# setnx: creation fails if there is a key value
(integer) 0
127.0.0.1:6379> keys *
1) "key2"
127.0.0.1:6379>

### Batch setting and acquisition
127.0.0.1:6379> mset key1 1 key2 2 key3 3 key4 4			# Set multiple values at the same time
OK
127.0.0.1:6379> keys *
1) "key1"
2) "key4"
3) "key3"
4) "key2"
127.0.0.1:6379> mget key1 key2 key3 key4					# Get multiple values at the same time
1) "1"
2) "2"
3) "3"
4) "4"
127.0.0.1:6379> msetnx key5 5 key4 4						# Atomic operations: either succeed or fail together
(integer) 0
127.0.0.1:6379> get key5
(nil)
127.0.0.1:6379>

### object
127.0.0.1:6379> set user:1 {name:yunmx,age:25}				# Common setting object: key plus json string
OK
127.0.0.1:6379> get user:1
"{name:yunmx,age:25}"
127.0.0.1:6379> mset user:1:name yunmx user:1:age 25		# Skillfully designed objects; Such a design is entirely possible
OK
127.0.0.1:6379> mget user:1:name user:1:age
1) "yunmx"
2) "25"

### Combination command
127.0.0.1:6379> getset db mysql								# If not, set
(nil)
127.0.0.1:6379> get db
"mysql"
127.0.0.1:6379> getset db MongoDB							# If it exists, return the current value and set a new value
"mysql"
127.0.0.1:6379> get db
"MongoDB"
127.0.0.1:6379>
1.5.2 List
Basic data types
Basic data types, lists
In redis, list can complete stack, queue and blocking queue!
Usage:
- It is actually a linked list. Before node after, left right can insert values
- If the key does not exist, create a new linked list
- If the key exists, add content
- If all values are removed, the empty linked list indicates that it does not exist
- Insert or change values on both sides for the highest efficiency; Modifying intermediate elements is relatively inefficient
Message queuing, message queuing (lpush Rpop) stack (lpush lpop)
### Basic command
127.0.0.1:6379> LPUSH key1 1								# Add one or more values to the header
(integer) 1
127.0.0.1:6379> LPUSH key1 2
(integer) 2
127.0.0.1:6379> LPUSH key1 3
(integer) 3
127.0.0.1:6379> LRANGE key1 0 -1
1) "3"
2) "2"
3) "1"
127.0.0.1:6379> LRANGE key1 0 1
1) "3"
2) "2"
127.0.0.1:6379> rpush key1 5								# Add a value to the tail
(integer) 4
127.0.0.1:6379> LRANGE key1 0 -1
1) "3"
2) "2"
3) "1"
4) "5"

### Removing Elements
127.0.0.1:6379> LRANGE key1 0 -1
1) "5"
2) "4"
3) "3"
4) "2"
5) "1"
127.0.0.1:6379> LPOP key1									# Remove the first element of the list
"5"
127.0.0.1:6379> rPOP key1									# Removes the last element of the list
"1"
127.0.0.1:6379> LRANGE key1 0 -1
1) "4"
2) "3"
3) "2"

### Get element, list length
127.0.0.1:6379> LRANGE key1 0 -1
1) "4"
2) "3"
3) "2"
127.0.0.1:6379> LINDEX key1 0								# Gets the first element in the list
"4"
127.0.0.1:6379> LINDEX key1 1
"3"
127.0.0.1:6379> LINDEX key1 2
"2"
127.0.0.1:6379> LINDEX key1 3
(nil)
127.0.0.1:6379> LLEN key1									# Get list length
(integer) 3

### Removes the specified value
 127.0.0.1:6379> LRANGE key1 0 -1
1) "2"
2) "4"
3) "4"
4) "3"
5) "2"
127.0.0.1:6379> LREM key1 1 2								# Remove a 2
(integer) 1
127.0.0.1:6379> LRANGE key1 0 -1
1) "4"
2) "4"
3) "3"
4) "2"
127.0.0.1:6379> LREM key1 2 4								# 4 removed
(integer) 2
127.0.0.1:6379> LRANGE key1 0 -1
1) "3"
2) "2"

### intercept
127.0.0.1:6379> LRANGE key1 0 -1
1) "15"
2) "14"
3) "13"
4) "12"
5) "11"
6) "10"
127.0.0.1:6379> LTRIM key1 0 3								# The list has been changed by intercepting the specified length by subscript
OK
127.0.0.1:6379> LRANGE key1 0 -1
1) "15"
2) "14"
3) "13"
4) "12"

### Combined command: rpoppush
127.0.0.1:6379> rpush list1 1 2 3 4 5
(integer) 5
127.0.0.1:6379> LRANGE list1 0 -1
1) "1"
2) "2"
3) "3"
4) "4"
5) "5"
127.0.0.1:6379> rpoplpush list1 list2					# Removes the last element from the list and adds it to the new list
"5"
127.0.0.1:6379> LRANGE list1 0 -1
1) "1"
2) "2"
3) "3"
4) "4"
127.0.0.1:6379> LRANGE list2 0 -1
1) "5"
127.0.0.1:6379>

### Element update
127.0.0.1:6379> EXISTS list1						# Determine whether the list exists
(integer) 0
127.0.0.1:6379> lset list1 0 yunmx					# There is no error report
(error) ERR no such key
127.0.0.1:6379> lpush lista1 1 2 3 4
(integer) 4
127.0.0.1:6379> LRANGE list1 0 0
(empty array)
127.0.0.1:6379> LRANGE list1 0 -1
(empty array)
127.0.0.1:6379> LRANGE lista1 0 0
1) "4"
127.0.0.1:6379> lset lista1 0 yunmx						# There is a value to modify the current subscript
OK
127.0.0.1:6379> LRANGE lista1 0 0
1) "yunmx"

### Element insertion
127.0.0.1:6379> LRANGE lista1 0 -1
1) "yunmx"
2) "3"
3) "2"
4) "1"
127.0.0.1:6379> LINSERT lista1 before yunmx hejie		# Insert in front of the current element
(integer) 5
127.0.0.1:6379> LINSERT lista1 after yunmx hejie1		# Insert after current element
(integer) 6
127.0.0.1:6379> LRANGE lista1 0 -1
1) "hejie"
2) "yunmx"
3) "hejie1"
4) "3"
5) "2"
6) "1"
1.5.3 Set
The values in set cannot be repeated d and are out of order
### Basic usage
127.0.0.1:6379> sadd set1 yunmx													# Save values into the set
(integer) 1
127.0.0.1:6379> sadd set1 hejie1
(integer) 1
127.0.0.1:6379> sadd set1 hejie01
(integer) 1
127.0.0.1:6379> sadd set1 hejie02
(integer) 1
127.0.0.1:6379> sadd set1 hejie02
(integer) 0
127.0.0.1:6379> SMEMBERS set1													# Query all elements in the collection
1) "yunmx"
2) "hejie02"
3) "hejie01"
4) "hejie1"
127.0.0.1:6379> SISMEMBER set1 hejie											# Determine whether the element exists
(integer) 0
127.0.0.1:6379> SISMEMBER set1 hejie5
(integer) 0
127.0.0.1:6379> SISMEMBER set1 hejie1											# Presence return 1
(integer) 1

### Gets the number of elements in the collection
127.0.0.1:6379> SCARD set1
(integer) 4
127.0.0.1:6379> sadd set1 hejie09
(integer) 1
127.0.0.1:6379> SCARD set1
(integer) 5

### Removes the specified element from the set collection
127.0.0.1:6379> SREM set1 yunmx													# Remove: yunmx from set set
(integer) 1
127.0.0.1:6379> SCARD set1
(integer) 4
127.0.0.1:6379> SMEMBERS set1
1) "hejie01"
2) "hejie09"
3) "hejie1"
4) "hejie02"

### Random usage (unordered and not repeated)
127.0.0.1:6379> SRANDMEMBER set1												# Select an element at random
"hejie02"
127.0.0.1:6379> SRANDMEMBER set1
"hejie09"
127.0.0.1:6379> SRANDMEMBER set1
"hejie02"
127.0.0.1:6379> SRANDMEMBER set1
"hejie09"
127.0.0.1:6379> SRANDMEMBER set1
"hejie01"
127.0.0.1:6379> SRANDMEMBER set1 2												# Randomly select the specified number of elements
1) "hejie1"
2) "hejie01"
127.0.0.1:6379> SRANDMEMBER set1 2
1) "hejie09"
2) "hejie02"
127.0.0.1:6379> SRANDMEMBER set1 2
1) "hejie1"
2) "hejie01"

### Randomly remove elements
127.0.0.1:6379> SMEMBERS set1
1) "hejie01"
2) "hejie09"
3) "hejie1"
4) "hejie02"
127.0.0.1:6379> spop set1														# Remove an element at random
"hejie02"
127.0.0.1:6379> spop set1
"hejie1"
127.0.0.1:6379> SMEMBERS set1
1) "hejie01"
2) "hejie09"

### Moves the specified value to another collection
127.0.0.1:6379> SMEMBERS set1
1) "1"
2) "2"
3) "3"
127.0.0.1:6379> SMEMBERS set2
1) "er"
2) "san"
3) "yi"
127.0.0.1:6379> smove set1 set2 1												# Move the element in set1 to set2. The value to be moved is 1 in set1
(integer) 1
127.0.0.1:6379> SMEMBERS set1
1) "2"
2) "3"
127.0.0.1:6379> SMEMBERS set2
1) "1"
2) "er"
3) "san"
4) "yi"

### Common concern: station B, microblog (combined)
# Digital set: difference set, intersection set, union set
127.0.0.1:6379> sadd set1 1 2 3 4 5 6
(integer) 6
127.0.0.1:6379> sadd set2 4 5 6 7 8 9
(integer) 6
127.0.0.1:6379>
127.0.0.1:6379> SDIFF set1 set2												# Difference set: the element in set1 does not exist in set2
1) "1"
2) "2"
3) "3"
127.0.0.1:6379> SINTER set1 set2											# intersection
1) "4"
2) "5"
3) "6"
127.0.0.1:6379> SDIFF set2 set1
1) "7"
2) "8"
3) "9"
127.0.0.1:6379> SUNION set1 set2										  	# Union
1) "1"
2) "2"
3) "3"
4) "4"
5) "5"
6) "6"
7) "7"
8) "8"
9) "9"
1.5.4 Hash
The essence of Map set and key Map set is not much different from that of string. It is still a simple key vlaue
application
- User information and so on
- Frequently changing information
- It is more suitable for storing objects, and string is more suitable for storing strings
### Basic usage
127.0.0.1:6379> hset hash1 name yunmx										# Set a key vlaue
(integer) 1
127.0.0.1:6379> hget hash1 name												# Get a field value
"yunmx"
127.0.0.1:6379> hmset hash1 name hejie age 28								# Set multiple
OK
127.0.0.1:6379> hgetall hash1												# Get all elements
1) "name"
2) "hejie"
3) "age"
4) "28"
127.0.0.1:6379> hget hash1 age												# Get a field value
"28"

### Delete a value
127.0.0.1:6379> HDEL hash1 name												# Delete the specified key field
(integer) 1
127.0.0.1:6379> hgetall hash1
1) "age"
2) "28"

### Get all the lengths of the hash (key value pairs)
127.0.0.1:6379> HLEN hash1													# Gets the number of key value pairs in the hash
(integer) 1
127.0.0.1:6379> hset hash1 age 18
(integer) 0
127.0.0.1:6379> hset hash1 age1 19
(integer) 1
127.0.0.1:6379> hset hash1 name hejie
(integer) 1
127.0.0.1:6379> HLEN hash1
(integer) 3

### Determine whether the field in the hash exists
127.0.0.1:6379> HGETALL hash1
1) "age"
2) "18"
3) "age1"
4) "19"
5) "name"
6) "hejie"
127.0.0.1:6379> HEXISTS hash1 age											# Determine whether the age field exists in the hash
(integer) 1
127.0.0.1:6379> HEXISTS hash1 yunmx
(integer) 0

### Get only all fields or values
127.0.0.1:6379> hkeys hash1
1) "age"
2) "age1"
3) "name"
127.0.0.1:6379> HVALS hash1
1) "18"
2) "19"
3) "hejie"

### Specified self increment
127.0.0.1:6379> HINCRBY hash1 age 1											# Self increment 1
(integer) 19
127.0.0.1:6379> HINCRBY hash1 age -1
(integer) 18
127.0.0.1:6379> hsetnx hash1 age 1											# If present, do not set
(integer) 0
127.0.0.1:6379> hsetnx hash1 age2 1											# If it does not exist, add a new key value pair
(integer) 1
1.5.5 Zset (ordered set)
On the basis of set, a value is added and a counting digit is added
Scenario idea:
- set can do everything it can. It can store the class grade sheet and payroll sorting
- Ordinary message 1 and important message 2 are judged with weight
- Application implementation of leaderboard: TOP N
### Basic usage
127.0.0.1:6379> zadd myset 1 one											# Add a value
(integer) 1
127.0.0.1:6379> zadd myset 2 two
(integer) 1
127.0.0.1:6379> zadd myset 3 three
(integer) 1
127.0.0.1:6379> zadd myset 4 four 5 five									# Add multiple values
(integer) 2
127.0.0.1:6379> ZRANGE myset 0 -1											# View all values
1) "one"
2) "two"
3) "three"
4) "four"
5) "five"

### How to implement sorting
# Usage: from minimum to maximum
# ZRANGEBYSCORE key min max [WITHSCORES] [LIMIT offset count]
127.0.0.1:6379> zadd salary 12000 yunmx										# Add 4 users
(integer) 1
127.0.0.1:6379> zadd salary 11000 hejie
(integer) 1
127.0.0.1:6379> zadd salary 10000 hejie01
(integer) 1
127.0.0.1:6379> zadd salary 9000 yunmx01
(integer) 1
127.0.0.1:6379> ZRANGEBYSCORE salary -inf +inf								# -inf +inf negative infinity to positive infinity from small to large
1) "yunmx01"
2) "hejie01"
3) "hejie"
4) "yunmx"
127.0.0.1:6379> ZRANGEBYSCORE salary -inf +inf withscores					# WithCores means with some other parameter descriptions
1) "yunmx01"
2) "9000"
3) "hejie01"
4) "10000"
5) "hejie"
6) "11000"
7) "yunmx"
8) "12000"

### Removing Elements
127.0.0.1:6379> ZRANGE salary 0 -1											# View all elements
1) "yunmx01"
2) "hejie01"
3) "hejie"
4) "yunmx"
127.0.0.1:6379> zrem salary yunmx01											# Remove specific elements
(integer) 1
127.0.0.1:6379> ZRANGE salary 0 -1
1) "hejie01"
2) "hejie"
3) "yunmx"

### Gets the number of in the ordered collection
127.0.0.1:6379> ZRANGE salary 0 -1
1) "hejie01"
2) "hejie"
3) "yunmx"
127.0.0.1:6379> ZCARD salary
(integer) 3

### Calculated by interval
127.0.0.1:6379> ZRANGE salary 0 -1
1) "hejie01"
2) "hejie"
3) "yunmx"
127.0.0.1:6379> zcount salary 1000 9000										# View quantities between 1000 and 9000
(integer) 0
127.0.0.1:6379> zcount salary 1000 10000									# View the quantity value between 1000 and 1-000
(integer) 1
1.5.6 geospatial (geospatial)
City longitude and latitude query: http://www.jsons.cn/lngcode/
- Positioning of circle of friends
- people nearby
- Taxi distance calculation
- ...
The underlying principle of GEO implementation is actually Zset! You can use Zset to operate GEO!
There are only six commands
- GEOADD
- GEODIST
- GEOHASH
- GEOPOS
- GEORADIUS
- GEORADIUSBYMEMBER
### Add location
# Geodd key longitude latitude member [longitude latitude member...] Multiple can be added
# Parameter: key value (longitude dimension name)
127.0.0.1:6379> geoadd china:city 104.065735 30.659462 chengdu
(integer) 1
127.0.0.1:6379> geoadd china:city 106.504962 29.533155 chongqing
(integer) 1

### Get the latitude and longitude of the current positioning
127.0.0.1:6379> GEOPOS china:city chengdu									# Get the longitude and latitude of Chengdu
1) 1) "104.06573742628097534"
   2) "30.65946118872339099"
127.0.0.1:6379> GEOPOS china:city chongqing									# Get the longitude and latitude of Chongqing
1) 1) "106.50495976209640503"
   2) "29.53315530684997015"

### Calculate the distance between two places
#Unit: m/km/mi/ft
127.0.0.1:6379> geodist china:city chengdu chongqing m						# Calculate the straight-line distance from Chengdu to Chongqing, in m
"266056.2971"
127.0.0.1:6379> geodist china:city chengdu chongqing km						# Calculate the straight-line distance from Chengdu to Chongqing, in km
"266.0563"

### Take the given longitude and latitude as the center, and return all position elements whose distance from the center does not exceed the given maximum distance among the position elements contained in the key.
# GEORADIUS:
127.0.0.1:6379> GEORADIUS china:city 103 30 1 km							# Take 103 30 as the center and 1km as the radius
(empty array)
127.0.0.1:6379> GEORADIUS china:city 103 30 2 km
(empty array)
127.0.0.1:6379> GEORADIUS china:city 103 30 20 km
(empty array)
127.0.0.1:6379> GEORADIUS china:city 103 30 200 km
1) "chengdu-qingyangqu"
2) "chengdu"
3) "chengdu-jinjiangqu"
127.0.0.1:6379> GEORADIUS china:city 103 30 20000 km
1) "chengdu-qingyangqu"
2) "chongqing"
3) "chengdu"
4) "chengdu-jinjiangqu"
127.0.0.1:6379> GEORADIUS china:city 103 30 20000 km withcoord				# Longitude and latitude are displayed
1) 1) "chengdu-qingyangqu"
   2) 1) "104.06151026487350464"
      2) "30.67387107851423167"
2) 1) "chongqing"
   2) 1) "106.50495976209640503"
      2) "29.53315530684997015"
3) 1) "chengdu"
   2) 1) "104.06573742628097534"
      2) "30.65946118872339099"
4) 1) "chengdu-jinjiangqu"
   2) 1) "104.06573742628097534"
      2) "30.65946118872339099"

### Find the element within the specified range. The center point is determined by the given location element
# GEORADIUSBYMEMBER
127.0.0.1:6379> GEORADIUSBYMEMBER china:city chengdu 10 km					# City coordinates of 10km
1) "chengdu"
2) "chengdu-jinjiangqu"
3) "chengdu-qingyangqu"
127.0.0.1:6379> GEORADIUSBYMEMBER china:city chengdu 100 km
1) "chengdu"
2) "chengdu-jinjiangqu"
3) "chengdu-qingyangqu"
127.0.0.1:6379> GEORADIUSBYMEMBER china:city chengdu 10 km
1) "chengdu"
2) "chengdu-jinjiangqu"
3) "chengdu-qingyangqu"
127.0.0.1:6379> GEORADIUSBYMEMBER china:city chengdu 1000 km
1) "chengdu-qingyangqu"
2) "chongqing"
3) "chengdu"
4) "chengdu-jinjiangqu"
127.0.0.1:6379> GEORADIUSBYMEMBER china:city chengdu 1000 km withcoord		# With coordinate information
1) 1) "chengdu-qingyangqu"
   2) 1) "104.06151026487350464"
      2) "30.67387107851423167"
2) 1) "chongqing"
   2) 1) "106.50495976209640503"
      2) "29.53315530684997015"
3) 1) "chengdu"
   2) 1) "104.06573742628097534"
      2) "30.65946118872339099"
4) 1) "chengdu-jinjiangqu"
   2) 1) "104.06573742628097534"
      2) "30.65946118872339099"

### Redis GEOHASH command - returns the Geohash representation of one or more location elements, which is not commonly used
1.5.7 hyperlog (cardinality Statistics)
Cardinality: the number of elements that are not repeated. The error is acceptable
A(1 2 3 45 5 78)
B(3 4 6 7 8 9 0 9 78 )
Algorithm of cardinality statistics
-
UV of web page (a person visits a website, but still counts as one)
The traditional way: set saves the user's ID, and then you can count the number of elements in set as the standard judgment. If you save a large number of user IDs, it will be more troublesome. Our purpose is to count rather than save the ID
-
The occupied memory is fixed. 2 ^ 64 different element technologies only need to waste 12KB of memory
0.81% error rate! UV statistics can be ignored
127.0.0.1:6379> PFADD key1 a 1 2 3 4 b c 6 7 9								# Set up a HyperLOGLOG
(integer) 1
127.0.0.1:6379> PFCOUNT key1												# Check the number of non duplicates
(integer) 10
127.0.0.1:6379> PFADD key2 a a  1 2 3 4 b c 6 7 9 10 10 101 10 10 8 6
(integer) 1
127.0.0.1:6379> PFCOUNT key2
(integer) 13
127.0.0.1:6379> PFMERGE key3 key1 key2										# Number of elements merging two key s
OK
127.0.0.1:6379> PFCOUNT key3												# View the number of non repeating elements
(integer) 13
1.5.8 Bitmap
Bit store 0 and 1
This data type can be used for both statuses
- Active, inactive
- Number of infected and uninfected persons
127.0.0.1:6379> SETBIT key 0 1												# Use Bitmaps to record the clock out of a week
(integer) 0
127.0.0.1:6379> SETBIT key 1 0
(integer) 0
127.0.0.1:6379> SETBIT key 2 0
(integer) 0
127.0.0.1:6379> SETBIT key 3 1
(integer) 0
## Check whether there is a clock out on a certain day
127.0.0.1:6379> getbit key 3
(integer) 1
127.0.0.1:6379> getbit key 2
(integer) 0

### Statistical operation
# Count open days
127.0.0.1:6379> BITCOUNT key
(integer) 2
1.6 Redis transaction
A transaction can execute multiple commands at one time with the following two important guarantees:
- A transaction is a separate isolation operation: all commands in the transaction are serialized and executed sequentially. During the execution of the transaction, it will not be interrupted by the command request sent by other clients
- A transaction is an atomic operation: all commands in the transaction are either executed or not executed at all
1.6.1 basic transaction operations
Redis transaction essence: a collection of commands! All commands in a transaction will be serialized and executed in sequence during transaction execution
Redis single command guarantees atomicity, but transactions do not guarantee atomicity!
- disposable
- Order
- exclusiveness
- There is no concept of isolation level, no unreal reading, dirty reading
---Join the team---
command1
command2
command2
---implement---
Three stages:
- Open transaction (MULTI)
- commands
- Execute transaction (EXEC)
### Normal execution
127.0.0.1:6379> MULTI								# Open transaction
OK
127.0.0.1:6379> set key1 1							# Order to join the team
QUEUED
127.0.0.1:6379> set key2 2
QUEUED
127.0.0.1:6379> set key3 3
QUEUED
127.0.0.1:6379> get key1
QUEUED
127.0.0.1:6379> get key2
QUEUED
127.0.0.1:6379> exec								# Transaction execution, in order
1) OK
2) OK
3) OK
4) "1"
5) "2"

### Abandon transaction
127.0.0.1:6379> MULTI								# Open transaction
OK
127.0.0.1:6379> set key1 1
QUEUED
127.0.0.1:6379> set key2 2
QUEUED
127.0.0.1:6379> set key3 3
QUEUED
127.0.0.1:6379> DISCARD								# Cancel transaction
OK
127.0.0.1:6379> exec
(error) ERR EXEC without MULTI
127.0.0.1:6379> get key1							# Failed to get the relevant value after abandoning the transaction
(nil)

### Transaction error 1: if the command is wrong, all commands in the transaction will not be executed!
127.0.0.1:6379> MULTI
OK
127.0.0.1:6379> set key1 1
QUEUED
127.0.0.1:6379> set key2 2
QUEUED
127.0.0.1:6379> getset key3											# Wrong command, direct error reporting
(error) ERR wrong number of arguments for 'getset' command
127.0.0.1:6379> set key3 3
QUEUED
127.0.0.1:6379> exec
(error) EXECABORT Transaction discarded because of previous errors.	# Error in executing transaction
127.0.0.1:6379> get key1											# As a result, all commands will not be executed
(nil)

### Transaction error 2: operation exception. If there is syntax in the transaction queue, other commands can be executed normally when executing the command, and the error command throws an exception
127.0.0.1:6379> MULTI
OK
127.0.0.1:6379> set key1 "yunmx"
QUEUED
127.0.0.1:6379> incr key1
QUEUED
127.0.0.1:6379> set key2 2
QUEUED
127.0.0.1:6379> set key3 3
QUEUED
127.0.0.1:6379> get key3
QUEUED
127.0.0.1:6379> exec
1) OK
2) (error) ERR value is not an integer or out of range				# The code structure is OK, and an exception is thrown
3) OK
4) OK
5) "3"
127.0.0.1:6379> get key2
"2"
1.6.2 optimistic lock
Monitoring: watch
Pessimistic lock: very pessimistic; I think there will be problems at any time. No matter what I do, I will lock it, which will affect the performance
Optimistic lock: very optimistic. The task will not have problems at any time, so it will not be locked. When updating the data, judge whether anyone has modified the data during this period. The version field used by mysql!
### Redis test monitoring
127.0.0.1:6379> set mymoney 1000
OK
127.0.0.1:6379> set myout 0
OK
127.0.0.1:6379> WATCH mymoney										# monitor
OK
127.0.0.1:6379> MULTI
OK
127.0.0.1:6379> DECRby mymoney 20
QUEUED
127.0.0.1:6379> INCRBY myout 20
QUEUED
127.0.0.1:6379> exec												# The transaction ended normally, and there was no change in the data period. It was executed normally
1) (integer) 980
2) (integer) 20
127.0.0.1:6379>

### Use the watch lock to test the multithreading. After modifying the value, the transaction submission fails
# The first process starts the transaction
127.0.0.1:6379>  watch mymoney
OK
127.0.0.1:6379> MULTI
OK
127.0.0.1:6379> DECRBY mymoney 10
QUEUED
127.0.0.1:6379> INCRBY myout 10
QUEUED
127.0.0.1:6379> exec												# Execute the second transaction to modify the data before committing
(nil)																# After the transaction is committed, the modification fails,
127.0.0.1:6379>
# The second process modifies our values
127.0.0.1:6379> get mymoney
"980"
127.0.0.1:6379> set mymoney 20
OK
127.0.0.1:6379> get mymoney
"20"
127.0.0.1:6379> set mymoney 1000
OK
127.0.0.1:6379> get mymoney
"1000"

### You can use unwatch to unlock, use watch again to get the latest value, and then execute the transaction
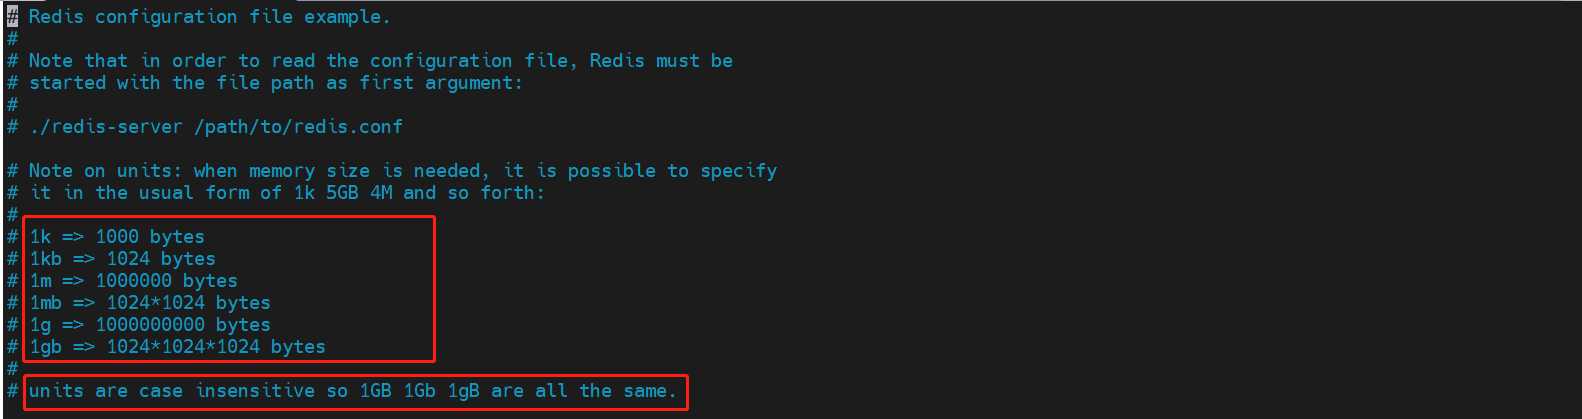
1.7 detailed explanation of redis configuration file
1.7.1 redis.conf
When starting, it is started through the configuration file
The configuration file is case insensitive
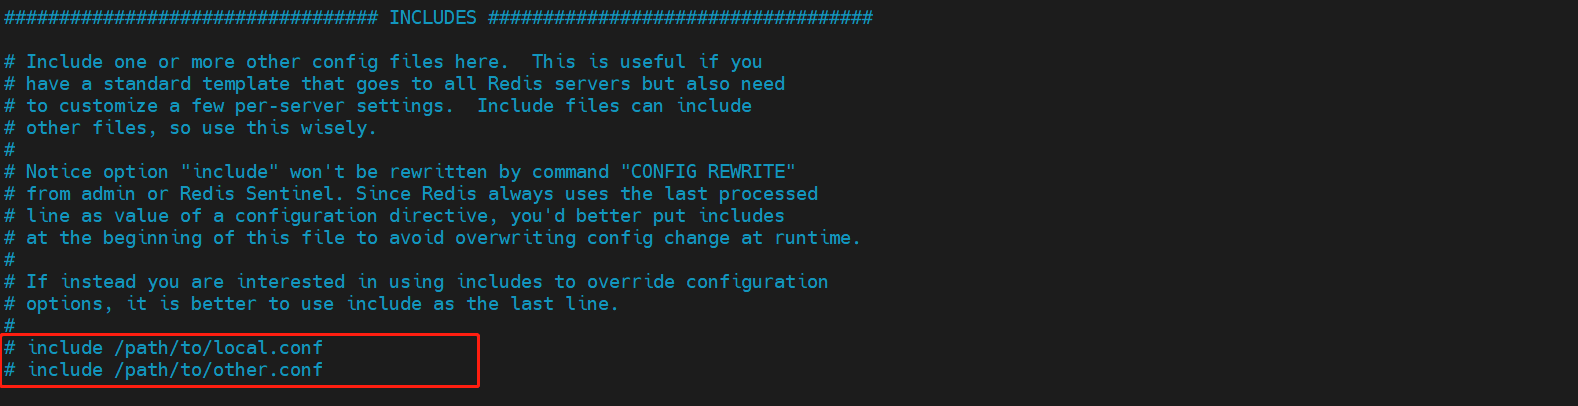
Include other profiles
network
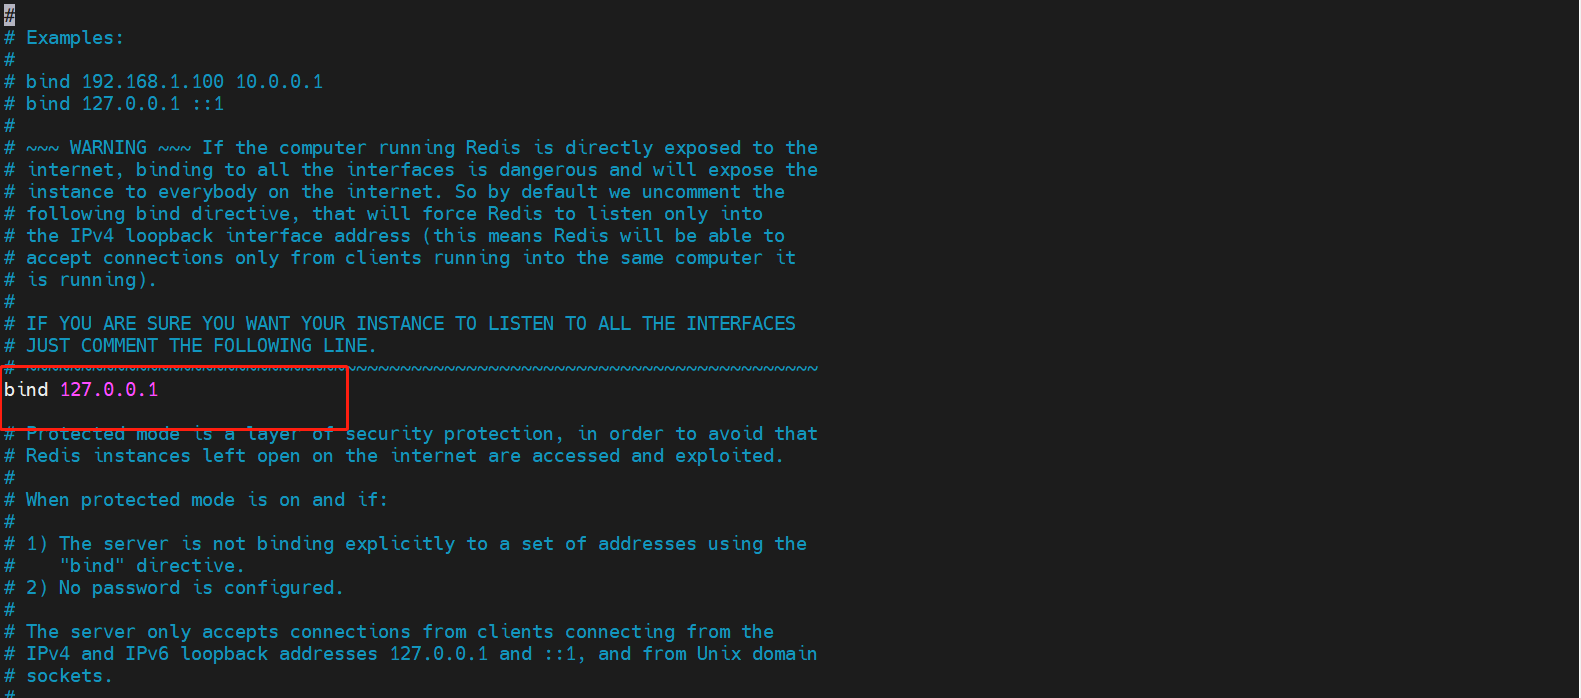
bind 127.0.0.1		# Bound ip
protected-mode yes	# Protection mode
port 6379			# port settings
GENERAL configuration
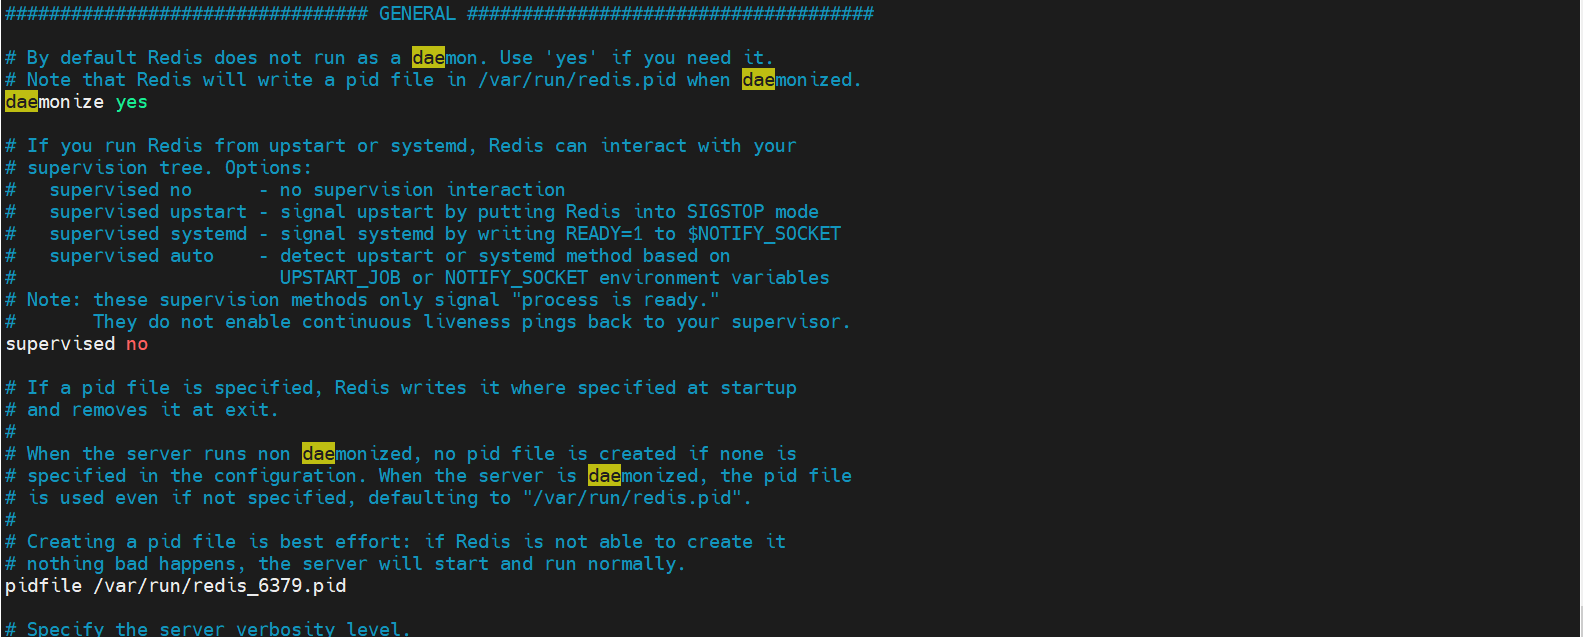
daemonize yes		# It has been run in daemon mode. The default is no. We need to start it ourselves
pidfile /var/run/redis_6379.pid	# If we run in the background mode, we need to specify a pid file
# Log (4 levels)
# Specify the server verbosity level.
# This can be one of:
# debug (a lot of information, useful for development/testing)
# verbose (many rarely useful info, but not a mess like the debug level)
# notice (moderately verbose, what you want in production probably)
# warning (only very important / critical messages are logged)
loglevel notice	#
logfile ""	#File location name of the log
databases 16	# The default number of databases is 16
always-show-logo yes	# Whether the logo is always displayed. It can not be displayed. It is displayed by default
Snapshot
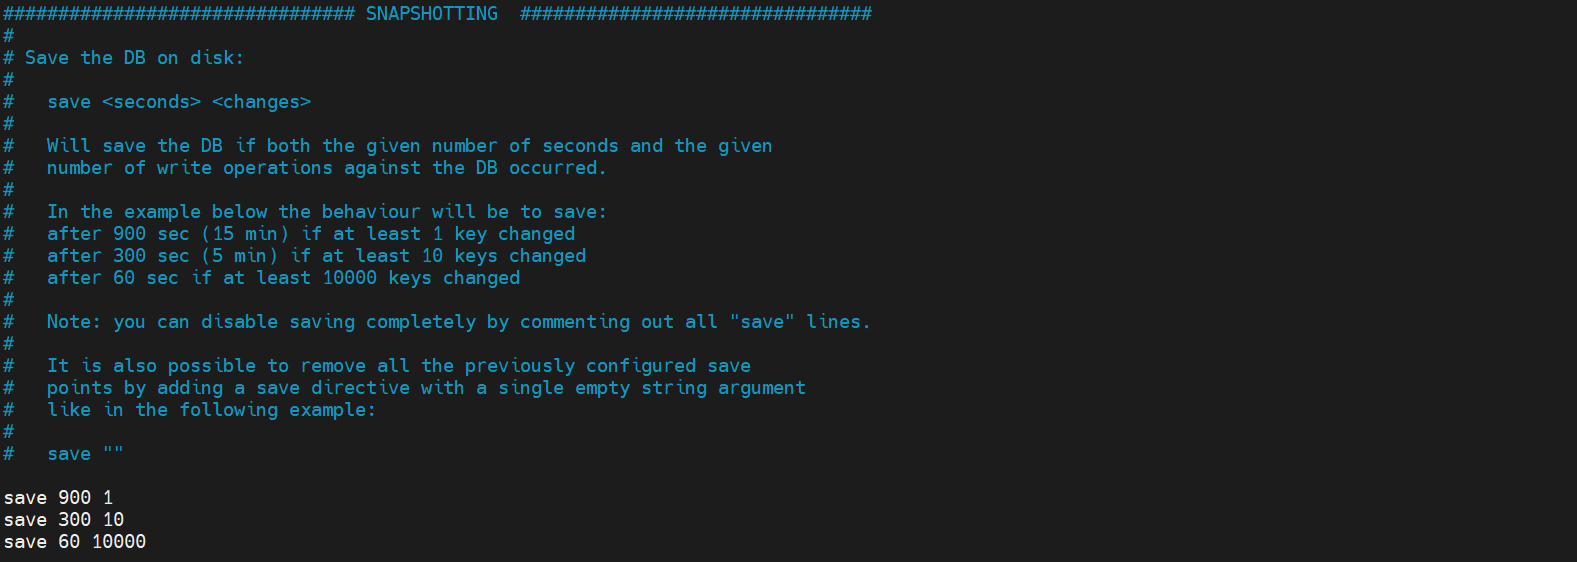
# rule
save 900 1		# If at least one key is modified within 900 seconds, we will perform the persistence operation
save 300 10
save 60 10000
# We can set our own rules
stop-writes-on-bgsave-error yes	# Whether to continue working when persistence fails. The default is yes
rdbcompression yes				# Whether to compress rdb files, which will consume CPU resources
rdbchecksum yes					# Check the rdb file or not. If there is an error, it will be repaired
dir ./							# Directory where rdb files are saved
snapshot
Persistence: the number of operations performed within the specified time will be persisted to the file rdb .aof, if there is no persistence, the data will be powered off and lost
Master slave REPLICATION

SECURITY
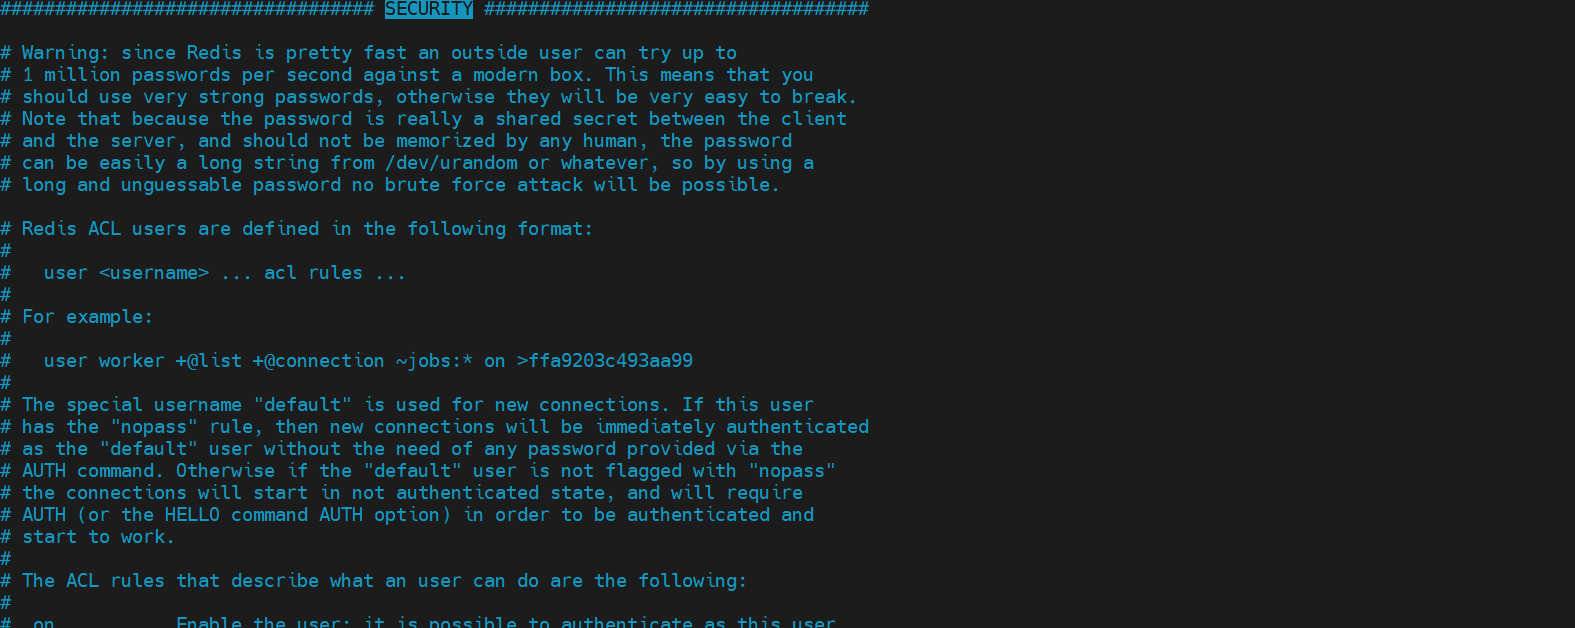
# requirepass foobared no password by default
# You can set the password by modifying the configuration file
# For example:
requirepass 123456

# verification
127.0.0.1:6379> ping
(error) NOAUTH Authentication required.
127.0.0.1:6379> auth 123456
OK
127.0.0.1:6379> ping
PONG
127.0.0.1:6379>
# You can also set the password through the command
127.0.0.1:6379> config get requirepass
1) "requirepass"
2) "123456"
127.0.0.1:6379> config set requirepass "110"
OK

127.0.0.1:6379> ping
(error) NOAUTH Authentication required.
127.0.0.1:6379> auth 110
OK
127.0.0.1:6379> ping
PONG
127.0.0.1:6379>
Client CLIENTS
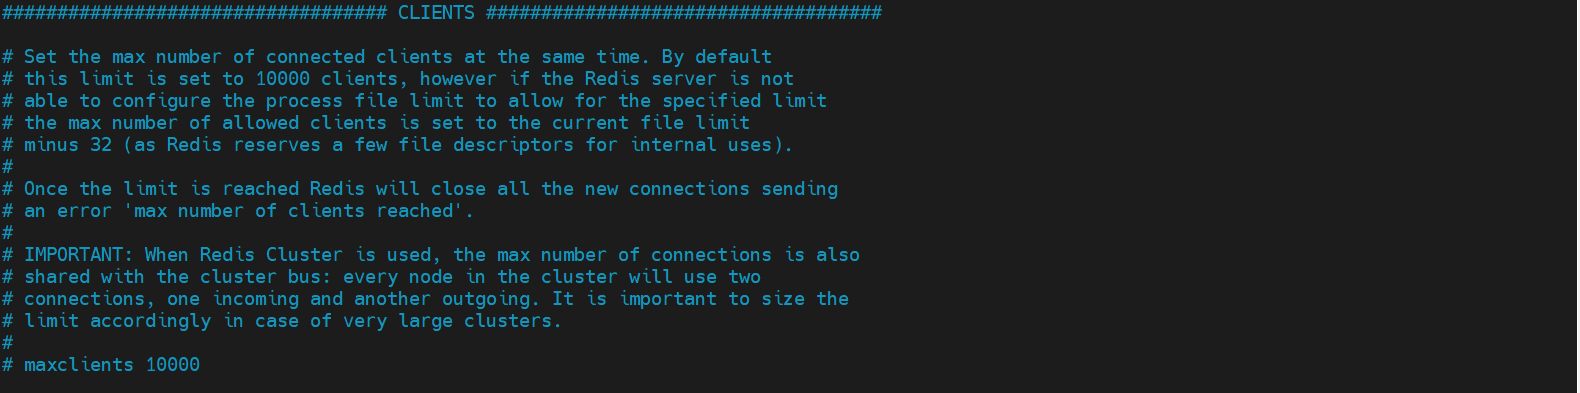
# Some limitations of the client
maxclients 10000   # Set the limit on the number of clients that can connect to redis
maxmemory <bytes>	# Maximum memory capacity of redis configuration
maxmemory-policy noeviction	# Processing strategy after the memory reaches the upper limit
	# Remove some expired key s
	# report errors
	# ...
1,volatile-lru: Only for those with expiration time set key conduct LRU((default)
2,allkeys-lru :  delete lru Algorithmic key
3,volatile-random: Random deletion is about to expire key
4,allkeys-random: Random deletion
5,volatile-ttl :  Delete expiring
6,noeviction :  Never expire, return error
APPEND ONLY MODE aof configuration
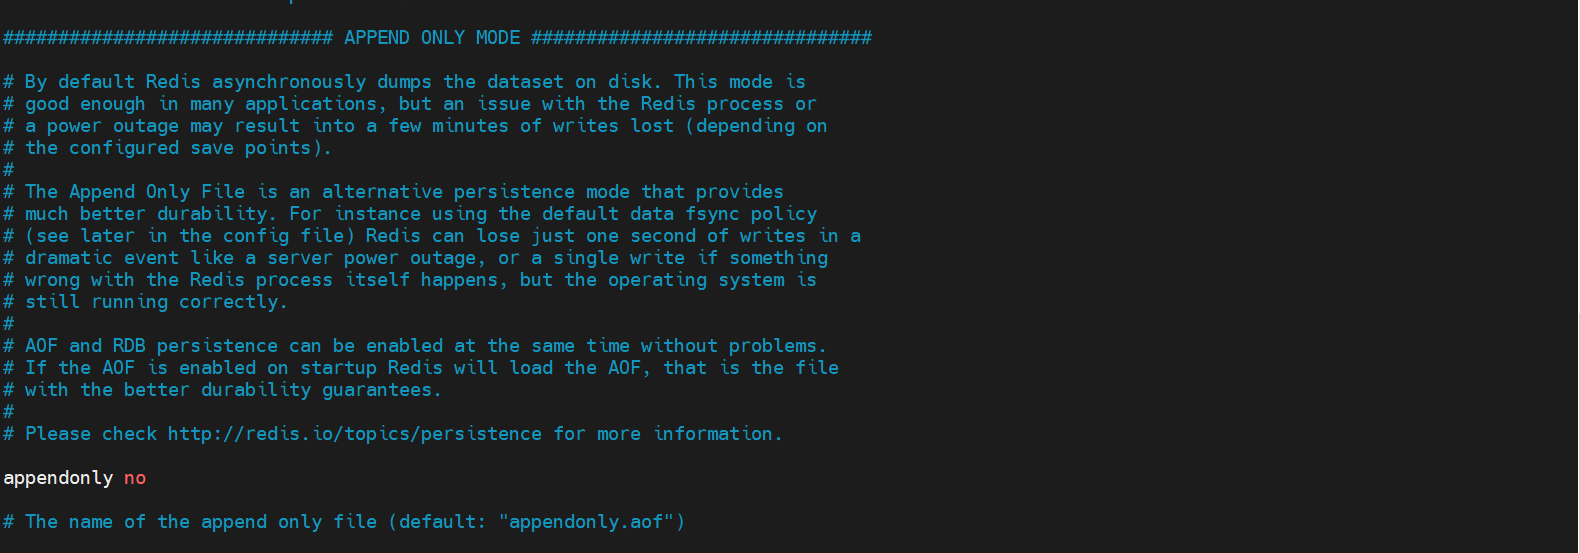
appendonly no   		# aof mode is not enabled by default. rdb persistent mode is used by default
appendfilename "appendonly.aof"			# The name of the persistent file

# appendfsync always			# The value will be written every time it is modified, which is slow
appendfsync everysec			# sync is executed once every second, and 1s of data may be lost!
# appendfsync no				# Out of sync. At this time, the operating system synchronizes data by itself. The speed is the fastest!
1.8 Redis persistence
Redis is an in memory database. If the database state in memory is not saved to the hard disk, the data state in the server will disappear once the server process exits. Therefore, redis provides the persistence function
1.8.1 RDB(Redis DataBase)
RDB
Within the specified time interval, the collective Snapshot of data in memory is written to disk, that is, Snapshot snapshot Snapshot. When it is restored, the Snapshot file is directly read into memory.
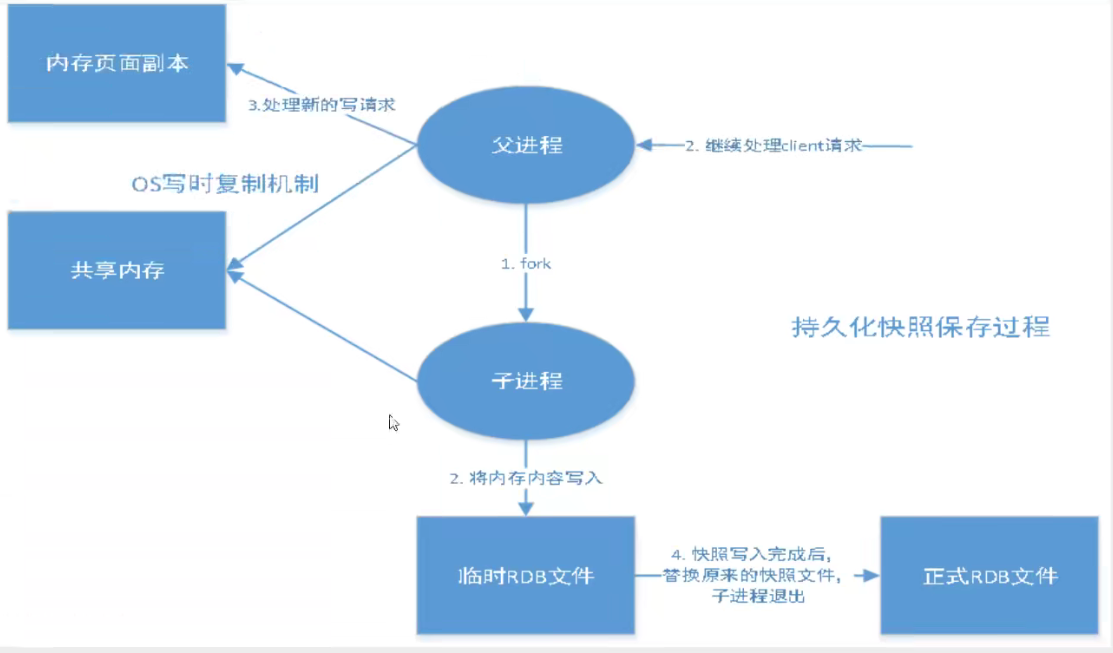
operation
Create (fork) a sub process separately for persistence. The data will be written to a temporary file. After the persistence process is completed, this temporary file will be used to replace the last persistent file. During the whole process, the main process does not perform any IO operations. This ensures extremely high performance. If large-scale data recovery is required and the integrity of data recovery is not very sensitive, RDB method is more effective than AOF method. The disadvantage of RDB is that the data may be lost after one persistence. Our default is RDB. Generally, we don't need to modify this configuration!
The file saved by RDB is dump rdb

# Trigger mechanism
1.save When the rules are met
2.Yes FLUSHALL command
3.sign out redis Can also trigger
How to recover rdb files
- You only need to put the rdb file in the redis startup directory, and dump will be checked automatically during startup rdb restores the data in it
# View storage location
127.0.0.1:6379> config get dir
1) "dir"
2) "/usr/local/bin"
Advantages and disadvantages
advantage
- Suitable for large-scale data recovery
- If you don't have high requirements for data integrity
shortcoming
- A certain time interval is required for operation! If redis goes down unexpectedly, the last modified data will be gone
- The fork process takes up a certain amount of memory space
1.8.2 AOF(Append Only File)
Record all our commands, history, and execute all the files when recovering
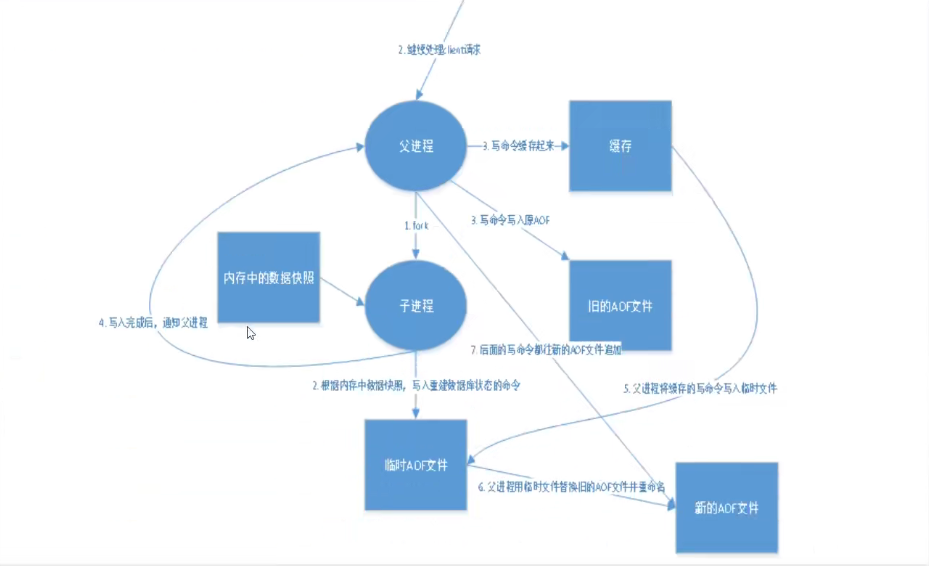
AOF
Record each operation in the form of a log, and record all instructions executed by redis (the read operation will not be recorded). Only files can be added, but files cannot be rewritten. After redis starts, the file will be read to rebuild the data. In other words, if redis restarts, the write instructions will be executed from front to back according to the contents of the daily record file to complete the data recovery
The file saved by aof is appendonly aof file
# After destroying the aof file, try to connect
[root@yunmx bin]# redis-cli
Could not connect to Redis at 127.0.0.1:6379: Connection refused
# Use the detection file to automatically repair the AOF file: redis check AOF
[root@yunmx bin]# redis-check-aof --fix appendonly.aof
0x              62: Expected \r\n, got: 6173
AOF analyzed: size=122, ok_up_to=23, diff=99
This will shrink the AOF from 122 bytes, with 99 bytes, to 23 bytes
Continue? [y/N]: y
Successfully truncated AOF
Advantages and disadvantages
advantage
- Each modification is synchronized to improve file integrity,
- Sync once per second, which will lose one second of data
- Never synchronized, the most efficient!
shortcoming
- Compared with data files, aof is much larger than rdb, and the repair speed is slower than rdb
- aof runs slower than rdb and performs IO operations
Extension:
-
RBD
RDB persistence can snapshot and store your data at a specified time interval. -
AOF
Aof persistence records every write operation to the server. When the server restarts, these commands will be re executed to recover the original data. AOF command saves each write operation to the end of the file with redis protocol. Redis can also rewrite AOF files in the background, so that the volume of AOF files will not be too large. -
Cache only
If you only want your data to exist when the server is running, you can also not use any persistence method. -
Enable two persistence methods at the same time
- When AOF is restarted, saving the original dataset takes precedence over saving the original dataset
- RDB data is not real-time. When using both, the server will only find AOF files when restarting. Do you want to use AOF only? The author suggests not, because RDB is more suitable for backing up the database (AOF is changing and hard to back up), fast restart, and there will be no potential bug s in AOF, so keep it as a means in case.
-
Performance recommendations
- Because RDB files are only used for backup purposes, it is recommended to only persist RDB files on Slave, and only backup once every 15 minutes is enough. Only save 900 1 is retained.
- If Enalbe AOF, the advantage is that in the worst case, only less than two seconds of data will be lost. The startup script is relatively simple, and only load your own AOF file. The first cost is that it brings continuous IO. The second is that AOF rewrite s. Finally, the new data generated in the rewriting process is written to a new file, and the blocking caused by it is almost inevitable. As long as the hard disk is allowed, the frequency of AOF rewriting should be minimized. The default value of 64M is too small and can be set to more than 5G. When the default size exceeds 100% of the original size, the override can be changed to an appropriate value.
- If AOF is not enabled, high availability can be achieved only by master slave replication. It can save a lot of IO and reduce the system fluctuation caused by rewriting. The price is that if the Master/Slave is dropped at the same time, more than ten minutes of data will be lost. The startup script also needs to compare the RDB files in the two Master/Slave and load the newer one. Sina Weibo chose this architecture.
1.9 Redis publish and subscribe
1.9.1 Redis publish and subscribe
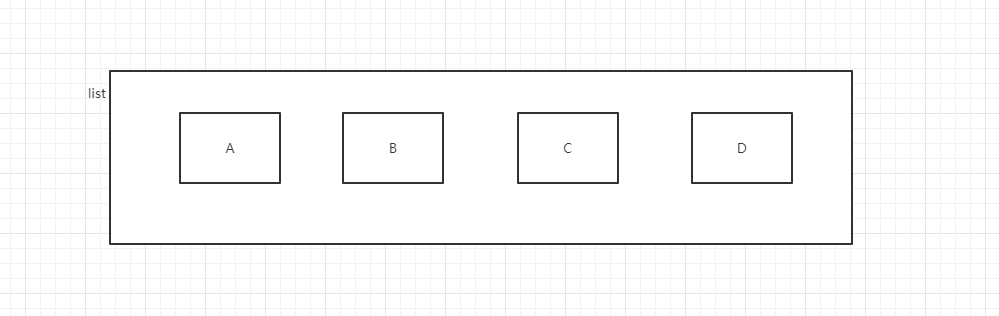
Subscribe and publish message diagram:
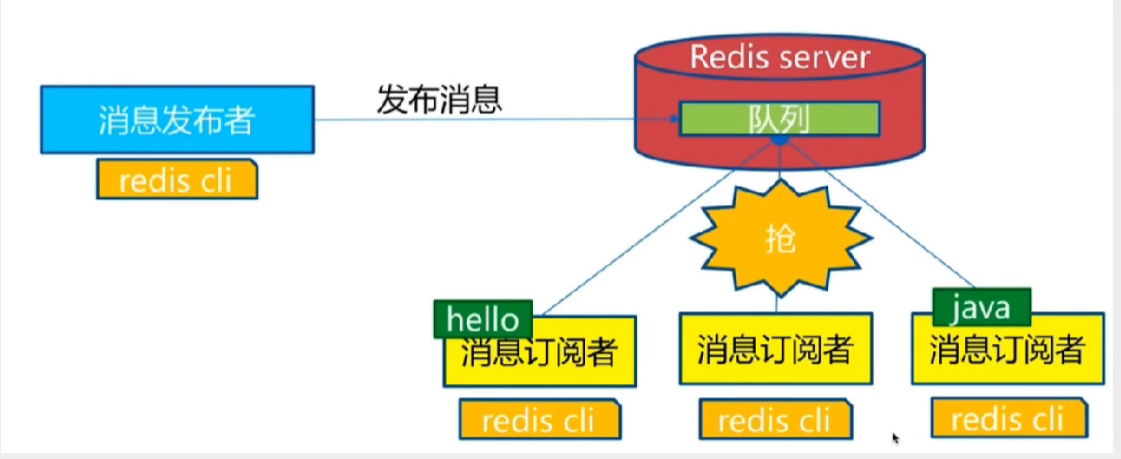
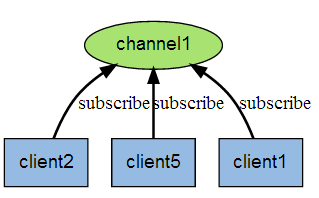
Redis publish / subscribe (pub/sub) is a message communication mode: the sender (pub) sends messages and the subscriber (sub) receives messages
Redis client can subscribe to any number of channels
The first is the message sender, the second is the channel, and the third is the message subscriber
The following figure shows the relationship between channel 1 and the three clients subscribing to this channel - client2, client5 and client1:
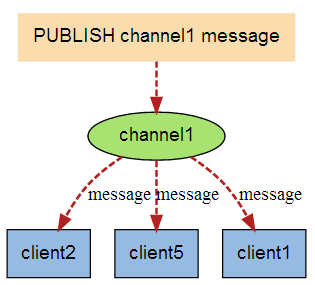
When a new message is sent to channel 1 through the PUBLISH command, the message will be sent to the three clients subscribing to it:
Redis publish subscribe command
The following table lists the common commands for publishing and subscribing to redis:
- PSUBSCRIBE pattern [pattern ...]
Subscribe to one or more channels that match a given pattern. - PUBSUB subcommand [argument [argument ...]]
View subscription and publishing system status. - PUBLISH channel message
Send information to the specified channel. - PUNSUBSCRIBE [pattern [pattern ...]]
Unsubscribe from all channels in a given mode. - SUBSCRIBE channel [channel ...]
Subscribe to information for a given channel or channels. - UNSUBSCRIBE [channel [channel ...]]
Unsubscribe from a given channel.
# test
# Subscribe to a channel
127.0.0.1:6379> SUBSCRIBE yunmx										# Subscribe to a channel to yunmx
Reading messages... (press Ctrl-C to quit)
1) "subscribe"
2) "yunmx"
3) (integer) 1

# New window sends a message: Publisher
[root@yunmx ~]# redis-cli
127.0.0.1:6379> PUBLISH yunmx test									# The publisher publishes a message to a channel with a specified name
(integer) 1

# Received message
127.0.0.1:6379> SUBSCRIBE yunmx
Reading messages... (press Ctrl-C to quit)
1) "subscribe"
2) "yunmx"
3) (integer) 1
1) "message"														# Received messages
2) "yunmx"															# Which channel
3) "test"															# Message content
Principle of Redis publishing and subscription
It is implemented in C by analyzing PubSub. In redis source code C file to understand the underlying implementation logic of publish and subscribe mechanism and deepen the understanding of redis. (I don't know C, and I'm not a developer. How to fix it)
Publish and subscribe functions are realized through PUBLISH/SUBSCRIBE/PSUBSCRIBE and other commands
- SUBSCRIBE: after subscribing to channels through this command, a dictionary is maintained in redis server. The key of the dictionary is each channel, and the value of the dictionary is a linked list, which saves all clients subscribing to this channel----- Is to add the client to the subscription list of a given channel
- PUBLISH: Send a message to subscribers. Redis server will use the given channel as the key, query and record all client connections subscribing to this channel in the channel dictionary maintained by it, traverse the whole linked list and send the message to all subscribers
- PUB and SUB: publish and subscribe. In redis, you can set a key value for message publishing and message subscription. When a key value is published, all clients subscribing to it will receive corresponding messages. This function is obviously used as a real-time message system, such as ordinary instant chat, group chat and other functions
1.9.2 usage scenarios
- Real time message system
- Real time chat ---- the channel can be used as a chat room and the information can be echoed back to everyone
- Subscription, official account subscription, etc.
- In a slightly complex scenario, we will use message oriented middleware (MQ)
2.0 Redis master-slave replication
2.0.1 concept
Master-slave replication
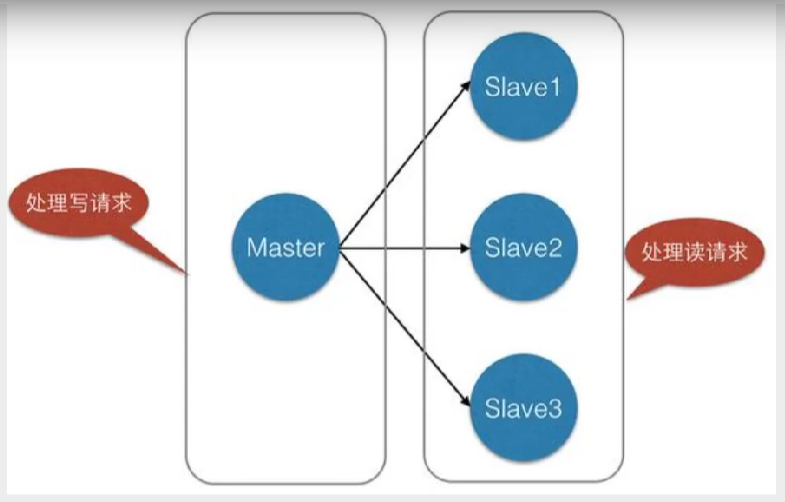
It refers to copying the data of one Redis server to other Redis servers. The former is called master and the latter is called slave; Data replication is unidirectional and can only be from master node to slave node. Master mainly writes, slave mainly reads.
By default, each Redis server is the master node; And a master node can have multiple slave nodes (or no slave nodes), but a slave node can only have one master node.
Role of master-slave replication
- Data redundancy: master-slave replication realizes the hot backup of data, which is a way of data redundancy other than persistence.
- Fault recovery: when the master node has problems, the slave node can provide services to achieve rapid fault recovery; In fact, it is a kind of redundancy of services.
- Load balancing: on the basis of master-slave replication, combined with read-write separation, the master node can provide write services, and the slave node can provide read services (that is, the application connects to the master node when writing Redis data, and the application connects to the slave node when reading Redis data), sharing the server load; Especially in the scenario of less writing and more reading, the concurrency of Redis server can be greatly improved by sharing the reading load among multiple slave nodes.
- High availability cornerstone: in addition to the above functions, master-slave replication is also the basis for sentinels and clusters to implement. Therefore, master-slave replication is the basis for Redis high availability.
Generally speaking, to apply redis to production projects, it is absolutely impossible to use only one redis
- Structurally, a single redis server will have a single point of failure, and a single machine processing all requests will lead to excessive load
- In terms of capacity, the memory capacity of a single machine is limited. Generally speaking, the maximum memory used by a single redis should not exceed 20G
2.0.2 configure master-slave
Master-slave copy, read-write separation! 80% of the cases are read operations! Ease the pressure on the server and often use it in the architecture! One master and two slaves!
Test scenario
Environment configuration
Configure only slave libraries, not master libraries!
# Start a redis to view the information
127.0.0.1:6379> info replication
# Replication
role:master														# role
connected_slaves:0												# Number of slaves
master_replid:fa0e795a3e369ed7e46a40ee8818a51255ab6df3
master_replid2:0000000000000000000000000000000000000000
master_repl_offset:0
second_repl_offset:-1
repl_backlog_active:0
repl_backlog_size:1048576
repl_backlog_first_byte_offset:0
repl_backlog_histlen:0
Copy a configuration file, modify the port number, the file name of log saving, rdb file name and pid file, and start two redis
[root@yunmx bin]# redis-server redis-conf/redis.conf1			# 6380
6038:C 12 Dec 2021 13:06:38.166 # oO0OoO0OoO0Oo Redis is starting oO0OoO0OoO0Oo
6038:C 12 Dec 2021 13:06:38.166 # Redis version=6.0.6, bits=64, commit=00000000, modified=0, pid=6038, just started
6038:C 12 Dec 2021 13:06:38.166 # Configuration loaded
[root@yunmx bin]# redis-server redis-conf/redis.conf2			# 6381
6045:C 12 Dec 2021 13:06:39.640 # oO0OoO0OoO0Oo Redis is starting oO0OoO0OoO0Oo
6045:C 12 Dec 2021 13:06:39.641 # Redis version=6.0.6, bits=64, commit=00000000, modified=0, pid=6045, just started
6045:C 12 Dec 2021 13:06:39.641 # Configuration loaded


Before configuring master-slave, all three nodes are master nodes


Recognize the boss
One master (79) and two slaves (80,81)
# 6380 configuration
127.0.0.1:6380> SLAVEOF 127.0.0.1 6379							# redis, who recognizes the 6379 port service of this machine, is the boss
OK
127.0.0.1:6380> info replication
# Replication
role:slave														# Becomes a slave node
master_host:127.0.0.1											# Master node information
master_port:6379
master_link_status:up
master_last_io_seconds_ago:8
master_sync_in_progress:0
slave_repl_offset:0
slave_priority:100
slave_read_only:1
connected_slaves:0
master_replid:55c3146a93d180ad5aa89e4d64ff894a451e77e5
master_replid2:0000000000000000000000000000000000000000
master_repl_offset:0
second_repl_offset:-1
repl_backlog_active:1
repl_backlog_size:1048576
repl_backlog_first_byte_offset:1
repl_backlog_histlen:0
# View host information
127.0.0.1:6379> info replication
# Replication
role:master
connected_slaves:2
slave0:ip=127.0.0.1,port=6380,state=online,offset=168,lag=0			# Slave information
slave1:ip=127.0.0.1,port=6381,state=online,offset=168,lag=0
master_replid:55c3146a93d180ad5aa89e4d64ff894a451e77e5
master_replid2:0000000000000000000000000000000000000000
master_repl_offset:168
second_repl_offset:-1
repl_backlog_active:1
repl_backlog_size:1048576
repl_backlog_first_byte_offset:1
repl_backlog_histlen:168
The real master-slave configuration should be configured in the configuration file. In this case, it is permanent. The above commands are used, but only temporary
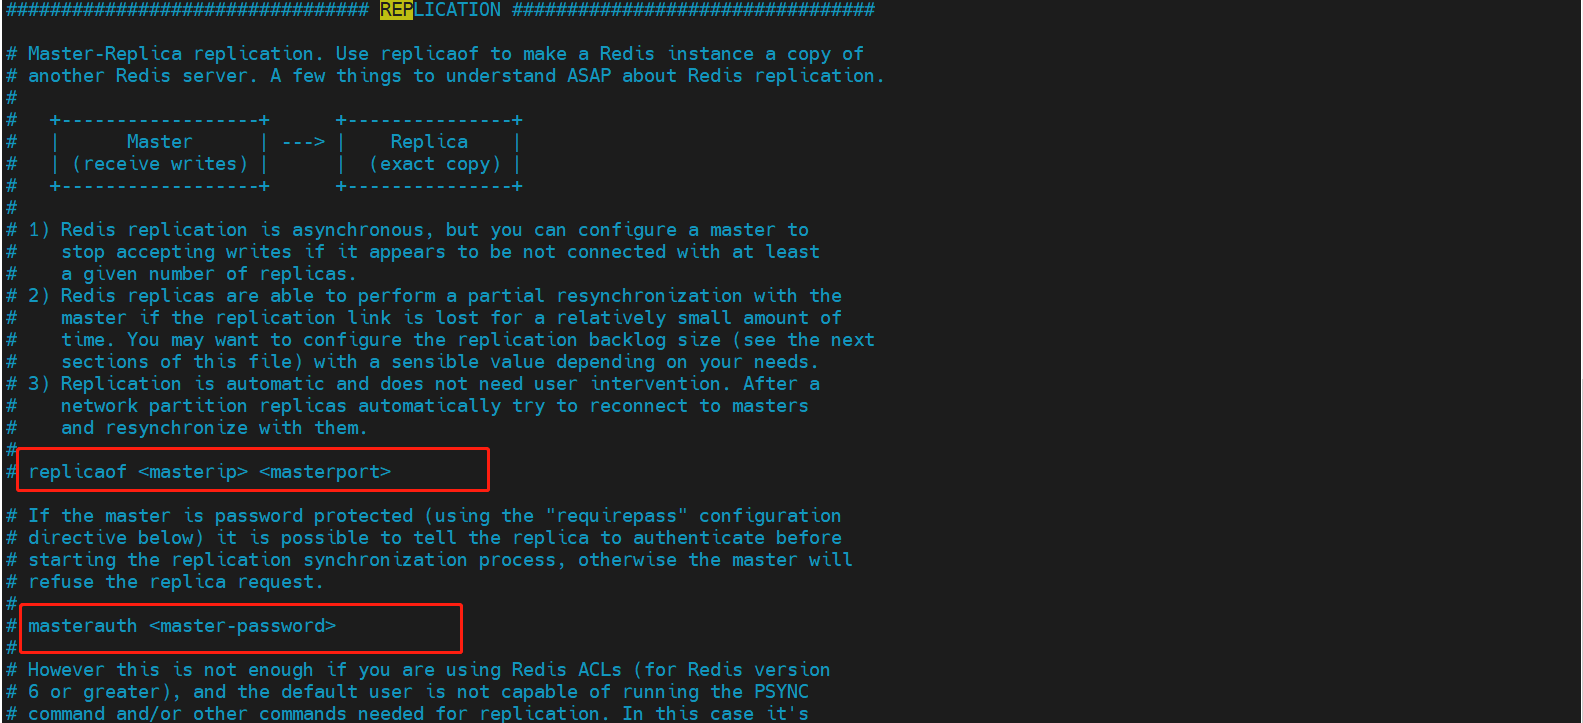
replicaof <masterip> <masterport>   # IP address and port number of the host
masterauth <master-password>		# If a password is set, configure the password
2.0.3 characteristic verification
The master can set values, but the slave cannot write. All information and data in the master will be saved by the slave
# Set a key for the host
127.0.0.1:6379> set key1 yunmx
OK
127.0.0.1:6379>
# There will also be in the slave. The slave cannot set the key
127.0.0.1:6380> keys *
1) "key1"
127.0.0.1:6380> get key1
"yunmx"
127.0.0.1:6380> set key2 yunmx2
(error) READONLY You can't write against a read only replica.
127.0.0.1:6380>
After the boss goes down, the slave or slave will only show that the host state is abnormal; When the host is restored, the slave can still directly obtain the information written by the host, ensuring a certain high availability
If we use the master-slave configured on the command line, if the slave goes down, the slave will be separated from the master-slave. We need to configure the slave on the command line again. After it becomes a slave, we can get the value of the key
# Stop the 6379 host service and check the status of the slave cluster
127.0.0.1:6380> info replication
# Replication
role:slave
master_host:127.0.0.1
master_port:6379
master_link_status:down
master_last_io_seconds_ago:-1
master_sync_in_progress:0
slave_repl_offset:1065
master_link_down_since_seconds:10
slave_priority:100
slave_read_only:1
connected_slaves:0
master_replid:55c3146a93d180ad5aa89e4d64ff894a451e77e5
master_replid2:0000000000000000000000000000000000000000
master_repl_offset:1065
second_repl_offset:-1
repl_backlog_active:1
repl_backlog_size:1048576
repl_backlog_first_byte_offset:1
repl_backlog_histlen:1065

# Restore 6379 host services and verify that data will also be synchronized
[root@yunmx ~]# redis-cli -p 6379
127.0.0.1:6379> set key2 yunmx2													# Restore primary node, set one key
OK
127.0.0.1:6379>
# Read the key set after host recovery from the node
127.0.0.1:6380> get key2														# It can be read normally
"yunmx2"

# Stop the slave service, set a key on the host, and verify when the slave is restored
127.0.0.1:6379> set key3 yunmx3
OK

127.0.0.1:6380> get key3														# The slave cannot obtain the data of key3
(nil)

127.0.0.1:6381> get key3
"yunmx3"
2.0.4 replication principle
After Slave is successfully started and connected to the master, it will send a sync synchronization command
After receiving the command, the master determines the background save process and collects all received commands for modifying the dataset. After the background process is executed, the master will transfer the whole data file to the slave and complete a complete synchronization
Full copy: the slave service will save and load the database file data into memory after receiving it
Incremental replication: Mster continues to transmit all new collected modification commands to slave in turn to complete synchronization
However, as long as you reconnect to the master, a full synchronization will be performed automatically! Our data can certainly be seen in the slave!
2.0.5 layer by layer link
The previous M links to the next S!
Master slave replication can be completed!
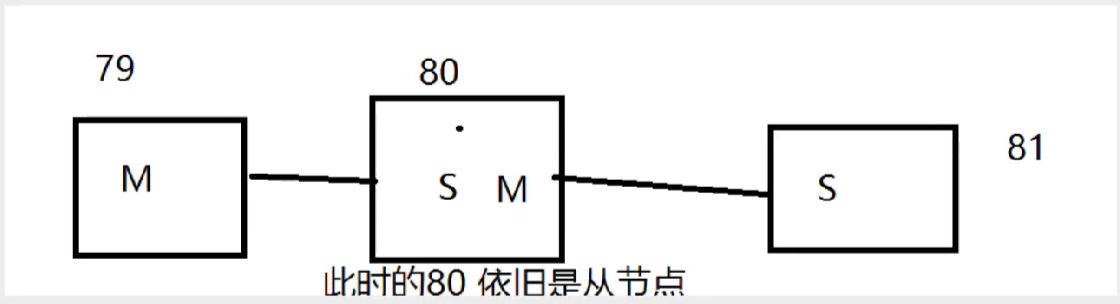
If there is no 79, can you choose a boss at this time? You need to configure it manually at this time!
Seek to usurp the throne: slaveof no one make yourself a host! If the boss comes back, it also needs to be configured manually
2.1 Redis sentinel mode
Automatic version selection mode
2.1.1 general
-
The way of master-slave switching technology is: when the master server goes down, one server needs to be manually switched to the main service, which requires manual intervention, which is time-consuming and laborious, and the service can not be used for a period of time. This is not a recommended way, but rather we consider the Sentinel mode. Redis has officially provided Sentinel architecture since 2.8 to solve this problem.
-
It can monitor whether the host fails in the background. If it fails, it will automatically convert from the library to the main library according to the number of votes
-
Sentinel mode is a special mode. Firstly, Redis provides sentinel commands. It is an independent process. As a process, it will run independently. The principle is that the sentinel monitors multiple running Redis instances by sending commands and waiting for a response from the Redis server.
2.1.2 basic structure
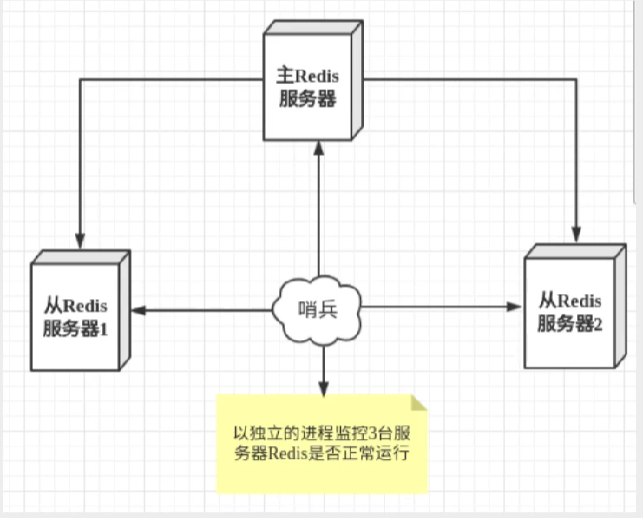
The role of sentinel mode:

- By sending commands, the Redis server can return to the monitoring operation status, including master service and slave service
- When the sentinel detects that the master is down, it will automatically switch the slave to the master, and then modify the configuration file through other slave servers through publish and subscribe mode to let them switch the host
If a sentinel process monitors the redis server, there may be problems. Therefore, we can use multiple sentinels for monitoring, and each sentinel will also monitor. In this way, a multi sentinel mode is formed
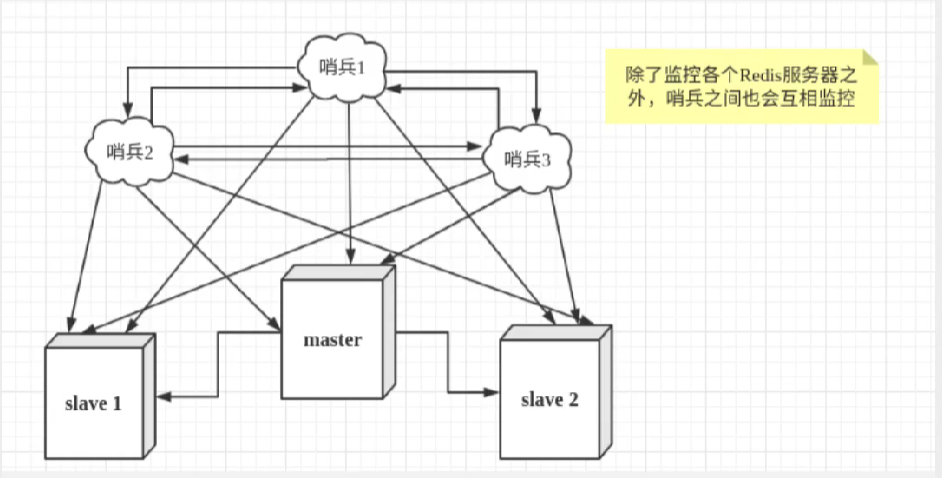
Using sentinel mode, at least 6 processes will be started
Assuming that the main service is down, sentry 1 detects this result first, and the system will not immediately carry out the failover process. Only sentry 1 subjectively thinks that the main service is unavailable. This site is called subjective offline. When the following sentry also detects that the main service is unavailable and the number reaches a certain value, the Sentry will vote once, and the voting result is initiated by a sentry for failover failover. After the handover is successful, each sentinel will switch the monitored from the service to the host through the publish and subscribe mode. This process is called objective offline
2.1.3 scenario test
The architecture we are currently testing is one master and two slave
Configure the profile for sentinel mode
# Create a new profile and edit the following
sentinel monitor myredis 127.0.0.1 6379 1# Syntax: sentinel monitor the name of the monitored host port 1 (1 represents who will take over as the host after the host goes down)
Activate the sentry
[root@yunmx bin]# redis-sentinel redis-conf/sentinel.conf				# Start a sentry
12680:X 12 Dec 2021 15:13:42.570 # oO0OoO0OoO0Oo Redis is starting oO0OoO0OoO0Oo
12680:X 12 Dec 2021 15:13:42.570 # Redis version=6.0.6, bits=64, commit=00000000, modified=0, pid=12680, just started
12680:X 12 Dec 2021 15:13:42.570 # Configuration loaded
                _._
           _.-``__ ''-._
      _.-``    `.  `_.  ''-._           Redis 6.0.6 (00000000/0) 64 bit
  .-`` .-```.  ```\/    _.,_ ''-._
 (    '      ,       .-`  | `,    )     Running in sentinel mode
 |`-._`-...-` __...-.``-._|'` _.-'|     Port: 26379
 |    `-._   `._    /     _.-'    |     PID: 12680
  `-._    `-._  `-./  _.-'    _.-'
 |`-._`-._    `-.__.-'    _.-'_.-'|
 |    `-._`-._        _.-'_.-'    |           http://redis.io
  `-._    `-._`-.__.-'_.-'    _.-'
 |`-._`-._    `-.__.-'    _.-'_.-'|
 |    `-._`-._        _.-'_.-'    |
  `-._    `-._`-.__.-'_.-'    _.-'
      `-._    `-.__.-'    _.-'
          `-._        _.-'
              `-.__.-'

12680:X 12 Dec 2021 15:13:42.571 # WARNING: The TCP backlog setting of 511 cannot be enforced because /proc/sys/net/core/somaxconn is set to the lower value of 128.
12680:X 12 Dec 2021 15:13:42.575 # Sentinel ID is ea7ccf0119a4cf2873cf3bb108da5c7af86d36bd
12680:X 12 Dec 2021 15:13:42.575 # +monitor master myredis 127.0.0.1 6379 quorum 1
12680:X 12 Dec 2021 15:13:42.575 * +slave slave 127.0.0.1:6380 127.0.0.1 6380 @ myredis 127.0.0.1 6379
12680:X 12 Dec 2021 15:13:42.580 * +slave slave 127.0.0.1:6381 127.0.0.1 6381 @ myredis 127.0.0.1 6379
Manual downtime test
# Turn off the host
127.0.0.1:6379> SHUTDOWN
not connected>
# Some information monitored by the sentry
12680:X 12 Dec 2021 15:16:49.174 # +failover-state-select-slave master myredis 127.0.0.1 6379
12680:X 12 Dec 2021 15:16:49.241 # +selected-slave slave 127.0.0.1:6381 127.0.0.1 6381 @ myredis 127.0.0.1 6379
12680:X 12 Dec 2021 15:16:49.241 * +failover-state-send-slaveof-noone slave 127.0.0.1:6381 127.0.0.1 6381 @ myredis 127.0.0.1 6379
12680:X 12 Dec 2021 15:16:49.324 * +failover-state-wait-promotion slave 127.0.0.1:6381 127.0.0.1 6381 @ myredis 127.0.0.1 6379
12680:X 12 Dec 2021 15:16:50.181 # +promoted-slave slave 127.0.0.1:6381 127.0.0.1 6381 @ myredis 127.0.0.1 6379
12680:X 12 Dec 2021 15:16:50.181 # +failover-state-reconf-slaves master myredis 127.0.0.1 6379
12680:X 12 Dec 2021 15:16:50.237 * +slave-reconf-sent slave 127.0.0.1:6380 127.0.0.1 6380 @ myredis 127.0.0.1 6379
12680:X 12 Dec 2021 15:16:51.182 * +slave-reconf-inprog slave 127.0.0.1:6380 127.0.0.1 6380 @ myredis 127.0.0.1 6379
12680:X 12 Dec 2021 15:16:51.182 * +slave-reconf-done slave 127.0.0.1:6380 127.0.0.1 6380 @ myredis 127.0.0.1 6379
12680:X 12 Dec 2021 15:16:51.234 # +failover-end master myredis 127.0.0.1 6379
12680:X 12 Dec 2021 15:16:51.234 # +switch-master myredis 127.0.0.1 6379 127.0.0.1 6381		# The sentry shows that the host is automatically switched to 6381
12680:X 12 Dec 2021 15:16:51.234 * +slave slave 127.0.0.1:6380 127.0.0.1 6380 @ myredis 127.0.0.1 6381
12680:X 12 Dec 2021 15:16:51.234 * +slave slave 127.0.0.1:6379 127.0.0.1 6379 @ myredis 127.0.0.1 6381
12680:X 12 Dec 2021 15:17:21.244 # +sdown slave 127.0.0.1:6379 127.0.0.1 6379 @ myredis 127.0.0.1 6381
# Check the information of 6381 host
127.0.0.1:6381> info replication
# Replication
role:master								# Become a master
connected_slaves:1
slave0:ip=127.0.0.1,port=6380,state=online,offset=21944,lag=0
master_replid:a4719b795f6c088ed1a11408a2bc52cc48ece215
master_replid2:367d9493cb151b433bd535ad9e49603d1fa35013
master_repl_offset:21944
second_repl_offset:11812
repl_backlog_active:1
repl_backlog_size:1048576
repl_backlog_first_byte_offset:1
repl_backlog_histlen:21944
If the master goes down, it will randomly select a server (with its own voting algorithm) from the slave as the host
Host recovery
# Restart the host that was previously down. Observe the reaction of the sentry
12680:X 12 Dec 2021 15:23:41.461 * +convert-to-slave slave 127.0.0.1:6379 127.0.0.1 6379 @ myredis 127.0.0.1 6381
# View information about previous hosts
127.0.0.1:6379> info replication
# Replication
role:slave								# Become a slave
master_host:127.0.0.1
master_port:6381
master_link_status:up
master_last_io_seconds_ago:1
master_sync_in_progress:0
slave_repl_offset:41645
slave_priority:100
slave_read_only:1
connected_slaves:0
master_replid:a4719b795f6c088ed1a11408a2bc52cc48ece215
master_replid2:0000000000000000000000000000000000000000
master_repl_offset:41645
second_repl_offset:-1
repl_backlog_active:1
repl_backlog_size:1048576
repl_backlog_first_byte_offset:39205
repl_backlog_histlen:2441
# It can only be merged into the new host and treated as a slave. This is the rule of sentinel mode!
Advantages and disadvantages
-
Sentinel cluster, based on master-slave replication mode, has many advantages of all master-slave configurations
-
The master-slave can be switched and the fault can be transferred, so the availability of the system will be better
-
It is the upgrade of master-slave mode, from manual to automatic, which is more robust!
-
Online capacity expansion is not good. Once the cluster capacity reaches the online level, online capacity expansion will be very troublesome!
-
The configuration of sentinel mode is actually very troublesome. There are many choices!
Full configuration of sentinel mode
< follow up detailed study >
# Example sentinel.conf

# port <sentinel-port>
# The port that this sentinel instance will run on
# The port on which the sentinel instance runs
port 26379												# The port number on which the sentinel process runs

# sentinel announce-ip <ip>
# sentinel announce-port <port>
#
# The above two configuration directives are useful in environments where,
# because of NAT, Sentinel is reachable from outside via a non-local address.
#
# When announce-ip is provided, the Sentinel will claim the specified IP address
# in HELLO messages used to gossip its presence, instead of auto-detecting the
# local address as it usually does.
#
# Similarly when announce-port is provided and is valid and non-zero, Sentinel
# will announce the specified TCP port.
#
# The two options don't need to be used together, if only announce-ip is
# provided, the Sentinel will announce the specified IP and the server port
# as specified by the "port" option. If only announce-port is provided, the
# Sentinel will announce the auto-detected local IP and the specified port.
#
# Example:
#
# sentinel announce-ip 1.2.3.4

# dir <working-directory>
# Every long running process should have a well-defined working directory.
# For Redis Sentinel to chdir to /tmp at startup is the simplest thing
# for the process to don't interferer with administrative tasks such as
# unmounting filesystems.
dir /tmp

# sentinel monitor <master-name> <ip> <redis-port> <quorum>
# Master Name: the name of the master redis server
# IP: the IP address of the master redis server
# Redis port: the port number of the master redis server
# Quorum: if the primary instance is judged to be invalid, it needs the consent of at least quorum Sentinel processes. As long as the number of Sentinel processes agreed is not up to standard, the automatic failover will not be executed
#
# Tells Sentinel to monitor this master, and to consider it in O_DOWN
# (Objectively Down) state only if at least <quorum> sentinels agree.
#
# Note that whatever is the ODOWN quorum, a Sentinel will require to
# be elected by the majority of the known Sentinels in order to
# start a failover, so no failover can be performed in minority.
#
# Slaves are auto-discovered, so you don't need to specify slaves in
# any way. Sentinel itself will rewrite this configuration file adding
# the slaves using additional configuration options.
# Also note that the configuration file is rewritten when a
# slave is promoted to master.
#
# Note: master name should not include special characters or spaces.
# The valid charset is A-z 0-9 and the three characters ".-_".
#
sentinel monitor mymaster 127.0.0.1 6379 2

# sentinel auth-pass <master-name> <password>
#
# Set the password to use to authenticate with the master and slaves.
# Useful if there is a password set in the Redis instances to monitor.
#
# Note that the master password is also used for slaves, so it is not
# possible to set a different password in masters and slaves instances
# if you want to be able to monitor these instances with Sentinel.
#
# However you can have Redis instances without the authentication enabled
# mixed with Redis instances requiring the authentication (as long as the
# password set is the same for all the instances requiring the password) as
# the AUTH command will have no effect in Redis instances with authentication
# switched off.
#
# Example:
#
# sentinel auth-pass mymaster MySUPER--secret-0123passw0rd

# sentinel down-after-milliseconds <master-name> <milliseconds>
#
# Number of milliseconds the master (or any attached slave or sentinel) should
# be unreachable (as in, not acceptable reply to PING, continuously, for the
# specified period) in order to consider it in S_DOWN state (Subjectively
# Down).
# Option specifies the number of milliseconds required for Sentinel to think that the Redis instance has expired. When an instance does not return PING after this time, or an error is returned directly, Sentinel marks the instance as subjectively down (SDOWN for short)
#
# Default is 30 seconds.
sentinel down-after-milliseconds mymaster 30000

# sentinel parallel-syncs <master-name> <numslaves>
#
# How many slaves we can reconfigure to point to the new slave simultaneously
# during the failover. Use a low number if you use the slaves to serve query
# to avoid that all the slaves will be unreachable at about the same
# time while performing the synchronization with the master.
# This option specifies the maximum number of secondary Redis instances that can synchronize new primary instances during failover. When there are many secondary Redis instances, the smaller the number, the longer the synchronization time, and the longer the time required to complete failover.
sentinel parallel-syncs mymaster 1

# sentinel failover-timeout <master-name> <milliseconds>
#
# Specifies the failover timeout in milliseconds. It is used in many ways:
#
# - The time needed to re-start a failover after a previous failover was
# already tried against the same master by a given Sentinel, is two
# times the failover timeout.
#
# - The time needed for a slave replicating to a wrong master according
# to a Sentinel current configuration, to be forced to replicate
# with the right master, is exactly the failover timeout (counting since
# the moment a Sentinel detected the misconfiguration).
#
# - The time needed to cancel a failover that is already in progress but
# did not produced any configuration change (SLAVEOF NO ONE yet not
# acknowledged by the promoted slave).
#
# - The maximum time a failover in progress waits for all the slaves to be
# reconfigured as slaves of the new master. However even after this time
# the slaves will be reconfigured by the Sentinels anyway, but not with
# the exact parallel-syncs progression as specified.
# If the failover operation cannot be completed within this time (ms), the failover is considered to have failed
#
# Default is 3 minutes.
sentinel failover-timeout mymaster 180000

# SCRIPTS EXECUTION
#
# sentinel notification-script and sentinel reconfig-script are used in order
# to configure scripts that are called to notify the system administrator
# or to reconfigure clients after a failover. The scripts are executed
# with the following rules for error handling:
#
# If script exits with "1" the execution is retried later (up to a maximum
# number of times currently set to 10).
#
# If script exits with "2" (or an higher value) the script execution is
# not retried.
#
# If script terminates because it receives a signal the behavior is the same
# as exit code 1.
#
# A script has a maximum running time of 60 seconds. After this limit is
# reached the script is terminated with a SIGKILL and the execution retried.

# NOTIFICATION SCRIPT
#
# sentinel notification-script <master-name> <script-path>
#
# Call the specified notification script for any sentinel event that is
# generated in the WARNING level (for instance -sdown, -odown, and so forth).
# This script should notify the system administrator via email, SMS, or any
# other messaging system, that there is something wrong with the monitored
# Redis systems.
#
# The script is called with just two arguments: the first is the event type
# and the second the event description.
#
# The script must exist and be executable in order for sentinel to start if
# this option is provided.
# Specify the alarm script to be called when sentinel detects the instance exception pointed to by the redis instance of the monitoring. This configuration item is optional, but very common.
#
# Example:
#
# sentinel notification-script mymaster /var/redis/notify.sh

# CLIENTS RECONFIGURATION SCRIPT
#
# sentinel client-reconfig-script <master-name> <script-path>
#
# When the master changed because of a failover a script can be called in
# order to perform application-specific tasks to notify the clients that the
# configuration has changed and the master is at a different address.
#
# The following arguments are passed to the script:
#
# <master-name> <role> <state> <from-ip> <from-port> <to-ip> <to-port>
#
# <state> is currently always "failover"
# <role> is either "leader" or "observer"
#
# The arguments from-ip, from-port, to-ip, to-port are used to communicate
# the old address of the master and the new address of the elected slave
# (now a master).
#
# This script should be resistant to multiple invocations.
#
# Example:
#
# sentinel client-reconfig-script mymaster /var/redis/reconfig.sh
2.2 Redis cache penetration and avalanche
High availability of services!
The use of Redis cache has greatly improved the performance and efficiency of applications, especially in data query, but it will also bring some problems. Among them, the most crucial is the consistency of data. Strictly speaking, this problem has no solution. If the requirements for data consistency are high, cache cannot be used. There are also some typical problems: cache penetration, cache avalanche and cache breakdown. At present, the industry also has more popular solutions.
2.2.1 cache penetration
Can't find the cause
concept
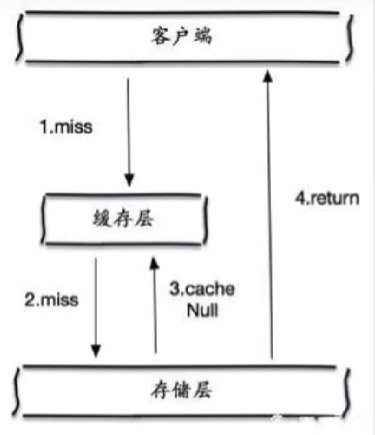
The user wants to query a data and finds that the redis memory database is missing, that is, the cache misses, so he queries the persistence layer database. No, so this query failed. When there are many users, the cache fails to hit, so they all request the persistence layer database. This will put a lot of pressure on the persistence layer database, which is equivalent to cache penetration.
Insert picture description here
Solution
- Bloom filter
It is a data structure that stores all possible query parameters in the form of hash. It is verified at the control layer first and discarded if it does not meet the requirements, so as to avoid the query pressure on the underlying storage system

- Cache empty objects
When the storage layer does not hit, even the returned empty object will be stored, and an expiration time will be set. After accessing this data, it will be obtained from the cache to protect the back-end data source
Two problems with caching empty objects:
- If null values can be cached, this means that the cache needs more space to store more keys, because there may be many null keys
- Even if the expiration time is set for the null value, there will still be inconsistency between the data of the cache layer and the storage layer in a certain time window, which will have an impact on the business that needs to maintain consistency
2.2.2 buffer breakdown
Too much, cache expired!
concept
-
Cache breakdown refers to that there is no data in the cache but there is some data in the database (generally when the cache time expires). At this time, due to the large number of concurrent users, the data is not read in the read cache at the same time, and the data is fetched from the database at the same time, resulting in an instantaneous increase in the pressure on the database, resulting in excessive pressure
-
Cache breakdown refers to that a key is very hot and is constantly carrying large concurrency. Large concurrency focuses on accessing this point. When the key fails, the continuous large concurrency will break through the cache and directly request the database, which is like cutting a hole in a barrier
-
When a key expires, a large number of concurrent access requests will be made. This kind of data is generally hot data. Because the cache expires, the database will be accessed at the same time to query the latest data and write back to the cache, which will lead to excessive pressure on the database at the moment
Solution
- Set hotspot data not to expire
From the cache level, no expiration time is set, so there will be no problems after the hot key expires
- Add mutex
Distributed lock: ensure that there is only one thread for each key to query the back-end service at the same time, and other threads do not have access to the distributed lock, so they only need to wait. This method transfers the pressure of high concurrency to the distributed lock, because the test of distributed lock is very big
2.2.3 cache avalanche
concept
It refers to a certain period of time when the cache set expires and redis goes down
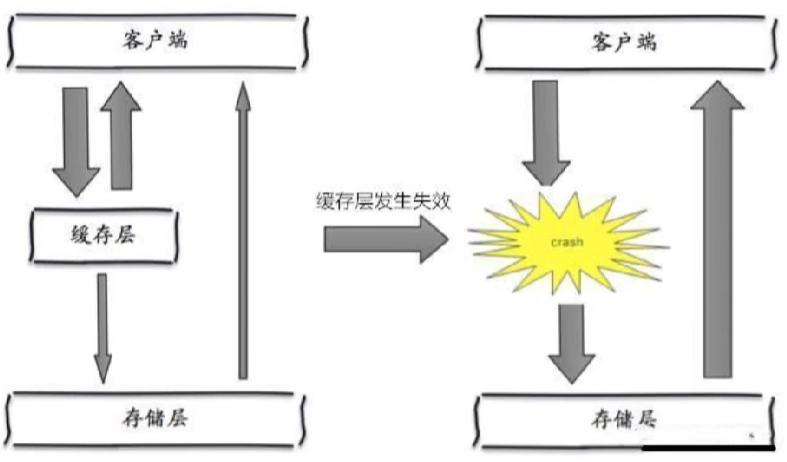
Solution
- redis high availability
redis cluster to ensure high availability of services (multi activity in different places)
- Current limiting degradation
After the cache fails, the number of threads reading and writing to the database cache is controlled by locking and queuing. For example, for a key, only one thread is allowed to view data and write to the cache, while other threads wait
- Data preheating
Before the formal deployment, access the possible data in advance, so that part of the data that may be accessed in large quantities will be loaded into the cache. Before a large concurrent access is about to occur, manually trigger the loading of different key s in the cache and set different expiration times to make the time point of cache invalidation as uniform as possible