#0 Preface
In the last article, we learned about the basic use of Constraint Layout. If you don't know Constraint Layout, go and learn about it.
Guidelines for Constraint Layout Use
https://www.jianshu.com/p/958887ed4f5f
This number has also pushed some articles:
Learn some new features of Constraint Layout again
This article focuses on Constraint Layout's Circular positioning function.
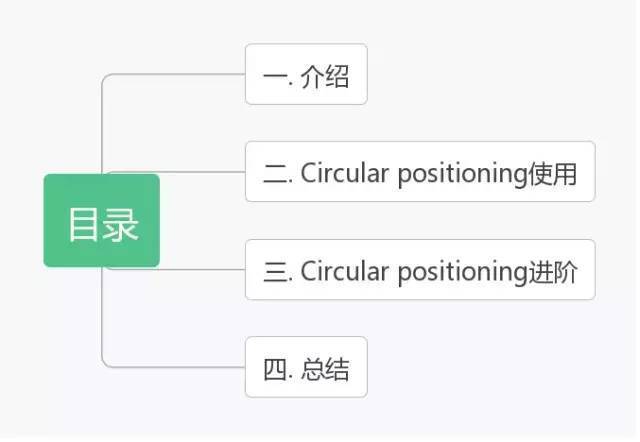
Catalog
# 1 Introduction and Use
What is Circular positioning? We can call it circular positioning, that is, taking the target control as the center of the circle, by setting the angle and radius to determine the position of our current control, such as the official map:
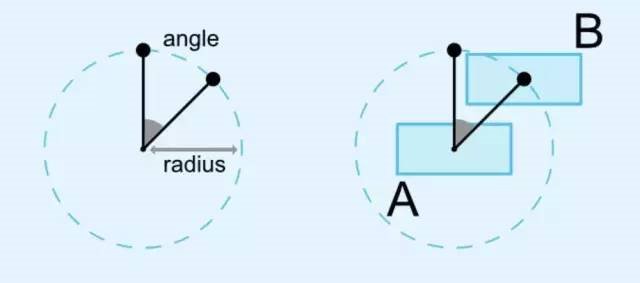
For introductory use, you can see my previous blog about the use of Circular positioning, mainly layout_constraintCircle lock target control, layout_constraintCircleRadius and layout_constraintCircleAngle control radius and angle respectively. I will not repeat it here.
Guidelines for Constraint Layout Use
https://www.jianshu.com/p/958887ed4f5f
# 2Circular positioning advancement
Let's first look at the target effect:
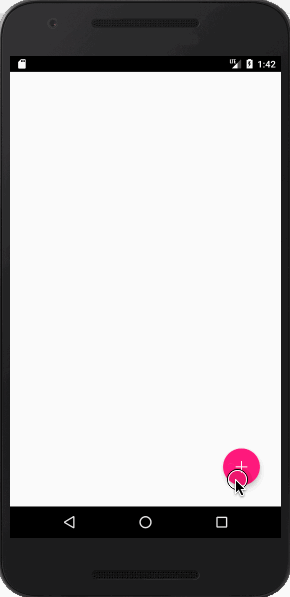
1. Layout
The layout of the xml file is relatively long, the content is actually very simple, mainly four Floating Action Buttons and three groups, at this time you may be confused, why there are three groups?
I'll answer this question. As we mentioned in the previous article, Group is used to display and hide the unified control view in Constraint Layout. If only one Group can't display and hide our control in an orderly way, Floating Action Button can only use Group to manage the display and hide of Floating Action Button, because it can't use setVisibility method, so it uses three Groups to manage the display and hide of Floating Action Button. P implements the orderly display and hiding of the three Floating Action Buttons in the figure above (Floating Action Button is intended to reduce the workload instead of ImageView, but the problems caused by Floating Action Button increase the workload, haha-). activity_constraint.xml is as follows:
<android.support.constraint.ConstraintLayout xmlns:android="http://schemas.android.com/apk/res/android"
    xmlns:app="http://schemas.android.com/apk/res-auto"
    xmlns:tools="http://schemas.android.com/tools"
    android:layout_width="match_parent"
    android:layout_height="match_parent"
    tools:context="com.orient.test.ui.activity.ConstraintActivity">

    <android.support.design.widget.FloatingActionButton
        android:id="@+id/fab_add"
        android:layout_width="wrap_content"
        android:layout_height="wrap_content"
        android:layout_marginBottom="32dp"
        android:layout_marginEnd="32dp"
        android:backgroundTint="@color/colorAccent"
        android:padding="10dp"
        android:src="@drawable/ic_constraint_add"
        app:fabSize="normal"
        app:layout_constraintBottom_toBottomOf="parent"
        app:layout_constraintRight_toRightOf="parent"
        app:pressedTranslationZ="20dp"
        app:rippleColor="#1f000000" />

    <android.support.design.widget.FloatingActionButton
        android:id="@+id/fab_like"
        android:layout_width="wrap_content"
        android:layout_height="wrap_content"
        android:layout_marginBottom="32dp"
        android:layout_marginEnd="32dp"
        android:visibility="gone"
        android:backgroundTint="@color/colorAccent"
        android:padding="10dp"
        android:src="@drawable/ic_constraint_like"
        app:fabSize="normal"
        app:layout_constraintCircle="@+id/fab_add"
        app:layout_constraintCircleRadius="80dp"
        app:layout_constraintCircleAngle="270"
        app:pressedTranslationZ="20dp"
        app:rippleColor="#1f000000" />

    <android.support.design.widget.FloatingActionButton
        android:id="@+id/fab_write"
        android:layout_width="wrap_content"
        android:layout_height="wrap_content"
        android:layout_marginBottom="32dp"
        android:layout_marginEnd="32dp"
        android:backgroundTint="@color/colorAccent"
        android:padding="10dp"
        android:src="@drawable/ic_constraint_write"
        app:fabSize="normal"
        app:layout_constraintCircle="@+id/fab_add"
        app:layout_constraintCircleRadius="80dp"
        app:layout_constraintCircleAngle="315"
        app:pressedTranslationZ="20dp"
        app:rippleColor="#1f000000" />

    <android.support.design.widget.FloatingActionButton
        android:id="@+id/fab_top"
        android:layout_width="wrap_content"
        android:layout_height="wrap_content"
        android:layout_marginBottom="32dp"
        android:layout_marginEnd="32dp"
        android:backgroundTint="@color/colorAccent"
        android:padding="10dp"
        android:src="@drawable/ic_constraint_top"
        app:fabSize="normal"
        app:layout_constraintCircle="@+id/fab_add"
        app:layout_constraintCircleRadius="80dp"
        app:layout_constraintCircleAngle="360"
        app:pressedTranslationZ="20dp"
        app:rippleColor="#1f000000" />

    <android.support.constraint.Group
        android:id="@+id/gp_like"
        android:layout_width="wrap_content"
        android:layout_height="wrap_content"
        app:constraint_referenced_ids="fab_like"/>

    <android.support.constraint.Group
        android:id="@+id/gp_write"
        android:layout_width="wrap_content"
        android:layout_height="wrap_content"
        app:constraint_referenced_ids="fab_write"/>

    <android.support.constraint.Group
        android:id="@+id/gp_top"
        android:layout_width="wrap_content"
        android:layout_height="wrap_content"
        app:constraint_referenced_ids="fab_top"/>

</android.support.constraint.ConstraintLayout>
2. Coding
First, identify the examples we need to use:
private FloatingActionButton mAdd;
private FloatingActionButton mLike;
private FloatingActionButton mWrite;
private FloatingActionButton mTop;
private Group likeGroup;
private Group writeGroup;
private Group topGroup;
// A collection of animations used to control the orderly playback of animations.
private AnimatorSet animatorSet;
// Radius of circle
private int radius;
// Floating Action Button has the same width and height
private int width;
Then we initialize our control. The code here is relatively simple. We will introduce initListener() later.
@Override
protected void onCreate(Bundle savedInstanceState) {
    super.onCreate(savedInstanceState);
    setContentView(R.layout.activity_constraint);

    initWidget();
    initListener();
}

@Override
protected void onResume() {
    super.onResume();

    // Dynamic acquisition of the width of Floating Action Button
    mAdd.post(new Runnable() {
        @Override
        public void run() {
            width = mAdd.getMeasuredWidth();
        }
    });
    // The radius set in the xml file
    radius = UiUtils.dp2px(this, 80);
}

private void initWidget() {
    mAdd = findViewById(R.id.fab_add);
    mLike = findViewById(R.id.fab_like);
    mTop = findViewById(R.id.fab_top);
    mWrite = findViewById(R.id.fab_write);
    likeGroup = findViewById(R.id.gp_like);
    writeGroup = findViewById(R.id.gp_write);
    topGroup = findViewById(R.id.gp_top);
    // Hide three pop-up Floating Action Buttons
    setViewVisible(false);
}

private void setViewVisible(boolean isShow) {
    likeGroup.setVisibility(isShow?View.VISIBLE:View.GONE);
    writeGroup.setVisibility(isShow?View.VISIBLE:View.GONE);
    topGroup.setVisibility(isShow?View.VISIBLE:View.GONE);
}
Our focus is in initListener(), the idea is to use attribute animation to control ConstraintLayout.LayoutParams, thereby controlling the angle and radius of Circular positioning:
private void initListener() {
    mAdd.setOnClickListener(new View.OnClickListener() {
        @Override
        public void onClick(View v) {
            // You can't click when playing animation.
            if(animatorSet != null && animatorSet.isRunning())
                return;

            // Judging whether to play or hide animation
            if(likeGroup.getVisibility() != View.VISIBLE) {
                animatorSet = new AnimatorSet();
                ValueAnimator likeAnimator = getValueAnimator(mLike, false, likeGroup,0);
                ValueAnimator writeAnimator = getValueAnimator(mWrite, false, writeGroup,45);
                ValueAnimator topAnimator = getValueAnimator(mTop, false, topGroup,90);
                animatorSet.playSequentially(likeAnimator, writeAnimator, topAnimator);
                animatorSet.start();
            }else {
                animatorSet = new AnimatorSet();
                ValueAnimator likeAnimator = getValueAnimator(mLike, true, likeGroup,0);
                ValueAnimator writeAnimator = getValueAnimator(mWrite, true, writeGroup,45);
                ValueAnimator topAnimator = getValueAnimator(mTop, true, topGroup,90);
                animatorSet.playSequentially(topAnimator, writeAnimator, likeAnimator);
                animatorSet.start();
            }

        }
    });
}

/**
 * Get Value Animator
 *
 * @param button FloatingActionButton
 * @param reverse Start or hide
 * @param group Group
 * @param angle angle Angle of rotation
 * @return ValueAnimator
 */
private ValueAnimator getValueAnimator(final FloatingActionButton button, final boolean reverse, final Group group, final int angle) {
    ValueAnimator animator;
    if (reverse)
        animator = ValueAnimator.ofFloat(1, 0);
    else
        animator = ValueAnimator.ofFloat(0, 1);
    animator.addUpdateListener(new ValueAnimator.AnimatorUpdateListener() {
        @Override
        public void onAnimationUpdate(ValueAnimator animation) {
            float v = (float) animation.getAnimatedValue();
            ConstraintLayout.LayoutParams params = (ConstraintLayout.LayoutParams) button.getLayoutParams();
            params.circleRadius = (int) (radius * v);
            //params.circleAngle = 270f + angle * v;
            params.width = (int) (width * v);
            params.height = (int) (width * v);
            button.setLayoutParams(params);
        }
    });
    animator.addListener(new SimpleAnimation() {
        @Override
        public void onAnimationStart(Animator animation) {
            group.setVisibility(View.VISIBLE);
        }

        @Override
        public void onAnimationEnd(Animator animation) {
            if(group == likeGroup && reverse){
                setViewVisible(false);
            }
        }
    });
    animator.setDuration(300);
    animator.setInterpolator(new DecelerateInterpolator());
    return animator;
}

abstract class SimpleAnimation implements Animator.AnimatorListener{
    @Override
    public void onAnimationStart(Animator animation) {
    }

    @Override
    public void onAnimationEnd(Animator animation) {
    }

    @Override
    public void onAnimationCancel(Animator animation) {
    }

    @Override
    public void onAnimationRepeat(Animator animation) {
    }
}
Then the effect comes out:
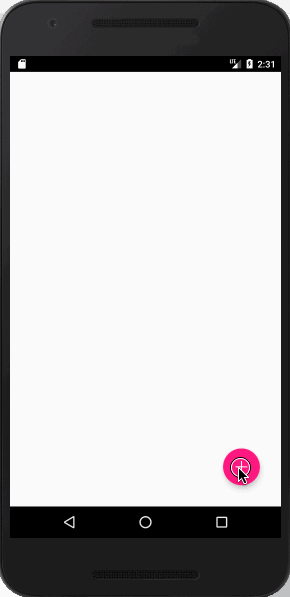
If you feel that the pop-up curve is not smooth enough, you can cancel the comment on //params.circleAngle = 270f + angle * v in the getValue Animator method; the effect of this line is as good as that at the beginning of this chapter.
summary
The idea of this paper is to use attribute animation to control ConstraintLayout.LayoutParams, so as to control the angle and radius of Circular positioning. The content is relatively simple, if you have to master the use of attribute animation and Constraint Layout. My level is limited, inevitably there are mistakes, if there are mistakes, welcome to put forward.