MongoDB
1, windows installation
1. Download from the official website
MongoDB The default is the latest version installed. I compare Buddhism and just use it for learning. I feel it doesn't make much difference, so I choose the default method.
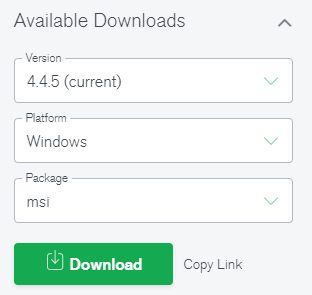
The windows version downloads msi files, which is the default visual installation interface. As shown below

Double click to start the installation and go to the next step: select custom custom installation
Click ok, and then click next. After that, the new version of Mongodb will actively create log and data files in the installation directory. This is an improvement over the previous version. In the early stage, we need to create the db folder manually, but we still need to create the db folder under data. The author's is in C:\MongoDB\data\db (remember to create another db folder)

Cancel the following downloading methods in the installation interface. Due to the wall, the downloading time is long and it is not recommended to download
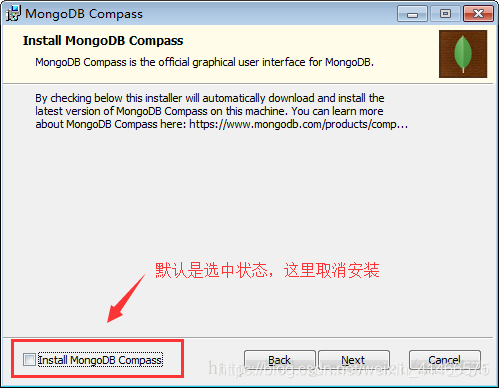
Finally, a warning box will pop up if the installation is successful. Just select Ignore
So far, the MongoDB client has been installed.
The last important step:
Since we have created the C:\MongoDB\data\db folder, there is no need to create it here. Otherwise, we need to create it
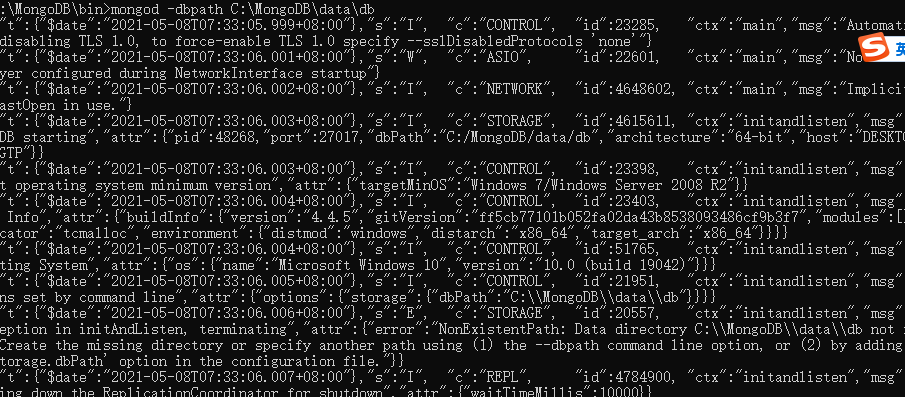
Then enter the C:\MongoDB\bin directory in cmd (shift + right-click to open powershell in windows Explorer) and execute the command mongod -dbpath C:\MongoDB\data\db, as shown in the figure below (this command is to start the service and it will run all the time).
cmd enter the following command:
mongod -dbpath C:\MongoDB\data\db
The result is as shown in the figure below (this indicates that mongodb service is enabled. If you want to use it all the time, this page cannot be closed)
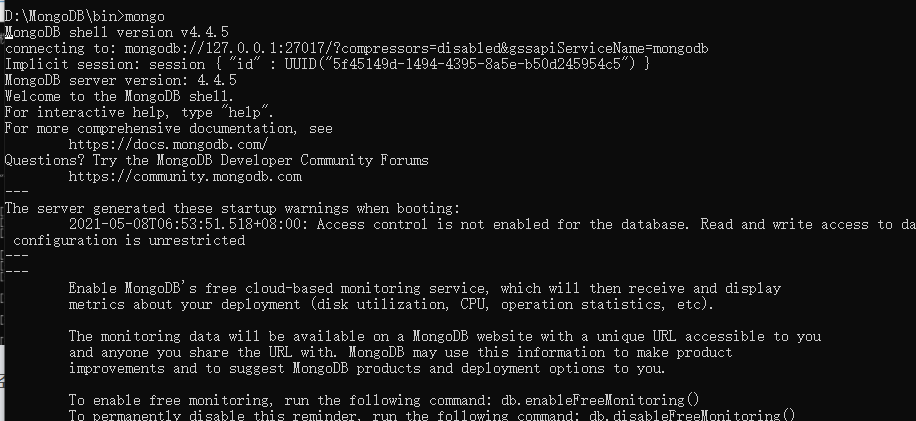
Create a new command page and enter mongo as shown in the figure below. At this time, all mongodbs have been installed.
2, macos installation
MongoDB provides a 64 bit installation package on the OSX platform. You can download the installation package on the official website.
Download address: https://www.mongodb.com/download-center#community
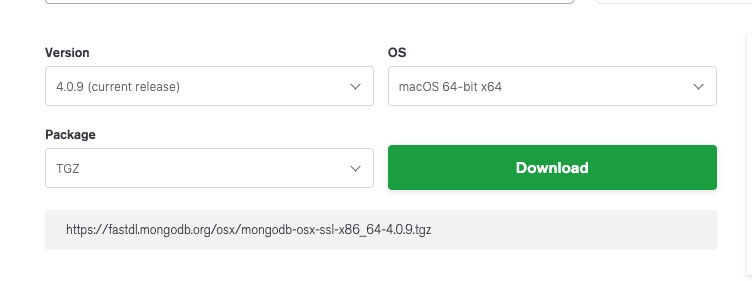
Generally, the latest version is downloaded by default.
Next, enter the terminal:
# Enter / usr/local
cd /usr/local

# download
sudo curl -O https://fastdl.mongodb.org/osx/mongodb-osx-ssl-x86_64-4.0.9.tgz

# decompression
sudo tar -zxvf mongodb-osx-ssl-x86_64-4.0.9.tgz
# Rename to mongodb directory

sudo mv mongodb-osx-x86_64-4.0.9/ mongodb
After installation, we can add MongoDB's binary command file directory (installation directory / bin) to the PATH:
export PATH=/usr/local/mongodb/bin:$PATH
Create log and data storage directory:
-
Data storage path:
sudo mkdir -p /usr/local/var/mongodb
-
Log file path:
sudo mkdir -p /usr/local/var/log/mongodb
Next, ensure that the current user has read and write permissions to the above two directories:
sudo chown runoob /usr/local/var/mongodb
sudo chown runoob /usr/local/var/log/mongodb
The above runoob is the user on my computer. You need to modify it according to your current user name.
Next, we use the following command to start mongodb in the background:
mongod --dbpath /usr/local/var/mongodb --logpath /usr/local/var/log/mongodb/mongo.log --fork
- – dbpath sets the data storage directory
- – logpath set the log storage directory
- – fork runs in the background
If you do not want to run on the back end, but view the running process on the console, you can directly set the configuration file to start:
mongod --config /usr/local/etc/mongod.conf
Check whether mongod service is started:
ps aux | grep -v grep | grep mongod
Using the above command, if you see the record of mongod, it indicates that the operation is successful.
After startup, we can use the mongo command to open a terminal:
 cd /usr/local/mongodb/bin
 ./mongo
 MongoDB shell version v4.0.9
connecting to: mongodb://127.0.0.1:27017/?gssapiServiceName=mongodb
Implicit session: session { "id" : UUID("3c12bf4f-695c-48b2-b160-8420110ccdcf") }
MongoDB server version: 4.0.9
......
Installing with brew
In addition, you can also use the brew of OSX to install mongodb:
brew tap mongodb/brew
brew install mongodb-community@4.4
@4.4 after the symbol is the latest version number.
Installation information:
- Configuration file: / usr / local / etc / mongod conf
- Log file path: / usr/local/var/log/mongodb
- Data storage path: / usr/local/var/mongodb
Run MongoDB
We can use the brew command or mongod command to start the service.
brew startup:
brew services start mongodb-community@4.4
brew stop:
brew services stop mongodb-community@4.4
mongod command background process mode:
mongod --config /usr/local/etc/mongod.conf --fork
To start and close this mode, you can enter the mongo shell console:
> db.adminCommand({ "shutdown" : 1 })
ongodb-community@4.4