This blog will introduce how to use Python and OpenCV to apply morphological operations.
include:
- Corrosion (Erosion)
- Expansion
- Opening
- Closing
- Morphological gradient
- Black hat
- Top hat (also called "White hat")
Morphological operation is an image processing transformation applied to gray or binary images. These operations require a structural element that defines the neighborhood of the pixel to which the operation is applied. More specifically, morphological operations can be applied to the shape and structure inside the image to adjust the output image. (for example, increase / decrease the size of objects in the image and open / reduce the gap between objects)
Morphological operations are often used as preprocessing steps for more powerful computer vision solutions such as OCR, automatic license plate recognition (ANPR) and bar code detection. Clever use of morphological operations can avoid more complex (and computationally expensive) machine learning and deep learning algorithms. (for example, the barcode detection in the image can be completed only by morphological operation ~)
1. Renderings
Original VS corrosion 1 VS corrosion 2 VS corrosion 3 VS corrosion 4 times effect drawing is as follows:
It can be seen that as the number of corrosion iterations increases, more and more logos are corroded.
Corrosion is most useful for removing small spots from the image or disconnecting two connected components.

The original drawing VS expansion 1 VS expansion 2 VS expansion 3 times. The effect drawing is as follows:
You can see that the expansion of 3 iterations has been applied, and the gaps of all letters in the logo have been connected.
Inflation expands the foreground area. Inflation is particularly useful when connecting disconnected parts of an object.

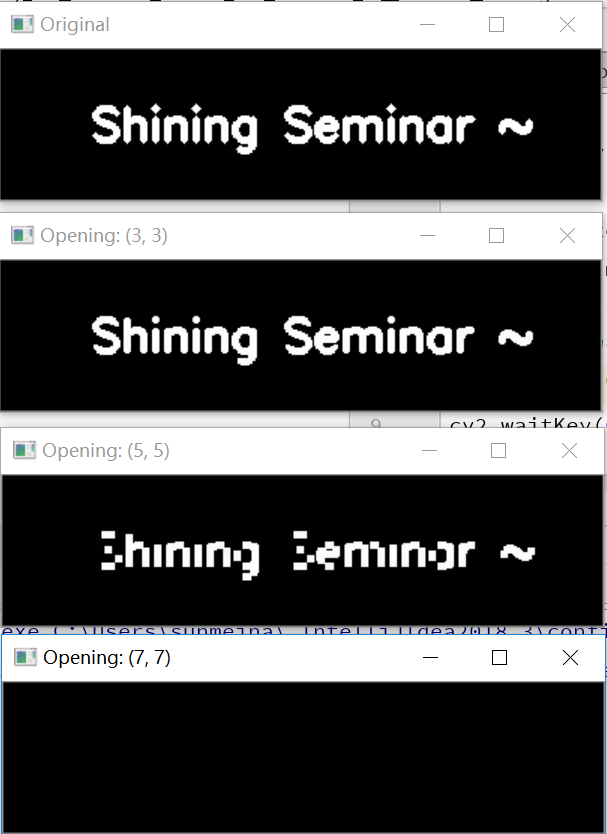
The opening operation is similar to the corrosion operation. When removing small spots, the holes on the image may be "opened", as shown in the following figure:
When we use a kernel of size 5 × 5. The small and random spots almost completely disappeared. When it reaches a 7-size kernel, the open operation not only removes all random spots, but also "opens" the holes on the letters "s", "n" and "a".
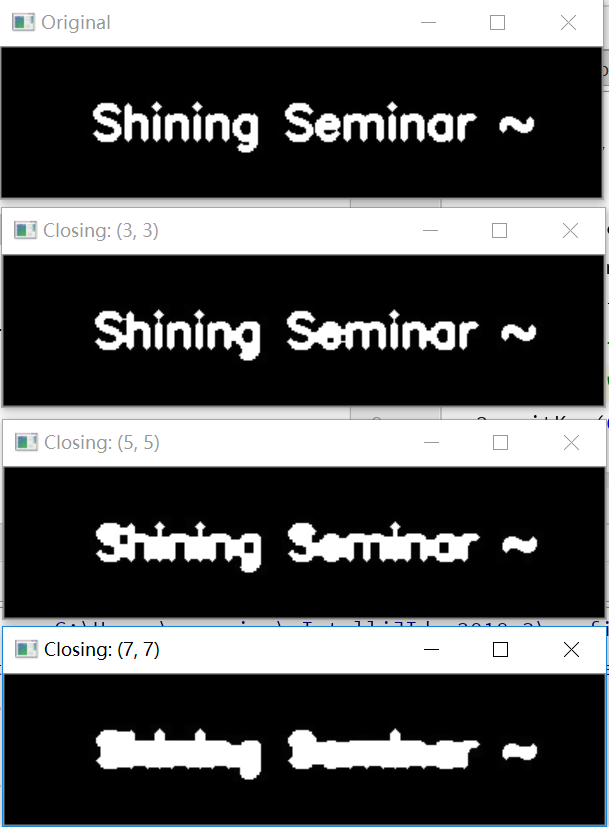
Closing is the opposite of opening, and closing is corrosion after expansion. Close closes holes inside objects or connects components together.
You can see that the closing operation begins to bridge the gap between the letters in the logo.
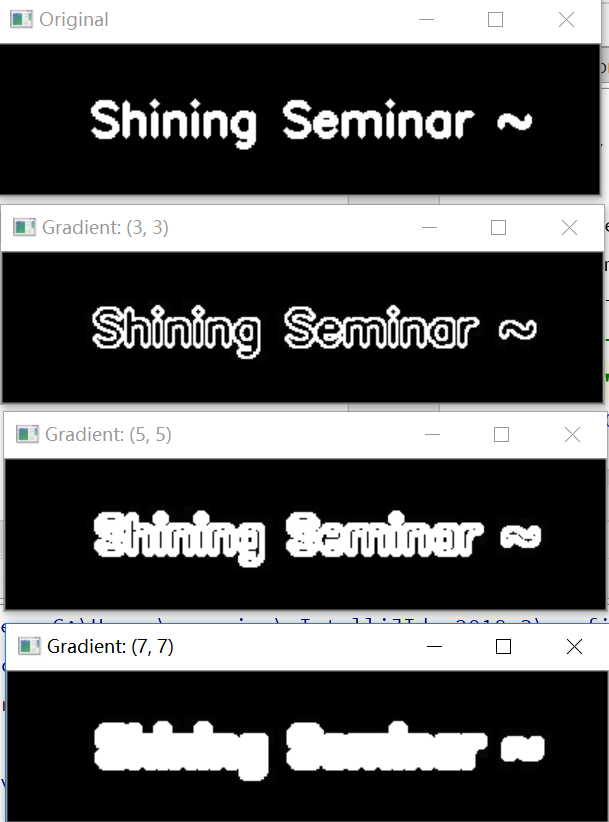
 The effect diagram of morphological operation is as follows:
Morphological operation can make the outline of the logo clearly displayed.
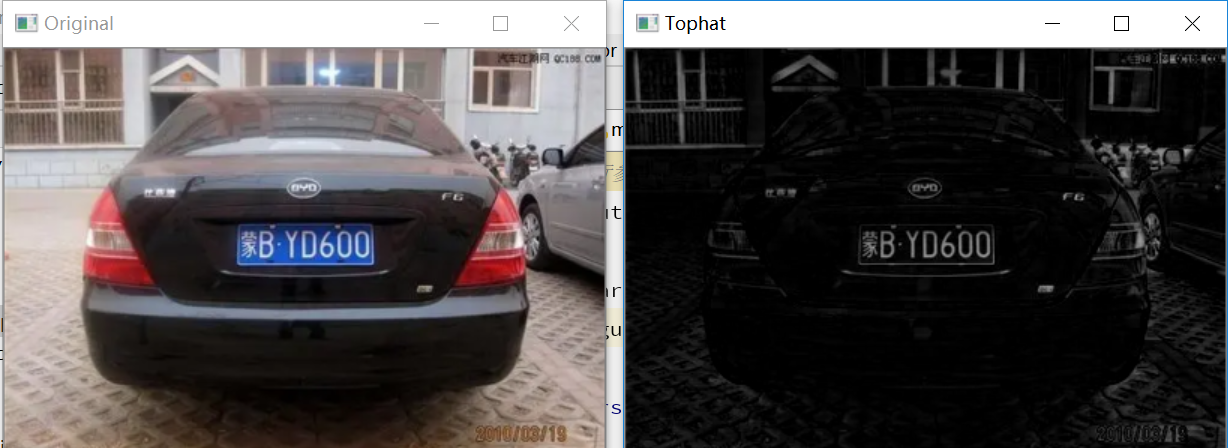
The effect drawing of white hat operation is as follows:
amateur 🎩 Morphological operation is the difference between the original (gray / single channel) input image and the opening.
The white hat operation is used to display the bright area of the image on a dark background. White hat / black hat operators are more suitable for gray images than binary images.
In the dark background, how the bright right area (i.e. white hat) is clearly displayed, you can clearly see that the license plate area of the car has been displayed. Note that the license plate characters themselves are not included. This is because the license plate characters are dark on a light background.
Black hat can be applied. The operation effect diagram is as follows:
The black hat operation is used to find out the darker area from the brighter background;
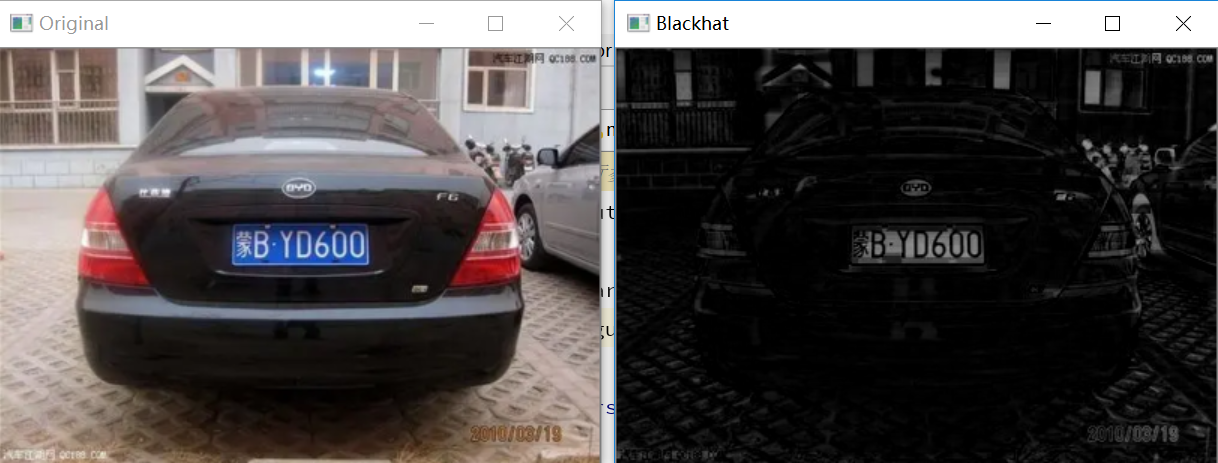
To display the license plate characters, first segment the license plate itself through the white hat operation, and then apply the black hat operator (or threshold) to extract a single license plate character (possibly using methods such as contour detection).
2. Principle
Structure elements are considered a type of kernel or mask. Like the kernel, it can be a neighborhood of any size.
- cv2.erode: corrosion is very useful for removing small spots in an image or disconnecting two connected objects;
- cv2.diplate: expansion will increase the size of the foreground object, which is especially suitable for connecting the disconnected parts of the image together;
- cv2.morphologyEx(cv2.MORPH_GRADIENT) morphological gradient is the difference between expansion and corrosion. It helps to determine the contour of a specific object in the image;
- cv2.morphologyEx(gray, cv2.MORPH_TOPHAT, rectKernel) applies a white hat operation (allows you to find a brighter area from a darker background)
- cv2.morphologyEx(gray, cv2.MORPH_BLACKHAT, rectKernel) applies black hat operation (allows you to find darker areas from brighter backgrounds)
3. Source code
3.1 Making logo source code
import cv2
import numpy as np

zeros = np.zeros((100, 400), dtype="uint8")
image = cv2.merge([zeros, zeros, zeros])
cv2.putText(image, "Shining Seminar ~ ", (60, 60), cv2.FONT_HERSHEY_SIMPLEX, 1, (255, 255, 255), 3)
cv2.imshow("image", image)
cv2.imwrite("seminar.jpg", image)
cv2.waitKey(0)

img = np.ones((600, 800, 4)) * (0, 0, 0, 0)
list = ["cv2.FONT_HERSHEY_SIMPLEX",
        "cv2.FONT_HERSHEY_COMPLEX",
        "cv2.FONT_HERSHEY_COMPLEX_SMALL",
        "cv2.FONT_HERSHEY_DUPLEX",
        "cv2.FONT_HERSHEY_PLAIN",
        "cv2.FONT_HERSHEY_SCRIPT_COMPLEX",
        "cv2.FONT_HERSHEY_SCRIPT_SIMPLEX",
        "cv2.FONT_HERSHEY_SIMPLEX",
        "cv2.FONT_HERSHEY_TRIPLEX",
        "cv2.FONT_ITALIC"
        ]
height = 80
fonti = 0
for font in list:
# Traverse all fonts to find the best one~
    cv2.putText(img, str(fonti) + " Shining Seminar ~ ", (60, height), fonti, 1, (255, 255, 255), 3)
    if (fonti == 16):
        break
    fonti = fonti + 1
    if (fonti == 8):
        fonti = 16

    height = height + 60
cv2.imshow("0image", img)
cv2.waitKey(0)
3.2 corrosion expansion open and close form gradient source code
# USAGE
# python morphological_ops.py --image pyimagesearch_logo.png

# Morphological operations using OpenCV, including corrosion, expansion, opening, closing and morphological gradient.
# Import necessary packages
import argparse

import cv2

# Building command line parameters and parsing
# --Image input image path
ap = argparse.ArgumentParser()
ap.add_argument("-i", "--image", required=False, default="seminar.jpg",
                help="path to input image")
args = vars(ap.parse_args())

# Load the image, convert it into gray image, and display it
image = cv2.imread(args["image"])
gray = cv2.cvtColor(image, cv2.COLOR_BGR2GRAY)
cv2.imshow("Original", image)

# corrosion
# Just as the river washes the bank and corrodes the soil, the corrosion in the image "corrodes" the foreground object and makes it smaller. In short, the pixels near the object boundary in the image will be discarded and "corroded".
# The working principle of corrosion is to define a structural element, and then slide the structural element from left to right and from top to bottom to the input image.
# Only when all pixels in the structure element are greater than 0, the foreground pixels in the input image will be retained. Otherwise, the pixel is set to 0 (i.e. background).
# cv2.erode: corrosion is useful for removing small spots in an image or disconnecting two connected objects.
# Apply a series of corrosion
for i in range(0, 3):
    # As the number of corrosion increases, the foreground signs will begin to "corrode" and disappear.
    # -Image the image to be etched
    # -None defaults to 3 * 3 and can also be provided
    # -Iterations iterations. As the number of iterations increases, you will see more and more logos eroded.
    eroded = cv2.erode(gray.copy(), None, iterations=i + 1)
    cv2.imshow("Eroded {} times".format(i + 1), eroded)
    # cv2.waitKey(0)

# expand
# The opposite of corrosion is expansion. Just as corrosion corrodes foreground pixels, expansion increases foreground pixels. Swelling increases the size of the foreground object, especially for connecting the disconnected parts of the image together.
# cv2.diplate: expansion, like corrosion, also uses structural elements - if any pixel in the structural element is greater than 0, the central pixel p of the structural element is set to white.
# We use to expand
# Close all windows and display the original image
cv2.waitKey(0)
cv2.destroyAllWindows()
cv2.imshow("Original", image)

# Apply a series of expansion
for i in range(0, 3):
    dilated = cv2.dilate(gray.copy(), None, iterations=i + 1)
    cv2.imshow("Dilated {} times".format(i + 1), dilated)
    cv2.waitKey(0)

# Close all windows and initialize 3 sets of kernels
cv2.destroyAllWindows()
cv2.imshow("Original", image)
kernelSizes = [(3, 3), (5, 5), (7, 7)]

# Traverse kernel size
for kernelSize in kernelSizes:
    # Apply the open operation to build a rectangular kernel from the current kernel size
    # Build structural elements according to the kernel, CV2 MORPH_ Rect: rectangle, or CV2 MORPH_ Cross, CV2 MORPH_ Ellipse, etc
    kernel = cv2.getStructuringElement(cv2.MORPH_RECT, kernelSize)
    # Perform actual morphological operations
    opening = cv2.morphologyEx(gray, cv2.MORPH_OPEN, kernel)
    cv2.imshow("Opening: ({}, {})".format(
        kernelSize[0], kernelSize[1]), opening)
    cv2.waitKey(0)

# Close all windows
cv2.destroyAllWindows()
cv2.imshow("Original", image)
# Traversal kernel
for kernelSize in kernelSizes:
    # Build a rectangular kernel and perform a close operation
    kernel = cv2.getStructuringElement(cv2.MORPH_RECT, kernelSize)
    closing = cv2.morphologyEx(gray, cv2.MORPH_CLOSE, kernel)
    cv2.imshow("Closing: ({}, {})".format(
        kernelSize[0], kernelSize[1]), closing)
    cv2.waitKey(0)

# The morphological gradient is the difference between expansion and corrosion. It helps to determine the outline of specific objects in the image:
# Close all windows
cv2.destroyAllWindows()
cv2.imshow("Original", image)
# Traversal kernel
for kernelSize in kernelSizes:
    # Build a rectangular kernel and perform morphological gradient operation
    kernel = cv2.getStructuringElement(cv2.MORPH_RECT, kernelSize)
    gradient = cv2.morphologyEx(gray, cv2.MORPH_GRADIENT, kernel)
    cv2.imshow("Gradient: ({}, {})".format(
        kernelSize[0], kernelSize[1]), gradient)
    cv2.waitKey(0)

cv2.destroyAllWindows()
3.3 white hat and black hat operation source code
# USAGE
# python morphological_hats.py --image bmcp.jpg
# Use OpenCV to apply black hat and top hat / white hat operations.

# Import necessary packages
import argparse

import cv2

# Build command line parameters and analysis
import imutils

ap = argparse.ArgumentParser()
ap.add_argument("-i", "--image", required=False, default="byd.jpg",
                help="path to input image")
args = vars(ap.parse_args())

# Load the input image and convert it to a grayscale image
image = cv2.imread(args["image"])
image = imutils.resize(image, width=400)
gray = cv2.cvtColor(image, cv2.COLOR_BGR2GRAY)

# Build a rectangular kernel and apply the black hat operation (allowing you to find the darker area from the brighter background)
rectKernel = cv2.getStructuringElement(cv2.MORPH_RECT, (13, 5))
blackhat = cv2.morphologyEx(gray, cv2.MORPH_BLACKHAT, rectKernel)

# Similarly, white hat operation is applied (allowing brighter areas to be found from a darker background)
tophat = cv2.morphologyEx(gray, cv2.MORPH_TOPHAT, rectKernel)

# Show output image
cv2.imshow("Original", image)
cv2.imshow("Blackhat", blackhat)
cv2.imshow("Tophat", tophat)
cv2.waitKey(0)