Warm tip: This is the "Pulsar fool's Manual", with zero experience, small white pit lightning protection. As long as you follow the instructions, the success rate is 100%!
This article is the second in the Pulsar isolation strategy series. The first blog in this series - "How to realize isolation in Pulsar by deep resolution" - focus on Pulsar isolation strategy and how to realize resource isolation in the following three ways:
- Multiple Pulsar clusters
- Shared BookKeeper cluster
- Single Pulsar cluster
This article will explain the first method in detail, that is, how to play with the Pulsar isolation strategy in the environment of "multiple Pulsar clusters", and provide detailed steps for the following operations:
- Verify data isolation.
- Synchronize and migrate cluster data.
- Expansion and contraction node.
Prepare environment
This article takes operating on macOS (version 11.2.3, memory 8G) as an example.
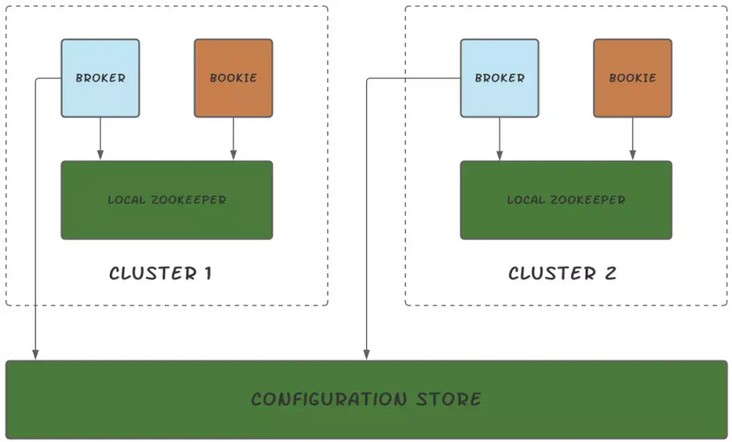
As shown in the figure below, two Pulsar clusters are deployed in this paper, and each cluster provides the following services:
- 1 ZooKeeper node
- 1 bookie node
- 1 broker node
Software requirements
Java 8
Environmental details
Two Pulsar clusters will be deployed below, and the details of components are shown in the table below.
Deployment preparation
- Download Pulsar And unzip. This article takes the installation of Pulsar 2.7.0 as an example.
- In any local location, create the corresponding empty folder according to the following directory structure.
|-separate-clusters
    |-configuration-store
        |-zk1
    |-cluster1
        |-zk1
        |-bk1
        |-broker1
    |-cluster2
        |-zk1
        |-bk1
|-broker1- Copy the contents of the extracted Pulsar folder into each folder created in the previous step.
- start-up configuration store.
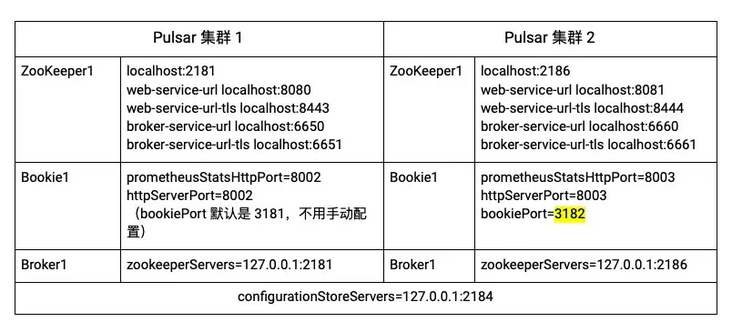
The configuration store provides cross cluster configuration management and task coordination for pulsar instances. Pulsar cluster 1 and pulsar cluster 2 share the configuration store.
cd configuration-store/zk1
bin/pulsar-daemon start configuration-store
Deploy Pulsar cluster 1
- start-up local ZooKeeper . Deploy one local ZooKeeper for each Pulsar cluster, which is responsible for managing, configuring and coordinating tasks for the cluster.
cd cluster1/zk1
bin/pulsar-daemon start zookeeper
- Initialize metadata . After setting the configuration store and local ZooKeeper, you need to write metadata to ZooKeeper.
cd cluster1/zk1
bin/pulsar initialize-cluster-metadata \
  --cluster cluster1 \
  --zookeeper localhost:2181 \
  --configuration-store localhost:2184 \
  --web-service-url http://localhost:8080/ \
  --web-service-url-tls https://localhost:8443/ \
  --broker-service-url pulsar://localhost:6650/ \
  --broker-service-url-tls pulsar+ssl://localhost:6651/
- Deploy BookKeeper . BookKeeper provides for Pulsar Message persistent storage . Each Pulsar broker has a bookie. BookKeeper cluster and Pulsar cluster share local ZooKeeper.
1) . configure bookie.
change cluster1/bk1/conf/bookkeeper.conf The values of the following configuration items in the file.
allowLoopback=true
prometheusStatsHttpPort=8002
httpServerPort=8002
2) . start bookie.
cd cluster1/bk1
bin/pulsar-daemon start bookie
Verify that bookie started successfully.
bin/bookkeeper shell bookiesanity
output
Bookie sanity test succeeded
- Deploy broker.
1) Configure the broker.
change cluster1/broker1/conf/broker.conf The values of the following configuration items in the file.
zookeeperServers=127.0.0.1:2181
configurationStoreServers=127.0.0.1:2184
clusterName=cluster1
managedLedgerDefaultEnsembleSize=1
managedLedgerDefaultWriteQuorum=1
managedLedgerDefaultAckQuorum=1
2) Start the broker.
cd cluster1/broker1
bin/pulsar-daemon start broker
Deploying Pulsar cluster 2
- Deploy local ZooKeeper.
1) Configure local ZooKeeper.
- change cluster2/zk1/conf/zookeeper.conf The values of the following configuration items in the file.
clientPort=2186admin.serverPort=9992
- Add the following configuration items to cluster2/zk1/conf/pulsar_env.sh File.
OPTS="-Dstats_server_port=8011"
2) Start local ZooKeeper.
cd cluster2/zk1
bin/pulsar-daemon start zookeeper
2. Initialize metadata.
bin/pulsar initialize-cluster-metadata \
  --cluster cluster2 \
  --zookeeper localhost:2186 \
  --configuration-store localhost:2184 \
  --web-service-url http://localhost:8081/ \
  --web-service-url-tls https://localhost:8444/ \
  --broker-service-url pulsar://localhost:6660/ \
  --broker-service-url-tls pulsar+ssl://localhost:6661/
- Deploy BookKeeper.
1) Configure bookie.
change cluster2/bk1/conf/bookkeeper.conf The values of the following configuration items in the file.
bookiePort=3182
zkServers=localhost:2186
allowLoopback=true
prometheusStatsHttpPort=8003
httpServerPort=8003
2) Start bookie.
cd cluster2/bk1
bin/pulsar-daemon start bookie
Verify that bookie started successfully.
bin/bookkeeper shell bookiesanity
output
Bookie sanity test succeeded
5. Deploy broker.
1) Configure the broker.
- change cluster2/broker1/conf/broker.conf The values of the following configuration items in the file.
clusterName=cluster2
zookeeperServers=127.0.0.1:2186
configurationStoreServers=127.0.0.1:2184
brokerServicePort=6660
webServicePort=8081
managedLedgerDefaultEnsembleSize=1
managedLedgerDefaultWriteQuorum=1
managedLedgerDefaultAckQuorum=1
• change cluster2/broker1/conf/client.conf The values of the following configuration items in the file.
webServiceUrl=http://localhost:8081/
brokerServiceUrl=pulsar://localhost:6660/
2) Start the broker.
cd cluster2/broker1
bin/pulsar-daemon start broker
Verify data isolation
This chapter verifies whether the data in the two Pulsar clusters are isolated.
- Create namespace1 and assign namespace1 to cluster1.
Tip: the naming rule for namespace is /. For more information about namespace, see here.
cd cluster1/broker1
bin/pulsar-admin namespaces create -c cluster1 public/namespace1
Verification results
bin/pulsar-admin namespaces list public
output
"public/default"
"public/namespace1"
2. Set the message retention policy of namespace1.
Note: if no message retention policy is set and topic is not subscribed, the data of topic will be automatically cleaned up after a period of time.
bin/pulsar-admin namespaces set-retention -s 100M -t 3d public/namespace1
3. Create topic1 in namespace1 and write 1000 pieces of data using.
Tip: Pulsar client is a command line tool for sending and consuming data. For more information about Pulsar command line tools, see here.
bin/pulsar-client produce -m 'hello c1 to c2' -n 1000 public/namespace1/topic1
09:56:34.504 [main] INFO  org.apache.pulsar.client.cli.PulsarClientTool - 1000 messages successfully produced
Verification results
bin/pulsar-admin --admin-url http://localhost:8080 topics stats-internal public/namespace1/topic1
output
entriesAddedCounter shows that 1000 pieces of data have been added.
{
 "entriesAddedC{
 "entriesAddedCounter" : 1000,
 "numberOfEntries" : 1000,
 "totalSize" : 65616,
 "currentLedgerEntries" : 1000,
 "currentLedgerSize" : 65616,
 "lastLedgerCreatedTimestamp" : "2021-04-22T10:24:00.582+08:00",
 "waitingCursorsCount" : 0,
 "pendingAddEntriesCount" : 0,
 "lastConfirmedEntry" : "4:999",
 "state" : "LedgerOpened",
 "ledgers" : [ {
   "ledgerId" : 4,
   "entries" : 0,
   "size" : 0,
   "offloaded" : false
 } ],
 "cursors" : { },
 "compactedLedger" : {
   "ledgerId" : -1,
   "entries" : -1,
   "size" : -1,
   "offloaded" : false
 }
}ounter" : 1000, "numberOfEntries" : 1000, "totalSize" : 65616, "currentLedgerEntries" : 1000, "currentLedgerSize" : 65616, "lastLedgerCreatedTimestamp" : "2021-04-22T10:24:00.582+08:00", "waitingCursorsCount" : 0, "pendingAddEntriesCount" : 0, "lastConfirmedEntry" : "4:999", "state" : "LedgerOpened", "ledgers" : [ {   "ledgerId" : 4,   "entries" : 0,   "size" : 0,   "offloaded" : false } ], "cursors" : { }, "compactedLedger" : {   "ledgerId" : -1,   "entries" : -1,   "size" : -1,   "offloaded" : false }}
4. View the data of public/namespace1/topic1 through cluster2 (localhost:8081).
bin/pulsar-admin --admin-url http://localhost:8081 topics stats-internal public/namespace1/topic1
output
View failed. The print information shows that public/namespace1 is only assigned to cluster 1, not cluster 2. At this point, it is verified that the data is isolated.
Namespace missing local cluster name in clusters list: local_cluster=cluster2 ns=public/namespace1 clusters=[cluster1]
Reason: Namespace missing local cluster name in clusters list: local_cluster=cluster2 ns=public/namespace1 clusters=[cluster1]
5. In cluster2, write data to public/namespace1/topic1.
cd cluster2/broker1
bin/pulsar-client produce -m 'hello c1 to c2' -n 1000 public/namespace1/topic1
output
The result shows that the number of write messages is 0, and the operation failed because namespace1 is only allocated to cluster1, not cluster 2. At this point, it is verified that the data is isolated.
12:09:50.005 [main] INFO org.apache.pulsar.client.cli.PulsarClientTool - 0 messages successfully produced
Migrate data
The following steps continue with the previous "verify data isolation".
After confirming that the data has been isolated, this chapter describes how to synchronize (using the cross region replication function) and migrate the cluster data.
- Assign namespace1 to cluster2, that is, add cluster2 to the cluster list of nameapce1.
This step enables the cross region replication function to synchronize the data of cluster1 and cluster2.
bin/pulsar-admin namespaces set-clusters --clusters cluster1,cluster2 public/namespace1
Verification results
bin/pulsar-admin namespaces get-clusters public/namespace1
output
"cluster1"
"cluster2"
2. Check whether there is topic1 in cluster2.
bin/pulsar-admin --admin-url http://localhost:8081 topics stats-internal public/namespace1/topic1
output
The results show that there are 1000 pieces of data in topic1 of cluster2, indicating that the topic1 data of cluster1 has been successfully copied to cluster2.
{
  "entriesAddedCounter" : 1000,
  "numberOfEntries" : 1000,
  "totalSize" : 75616,
  "currentLedgerEntries" : 1000,
  "currentLedgerSize" : 75616,
  "lastLedgerCreatedTimestamp" : "2021-04-23T12:02:52.929+08:00",
  "waitingCursorsCount" : 1,
  "pendingAddEntriesCount" : 0,
  "lastConfirmedEntry" : "1:999",
  "state" : "LedgerOpened",
  "ledgers" : [ {
    "ledgerId" : 1,
    "entries" : 0,
    "size" : 0,
    "offloaded" : false
  } ],
  "cursors" : {
    "pulsar.repl.cluster1" : {
      "markDeletePosition" : "1:999",
      "readPosition" : "1:1000",
      "waitingReadOp" : true,
      "pendingReadOps" : 0,
      "messagesConsumedCounter" : 1000,
      "cursorLedger" : 2,
      "cursorLedgerLastEntry" : 2,
      "individuallyDeletedMessages" : "[]",
      "lastLedgerSwitchTimestamp" : "2021-04-23T12:02:53.248+08:00",
      "state" : "Open",
      "numberOfEntriesSinceFirstNotAckedMessage" : 1,
      "totalNonContiguousDeletedMessagesRange" : 0,
      "properties" : { }
    }
  },
  "compactedLedger" : {
    "ledgerId" : -1,
    "entries" : -1,
    "size" : -1,
    "offloaded" : false
  }
}
3. Migrate the producer and consumer of cluster1 to cluster2.
PulsarClient pulsarClient1 = PulsarClient.builder().serviceUrl("pulsar://localhost:6650").build();
// migrate the client to cluster2 pulsar://localhost:6660
PulsarClient pulsarClient2 = PulsarClient.builder().serviceUrl("pulsar://localhost:6660").build();
4. Remove cluster1 from the cluster list of namespace1.
bin/pulsar-admin namespaces set-clusters --clusters cluster2 public/namespace1
5. Check the data of topic1 of cluster1.
cd cluster1/broker1
bin/pulsar-admin --admin-url http://localhost:8080 topics stats-internal public/namespace1/topic1
output
The result shows that the data is empty, indicating that the data has been successfully removed from topic1 of cluster1.
{
  "entriesAddedCounter" : 0,
  "numberOfEntries" : 0,
  "totalSize" : 0,
  "currentLedgerEntries" : 0,
  "currentLedgerSize" : 0,
  "lastLedgerCreatedTimestamp" : "2021-04-23T15:20:08.1+08:00",
  "waitingCursorsCount" : 1,
  "pendingAddEntriesCount" : 0,
  "lastConfirmedEntry" : "3:-1",
  "state" : "LedgerOpened",
  "ledgers" : [ {
    "ledgerId" : 3,
    "entries" : 0,
    "size" : 0,
    "offloaded" : false
  } ],
  "cursors" : {
    "pulsar.repl.cluster2" : {
      "markDeletePosition" : "3:-1",
      "readPosition" : "3:0",
      "waitingReadOp" : true,
      "pendingReadOps" : 0,
      "messagesConsumedCounter" : 0,
      "cursorLedger" : 4,
      "cursorLedgerLastEntry" : 0,
      "individuallyDeletedMessages" : "[]",
      "lastLedgerSwitchTimestamp" : "2021-04-23T15:20:08.122+08:00",
      "state" : "Open",
      "numberOfEntriesSinceFirstNotAckedMessage" : 1,
      "totalNonContiguousDeletedMessagesRange" : 0,
      "properties" : { }
    }
  },
  "compactedLedger" : {
    "ledgerId" : -1,
    "entries" : -1,
    "size" : -1,
    "offloaded" : false
  }
}
So far, we have successfully copied the topic1 data of cluster1 to cluster2, and then removed the topic1 data of cluster1.
Expansion and contraction node
This chapter describes how to scale up broker and bookie nodes.
Broker
Add broker node
This example creates two partitioned topics in cluster1/broker1 and adds two broker nodes. After that, uninstall the partitioned topic data and view the data distribution among the three brokers.
- View the broker information of cluster1.
cd/cluster1/broker1
bin/pulsar-admin brokers list cluster1
output
The result shows that currently there are only broker1 in cluster1.
"192.168.0.105:8080"
- Create two partitioned topic s on cluster1/broker1.
Create 6 partitions for partitioned-topic1 and 7 partitions for partitioned-topic2.
bin/pulsar-admin topics create-partitioned-topic -p 6 public/namespace1/partitioned-topic1
bin/pulsar-admin topics create-partitioned-topic -p 7 public/namespace1/partitioned-topic2
View the results.
bin/pulsar-admin topics partitioned-lookup public/namespace1/partitioned-topic1
output
The results show that all data of partitioned topic 1 belongs to broker 1.
"persistent://public/namespace1/partitioned-topic1-partition-0    pulsar://192.168.0.105:6650"
"persistent://public/namespace1/partitioned-topic1-partition-1    pulsar://192.168.0.105:6650"
"persistent://public/namespace1/partitioned-topic1-partition-2    pulsar://192.168.0.105:6650"
"persistent://public/namespace1/partitioned-topic1-partition-3    pulsar://192.168.0.105:6650"
"persistent://public/namespace1/partitioned-topic1-partition-4    pulsar://192.168.0.105:6650"
"persistent://public/namespace1/partitioned-topic1-partition-5    pulsar://192.168.0.105:6650"
input
bin/pulsar-admin topics partitioned-lookup public/namespace1/partitioned-topic2
output
The results show that all data of partitioned topic 2 belongs to broker 1.
"persistent://public/namespace1/partitioned-topic2-partition-0    pulsar://192.168.0.105:6650"
"persistent://public/namespace1/partitioned-topic2-partition-1    pulsar://192.168.0.105:6650"
"persistent://public/namespace1/partitioned-topic2-partition-2    pulsar://192.168.0.105:6650"
"persistent://public/namespace1/partitioned-topic2-partition-3    pulsar://192.168.0.105:6650"
"persistent://public/namespace1/partitioned-topic2-partition-4    pulsar://192.168.0.105:6650"
"persistent://public/namespace1/partitioned-topic2-partition-5    pulsar://192.168.0.105:6650"
"persistent://public/namespace1/partitioned-topic2-partition-6    pulsar://192.168.0.105:6650"
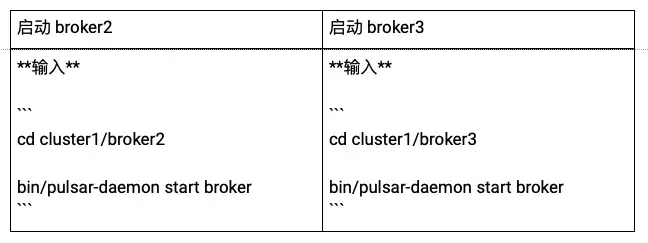
- Add two broker nodes: broker2 and broker3.
1) Deployment preparation. Create broker2 and broker3 folders in cluster1 folder, and copy the contents of the extracted Pulsar folder to broker2 and broker3 folders.
|-separate-clusters
    |-configuration-store
        |-zk1
    |-cluster1
        |-zk1
        |-bk1
        |-broker1
        |-broker2
        |-broker3
    |-cluster2
        |-zk1
        |-bk1
        |-broker1
2) Deploy broker.
a) . configure the broker.
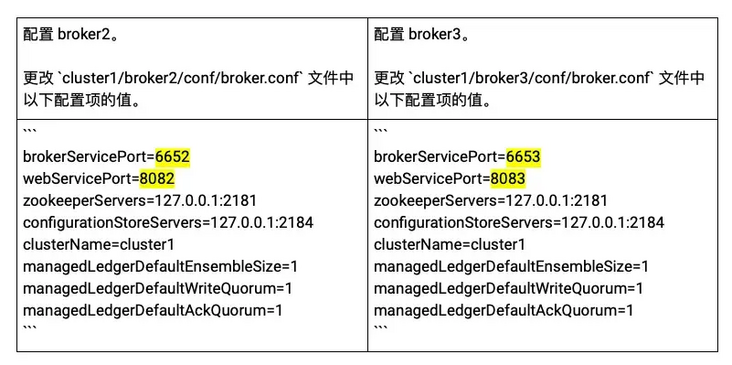
b) . start the broker.
c) . view the started broker s in cluster1.
bin/pulsar-admin brokers list cluster1
output
"192.168.0.105:8080" // broker1
"192.168.0.105:8082" // broker2
"192.168.0.105:8083" // broker3
- Uninstall the data of partitioned-topic1 in namespace 1.
bin/pulsar-admin namespaces unload public/namespace1
Verify the results.
1) . view the data allocation of partitioned-topic1.
bin/pulsar-admin topics partitioned-lookup public/namespace1/partitioned-topic1
output
The results show that the data of partitioned topic 1 are evenly distributed among broker 1, broker 2 and broker 3.
"persistent://public/namespace1/partitioned-topic1-partition-0    pulsar://192.168.0.105:6650"
"persistent://public/namespace1/partitioned-topic1-partition-1    pulsar://192.168.0.105:6653"
"persistent://public/namespace1/partitioned-topic1-partition-2    pulsar://192.168.0.105:6652"
"persistent://public/namespace1/partitioned-topic1-partition-3    pulsar://192.168.0.105:6653"
"persistent://public/namespace1/partitioned-topic1-partition-4    pulsar://192.168.0.105:6650"
"persistent://public/namespace1/partitioned-topic1-partition-5    pulsar://192.168.0.105:6653"
2) . view the data allocation of partitioned-topic2.
bin/pulsar-admin topics partitioned-lookup public/namespace1/partitioned-topic2
The results show that the data of partitioned topic 2 are evenly distributed among broker 1, broker 2 and broker 3.
output
"persistent://public/namespace1/partitioned-topic2-partition-0    pulsar://192.168.0.105:6653"
"persistent://public/namespace1/partitioned-topic2-partition-1    pulsar://192.168.0.105:6650"
"persistent://public/namespace1/partitioned-topic2-partition-2    pulsar://192.168.0.105:6653"
"persistent://public/namespace1/partitioned-topic2-partition-3    pulsar://192.168.0.105:6652"
"persistent://public/namespace1/partitioned-topic2-partition-4    pulsar://192.168.0.105:6653"
"persistent://public/namespace1/partitioned-topic2-partition-5    pulsar://192.168.0.105:6650"
"persistent://public/namespace1/partitioned-topic2-partition-6    pulsar://192.168.0.105:6653"
Reduce broker nodes
The following steps continue with the previous "how to add a broker node".
This example reduces one broker node in cluster1 and checks the allocation of partitioned topic data between the other two brokers.
- Reduce one broker node, that is, stop broker 3.
cd/cluster1/broker3
bin/pulsar-daemon stop broker
Verify the results.
bin/pulsar-admin brokers list cluster1
output
The results show that currently, cluster 1 only starts broker 1 and broker 2.
"192.168.0.105:8080" // broker1
"192.168.0.105:8082" // broker2
- View the allocation of partitioned-topic1 data.
bin/pulsar-admin topics partitioned-lookup public/namespace1/partitioned-topic1
output
The results show that the partitioned topic 1 data is evenly distributed to broker 1 and broker 2, that is, the data originally belonging to broker 3 has been evenly distributed to broker 1 and broker 2.
"persistent://public/namespace1/partitioned-topic1-partition-0    pulsar://192.168.0.105:6650"
"persistent://public/namespace1/partitioned-topic1-partition-1    pulsar://192.168.0.105:6650"
"persistent://public/namespace1/partitioned-topic1-partition-2    pulsar://192.168.0.105:6652"
"persistent://public/namespace1/partitioned-topic1-partition-3    pulsar://192.168.0.105:6652"
"persistent://public/namespace1/partitioned-topic1-partition-4    pulsar://192.168.0.105:6650"
"persistent://public/namespace1/partitioned-topic1-partition-5    pulsar://192.168.0.105:6650"
Similarly, the data of partitioned topic 2 is equally distributed to broker 1 and broker 2.
bin/pulsar-admin topics partitioned-lookup public/namespace1/partitioned-topic2
output
"persistent://public/namespace1/partitioned-topic2-partition-0    pulsar://192.168.0.105:6650"
"persistent://public/namespace1/partitioned-topic2-partition-1    pulsar://192.168.0.105:6650"
"persistent://public/namespace1/partitioned-topic2-partition-2    pulsar://192.168.0.105:6652"
"persistent://public/namespace1/partitioned-topic2-partition-3    pulsar://192.168.0.105:6652"
"persistent://public/namespace1/partitioned-topic2-partition-4    pulsar://192.168.0.105:6650"
"persistent://public/namespace1/partitioned-topic2-partition-5    pulsar://192.168.0.105:6650"
"persistent://public/namespace1/partitioned-topic2-partition-6    pulsar://192.168.0.105:6652"
Bookie
Add bookie node
In this example, there is bookie1 in cluster1/bookkeeper 1. After adding two bookie nodes, write data to topic1 and check whether multiple copies of the data have been saved.
- View the bookie information of cluster1.
cd cluster1/bk1
bin/bookkeeper shell listbookies -rw -h
output
The result shows that currently cluster1 has only bookie1.
12:31:34.933 [main] INFO  org.apache.bookkeeper.tools.cli.commands.bookies.ListBookiesCommand - ReadWrite Bookies :
12:31:34.946 [main] INFO  org.apache.bookkeeper.tools.cli.commands.bookies.ListBookiesCommand - BookieID:192.168.0.105:3181, IP:192.168.0.105, Port:3181, Hostname:192.168.0.105
2. Three bookie nodes are allowed to serve.
change cluster1/broker1/conf/broker.conf The values of the following configuration items in the file.
managedLedgerDefaultEnsembleSize=3 // Specifies the number of bookie node services
managedLedgerDefaultWriteQuorum=3 // Specifies the number of data copies written
managedLedgerDefaultAckQuorum=2  // The specified data is successfully written to several copies
3. Restart broker 1 to make the configuration effective.
cd cluster1/broker1
bin/pulsar-daemon stop broker
bin/pulsar-daemon start broker
4. Set the message retention policy of public/default.
Note: if no message retention policy is set and topic is not subscribed, the data of topic will be automatically cleaned up after a period of time.
cd cluster1/broker1
bin/pulsar-admin namespaces set-retention -s 100M -t 3d public/default
5. Create topic1 in public/default and write 100 pieces of data.
bin/pulsar-client produce -m 'hello' -n 100 topic1
output
The result shows that the number of bookie nodes is insufficient, resulting in data writing failure.
···
12:40:38.886 [pulsar-client-io-1-1] WARN  org.apache.pulsar.client.impl.ClientCnx - [id: 0x56f92aff, L:/192.168.0.105:53069 - R:/192.168.0.105:6650] Received error from server: org.apache.bookkeeper.mledger.ManagedLedgerException: Not enough non-faulty bookies available
...
12:40:38.886 [main] ERROR org.apache.pulsar.client.cli.PulsarClientTool - Error while producing messages
...
12:40:38.890 [main] INFO  org.apache.pulsar.client.cli.PulsarClientTool - 0 messages successfully produced
- Two bookie nodes are added: bookie2 and bookie3.
1) 3. Preparation for deployment.
Add bk2 and bk3 folders in cluster1, and copy the contents of the extracted Pulsar folder to bk2 and bk3 folders.
|-separate-clusters
    |-configuration-store
        |-zk1
    |-cluster1
        |-zk1
        |-bk1
        |-bk2
        |-bk3
        |-broker1
    |-cluster2
        |-zk1
        |-bk1
        |-broker1
2) . deploy bookie.
a) . configure bookie.
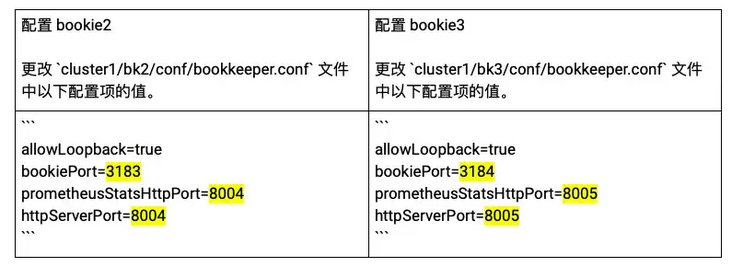
b) . start bookie.
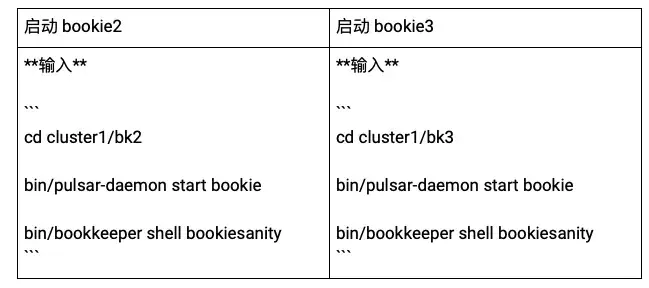
c) . check the started bookie in cluster1.
bin/bookkeeper shell listbookies -rw -h
output
The result shows that 3 bookie s have been started in cluster 1:
- bookie1: 192.168.0.105:3181
- bookie2: 192.168.0.105:3183
- bookie3: 192.168.0.105:3184
12:12:47.574 [main] INFO  org.apache.bookkeeper.tools.cli.commands.bookies.ListBookiesCommand - BookieID:192.168.0.105:3183, IP:192.168.0.105, Port:3183, Hostname:192.168.0.105
12:12:47.575 [main] INFO  org.apache.bookkeeper.tools.cli.commands.bookies.ListBookiesCommand - BookieID:192.168.0.105:3184, IP:192.168.0.105, Port:3184, Hostname:192.168.0.105
12:12:47.576 [main] INFO  org.apache.bookkeeper.tools.cli.commands.bookies.ListBookiesCommand - BookieID:192.168.0.105:3181, IP:192.168.0.105, Port:3181, Hostname:192.168.0.105
7. Set the message retention policy of public/default.
Note: if no message retention policy is set and topic is not subscribed, the data of topic will be automatically cleaned up after a period of time.
cd cluster1/broker1bin/pulsar-admin namespaces set-retention -s 100M -t 3d public/default
- Create topic1 in public/default and write 100 pieces of data.
bin/pulsar-client produce -m 'hello' -n 100 topic1
output
The result shows that the data is written successfully.
...
12:17:40.222 [main] INFO  org.apache.pulsar.client.cli.PulsarClientTool - 100 messages successfully produced
- View the information of topic1.
bin/pulsar-admin topics stats-internal topic1
output
The results show that ledgerId 5 saves the data of topic1.
{
  "entriesAddedCounter" : 100,
  "numberOfEntries" : 100,
  "totalSize" : 5500,
  "currentLedgerEntries" : 100,
  "currentLedgerSize" : 5500,
  "lastLedgerCreatedTimestamp" : "2021-05-11T12:17:38.881+08:00",
  "waitingCursorsCount" : 0,
  "pendingAddEntriesCount" : 0,
  "lastConfirmedEntry" : "5:99",
  "state" : "LedgerOpened",
  "ledgers" : [ {
    "ledgerId" : 5,
    "entries" : 0,
    "size" : 0,
    "offloaded" : false
  } ],
  "cursors" : { },
  "compactedLedger" : {
    "ledgerId" : -1,
    "entries" : -1,
    "size" : -1,
    "offloaded" : false
  }
}- Check which bookie nodes ledgerid 5 is stored on.
bin/bookkeeper shell ledgermetadata -ledgerid 5
output
The results show that as configured earlier, ledger 5 is stored on bookie1 (3181), bookie2 (3183), and bookie3 (3184).
...
12:23:17.705 [main] INFO  org.apache.bookkeeper.tools.cli.commands.client.LedgerMetaDataCommand - ledgerID: 5
12:23:17.714 [main] INFO  org.apache.bookkeeper.tools.cli.commands.client.LedgerMetaDataCommand - LedgerMetadata{formatVersion=3, ensembleSize=3, writeQuorumSize=3, ackQuorumSize=2, state=OPEN, digestType=CRC32C, password=base64:, ensembles={0=[192.168.0.105:3184, 192.168.0.105:3181, 192.168.0.105:3183]}, customMetadata={component=base64:bWFuYWdlZC1sZWRnZXI=, pulsar/managed-ledger=base64:cHVibGljL2RlZmF1bHQvcGVyc2lzdGVudC90b3BpYzE=, application=base64:cHVsc2Fy}}
...
Reduce bookie nodes
The following steps continue with the previous "how to add a bookie node".
This example reduces two bookie nodes in cluster1, writes data to topic2, and checks which nodes the data is saved in.
- One bookie node service is allowed.
change cluster1/broker1/conf/broker.conf The values of the following configuration items in the file.
managedLedgerDefaultEnsembleSize=1 // Specifies the number of bookie node services
managedLedgerDefaultWriteQuorum=1 // Specifies the number of data copies written
managedLedgerDefaultAckQuorum=1  // The specified data is successfully written to several copies
2. Restart broker 1 to make the configuration effective.
cd cluster1/broker1
bin/pulsar-daemon stop broker
bin/pulsar-daemon start broker
- View the bookie information of cluster1.
cd cluster1/bk1
bin/bookkeeper shell listbookies -rw -h
output
The results show that bookie1 (3181), bookie2 (3183) and bookie3 (3184) have been started by cluster1.
...
15:47:41.370 [main] INFO  org.apache.bookkeeper.tools.cli.commands.bookies.ListBookiesCommand - ReadWrite Bookies :
15:47:41.382 [main] INFO  org.apache.bookkeeper.tools.cli.commands.bookies.ListBookiesCommand - BookieID:192.168.0.105:3183, IP:192.168.0.105, Port:3183, Hostname:192.168.0.105
15:47:41.383 [main] INFO  org.apache.bookkeeper.tools.cli.commands.bookies.ListBookiesCommand - BookieID:192.168.0.105:3184, IP:192.168.0.105, Port:3184, Hostname:192.168.0.105
15:47:41.384 [main] INFO  org.apache.bookkeeper.tools.cli.commands.bookies.ListBookiesCommand - BookieID:192.168.0.105:3181, IP:192.168.0.105, Port:3181, Hostname:192.168.0.105
...
- Reduce 2 bookie nodes, that is, stop bookie2 and bookie3.
Tip: for more information on how to reduce bookie, see here.
cd cluster1/bk2
bin/bookkeeper shell listunderreplicated
bin/pulsar-daemon stop bookie
bin/bookkeeper shell decommissionbookie
cd cluster1/bk3
bin/bookkeeper shell listunderreplicated
bin/pulsar-daemon stop bookie
bin/bookkeeper shell decommissionbookie
5. View the bookie information of cluster1.
cd cluster1/bk1
bin/bookkeeper shell listbookies -rw -hcd cluster1/bk1bin/bookkeeper shell listbookies -rw -h
output
The result shows that currently cluster1 only starts bookie1 (3181).
...
16:05:28.690 [main] INFO  org.apache.bookkeeper.tools.cli.commands.bookies.ListBookiesCommand - ReadWrite Bookies :
16:05:28.700 [main] INFO  org.apache.bookkeeper.tools.cli.commands.bookies.ListBookiesCommand - BookieID:192.168.0.105:3181, IP:192.168.0.105, Port:3181, Hostname:192.168.0.105
...
- Set the message retention policy for public/default.
Note: if the message retention policy is not set and there is no subscription, the data will be automatically cleaned up after a period of time.
cd cluster1/broker1
bin/pulsar-admin namespaces set-retention -s 100M -t 3d public/default
- Create topic2 in public/default and write 100 pieces of data.
bin/pulsar-client produce -m 'hello' -n 100 topic2
output
The result shows that the data is written successfully.
...
16:06:59.448 [main] INFO  org.apache.pulsar.client.cli.PulsarClientTool - 100 messages successfully produced
- View the information of topic2.
bin/pulsar-admin topics stats-internal topic2
output
The result shows that ledgerId 7 saves the data of topic 2.
{
  "entriesAddedCounter" : 100,
  "numberOfEntries" : 100,
  "totalSize" : 5400,
  "currentLedgerEntries" : 100,
  "currentLedgerSize" : 5400,
  "lastLedgerCreatedTimestamp" : "2021-05-11T16:06:59.058+08:00",
  "waitingCursorsCount" : 0,
  "pendingAddEntriesCount" : 0,
  "lastConfirmedEntry" : "7:99",
  "state" : "LedgerOpened",
  "ledgers" : [ {
    "ledgerId" : 7,
    "entries" : 0,
    "size" : 0,
    "offloaded" : false
  } ],
  "cursors" : { },
  "compactedLedger" : {
    "ledgerId" : -1,
    "entries" : -1,
    "size" : -1,
    "offloaded" : false
  }
}- See which bookie nodes ledgerid 7 is stored on.
bin/bookkeeper shell ledgermetadata -ledgerid 7
output
The results show that ledgerid 7 is stored on bookie1 (3181).
...
16:11:28.843 [main] INFO  org.apache.bookkeeper.tools.cli.commands.client.LedgerMetaDataCommand - ledgerID: 7
16:11:28.846 [main] INFO  org.apache.bookkeeper.tools.cli.commands.client.LedgerMetaDataCommand - LedgerMetadata{formatVersion=3, ensembleSize=1, writeQuorumSize=1, ackQuorumSize=1, state=OPEN, digestType=CRC32C, password=base64:, ensembles={0=[192.168.0.105:3181]}, customMetadata={component=base64:bWFuYWdlZC1sZWRnZXI=, pulsar/managed-ledger=base64:cHVibGljL2RlZmF1bHQvcGVyc2lzdGVudC90b3BpYzM=, application=base64:cHVsc2Fy}}
...
summary
This article is the second in the "Pulsar isolation strategy series". It explains how to verify data isolation, synchronize cluster data and expand and shrink capacity nodes in the environment of "multiple Pulsar clusters".
The next blog in this series will analyze in detail how to play with Pulsar isolation strategy in the environment of "shared BookKeeper cluster". It will also be the "Pulsar fool's Manual"! Coming soon!
More information
If you are interested in "Pulsar isolation strategy series", please refer to more relevant resources:
- Fundamentals: Pulsar isolation policy - Official Website document
- Advanced level: How does deep parsing achieve isolation in Pulsar

click link , get Apache Pulsar hard core dry goods information!