1. Overview of MHA
At present, MHA is a relatively mature solution in mysql high availability. It is developed by Japanese DeNA company youshimaton (now working in Facebook company), and it is an excellent high availability software for failover and master-slave improvement in mysql high availability environment. In the process of mysql failover, MHA can automatically complete the database failover within 0-30 seconds, and in the process of failover, MHA can guarantee the consistency of data to the greatest extent, so as to achieve real high availability. In MHA, there are two roles: one is MHA Node, the other is MHA Manager. MHA Manager can be deployed on a single read-up server to manage multiple master slave clusters, or on a slave node.
The MHA Node runs on each mysql server, and the MHA Manager will regularly detect the master node in the cluster. When the master fails, it can automatically promote the slave of the latest data to the new master, and then point all other slave to the new master again. Transparent to the application throughout the failover process.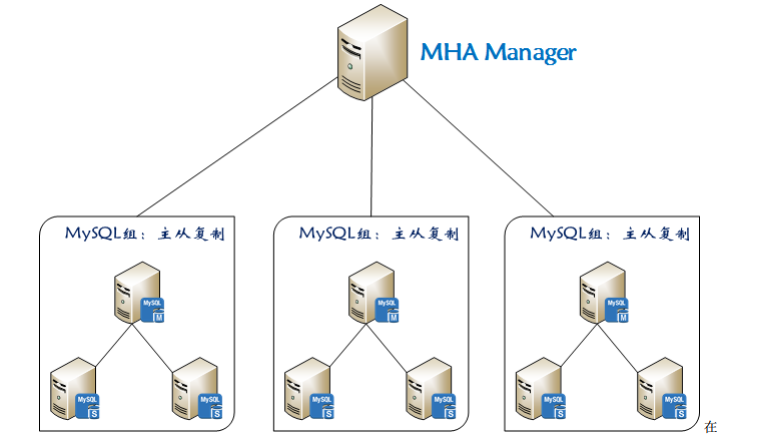
In the process of MHA automatic failover, MHA attempts to save binary logs from the down master server to ensure the maximum data loss, but this is not always feasible. For example, if the primary server hardware fails or cannot be accessed through ssh, MHA cannot save binary logs, only fails over and loses the latest data. Using mysql 5.5 semi synchronous replication can greatly reduce the risk of data loss. MHA can be combined with semi synchronous replication. If only one slave has received the latest binary log, MHA can apply the latest binary log to all other slave servers, so it can ensure the data consistency of all nodes.
Note: starting from mysql 5.5, mysql supports semi synchronous replication in the form of plug-ins.
2. How to understand semi synchronization?
#First, let's look at the concept of asynchronous and full synchronization:
Asynchronous replication: mysql's default replication is asynchronous. The main database will immediately return the results to the client after executing the transactions submitted by the client. It does not care whether the slave database has received and processed them, so there will be a problem. If the main database hangs up, the transactions submitted by the main database may not be transferred to the slave database at this time. If the main database is forced to upgrade from the primary database, it may lead to The data on the new master is incomplete.
Full synchronous replication: when the master database executes a transaction, all the slave databases execute the transaction before returning to the client. Because it needs to wait for all the slave databases to complete the transaction before returning, the performance of full synchronous replication will be seriously affected.
Semi synchronous replication: between asynchronous replication and full synchronous replication, the master database does not return to the client immediately after executing the transaction submitted by the client, but waits for at least one slave database to receive and write to the relay log before returning to the client. Compared with asynchronous replication, semi synchronous replication improves the security of data, and it also causes a certain degree of delay, which is at least the time of a TCP/IP round trip. Therefore, semi synchronous replication is best used in low latency networks.
Summary: asynchronous and semi synchronous are the same. By default, mysql replication is asynchronous. After all updates on the master are written to binglog, it does not ensure that all updates are copied to the slave. Although asynchronous operation is efficient, there is a high risk of data asynchrony or even data loss when master/slave fails. mysql 5.5 introduces the semi synchronous replication function to ensure that the data of at least one slave is complete when the master fails. In case of timeout, it can also be temporarily transferred to asynchronous replication to ensure the normal use of business. After a slave catches up, it can continue to switch to semi synchronous mode.
3. Working principle of MHA
Compared with other HA software, MHA aims to maintain the high availability of the mater Library in the master-slave replication of mysql. Its biggest feature is that it can repair the difference logs between multiple Slavs, and finally make all Slavs keep the data consistent. Then choose one of them to act as the new master, and point its slaves to it.
1) Save binary log events from the crashed master
2) Identify slave s with the latest updates
3) Apply differential relay log to other slave s
4) Apply binary log events saved from the master
5) Promote a slave to a new master
6) Connect other slave to the new master for replication
4. Deploy MHA
At present, MHA mainly supports the architecture of one master and many slaves. To build MHA, a replication cluster must have at least three database servers, one master and three slaves, that is, one master, one standby master and the other master, because at least three servers are needed.
The specific construction environment is as follows:
| host name | ip address | server id | type | OS |
|---|---|---|---|---|
| Manager | 172.16.1.100 | Management node | CentOS 7.3 | |
| Master | 172.16.1.110 | 1 | Primary mysql (write) | CentOS 7.3 |
| Candidatemaster (standby master) | 172.16.1.120 | 2 | From mysql (read) | CenOS 7.3 |
| slave | 172.16.1.130 | 3 | From mysql (read) | CentOS 7.3 |
The master provides external write services, the alternative master (the actual slave, hostname candidatemaster) provides read services, and the slave also provides related read services. Once the master is down, the alternative master will be promoted to a new master. The slave points to the new master, and the manager serves as the management server (mysql is not required).
1, Basic environment preparation
1. Check the setting of selinux and iptables after configuring the ip address, close selinux and iptables service so that the master-slave synchronization in the later stage is not wrong. Note: time should be synchronized.
#Configure time synchronization
Set the time ZONE (temporarily effective), permanently modify the / etc/sysconfig/clock file, change the value of ZONE to Asia/Shanghai, and UTC to false
[root@manager ~]# cp /usr/share/zoneinfo/Asia/Shanghai  /etc/localtime
[root@manager ~]# hwclock
 Time synchronization:
[root @ manager ~] (ntpdate - u ntp.api.bz / / NTP server (Shanghai)
2. epel source is configured on all four machines
#Download the epel source:
[root@manager ~]# wget -O /etc/yum.repos.d/epel.repo http://mirrors.aliyun.com/repo/epel-7.repo
3. Configure the hosts environment:
Copy to other hosts:
[root@manager ~]# for i in 110 120 130; do scp /etc/hosts root@172.16.1.$i:/etc/; done
4. Establish ssh non interactive login environment
(all four hosts need to be operated so that they can log in each other without secret)
[root@manager ~]# ssh-keygen -t rsa    #Generating key
[root@manager ~]# for i in manager master candicatemaster slave; do ssh-copy-id -i ~/.ssh/id_rsa.pub root@$i; done
5. Mutual testing ssh without interactive login (all four hosts need to be tested)
[root@manager ~]# for i in manager master candicatemaster slave; do ssh $i hostname; done
manager
master
candicatemaster
slave
//ssh each host and execute the hostname command to verify whether it is successful
2, Configure mysql semi synchronous replication
In order to reduce the data loss caused by the main database hardware damage and downtime as much as possible, it is recommended to configure the MHA as mysql semi synchronous replication.
Note: mysql semi synchronization plug-in is provided by google. The specific location is under / usr/local/mysql/lib/plugin. One is semisync ﹣ master.so for master, and the other is semisync ﹣ slave.so for slave. Let's configure it. If you do not know the directory of Plugin, look it up as follows:
mysql> show variables like '%plugin_dir%';  #Find plugin's directory
+---------------+------------------------------+
| Variable_name | Value                        |
+---------------+------------------------------+
| plugin_dir    | /usr/local/mysql/lib/plugin/ |
+---------------+------------------------------+
1 row in set (0.00 sec)
1. Install the related plug-ins (Master, candidate, slave) on the master and slave nodes respectively. To install the plug-ins on mysql, the database needs to support dynamic loading. Check whether it supports the following detection:
mysql> show variables like '%have_dynamic%'
    -> ;
+----------------------+-------+
| Variable_name        | Value |
+----------------------+-------+
| have_dynamic_loading | YES   |
+----------------------+-------+
1 row in set (0.00 sec)
#For all mysql database servers, install the semi synchronization plug-in (semisync ﹣ master.so, semisync ﹣ slave. So):
mysql> install plugin rpl_semi_sync_master soname 'semisync_master.so';
Query OK, 0 rows affected (0.30 sec)

mysql> install plugin rpl_semi_sync_slave soname 'semisync_slave.so';
Query OK, 0 rows affected (0.00 sec)
Other mysql hosts are installed in the same way.
#Ensure that plugin s are installed correctly for each mysql host:
mysql> show plugins;
Or use:
mysql> select * from information_schema.plugins\G;
#To view information about semi synchronization:
mysql> show variables like '%rpl_semi_sync%';
+-------------------------------------------+------------+
| Variable_name                             | Value      |
+-------------------------------------------+------------+
| rpl_semi_sync_master_enabled              | OFF        |
| rpl_semi_sync_master_timeout              | 10000      |
| rpl_semi_sync_master_trace_level          | 32         |
| rpl_semi_sync_master_wait_for_slave_count | 1          |
| rpl_semi_sync_master_wait_no_slave        | ON         |
| rpl_semi_sync_master_wait_point           | AFTER_SYNC |
| rpl_semi_sync_slave_enabled               | OFF        |
| rpl_semi_sync_slave_trace_level           | 32         |
+-------------------------------------------+------------+
8 rows in set (0.00 sec)
You can see from the above that the semi synchronous replication plug-in has been installed, but it has not been enabled, so it is OFF.
2. Modify my.cnf file and configure master-slave synchronization
Note: if the primary mysql server already exists, only later can the secondary mysql server be set up. Before configuring data synchronization, copy the database to be synchronized from the primary mysql server to the secondary mysql server (for example, backup the database on the primary mysql server first, and then restore it from the mysql server)
master mysql host:
[root@master ~]# vim /etc/my.cnf
//Add the following:
server-id=1
log-bin=mysql-bin
binlog_format=mixed
log-bin-index=mysql-bin.index
rpl_semi_sync_master_enabled=1
rpl_semi_sync_master_timeout=10000
rpl_semi_sync_slave_enabled=1
relay_log_purge=0
relay-log=relay-bin
relay-log-index=slave-relay-bin.index
Note: RPL? Semi? Sync? Master? Enabled = 1 1 table is enabled, 0 means closed,
RPL ﹣ semi ﹣ sync ﹣ master ﹣ timeout = 10000: millisecond unit. After the main server waits for the confirmation message for 10 seconds, it will not wait any more and will change to asynchronous mode.
Candidate master host:
[root@candicatemaster ~]# vim /etc/my.cnf
server-id=2
log-bin=mysql-bin
binlog_format=mixed
log-bin-index=mysql-bin.index
relay_log_purge=0
relay-log=relay-bin
relay-log-index=slave-relay-bin.index
rpl_semi_sync_master_enabled=1
rpl_semi_sync_master_timeout=10000
rpl_semi_sync_slave_enabled=1
Note: delay ﹣ log ﹣ purge = 0, it is forbidden for sql thread to automatically delete a relay log after executing it. In MHA scenario, for some delayed recovery from the database, it depends on the relay logs of other slave databases, so disable the automatic deletion function.
slave host:
[root@slave ~]# vim /etc/my.cnf
server-id=3
log-bin=mysql-bin
relay-log=relay-bin
relay-log-index=slave-relay-bin.index
read_only=1
rpl_semi_sync_slave_enabled=1
#Restart mysql service (Master, candidate master, slave): systemctl restart mysqld
#To view information about semi synchronization:
mysql> show variables like '%rpl_semi_sync%';
+-------------------------------------------+------------+
| Variable_name                             | Value      |
+-------------------------------------------+------------+
| rpl_semi_sync_master_enabled              | ON         |
| rpl_semi_sync_master_timeout              | 10000      |
| rpl_semi_sync_master_trace_level          | 32         |
| rpl_semi_sync_master_wait_for_slave_count | 1          |
| rpl_semi_sync_master_wait_no_slave        | ON         |
| rpl_semi_sync_master_wait_point           | AFTER_SYNC |
| rpl_semi_sync_slave_enabled               | ON         |
| rpl_semi_sync_slave_trace_level           | 32         |
+-------------------------------------------+------------+
8 rows in set (0.00 sec)
You can see that semi synchronous replication is ON.
#To view the semi synchronization status:
There are several parameters that deserve attention:
RPL? Semi? Sync? Master? Status: displays whether the primary service is in asynchronous or semi synchronous replication mode
 RPL? Semi? Sync? Master? Clients: shows how many slave servers are configured for semi synchronous replication mode
 RPL? Semi? Sync? Master? Yes? TX: displays the number of successful submissions confirmed from the server
 RPL? Semi? Sync? Master? No? TX: displays the number of unsuccessful submissions confirmed from the server
 RPL? Semi? Sync? Master? TX? AVG? Wait? Time: the average additional waiting time required for a transaction to open semi? Sync
 RPL? Semi? Sync? Master? Net? AVG? Wait? Time: the average waiting time to the network after a transaction enters the waiting queue.
master host:
mysql> grant replication slave on *.* to rep@'172.16.1.%' identified by '123.com';
Query OK, 0 rows affected, 1 warning (10.01 sec)

mysql> grant all privileges on *.* to manager@'172.16.1.%' identified by '123.com';
Query OK, 0 rows affected, 1 warning (0.00 sec)

mysql> show master status;
+------------------+----------+--------------+------------------+-------------------+
| File             | Position | Binlog_Do_DB | Binlog_Ignore_DB | Executed_Gtid_Set |
+------------------+----------+--------------+------------------+-------------------+
| mysql-bin.000002 |      737 |              |                  |                   |
+------------------+----------+--------------+------------------+-------------------+
1 row in set (0.00 sec)
The first grant command is to create an account for master-slave replication, which can be created on the host of master and candidate master. The second grant command is to create an MHA management account, which needs to be executed on all mysql servers. MHA will require remote login to the database in the configuration file, and all necessary authorizations shall be made.
Candidate master host:
mysql> grant replication slave on *.* to rep@'172.16.1.%' identified by '123.com';
Query OK, 0 rows affected, 1 warning (10.00 sec)

mysql> grant all privileges on *.* to manager@'172.16.1.%' identified by  '123.com';
Query OK, 0 rows affected, 1 warning (0.00 sec)

mysql>  change master to master_host='172.16.1.110',master_port=3306,master_user='rep',master_password='1233.com',master_log_file='mysql-bin.000002',master_log_pos=737;
Query OK, 0 rows affected, 2 warnings (0.00 sec)

mysql> start slave;
Query OK, 0 rows affected (0.00 sec)
#View the status of the slave. The following two values must be yes, which means that the slave server can connect to the master server normally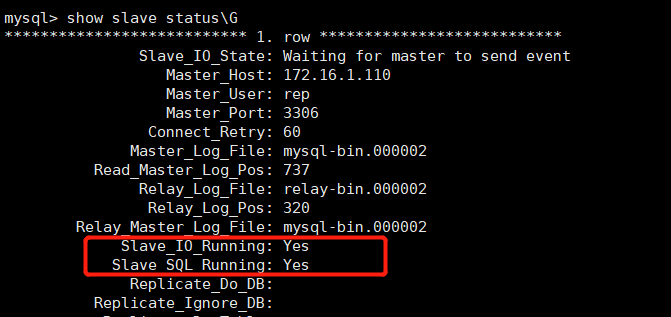
slave host:
mysql> grant all privileges on *.* to manager@'172.16.1.%' identified by '123.com';
Query OK, 0 rows affected, 1 warning (0.28 sec)

mysql> change master to master_host='172.16.1.110',master_port=3306,master_user='rep',master_password='123.com',master_log_file='mysql-bin.000002',master_log_pos=737;
Query OK, 0 rows affected, 2 warnings (0.01 sec)

mysql> start slave;
Query OK, 0 rows affected (0.00 sec)
#Also check the status of the slave. The following two values must be yes, which means that the slave server can connect to the master server normally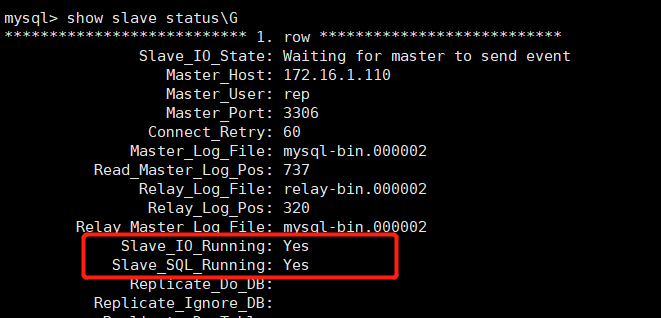
#To view the semi synchronization status of the master server:
It can be seen that two slave servers have been configured in semi synchronous mode.
3, Configure MySQL MHA
mha includes manager node and data node, and data node includes several original mysql replication hosts, at least three of which are one master and two slaves. After master failover, the master-slave structure can be guaranteed; only node package needs to be installed.
Manager node: run monitoring script, responsible for monitoring and auto failover; node package and manager package need to be installed.
1. Install the software package that mha depends on on on all hosts (requires the system's own yum source and Networking)
yum -y install perl-DBD-MySQL perl-Config-Tiny perl-Log-Dispatch perl-ParallelForkManager perl-Config-IniFiles ncftp perl-Params-Validate perl-CPAN perl-TestMock-LWP.noarch perl-LWP-Authen-Negotiate.noarch perl-devel perl-ExtUtils-CBuilder perl-ExtUtils-MakeMaker
2. The following operation management nodes (manager s) need to be installed in both. In the three database nodes, only the nodes of MHA need to be installed:
Software download address: https://github.com/yoshinorim
1) Install mha4mysql-node-0.56.tar.gz on all database nodes:
[root@master ~]# wget https://github.com/yoshinorim/mha4mysql-node/releases/download/v0.58/mha4mysql-node-0.58.tar.gz
[root@master ~]# tar zxf mha4mysql-node-0.58.tar.gz
[root@master ~]# cd mha4mysql-node-0.58
[root@master mha4mysql-node-0.58]# perl Makefile.PL
*** Module::AutoInstall version 1.06
*** Checking for Perl dependencies...
[Core Features]
- DBI        ...loaded. (1.627)
- DBD::mysql ...loaded. (4.023)
*** Module::AutoInstall configuration finished.
Checking if your kit is complete...
Looks good
Writing Makefile for mha4mysql::node
[root@master mha4mysql-node-0.58]# make && make install
#Copy the installation package to another host:
[root@master ~]# for i in candicatemaster slave; do scp mha4mysql-node-0.58.tar.gz root@$i:/root; done
mha4mysql-node-0.58.tar.gz                                              100%   55KB  24.5MB/s   00:00
mha4mysql-node-0.58.tar.gz                                              100%   55KB  23.1MB/s   00:00
The other two database nodes are installed in turn
2) Install MHA node and MHA manager on the management node:
#Download the installation package:
[root@manager ~]# wget https://github.com/yoshinorim/mha4mysql-node/releases/download/v0.58/mha4mysql-node-0.58.tar.gz
[root@manager ~]# wget https://github.com/yoshinorim/mha4mysql-manager/releases/download/v0.58/mha4mysql-manager-0.58.tar.gz
//To install MHA node:
[root@manager ~]# tar zxf mha4mysql-node-0.58.tar.gz
[root@manager ~]# cd mha4mysql-node-0.58
[root@manager mha4mysql-node-0.58]# perl Makefile.PL
*** Module::AutoInstall version 1.06
*** Checking for Perl dependencies...
[Core Features]
- DBI        ...loaded. (1.627)
- DBD::mysql ...loaded. (4.023)
*** Module::AutoInstall configuration finished.
Checking if your kit is complete...
Looks good
Writing Makefile for mha4mysql::node
[root@manager mha4mysql-node-0.58]# make && make install
//To install MHA Manager:
[root@manager ~]# tar zxf mha4mysql-manager-0.58.tar.gz
[root@manager ~]# cd mha4mysql-manager-0.58
[root@manager mha4mysql-manager-0.58]# perl Makefile.PL
*** Module::AutoInstall version 1.06
*** Checking for Perl dependencies...
[Core Features]
- DBI                   ...loaded. (1.627)
- DBD::mysql            ...loaded. (4.023)
- Time::HiRes           ...loaded. (1.9725)
- Config::Tiny          ...loaded. (2.14)
- Log::Dispatch         ...loaded. (2.41)
- Parallel::ForkManager ...loaded. (1.18)
- MHA::NodeConst        ...loaded. (0.58)
*** Module::AutoInstall configuration finished.
Writing Makefile for mha4mysql::manager
[root@manager mha4mysql-manager-0.58]# make && make install
#Create the required directory on manager:
[root@manager mha4mysql-manager-0.58]# mkdir /etc/masterha
[root@manager mha4mysql-manager-0.58]# mkdir -p /masterha/app1
[root@manager mha4mysql-manager-0.58]# mkdir /scripts
[root@manager mha4mysql-manager-0.58]# cp samples/conf/* /etc/masterha/
[root@manager mha4mysql-manager-0.58]# cp samples/scripts/* /scripts/
3. Configure mha
Like most linux applications, the correct use of MHA depends on a reasonable configuration file. The configuration file of MHA is similar to my.cnf file of mysql, which is configured in the way of param=value. The configuration file is located in the management node, usually including the host name of each mysql server, mysql user name, password, working directory, etc.
1) Edit the file / etc/masterha/app1.conf as follows:
[root@manager mha4mysql-manager-0.58]# vim /etc/masterha/app1.cnf
[server default]
manager_workdir=/masterha/app1    //Set up manager's working directory
manager_log=/masterha/app1/manager.log  //Set up manager's log
user=manager    //Set monitoring user manager
password=123.com    //Monitor password of user manager
ssh_user=root     //ssh connection user
repl_user=rep   //Primary and secondary replication users
repl_password=123.com   //Master slave copy user password
ping_interval=1   //Set the monitoring main database and the time interval for sending ping packets. The default is 3 seconds. When there is no response for three times, the system will automatically fail.

[server1]
hostname=172.16.1.110
port=3306
master_binlog_dir=/usr/local/mysql/data   //Set the location where Master saves binglog so that MHA can find the master's log. My data directory here is myslq's data directory
candidate_master=1   //Set as candidate master. If this parameter is set, the slave database will be promoted to the master database after the master-slave switch.

[server2]
hostname=172.16.1.120
port=3306
master_binlog_dir=/usr/local/mysql/data
candidate_master=1

[server3]
hostname=172.16.1.130
port=3306
master_binlog_dir=/usr/local/mysql/data
no_master=1
2) Clear the masterha ﹣ default.cnf file. When connecting to MySQL, the app1.cnf configuration file will be found automatically:
[root@manager ~]# >/etc/masterha/masterha_default.cnf
[root@manager ~]# cat /etc/masterha/masterha_default.cnf
[root@manager ~]#
3) ssh validation:
[root@manager ~]# masterha_check_ssh --global_conf=/etc/masterha/masterha_default.cnf --conf=/etc/masterha/app1.cnf
4) Validation of cluster replication (mysql service must be on)
[root@manager ~]# masterha_check_repl --global_conf=/etc/masterha/masterha_default.cnf --conf=/etc/masterha/app1.cnf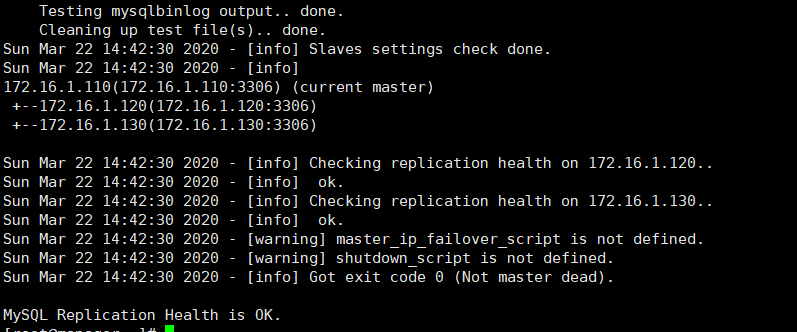
If the verification is successful, all servers and master-slave status will be automatically identified;
Note: if this error is encountered during validation: Can't exec "mysqlbinlog"... The solution is to execute on all servers:
ln -s /usr/local/mysql/bin/* /usr/local/bin/
5) Start manager:
[root@manager ~]# nohup masterha_manager --conf=/etc/masterha/app1.cnf &> /tmp/mha_manager.log &
[1] 19438
Note: when using unix/linux, we usually want a program to run in the background, so we will often use & at the end of the program to let the program run automatically. For ex amp le, we need to run mysql in the background: / usr/local/mysql/bin/mysqld_safe – user = mysql &. But there are many programs that are not like mysqld, so we need the nohub command;
#Status check:
[root@manager ~]# masterha_check_status --conf=/etc/masterha/app1.cnf
app1 (pid:19438) is running(0:PING_OK), master:172.16.1.110
#You can see that the manager role is running normally, and the master in the current master-slave architecture is 17.16.1.110.
4, Failover verification (automatic failover)
After the master is hung up, the MHA has been turned on at that time, and the candidate master database (slave) will automatically fail over to the master. The verification method is to stop the master first, because in the previous configuration file, the candidate msaer (candidatemaster) is used as the candidate. Then, go to the slave(slave host) to check whether the ip of the master has changed to that of the candidatemaster.
1) Stop the mysql service of the master and simulate the failure:
[root@master ~]# systemctl stop mysqld
[root@master ~]# netstat -anput | grep mysqld
[root@master ~]#
2) To view the MHA log file:
[root@manager ~]# tailf /masterha/app1/manager.log 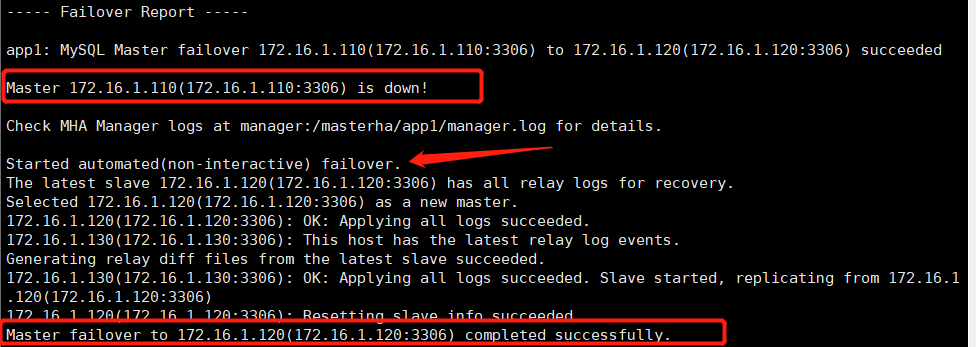
From the MHA log information, it can be seen that the original master has been hung up and failed over through the MHA mechanism. At last, the standby master (candidatemaster) was successfully replaced with a new master.
3) Check the replication of slave2:
#Log in mysql of the slave host and view the slave status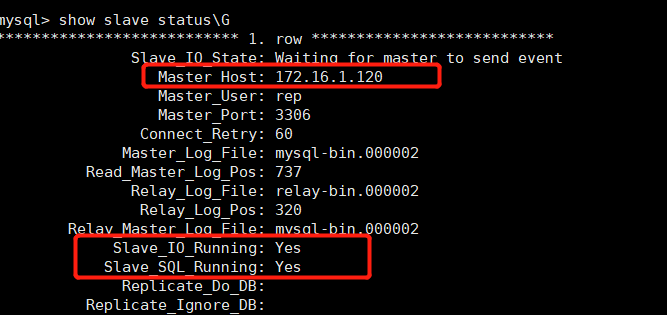
It can be seen that the ip address of the master is now 172.16.1.120, which has been switched to be synchronized with 172.16.1.120. It was originally synchronized with 172.16.1.110, which means that MHA has upgraded the standby master to a new master, IO thread and SQL thread are running normally, and the MHA is successfully built...
Main daily operation steps of MHA Manager
1) Check if there are any of the following files, and delete if there are.
#After the master-slave switch, the MHAmanager service will stop automatically, and the file app1.failover.complete will be generated under the manager's home directory (/ masterha/app1). To start MHA, you must ensure that there is no such file. If you have the following prompt, delete the file
//Tips:
 masterha/app1/app1.failover.complete [error]
[/usr/share/perl5/vendor_perl/MHA/MasterFailover.pm, ln298] Last failover was done at 2015/01/09 10:00:47.
Current time is too early to do failover again. If you want to do failover, manually remove /
masterha/app1/app1.failover.complete and run this script again.
[root@manager ~]# ps -ef | grep manager / / after failover, we can see that the service will stop automatically
root      20455  17892  0 15:28 pts/1    00:00:00 grep --color=auto manager
[root@manager ~]# ls /masterha/app1/
app1.failover.complete  manager.log
#Delete the file
[root@manager ~]# rm -rf /masterha/app1/app1.failover.complete
#I don't start the MHA service for the moment. If I want to start it at this time, I need to add the "- ignore fail on start" parameter, because when there is a slave node down, it can't be started by default (the original slave has been replaced by the master, so the MHA thinks that there is a slave not running). If I add this parameter, the MHA can be started even if the node is down, as shown below:
# #nohup masterha_manager --conf=/etc/masterha/app1.cnf --ignore_fail_on_start &>/tmp/mha_manager.log &
2) Check MHA replication check (master needs to be set to the secondary server of the candidcade)
#First, check the status of the new master:
mysql> show master status;
+------------------+----------+--------------+------------------+-------------------+
| File             | Position | Binlog_Do_DB | Binlog_Ignore_DB | Executed_Gtid_Set |
+------------------+----------+--------------+------------------+-------------------+
| mysql-bin.000002 |      737 |              |                  |                   |
+------------------+----------+--------------+------------------+-------------------+
1 row in set (0.00 sec)
#Set the recovered master as the slave server of the new master:
[root@master ~]# systemctl start mysqld   #service mysql start
// Log in mysql and configure master-slave replication
mysql> change master to master_host='172.16.1.120',master_port=3306,master_log_file='mysql-bin.000002',mastter_log_pos=737,master_user='rep',master_password='123.com'
    -> ;
Query OK, 0 rows affected, 2 warnings (0.06 sec)
mysql> start slave;
Query OK, 0 rows affected (0.00 sec)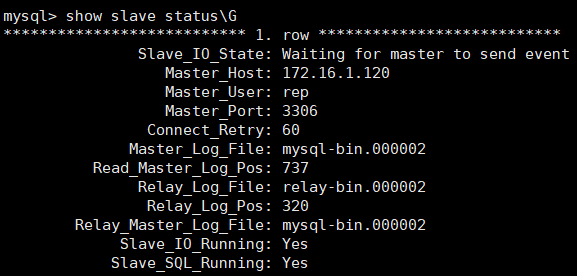
#The commands configured as master and slave can be viewed in the mha log (the password is not visible), so there is no need to log in to the master host to view the status:
#Cluster replication verification:
[root@manager ~]# masterha_check_repl --conf=/etc/masterha/app1.cnf

3) Start MHA:
[root@manager ~]# nohup masterha_manager --conf=/etc/masterha/app1.cnf &>/tmp/mha_manager.log &
[1] 20587
[root@manager ~]# ps -ef | grep manager
root      20587  17892  0 15:51 pts/1    00:00:00 perl /usr/local/bin/masterha_manager --conf=/etc/masterha/app1.cnf
root      20657  17892  0 15:52 pts/1    00:00:00 grep --color=auto manager
//You can see that MHA is back in operation
To stop MHA, execute the following command or kill the process number:
masterha_stop --conf=/etc/masterha/app1.cnf
4) Check log:
According to the MHA log, the master is just promoted to the master, and after the original master is restored, it becomes the slave of the current master, which represents the MHA to monitor again. If the master is hung up at this time, the MHA will still choose one of the slave above to be the master.
5) Delete relay logs periodically
In the configuration of master-slave replication, the parameter relay ﹣ log ﹣ purge = 0 is set on the slave, and the automatic deletion function is disabled. In order to ensure the performance of mysql, the slave node needs to delete the relay logs regularly (it is recommended that the time for each slave node to delete the relay logs be staggered)
#Scheduled tasks:
crontab -e
0 5 * * * /usr/local/bin/purge_relay_logs - -user=root --password=123.com --port=3306 --disable_relay_log_purge >> /var/log/purge_relay.log 2>&1
Summary: MHA software consists of two parts, Manager toolkit and Node toolkit. The specific instructions are as follows.
The manager toolkit mainly includes the following tools: masterha? Check? ssh (check the ssh configuration of MHA), master [check] repl (check the mysql replication status), master [Manager (start MHA), master [check] status (check the current MHA operation status), master [Master] monitor (check whether the master is down), master [Master] switch (control failover [automatic or manual]), master [conf] host (add or remove the configured server information) .
Node toolkits (these tools are usually provided by MHA Manager's script trigger, no need for human operation) mainly includes the following tools: save ﹣ binary ﹣ logs (save and copy the binary logs of the master), apply ﹣ diff ﹣ relay ﹣ logs (identify different relay log events and apply them to other slaves), filter ﹣ mysqlbinlog (remove unnecessary rollback events [MHA no longer uses this tool]), purge _Relay [logs].