2, MySQL introduction and installation
1 Introduction
Mysql database is subordinate to MySQL AB company, headquartered in Sweden and later acquired by Oracle.
Official website: https://www.mysql.com/
2 advantages
-
Low cost: open source, generally free to use.
-
High performance: fast execution.
-
Simple: easy to install and use.
3. MySQL version
-
Community Edition (free)
-
Enterprise Edition (charge)
Use the community edition as a learning tool.
4 MySQL installation
4.1 windows installation
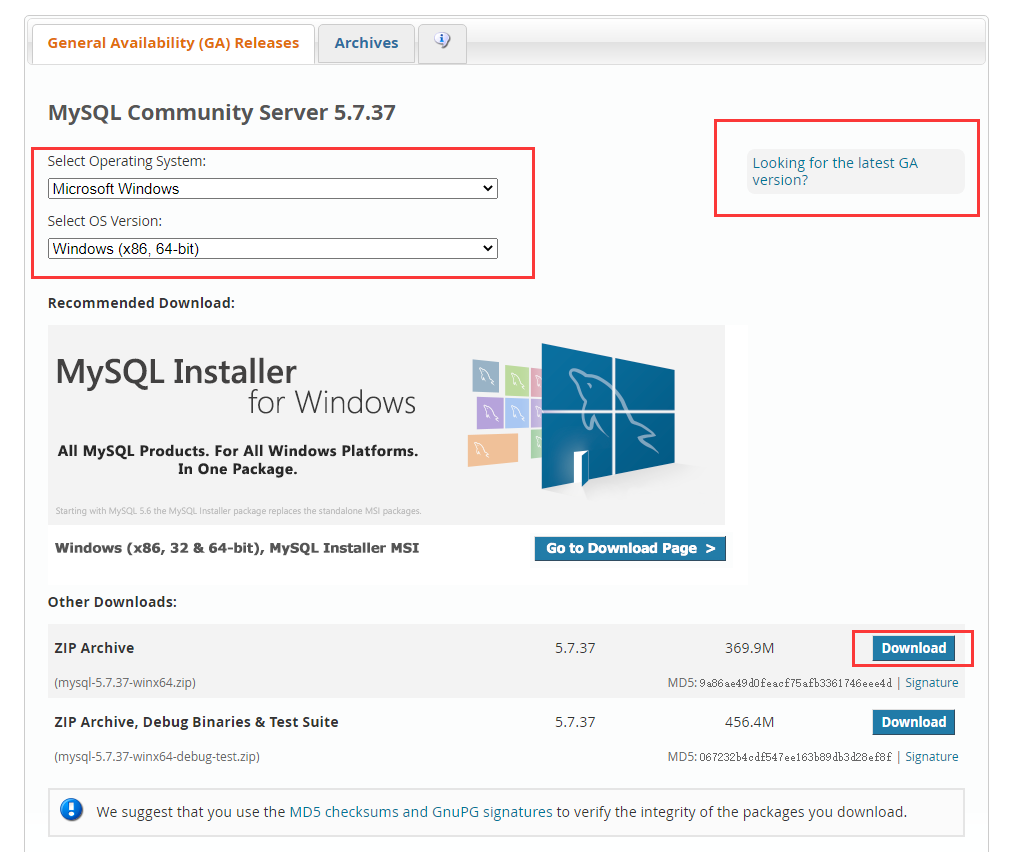
visit This page , select Windows version 5.7 to download, as shown in the figure:

After downloading, unzip and enter the bin directory to start mysqld Exe starts the service.
4.2 linux Installation
Install mysql5.0 with CentOS7 7 as an example, install using yum or up2date.
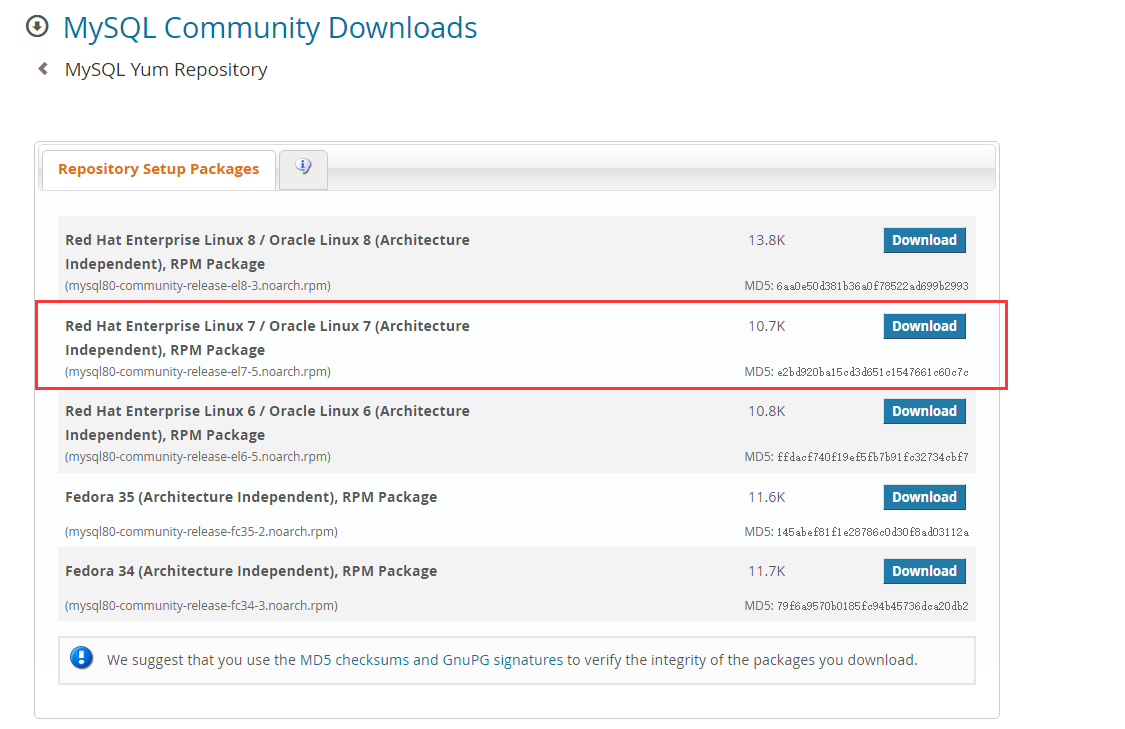
There is no mysql in the yum source of CentOS 7 by default. Download the repo source of mysql first, click here Get, as shown in the figure:

Copy the download link.
rpm -ivh https://dev.mysql.com/get/mysql80-community-release-el7-5.noarch.rpm
We can check whether the yum source has been successfully installed by the following methods:
[root@control-plane ~]# yum repolist enabled | grep "mysql.*-community.*"
mysql-connectors-community/x86_64 MySQL Connectors Community                 230
mysql-tools-community/x86_64      MySQL Tools Community                      138
mysql80-community/x86_64          MySQL 8.0 Community Server                 321
When you use this method to install mysql, you can see that the latest stable version of MySQL (MySQL 8.0 Community Server) will be installed by default. If you want to install the previous version, such as 5.7, you need to configure it.
First, let's check which sources of MySQL are disabled or enabled:
[root@control-plane ~]# yum repolist all | grep mysql
mysql-cluster-7.5-community/x86_64   MySQL Cluster 7.5 Community    Disable
mysql-cluster-7.5-community-source   MySQL Cluster 7.5 Community -  Disable
mysql-cluster-7.6-community/x86_64   MySQL Cluster 7.6 Community    Disable
mysql-cluster-7.6-community-source   MySQL Cluster 7.6 Community -  Disable
mysql-cluster-8.0-community/x86_64   MySQL Cluster 8.0 Community    Disable
mysql-cluster-8.0-community-source   MySQL Cluster 8.0 Community -  Disable
mysql-connectors-community/x86_64    MySQL Connectors Community     Enable:    230
mysql-connectors-community-source    MySQL Connectors Community - S Disable
mysql-tools-community/x86_64         MySQL Tools Community          Enable:    138
mysql-tools-community-source         MySQL Tools Community - Source Disable
mysql-tools-preview/x86_64           MySQL Tools Preview            Disable
mysql-tools-preview-source           MySQL Tools Preview - Source   Disable
mysql57-community/x86_64             MySQL 5.7 Community Server     Disable
mysql57-community-source             MySQL 5.7 Community Server - S Disable
mysql80-community/x86_64             MySQL 8.0 Community Server     Enable:    321
mysql80-community-source             MySQL 8.0 Community Server - S Disable
You can see that the version 8.0 series is now enabled. What we need to install is 5 X series. Then we can execute the following commands:
yum-config-manager --disable mysql80-community  #Disable version 8.0
yum-config-manager --enable mysql57-community  #Enable version 5.7 (enable whatever you need)
If the above command is prompted: - bash: Yum config Manager: command not found
Then we need to execute the following command to install a package: Yum install - y Yum utils. After successful execution, continue to execute the above command.
View again:
[root@control-plane ~]# yum repolist enabled | grep "mysql.*-community.*"
mysql-connectors-community/x86_64 MySQL Connectors Community                 230
mysql-tools-community/x86_64      MySQL Tools Community                      138
mysql57-community/x86_64          MySQL 5.7 Community Server                 564
Change to version 5.7 and you can start installing mysql.
yum install -y mysql-community-server
Start mysql service:
systemctl start mysqld  # Start service
systemctl status mysqld # View service status
If it is MySQL 5 Before version 7, the default password after installation is empty. You can enter directly by entering. MySQL5.7 will generate a random temporary password for the root user after installation. However, no matter which version of MySQL you install, which installation method you use, and whether you need a password to log in, always remember that the security of the database is greater than everything, so please set the password.
The MySQL installed this time does not have a password, but the system gives a default and temporary password. If it is the first installation and the service is not restarted repeatedly, open the MySQL default log file / var / log / mysqld Log, you can view:
# Search the temporary password and locate it in the log file
grep 'temporary password' /var/log/mysqld.log
After getting the password, you can log in:
mysql -uroot -p
Enter password:P&runEFZ_9E<
4.3 docker installation
With mysql5 7 as an example, you can search the official image on the docker hub:
docker pull mysql:5.7 # If you do not specify tag, the default is latest
Create container:
docker run -p 3306:3306 --name mysql -e MYSQL_ROOT_PASSWORD=123456 -d mysql:5.7
# MYSQL_ROOT_PASSWORD: root password
If you want to create a mysql container for directory mapping:
docker run -p 3306:3306 --name mysql \
-v /usr/local/docker/mysql/conf:/etc/mysql \
-v /usr/local/docker/mysql/logs:/var/log/mysql \
-v /usr/local/docker/mysql/data:/var/lib/mysql \
-e MYSQL_ROOT_PASSWORD=123456 \
-d mysql:5.7
After creation, you can connect to the 3306 port of the machine remotely.
5. MySQL uninstallation
5.1 windows uninstall
It's not difficult to uninstall windows. Please search the Internet yourself.
5.2 linux uninstall
First, query whether mysql is installed in the system
rpm -qa | grep -i mysql


View MySQL service status:
systemctl status mysqld
If the MySQL service is running, stop the MySQL service
systemctl stop mysqld
Uninstall the queried components:
mysql-community-common-5.7.37-1.el7.x86_64
mysql-community-client-5.7.37-1.el7.x86_64
mysql-community-server-5.7.37-1.el7.x86_64
mysql80-community-release-el7-5.noarch
mysql-community-libs-5.7.37-1.el7.x86_64
mysql-community-libs-compat-5.7.37-1.el7.x86_64
Command:
rpm -e --nodeps mysql-community-libs-compat-5.7.37-1.el7.x86_64
# Use this command to delete all components
Like Windows system, MySQL uninstallation is not only to uninstall the program, but also to delete the folder related to the program. To ensure the integrity of the uninstall.
View the folder corresponding to MySQL
find / -name mysql
# perhaps
whereis mysql
Just rm -rf the mysql directory found.
rm -rf  /usr/lib64/mysql
rm -rf  /usr/share/mysql
Delete MySQL profile
rm -rf /etc/my.cnf
rm -rf /etc/init.d/mysqld
Delete mysql user and user group
id mysql # View MySQL users and user groups
userdel mysql
Done.
5.3 docker unloading
docker unloading is simple. First, check the container id:
docker ps
Delete this container
docker stop containerID
docker rm containerID
If the data volume is mounted, delete the corresponding directory to complete the uninstall.
6. Change password
If it is a docker installation, you can specify the password when creating the container. windows and linux need to change the password and input commands in the terminal
mysqladmin -u user name -p password New password
# # Where username is the user name to modify the password, and newpwd is the new password to modify, such as
mysqladmin -uroot -p password 123456
If you are prompted when modifying: ERROR 1819 (HY000): Your password does not satisfy the current policy requirements, it indicates that the new password is relatively simple and does not comply with the password policy.
You can change the original temporary password by one digit and set the new password temporarily. For example:
mysqladmin -uroot -p password runEFZ_9E
After modification, log in to mysql and view the initial password policy of mysql
mysql> SHOW VARIABLES LIKE 'validate_password%';
+--------------------------------------+--------+
| Variable_name                        | Value  |
+--------------------------------------+--------+
| validate_password_check_user_name    | OFF    |
| validate_password_dictionary_file    |        |
| validate_password_length             | 8      |
| validate_password_mixed_case_count   | 1      |
| validate_password_number_count       | 1      |
| validate_password_policy             | MEDIUM |
| validate_password_special_char_count | 1      |
+--------------------------------------+--------+
7 rows in set (0.00 sec)
Parameters related to mysql password policy;
- validate_password_length is the total length of the fixed password. The default is 8 bits
- validate_password_dictionary_file specifies the file path of password authentication, which is empty by default
- validate_password_mixed_case_count the total number of upper / lower case letters in the whole password. The default value is 1
- validate_password_number_count the number of Arabic numerals at least in the whole password. The default value is 1
- validate_password_policy specifies the strength and authentication level of the password. The default is MEDIUM
- About validate_ password_ Value of policy:
- 0/LOW: verify length only
- 1/MEDIUM: verify the length, number, case and special characters
- 2/STRONG: verify the length, number, case, special characters and dictionary file
- validate_password_special_char_count the number of special characters that must be included in the whole password. The default value is 1
If you need to modify the password policy, use the following command:
mysql> set global validate_password_length=6;  # Set the total length of the password to 6 digits
mysql> set global validate_password_policy=LOW;  # Set the password strength verification level to LOW
Now you can set a simple password for mysql, as long as it meets the length of six digits. However, in the production environment, do not do so, and try to use high-strength passwords.
Introduce another way to change the password. When logging in to the mysql command line:
# Before MySQL version 5.7.6, users can use the following commands:
mysql> SET PASSWORD = PASSWORD('123456');
# Users starting with MySQL version 5.7.6 can use the following commands:
mysql> ALTER USER USER() IDENTIFIED BY '123456';

# If you don't know what version you are, you can try both.
Now, exit and log in again to test:
mysql -uroot -p123456
If the above method cannot be modified, the following security mode can be used to modify the root password:
Open / etc / my CNF file, add one line
skip-grant-tables
# Indicates that the security check is skipped (i.e. no password is required for login)
Restart service:
systemctl restart mysqld
Log in directly and log in successfully:
mysql -uroot
After logging in, switch to mysql database
mysql> use mysql
Database changed
View table structure
mysql> desc user;
It should be noted that the Password field is no longer available in versions above 5.7, but authentication is used instead_ String field.
Change Password:
mysql> update user set authentication_ String = 'password' where user ='root 'and host ='localhost'# 5.7 and above
MySQL > update user set password = 'password' where user ='root 'and host ='localhost'# 5.6 and below
mysql> FLUSH PRIVILEGES;
After the modification is successful, delete the newly added in the configuration file`skip-grant-tables`,Otherwise anyone can log in.

After deletion, restart the service again

```bash
systemctl restart mysqld
Done.
7 login and exit of MySQL service
On the computer with mysql client installed, connect the database through the command line:
mysql -h host name -P Port number -u user name -p password
# If you are connected locally, the host name and port may not be written, for example:
mysql -uroot -p
# -p you can enter the password according to the prompt instead of writing the password. In this way, the entered password is invisible
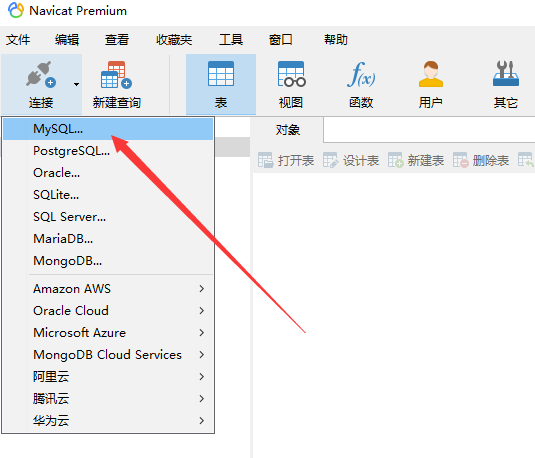
You can also connect to mysql through various tools, such as Navicat (download and install your own Internet search):
