catalogue
1, Master slave replication architecture and principle
1. Principle of mysql master-slave replication
2. Principle of read-write separation
2, Configure master-slave replication and read-write separation
2. Initial environmental preparation
3. Set up mysql master-slave replication
3. Build Amoeba to realize read-write separation
1. Reasons for inconsistency between master and slave
2. Repair method for master-slave inconsistency
3. How to avoid master-slave inconsistency
1, Master slave replication architecture and principle
1. Principle of mysql master-slave replication
mysql replication type:
Replication types supported by mysq
(1) STATEMENT: STATEMENT based replication. Execute sql statements on the server and the same statements on the slave server. mysql adopts STATEMENT based replication by default, with high execution efficiency.
(2) ROW: ROW based replication. Copy the changed content instead of executing the command from the server.
(3) MIXED: MIXED type replication. By default, statement based replication is adopted. Once it is found that statement based replication cannot be accurately copied, row based replication will be adopted.
Working process of mysql master-slave replication:
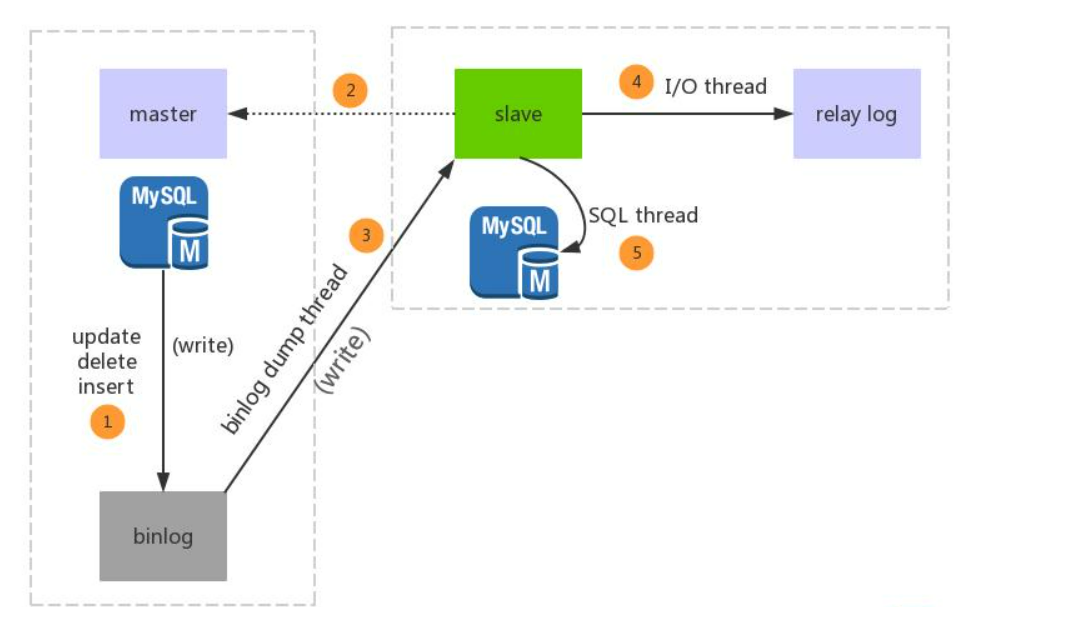
Principle and working process
Generate two threads from the library, one I/O thread and one SQL thread;
The i/o thread requests the binlog of the main database and writes the binlog log to the relay log file;
The master library will generate a log dump thread to transfer binlog to the slave library i/o thread;
The SQL thread will read the log in the relay log file and parse it into specific operations to achieve the consistency of master-slave operations, and the final data is one
To;
Role of replication: data distribution, load balancing, read operation, backup, high availability and failover, mysql upgrade test
Replication schema
Master slave replication related threads:
Master node:
dump Thread: start a dump Thread for each Slave I/O Thread to send binary log events
Slave node:
I/O Thread: request binary log events from the Master and save them in the relay log
SQL Thread: reads log events from the relay log and completes the replay locally
Copy files of related functions
-
master.info: used to save relevant information when slave connects to master, such as account, password, server address, etc
-
relay-log.info: saves the correspondence between the copied current binary log and the local relay log on the current slave node
-
mariadb-relay-bin.00000#: a relay log, which stores binary logs copied from the primary node. It is essentially a binary log
Delay of mysql master-slave replication
-
The master server is highly concurrent, forming a large number of transactions
-
Network delay
-
The master-slave hardware device causes cpu master frequency, memory io and hard disk io
-
It is not synchronous replication, but asynchronous replication. Optimize Mysql parameters from the library. For example, increase innodb_buffer_pool_size to allow more operations to be completed in Mysql memory and reduce disk operations. Use high-performance hosts from the library. Including strong cpu and increased memory. Avoid using virtual virtual hosts and use physical hosts, which improves the i/o complexity. The slave library uses SSD disk network optimization to avoid synchronization across machine rooms
2. Principle of read-write separation
What is read write separation
The basic principle of read-write separation is to let the main database handle transactional add, change and DELETE operations (INSERT, UPDATE and DELETE),
The SELECT query operation is processed from the database.
Database replication is used to synchronize changes caused by transactional operations to slave databases in the cluster.
Read write separation principle
MySQL read-write separation principle
Read write separation is to write only on the master server and read only on the slave server. The basic principle is to let the master database handle transactional operations and the select query from the database. Database replication is used to synchronize changes caused by transactional operations on the master database to the slave database in the cluster.
At present, the common MySQL read-write separation is divided into the following two types
1) Internal implementation based on program code
In the code, routing is classified according to select and insert. This kind of method is also the most widely used in production environment.
The advantage is better performance, because it is implemented in program code, and there is no need to add additional equipment for hardware expenditure; The disadvantage is that it needs developers to implement it, and the operation and maintenance personnel have no way to start.
However, not all applications are suitable for realizing read-write separation in program code. For example, some large and complex Java applications, if reading-write separation is realized in program code, the code will be greatly changed.
2) Implementation based on intermediate agent layer
The proxy is generally located between the client and the server. After receiving the client request, the proxy server forwards it to the back-end database through judgment. There are the following representative programs.
(1)MySQL-Proxy. MySQL proxy is an open source MySQL project, and SQL judgment is performed through its own lua script.
(2)Atlas. It is a data middle tier project based on MySQL protocol developed and maintained by the infrastructure team of Qihoo 360's Web Platform Department. Based on MySQL proxy version 0.8.2, it optimizes it and adds some new features. The MySQL service run by atlas in 360 carries billions of read and write requests every day. Support things and stored procedures.
(3)Amoeba. Developed by Chen Siru, the author once worked for Alibaba. The program is developed by the Java language and Alibaba uses it in the production environment. However, it does not support transactions and stored procedures.
Why read write separation
Because the "write" (writing 10000 pieces of data may take 3 minutes) operation of the database is time-consuming.
However, the "read" of the database (it may take only 5 seconds to read 10000 pieces of data).
Therefore, the separation of reading and writing solves the problem that the writing of the database affects the efficiency of query.
The database does not have to be read-write separated. If the program uses more databases, less updates and more queries, it will be considered.
The use of database master-slave synchronization, and then through read-write separation, can share the pressure of the database and improve the performance
Master-slave replication and read-write separation
In the actual production environment, the reading and writing of the database are in the same database server, which can not meet the actual needs. Whether in security, high availability or high concurrency, it can not meet the actual needs. Therefore, master-slave replication is used to synchronize data, and then read-write separation is used to improve the concurrent load capacity of the database. It is somewhat similar to rsync, but the difference is that rsync backs up disk files, while mysql master-slave replication backs up data and statements in the database.
2, Configure master-slave replication and read-write separation
1. Environment configuration
master server: 192.168.18.100 mysql5.7
slave1 server: 192.168.18.91 mysql5.7
slave2 server: 192.168.18.93 mysql5.7
Amoeba server: 192.168.18.90 jdk1.6,Amoeba
Client server: 192.168.18.109 mysql
2. Initial environmental preparation
Turn off firewall and selinux
[root@localhost ~]# systemctl stop firewalld
 You are /var/spool/mail/root New messages in
[root@localhost ~]# setenforce 0
[root@localhost ~]#    ###This operation is required for every machine to prevent impact
3. Set up mysql master-slave replication
1. Build time synchronization
Main service configuration:
Install time synchronization server
[root@localhost ~]# yum install ntp -y
Plug in loaded: fastestmirror, langpacks
centos                                    | 3.6 kB     00:00
Loading mirror speeds from cached hostfile
 software package ntp-4.2.6p5-25.el7.centos.2.x86_64 Installed and the latest version
Modify profile
[root@localhost ~]# vim /etc/ntp.conf

Open service
[root@localhost ~]# service ntpd start
Redirecting to /bin/systemctl start ntpd.service
Configure slave servers (same operation for two slave servers):
Install synchronization service
[root@localhost ~]# yum install ntpdate -y
 Plug in loaded: fastestmirror, langpacks
Loading mirror speeds from cached hostfile
 software package ntpdate-4.2.6p5-25.el7.centos.2.x86_64 Installed and the latest version
 No treatment is required
Open service
[root@localhost ~]# service ntpd start
Redirecting to /bin/systemctl start ntpd.service
Time synchronization with primary server
[root@localhost ~]# /usr/sbin/ntpdate 192.168.18.100
 7 Dec 14:01:57 ntpdate[72726]: the NTP socket is in use, exiting
Set the synchronization time of cyclic tasks every 30 minutes
[root@localhost ~]# crontab -e

*/30 * * * *  /usr/sbin/ntpdate 192.168.18.100


: wq


crontab: installing new crontab    #Task created successfully
2. Configure master-slave
Master server configuration
Open binary log to modify configuration file
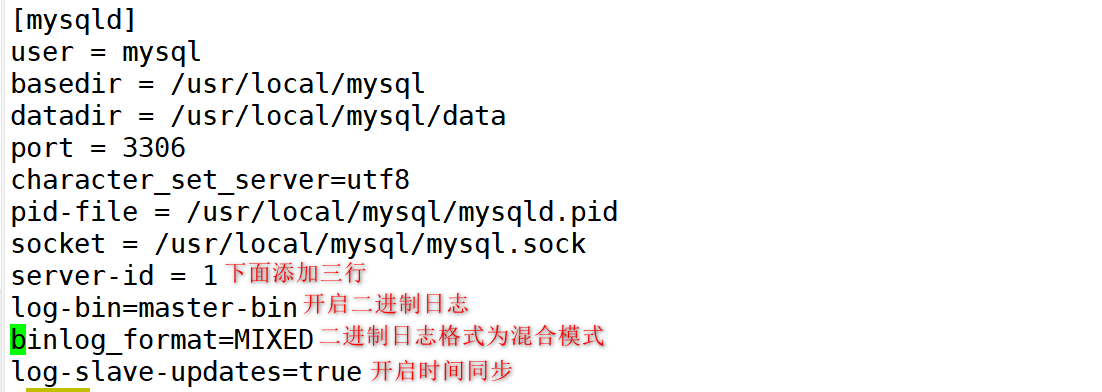
Restart the service and enter the database
[root@localhost ~]# systemctl restart mysqld.service
[root@localhost ~]# mysql -uroot -p123123
mysql: [Warning] Using a password on the command line interface can be insecure.
Configure replication master-slave configuration
(root@localhost) [(none)]> grant replication slave on *.* to 'myslave'@'192.168.18.%' identified by '123456';
Query OK, 0 rows affected, 1 warning (0.01 sec)
(root@localhost) [(none)]> flush privileges;    ##Refresh configuration
Query OK, 0 rows affected (0.00 sec)
View primary server
(root@localhost) [(none)]> show master status;
+-------------------+----------+--------------+------------------+-------------------+
| File              | Position | Binlog_Do_DB | Binlog_Ignore_DB | Executed_Gtid_Set |
+-------------------+----------+--------------+------------------+-------------------+
| master-bin.000001 |      603 |              |                  |                   |
+-------------------+----------+--------------+------------------+-------------------+
1 row in set (0.00 sec)
Configure slave servers (two slave servers have the same configuration):
Add log configuration
[root@localhost ~]# vim /etc/my.cnf
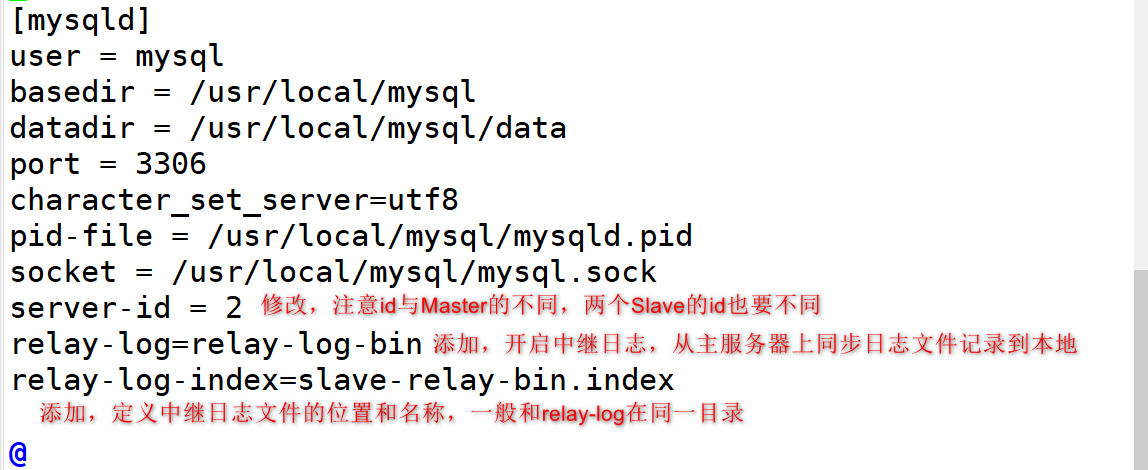
Restart the service and enter the database
[root@localhost ~]# systemctl restart mysqld.service
[root@localhost ~]# mysql -uroot -p123123
3mysql: [Warning] Using a password on the command line interface can be insecure.
View configuration format
mysql> help change master to

CHANGE MASTER TO
  MASTER_HOST='master2.mycompany.com',
  MASTER_USER='replication',
  MASTER_PASSWORD='bigs3cret',
  MASTER_PORT=3306,
  MASTER_LOG_FILE='master2-bin.001',
  MASTER_LOG_POS=4,
  MASTER_CONNECT_RETRY=10;
Slave server configuration (the user password should be consistent with the master service configuration, and the binary log and node should be consistent with the view of the master server)
mysql> change master to
    -> master_host='192.168.18.100',master_user='myslave',mmaster_password='123456',master_log_file='master-bin.0000011',master_log_pos=603;
Query OK, 0 rows affected, 2 warnings (0.01 sec)
Start the service and check the startup status
mysql> start slave;
Query OK, 0 rows affected (0.00 sec)

mysql> show slave status\G
*************************** 1. row ***************************
               Slave_IO_State: Waiting for master to send event
                  Master_Host: 192.168.18.100
                  Master_User: myslave
                  Master_Port: 3306
                Connect_Retry: 60
              Master_Log_File: master-bin.000001
          Read_Master_Log_Pos: 603
               Relay_Log_File: relay-log-bin.000002
                Relay_Log_Pos: 321
        Relay_Master_Log_File: master-bin.000001
             Slave_IO_Running: Yes   ##  If both items are yes, the configuration is successful
            Slave_SQL_Running: Yes   ##  If both items are yes, the configuration is successful
              Replicate_Do_DB:
          Replicate_Ignore_DB:
           Replicate_Do_Table:
       Replicate_Ignore_Table:
      Replicate_Wild_Do_Table:
  Replicate_Wild_Ignore_Table:
                   Last_Errno: 0
                   Last_Error:
                 Skip_Counter: 0
          Exec_Master_Log_Pos: 603
              Relay_Log_Space: 526
              Until_Condition: None
               Until_Log_File:
                Until_Log_Pos: 0
           Master_SSL_Allowed: No
           Master_SSL_CA_File:
           Master_SSL_CA_Path:
Verify master-slave replication function
On primary server
(root@localhost) [(none)]> show databases;
+--------------------+
| Database           |
+--------------------+
| information_schema |
| bbs                |
| mysql              |
| performance_schema |
| sys                |
+--------------------+
5 rows in set (0.01 sec)

(root@localhost) [(none)]> create database test;   ##Create Library
Query OK, 1 row affected (0.00 sec)

(root@localhost) [(none)]> show databases;
+--------------------+
| Database           |
+--------------------+
| information_schema |
| bbs                |
| mysql              |
| performance_schema |
| sys                |
| test               |
+--------------------+
6 rows in set (0.00 sec)

(root@localhost) [(none)]> use test;
Database changed
(root@localhost) [test]> create table test1(id int,name char(20),age char(10));
Query OK, 0 rows affected (0.00 sec) ##Create table

(root@localhost) [test]> show tables;  ##View table
+----------------+
| Tables_in_test |
+----------------+
| test1          |
+----------------+
1 row in set (0.00 sec)
View from server 192.168.18.91
mysql> show databases;
+--------------------+
| Database           |
+--------------------+
| information_schema |
| mysql              |
| performance_schema |
| sys                |
| test               |
+--------------------+
5 rows in set (0.00 sec)

mysql> use test;
Reading table information for completion of table and column names
You can turn off this feature to get a quicker startup with -A

Database changed
mysql> show tables;
+----------------+
| Tables_in_test |
+----------------+
| test1          |
+----------------+
1 row in set (0.00 sec)
View from server 192.168.18.93
mysql> show databases;
+--------------------+
| Database           |
+--------------------+
| information_schema |
| mysql              |
| performance_schema |
| sys                |
| test               |
+--------------------+
5 rows in set (0.00 sec)

mysql> use test;
Reading table information for completion of table and column names
You can turn off this feature to get a quicker startup with -A

Database changed
mysql> show tables;
+----------------+
| Tables_in_test |
+----------------+
| test1          |
+----------------+
1 row in set (0.00 sec)
The database tables created on the master server are all available on the slave server, indicating that the master-slave replication is complete and there is no problem
3. Build Amoeba to realize read-write separation
Install amoeba
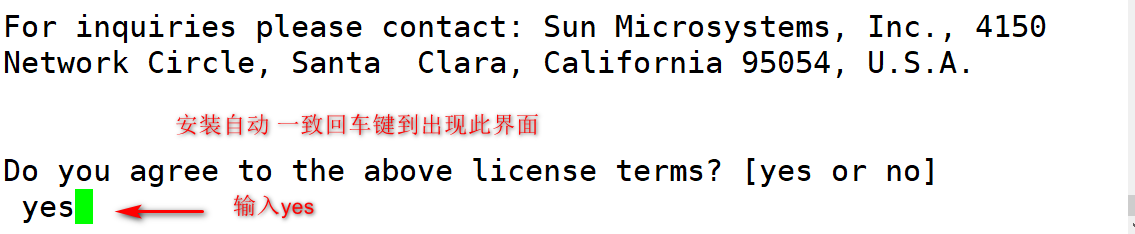
Because Amoeba is developed based on jdk1.5, it is officially recommended to use jdk1.5 or 1.6, and the higher version is not recommended.
Installing the Java environment
[root@localhost opt]# cd /opt
[root@localhost opt]# ls
amoeba-mysql-binary-2.2.0.tar.gz  jdk-6u14-linux-x64.bin   ##Prepare the installation package
[root@localhost opt]# cp jdk-6u14-linux-x64.bin /usr/local/  #Copy to specified location
[root@localhost opt]# chmod +x /usr/local/jdk-6u14-linux-x64.bin #Grant Execution Authority
[root@localhost opt]# cd /usr/local/ #Enter file location
[root@localhost local]# ls   ##see
bin  games    jdk-6u14-linux-x64.bin  lib64    sbin   src
etc  include  lib                     libexec  share
[root@localhost local]# ./jdk-6u14-linux-x64.bin  ##install
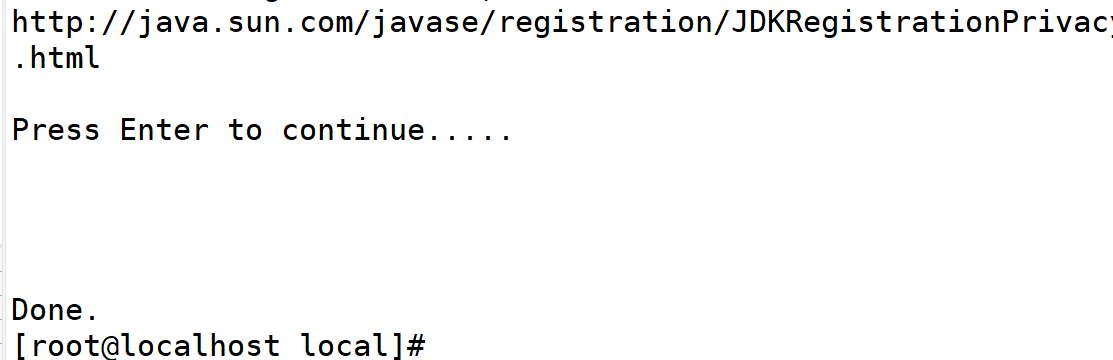
done installation complete appears
Change your name
[root@localhost local]# mv jdk1.6.0_14/ jdk1.6
Modify the configuration file and add variables at the end
[root@localhost local]# vim /etc/profile


done

unset i
unset -f pathmunge
export JAVA_HOME=/usr/local/jdk1.6
export CLASSPATH=$CLASSPATH:$JAVA_HOME/lib:$JAVA_HOME/jre/lib
export PATH=$JAVA_HOME/lib:$JAVA_HOME/jre/bin/:$PATH:$HOME/bin
export AMOEBA_HOME=/usr/local/amoeba
export PATH=$PATH:$AMOEBA_HOME/bin
"/etc/profile" 82L, 2028C                   82,1         bottom
Refresh configuration
[root@localhost local]# source /etc/profile
Create amoeba installation directory and unzip the installation package
[root@localhost local]# mkdir /usr/local/amoeba
[root@localhost local]# cd /opt
[root@localhost opt]# ls
amoeba-mysql-binary-2.2.0.tar.gz  jdk-6u14-linux-x64.bin
[root@localhost opt]# tar zxvf amoeba-mysql-binary-2.2.0.tar.gz
 -C /usr/local/amoeba  ##Unzip to the specified location
Give permissions to files
[root@localhost opt]# chmod -R 755 /usr/local/amoeba/

[root@localhost opt]# /usr/local/amoeba/bin/amoeba
amoeba start|stop
##If amoeba start|stop is displayed, the installation is successful
#Configure Amoeba read-write separation and two Slave read-write load balancing##
#First, open the permission to Amoeba on the mysql of Master, Slave1 and Slave2
mysql> grant all on *.* to test@'192.168.18.%' identified by '123123';
Query OK, 0 rows affected, 1 warning (0.00 sec)

mysql> flush privileges;
Query OK, 0 rows affected (0.00 sec)

mysql> ###The mysql of the master and the two slave should be granted permissions
Modify amoeba server configuration
[root@localhost opt]# cd /usr/local/amoeba/conf/
[root@localhost conf]# cp amoeba.xml amoeba.xml.bak
##When modifying a configuration file, it is generally necessary to back up the configuration file to prevent errors
[root@localhost conf]# vim amoeba.xml   ##Modify global profile

 30                  <property name="user">amoeba</property>
                     ##Set login user name on line 30
 32                  <property name="password">123456</property>
                     ##Line 32 set password

115             <property name="defaultPool">master</property>
116                  ##Set the default pool to master
117                  ##Line 117 uncomment
118             <property name="writePool">master</property>
                     ##Line 118 set write pool
119             <property name="readPool">slaves</property>
                     ##Set the read pool in line 119
120                  ##Line 120 uncomment


:wq
Modify profile
[root@localhost conf]# vim dbServers.xml


23         <!--      <property name="schema">test</property>  -->
             ###Line 23 comments
26                     <property name="user">test</property>
             ###Line 26 sets the login user
29             <property name="password">123123</property>
             ###Remove the comments in lines 28 and 30 and add the password
45         <dbServer name="master"  parent="abstractServer">
             ###Modify service pool name
48          <property name="ipAddress">192.168.18.100</property>
             ###Add service address
52         <dbServer name="slave1"  parent="abstractServer">
53                 <factoryConfig>
54                         <!-- mysql ip -->
55             <property name="ipAddress">192.168.18.91</property>
56                 </factoryConfig>
57         </dbServer>

             ###Add from service node 1 and address, copy 6 lines to add another node
58         <dbServer name="slave2"  parent="abstractServer">
59                 <factoryConfig>
60           <!-- mysql ip -->
61         <property name="ipAddress">192.168.18.93</property>
62             </factoryConfig>
63         </dbServer>
65         <dbServer name="slaves" virtual="true">
              ###Define pool name
71       <property name="poolNames">slave1,slave2</property>
              ###Write the node name

:wq
Open service
[root@localhost conf]# amoeba start
log4j:WARN log4j config load completed from file:/usr/local/amoeba/conf/log4j.xml
2021-12-07 16:24:20,788 INFO  context.MysqlRuntimeContext - Amoeba for Mysql current versoin=5.1.45-mysql-amoeba-proxy-2.2.0
log4j:WARN ip access config load completed from file:/usr/local/amoeba/conf/access_list.conf
2021-12-07 16:24:21,035 INFO  net.ServerableConnectionManager - Amoeba for Mysql listening on 0.0.0.0/0.0.0.0:8066.
2021-12-07 16:24:21,037 INFO  net.ServerableConnectionManager - Amoeba Monitor Server listening on /127.0.0.1:50103.
###It can be run in the background
see
[root@localhost conf]# netstat -natp|grep java
tcp6       0      0 127.0.0.1:60948         :::*                    LISTEN      3731/java
tcp6       0      0 :::8066                 :::*                    LISTEN      3731/java
tcp6       0      0 192.168.18.90:52704     192.168.18.91:3306      ESTABLISHED 3731/java
tcp6       0      0 192.168.18.90:59826     192.168.18.100:3306     ESTABLISHED 3731/java
tcp6       0      0 192.168.18.90:39724     192.168.18.93:3306      ESTABLISHED 3731/java
Client authentication
[root@localhost ~]# mysql -u amoeba -p -h 192.168.18.90 -P8066
Enter password:      ##Password 123456
Welcome to the MySQL monitor.  Commands end with ; or \g.
Your MySQL connection id is 63243527
Server version: 5.1.45-mysql-amoeba-proxy-2.2.0 Source distribution

Copyright (c) 2000, 2017, Oracle and/or its affiliates. All rights reserved.

Oracle is a registered trademark of Oracle Corporation and/or its
affiliates. Other names may be trademarks of their respective
owners.

Type 'help;' or '\h' for help. Type '\c' to clear the current input statement.

mysql>
mysql> show variables like 'general%';  ##View global log
+------------------+-------------------------------------+
| Variable_name    | Value                               |
+------------------+-------------------------------------+
| general_log      | OFF                                 |
| general_log_file | /usr/local/mysql/data/localhost.log |
+------------------+-------------------------------------+
2 rows in set (0.00 sec)
Verify read
Add data to two slave servers respectively
mysql> select *from test1;
+------+------+------+
| id   | name | age  |
+------+------+------+
|    1 | jj   | 20   |
+------+------+------+
1 row in set (0.00 sec)

mysql> insert into test1 values(2,'qq',24);
Query OK, 1 row affected (0.00 sec)
mysql> select *from test1;
+------+------+------+
| id   | name | age  |
+------+------+------+
|    1 | jj   | 20   |
+------+------+------+
1 row in set (0.00 sec)

mysql> insert into test1 values(3,'ww',12);
Query OK, 1 row affected (0.01 sec)
Read test on client
mysql> select *from test1;
+------+------+------+
| id   | name | age  |
+------+------+------+
|    1 | jj   | 20   |
|    2 | qq   | 24   |
+------+------+------+
2 rows in set (0.01 sec)

mysql> select *from test1;
+------+------+------+
| id   | name | age  |
+------+------+------+
|    1 | jj   | 20   |
|    3 | ww   | 12   |
+------+------+------+
2 rows in set (0.00 sec)
mysql> select *from test1;
+------+------+------+
| id   | name | age  |
+------+------+------+
|    1 | jj   | 20   |
|    2 | qq   | 24   |
+------+------+------+
2 rows in set (0.00 sec)

##Read is polled once per slave server
##Read is reading data from the server polling
Verify write:
Open global log on master-slave server
(root@localhost) [test]> set global general_log=1;
Query OK, 0 rows affected (0.01 sec)

(root@localhost) [test]> show variables like 'general%';
+------------------+-------------------------------------+
| Variable_name    | Value                               |
+------------------+-------------------------------------+
| general_log      | ON                                  |
| general_log_file | /usr/local/mysql/data/localhost.log |
+------------------+-------------------------------------+
2 rows in set (0.00 sec)
Shut down the slave server from the service
mysql> stop slave;
Query OK, 0 rows affected (0.00 sec)
View master-slave server log files in real time
[root@localhost ~]# tail -f /usr/local/mysql/data/localhost.log
Test on client
mysql> insert into test1 values(4,'gg',3);
Query OK, 1 row affected (0.02 sec)
Master server log
[root@localhost ~]# tail -f /usr/local/mysql/data/localhost.log
/usr/local/mysql/bin/mysqld, Version: 5.7.20-log (Source distribution). started with:
Tcp port: 3306  Unix socket: /usr/local/mysql/mysql.sock
Time                 Id Command    Argument
2021-12-07T09:32:20.142636Z	    3 Query	show variables like 'general%'
2021-12-07T09:38:03.533656Z	   37 Init DB	test
2021-12-07T09:38:03.534453Z	   37 Query	insert into test1 values(4,'gg',3)
Log from server
[root@localhost ~]# tail -f /usr/local/mysql/data/localhost.log
/usr/local/mysql/bin/mysqld, Version: 5.7.20 (Source distribution). started with:
Tcp port: 3306  Unix socket: /usr/local/mysql/mysql.sock
Time                 Id Command    Argument
2021-12-07T09:34:02.027694Z	   20 Query	stop slave
2021-12-07T09:39:08.872605Z	   39 Connect	test@192.168.18.90 on  using TCP/IP
2021-12-07T09:39:08.873539Z	   40 Connect	test@192.168.18.90 on  using TCP/IP
2021-12-07T09:39:08.874374Z	   41 Connect	test@192.168.18.90 on  using TCP/IP
##The master server has write operations, but the slave server has no write operations
The above operations can verify the read-write separation and read load balancing
3, Practical problems
1. Reasons for inconsistency between master and slave
-
The binlog format of the master library is Statement. After synchronization to the slave library, the master and slave may be inconsistent.
-
Set SQL is executed before the main database changes_ log_ If bin = 0, the master database will not record binlog, and the slave database will not be able to change this part of data.
-
The slave node is not set to read-only, and the data is written incorrectly
-
Unexpected downtime of the master database or slave database may cause damage to binlog or relaylog files, resulting in inconsistency between the master and slave databases
-
The versions of the master and slave instances are inconsistent, especially when the higher version is the master and the lower version is the slave, the functions supported on the master database are never supported
-
This function may not be supported on the database
-
MySQL bug
2. Repair method for master-slave inconsistency
-
Re implement from library
Although this is also a solution, the recovery time of this scheme is relatively slow, and sometimes the slave database also undertakes part of the query
Operation, can not be rebuilt rashly.
-
Using the percona toolkit tool to assist
PT toolkit contains two tools, Pt table checksum and Pt table sync, which are mainly used to detect whether the master and slave are consistent and repair
Inconsistency of complex data. This scheme has the advantages of fast repair speed and no need to stop master-slave assistance. The disadvantage is that it requires knowledge accumulation and time to learn and test, especially in the production environment. It should be used carefully
-
Manually rebuild inconsistent tables
In the slave database, it is found that some tables are inconsistent with the data of the master database, and the data volume of these tables is relatively large. It is unrealistic to compare the data manually, and it is slow to redo the whole database. At this time, you can redo only these tables to repair the inconsistency between the master and slave database
The disadvantage of this scheme is that you need to temporarily stop copying from the library during import, but it is also acceptable
Example: the master-slave data of tables a, B and C are inconsistent
3. How to avoid master-slave inconsistency
-
The binlog of the main database is in ROW format
-
The master-slave instance database version is consistent
-
The master database controls the account permissions and cannot execute set sql_log_bin=0
-
Read only is enabled from the library, and manual writing is not allowed
-
Conduct master-slave consistency inspection regularly