I preface
In enterprise applications, mature businesses usually have a large amount of data
A single MySQL cannot meet the actual needs in terms of security, high availability and high concurrency
Configure multiple master-slave database servers to realize read-write separation.
II Principle of master-slave replication
1.mysql replication type
(1) STATEMENT (based on SQL STATEMENT):
Every sql related to the modified sql will be recorded in binlog
Disadvantages: the log volume is too large, such as sleep() function and last_ insert_ ID () >, user defined fuctions (udf), master-slave replication and other architectures will have problems logging
(2) Row (row based)
Only change records are recorded, not the sql context
Disadvantages: if update... set... where true is encountered, the amount of binlog data will become larger and larger
(3) MIXED recommended
General statements use statement, and functions are stored in ROW mode
2. Detailed explanation of master-slave replication process
(1) Core point
2 logs, 3 threads
Inside the master is the binary log bin_log, dump thread
In the slave is the relay log relay_log. i/o threads and sql threads
(2) Detailed replication process
① The dump thread on the master listens to the binary log bin_log. If there is any update, the i/o thread of the slave will be notified
② The i/o thread on the slave will request to update the update content of the synchronization binary
③ The dump thread will synchronize the updated log contents to the slave, and the slave i/o thread will write the updated log contents to its relay log
④ The sql thread of slave will synchronously execute the update statements in the log into the database to achieve the consistency of the contents of the master database
III Master slave replication strategy
1. Full synchronization
When the master requests a service, it will not respond to the client until the slave is fully synchronized
2. Semi synchronous
When the master requests a service, it only needs to synchronize any slave
3. Asynchronous
When the master requests a service, it will respond to the request as long as the master is synchronized, regardless of the slave status; Default state
Because the default policy of master-slave replication is asynchronous, the result is that the storage memory of master-slave binary logs and relay logs will become larger and larger
IV Set up master-slave replication
1. Construction preparation
Three linux and CentOS 7 versions, one as mysql master server and two as mysql slave server. Turn off firewall and core protection
master: 192.168.206.88
slave1:192.168.206.188
slave2:192.168.206.177
2. Install mysql server
Three hosts manually compile and install mysql database at the same time. Version 5.7 is installed here.
3. Master slave time synchronization
(1) master configuration
① Install ntp and modify the configuration file
[root@master ~]# yum -y install ntp

[root@master ~]# ntpdate ntp.aliyun.com
20 Jul 15:08:10 ntpdate[1651]: adjust time server 203.107.6.88 offset 0.003463 sec

[root@master ~]# vim /etc/ntp.conf

server 127.127.1.0				#Set this machine as the time synchronization source
fudge 127.127.1.0 stratum 10	#Setting the local time level to level 10 means providing time synchronization sources to other servers. It cannot be set to level 0

[root@master ~]# crontab -e
no crontab for root - using an empty one
crontab: installing new crontab
[root@master ~]# crontab -l
*/10 * * * *  /usr/sbin/ntpdate 192.168.206.88
② Restart ntp
[root@master ~]# systemctl start ntpd
(2) 2 slave configurations
[root@slave1 ~]# yum -y install ntp

[root@slave1 ~]# ntpdate ntp.aliyun.com
20 Jul 15:08:10 ntpdate[1651]: adjust time server 203.107.6.88 offset 0.003463 sec

[root@slave2 ~]# yum -y install ntp

[root@slave2 ~]# ntpdate ntp.aliyun.com
20 Jul 15:08:10 ntpdate[1651]: adjust time server 203.107.6.88 offset 0.003463 sec

[root@slave1 ~]# crontab -e
crontab: installing new crontab
[root@slave1 ~]# crontab -l
*/10 * * * * /usr/sbin/ntpdate 192.168.206.88
[root@slave1 ~]# systemctl start ntpd
[root@slave1 ~]# ntpdate 192.168.206.88
20 Jul 17:28:24,from ntpdate[16023]: the NTP socket is in use, exiting


[root@slave2 ~]#  crontab -e
no crontab for root - using an empty one
crontab: installing new crontab
[root@slave2 ~]#  crontab -l
*/10 * * * * /usr/sbin/ntpdate 192.168.206.88
[root@slave2 ~]# systemctl start ntpd
[root@slave2 ~]# ntpdate 192.168.206.88
20 Jul 17:28:47 ntpdate[44686]: the NTP socket is in use, exiting
4. The master and slave respectively open their own log files
(1) master configuration
Start binaries from the server
[root@master ~]# vim /etc/my.cnf

server-id = 11
log_bin=master-bin
log_slave_updates=true

[root@master ~]# systemctl restart mysqld
(2) slave1 configuration
[root@slave1 ~]# vim /etc/my.cnf		#Enable relay log for slave1

[mysqld]
server-id = 22
relay-log=relay-log-bin					#Synchronize log file records from the primary server to the local
relay-log-index=slave-relay-bin.index	#Define the location and name of the relay log

[root@slave1 ~]# systemctl restart mysqld
(3) slave2 configuration
[root@slave2 ~]# vim /etc/my.cnf		#Enable relay log for slave2

[mysqld]
server-id = 33
relay-log=relay-log-bin					#Synchronize log file records from the primary server to the local
relay-log-index=slave-relay-bin.index	#Define the location and name of the relay log

[root@slave2 ~]# systemctl restart mysqld
5. Configuration rules
(1) master settings
grant the right to the slave server; For master-slave docking
[root@master ~]# mysql -uroot -p			#Login database

mysql> grant replication slave on *.* to 'myslave'@'192.168.206.%' identified by '123456';
Query OK, 0 rows affected, 1 warning (0.00 sec)

mysql> flush privileges;
Query OK, 0 rows affected (0.00 sec)

mysql> show master status;
+-------------------+----------+--------------+------------------+-------------------+
| File              | Position | Binlog_Do_DB | Binlog_Ignore_DB | Executed_Gtid_Set |
+-------------------+----------+--------------+------------------+-------------------+
| master-bin.000003 |     1053 |              |                  |                   |
+-------------------+----------+--------------+------------------+-------------------+
1 row in set (0.00 sec)


mysql> quit
Bye

[root@master ~]# cd /usr/local/mysql/data

[root@master data]# ls
auto.cnf        ib_logfile0  master-bin.000001  master-bin.index    sys
ib_buffer_pool  ib_logfile1  master-bin.000002  mysql
ibdata1         ibtmp1       master-bin.000003  performance_schema
(2) slave1 settings
[root@slave1 ~]# mysql -uroot -pqwer1234			#Login database

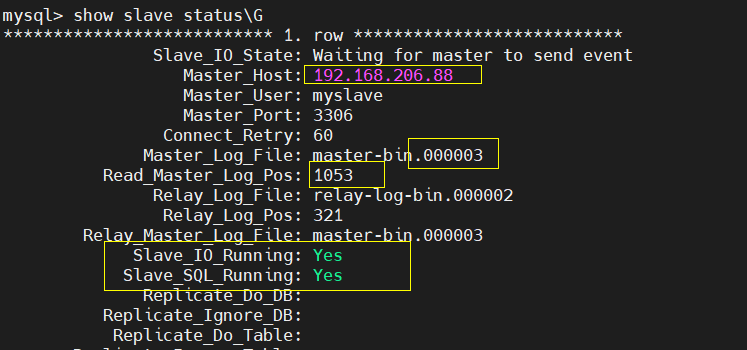
mysql> change master to master_host='192.168.206.88',master_user='myslave',master_password='123456',master_log_file='master-bin.000003',master_log_pos=1053;					#The slave server is authorized to copy all tables in all databases of msater using the identity of slave, and the password is 123456
Query OK, 0 rows affected, 2 warnings (0.01 sec)

mysql> start slave;
Query OK, 0 rows affected (0.00 sec)

mysql> show slave status\G							#View slave server status
(3) slave2 configuration
[root@slave2 ~]# mysql -uroot -pqwer1234			#Login database

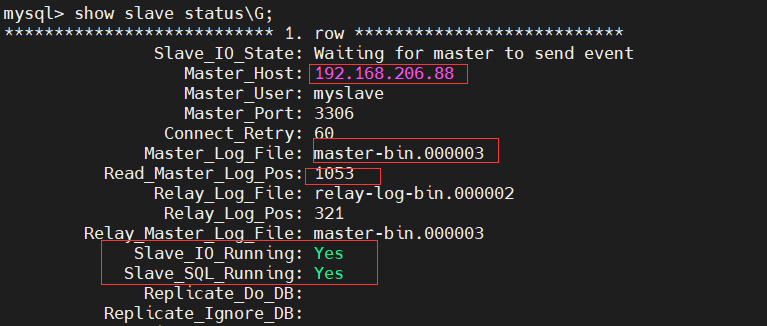
mysql> change master to master_host='192.168.206.88',master_user='myslave',master_password='123456',master_log_file='master-bin.000003',master_log_pos=1053;					#The slave server is authorized to copy all tables in all databases of msater using the identity of slave, and the password is 123456
Query OK, 0 rows affected, 2 warnings (0.01 sec)

mysql> start slave;
Query OK, 0 rows affected (0.00 sec)

mysql> show slave status\G							#View slave server status
6. Test for synchronization
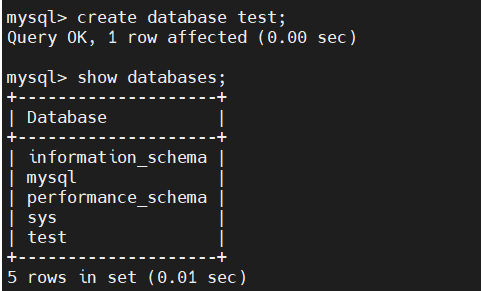
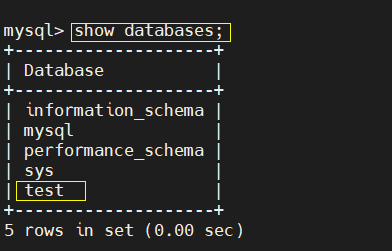
(1) master creates a library
(2) Check whether to synchronize on slave1
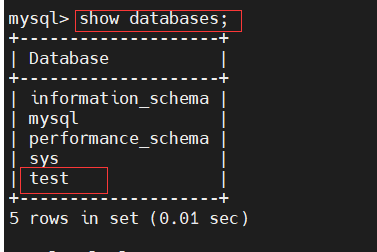
(2) Check whether to synchronize on slave2
V Read write separation
1. Principle
Read write separation is to write only on the master server and read only on the slave server
The basic principle is to let the master database handle transactional queries,
The select query is processed from the database. Database replication is used to synchronize changes caused by transactional queries on the master database to the slave database in the cluster
2. Why do you want to separate reading and writing
Because the "write" (writing 10000 pieces of data may take 3 minutes) operation of the database is time-consuming.
But the "read" of the database (it may take only 5 seconds to read 10000 pieces of data)
Therefore, the separation of reading and writing solves the problem that the writing of the database affects the efficiency of query
3. Benefits of separation of reading and writing
The database does not have to be read-write separated. If the program uses more databases, less updates and more queries, it will be considered.
The use of database master-slave synchronization, and then through read-write separation, can share the pressure of the database and improve the performance
4. Implementation scheme
Common MySQL read / write separation can be divided into the following two types:
(1) Internal implementation based on program code
In the code, routing is classified according to select and insert. This kind of method is also the most widely used in production environment.
The advantage is better performance, because it is implemented in program code, and there is no need to add additional equipment for hardware expenditure;
The disadvantage is that it needs developers to implement it, and the operation and maintenance personnel have no way to start.
However, not all applications are suitable for realizing read-write separation in program code. For example, some large and complex Java applications, if reading-write separation is realized in program code, the code will be greatly changed.
(2) Implementation based on intermediate agent layer
The proxy is generally located between the client and the server. After receiving the client request, the proxy server forwards it to the back-end database through judgment;
There are the following representative procedures:
① MySQL proxy: MySQL proxy is an open source project of MySQL. It uses its own lua script (script language) to judge SQL.
② Atlas: a data middle tier project based on MySQL protocol developed and maintained by the infrastructure team of Qihoo 360's Web Platform Department. It is in mysql-proxy0 Based on version 8.2, it is optimized and some new functional features are added. The MySQL service run by atlas in 360 carries billions of read and write requests every day. Support things and stored procedures.
③ Amoeba: developed by Chen Siru. The author once worked for Alibaba. The program is developed by the Java language and Alibaba uses it in the production environment. However, it does not support transactions and stored procedures.
5. Introduction to amoeba
Amoeba: it is a proxy with MySQL as the underlying data storage and corresponding MySQL protocol interface, nicknamed amoeba
When the read request is sent to the slave server, the polling scheduling algorithm is adopted
amoeba is written in java language, and the configuration file is xml
amoeba is mainly responsible for an external proxy IP
When accessing this IP, if the request sent is a "write" request, it will be forwarded to the primary server
When the sent request is "read", it will be forwarded to the slave server through scheduling, and the polling algorithm will be used to allocate it to two slave servers in turn
amoeba can be regarded as a scheduler. If the primary server hangs (single point of failure), MHA will solve this problem
Vi Set up read-write separation
The construction of read-write separation is based on master-slave replication.
1. Experimental preparation
5 linux, 1 mysql database master, 2 mysql database slave, 1 amoeba, 1 client
mysql-master: 192.168.206.88
mysql-slave1:192.168.206.188
mysql-slave2:192.168.206.177
amoeba: 192.168.206.99
client side: 192.168.206
3 mysql master-slave replication
2. Install ameoba
Install the java environment and JDK (because amoeba is developed based on jdk1.5, jkd1.5/jdk1.6 is officially recommended, and it is not recommended to use higher versions)
[root@ameoba ~]# cd /opt
[root@ameoba opt]# ls
anaconda-ks.cfg  rh
[root@ameoba opt]# ls											#Upload execution files and installation packages locally
amoeba-mysql-binary-2.2.0.tar.gz  anaconda-ks.cfg  jdk-6u14-linux-x64.bin  rh
[root@ameoba opt]# cp jdk-6u14-linux-x64.bin /usr/local/
[root@ameoba opt]# cd /usr/local/
[root@ameoba local]# chmod +x jdk-6u14-linux-x64.bin			#Give execution permission
[root@ameoba local]# ./jdk-6u14-linux-x64.bin					#implement

		#yes, enter

[root@ameoba local]# mv jdk1.6.0_14/ /usr/local/jdk1.6
[root@ameoba local]# vim /etc/profile							#Add variable

[root@ameoba local]# source /etc/profile						#Refresh effective
[root@ameoba local]# java -version								#View java version
java version "1.6.0_14"
Java(TM) SE Runtime Environment (build 1.6.0_14-b08)
Java HotSpot(TM) 64-Bit Server VM (build 14.0-b16, mixed mode)


[root@ameoba local]# mkdir /usr/local/amoeba					#Create directory
[root@ameoba local]# tar zxvf /opt/amoeba-mysql-binary-2.2.0.tar.gz -C /usr/local/amoeba/
																#Extract to the directory you created

[root@ameoba local]# chmod -R 755 /usr/local/amoeba/ 			#Recursively give permissions
[root@ameoba local]# /usr/local/amoeba/bin/amoeba				#Service startup
amoeba start|stop
3. Configure amoeba read-write separation, two slave read-write load balancing, and give database permissions
Open permissions to amoeba on mysql of master, slave1 and slave2
mysql> grant all on *.* to test @'192.168.206.%' identified by '123456';
Query OK, 0 rows affected, 1 warning (0.00 sec)
4. Reconfigure amoeba
(1) Modify master profile
[root@ameoba local]# cd /usr/local/amoeba/conf/
[root@ameoba conf]# ls
access_list.conf  dbserver.dtd   functionMap.xml  rule.dtd
amoeba.dtd        dbServers.xml  log4j.dtd        ruleFunctionMap.xml
amoeba.xml        function.dtd   log4j.xml        rule.xml
[root@ameoba conf]# cp amoeba.xml amoeba.xml.bak
[root@ameoba conf]# vim amoeba.xml


(2) Modify database configuration file
[root@ameoba conf]# cp dbServers.xml dbServers.xml.bak
[root@ameoba conf]# vim dbServers.xml

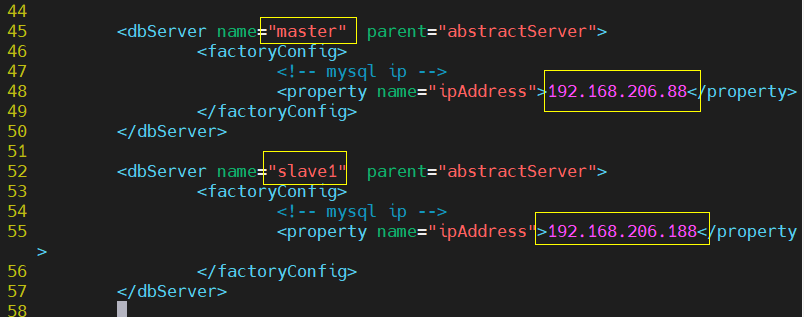
Then copy lines 52-57, paste, and add the second server name


At this time, the copy session opens another page to view the configuration file (because amoeba needs to be open all the time to query the port)
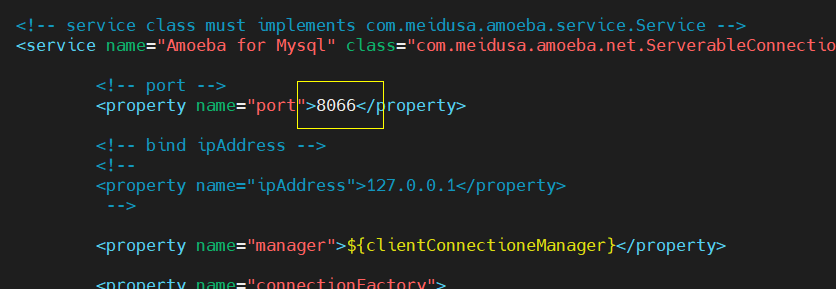
5. Open amoeba
[root@ameoba conf]# /usr/local/amoeba/bin/amoeba start
log4j:WARN log4j config load completed from file:/usr/local/amoeba/conf/log4j.xml
2021-07-21 03:51:56,755 INFO  context.MysqlRuntimeContext - Amoeba for Mysql current versoin=5.1.45-mysql-amoeba-proxy-2.2.0
log4j:WARN ip access config load completed from file:/usr/local/amoeba/conf/access_list.conf
2021-07-21 03:52:07,034 INFO  net.ServerableConnectionManager - Amoeba for Mysql listening on 0.0.0.0/0.0.0.0:8066.
2021-07-21 03:52:07,038 INFO  net.ServerableConnectionManager - Amoeba Monitor Server listening on /127.0.0.1:6475.


[root@ameoba conf]# netstat -antp | grep java
tcp6       0      0 127.0.0.1:6475          :::*                    LISTEN      35067/java
tcp6       0      0 :::8066                 :::*                    LISTEN      35067/java
tcp6       0      0 192.168.206.99:39278    192.168.206.88:3306     ESTABLISHED 35067/java
tcp6       0      0 192.168.206.99:39282    192.168.206.88:3306     ESTABLISHED 35067/java
tcp6       0      0 192.168.206.99:46678    192.168.206.177:3306    ESTABLISHED 35067/java
[root@ameoba conf]# netstat -antp | grep 8066
tcp6       0      0 :::8066                 :::*                    LISTEN      35067/java
6. Test verification
(1) Verify whether amoeba can be associated with backend mysql
The client side remotely accesses the address of amoeba, enters the database, creates a new database, and verifies whether the master and slave are synchronized
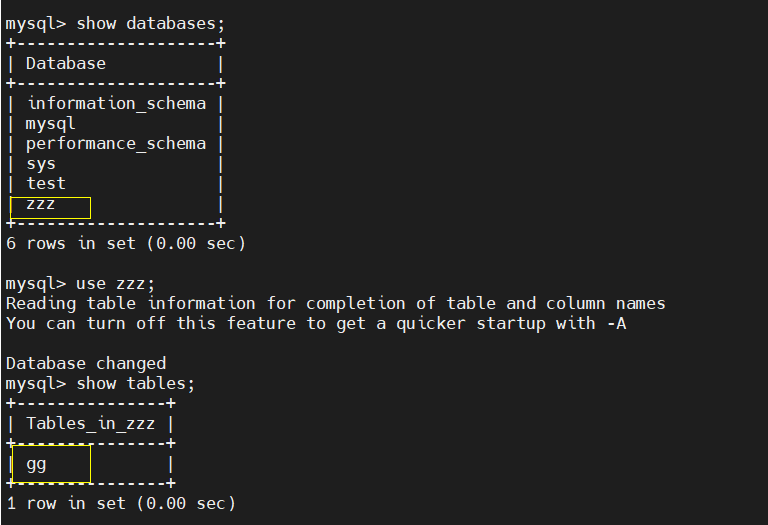
The client enters the database to create the table gg, and finds that the master+slave1+slave2 has synchronously created the data table gg
① Client remote login create table gg
[root@client ~]# mysql -uamoeba -p123123 -h 192.168.206.99 -P 8066
mysql: [Warning] Using a password on the command line interface can be insecure.
Welcome to the MySQL monitor.  Commands end with ; or \g.
Your MySQL connection id is 1342544436
Server version: 5.1.45-mysql-amoeba-proxy-2.2.0

Copyright (c) 2000, 2017, Oracle and/or its affiliates. All rights reserved.

Oracle is a registered trademark of Oracle Corporation and/or its
affiliates. Other names may be trademarks of their respective
owners.

Type 'help;' or '\h' for help. Type '\c' to clear the current input statement.

mysql> create database zzz;
Query OK, 1 row affected (0.02 sec)

mysql> use zzz;
No connection. Trying to reconnect...
Connection id:    1342544436
Current database: *** NONE ***

Database changed
mysql> create table gg(id int);
Query OK, 0 rows affected (0.03 sec)

mysql> show tables;
+---------------+
| Tables_in_zzz |
+---------------+
| gg            |
+---------------+
1 row in set (0.00 sec)
② master View
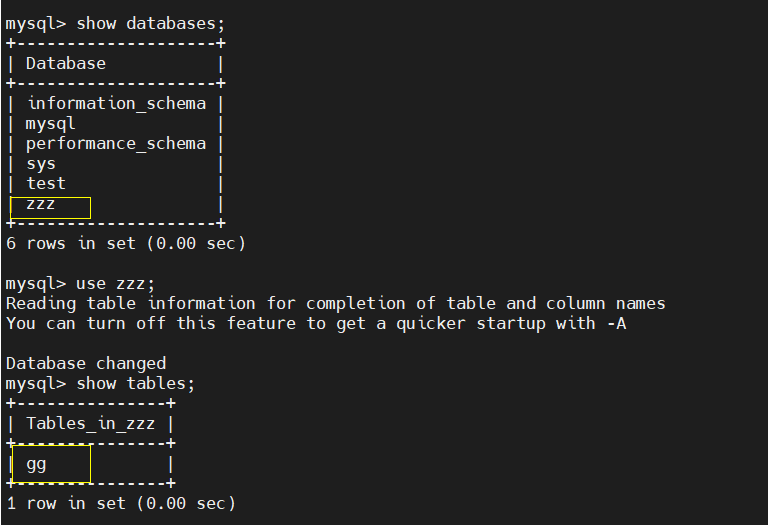
③ slave view
(2) Verify write
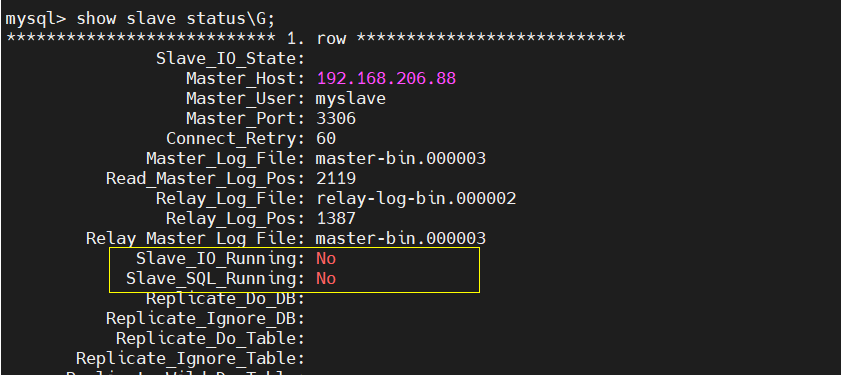
Test the read-write separation of mysql, turn off the master-slave synchronization of the two slave servers, insert data into the data table of the client database, and verify the read-write separation of amoeba
① Turn off the master-slave function from the server
mysql> stop slave;
Query OK, 0 rows affected (0.01 sec)
② client writes table data
mysql> show tables;
+---------------+
| Tables_in_zzz |
+---------------+
| gg            |
+---------------+
1 row in set (0.00 sec)

mysql> insert into gg values(1);
Query OK, 1 row affected (0.01 sec)
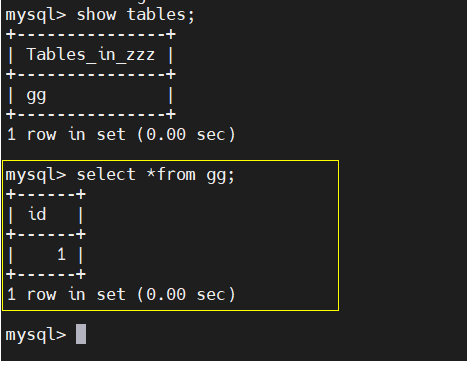
③ master View
The master handles the write task and can query the data table aa
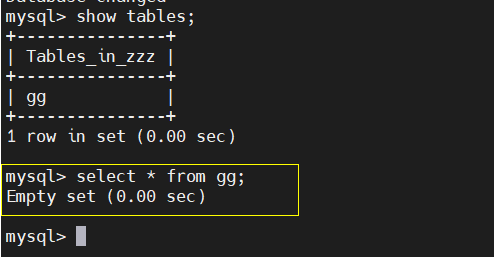
④ slave view
The read task is processed from the server, and the query cannot see the data
(3) Verify read
Change the table data on the slave server, read from the server using client authentication, and read by polling
① slaves1 inserts a piece of data
mysql> insert into gg values(2);
Query OK, 1 row affected (0.00 sec)
② slave2 insert a piece of data
mysql> insert into gg values(3);
Query OK, 1 row affected (0.00 sec)
③ Contents of client side query table gg
mysql> select * from gg;
+------+
| id   |
+------+
|    2 |
+------+
1 row in set (0.00 sec)

mysql> select * from gg;
+------+
| id   |
+------+
|    3 |
+------+
1 row in set (0.01 sec)


mysql> select * from gg;
+------+
| id   |
+------+
|    2 |
+------+
1 row in set (0.00 sec)

mysql> select * from gg;
+------+
| id   |
+------+
|    3 |
+------+
1 row in set (0.01 sec)