Introduction to MyCAT Distributed Architecture
MyCATMycat is a database middleware and a server that implements the MySQL protocol. Front-end users can view it as a database proxy, accessed using MySQL client tools and command lines, while back-end users can use it
MySQL native (Native) protocol communicates with multiple MySQL servers, and JDBC protocol can also communicate with most mainstream database servers. The core function is database sub-tables, and read-write separation can be achieved with the master-slave mode of the database.
The most important verb of MyCAT is intercept, which intercepts and analyzes SQL statements sent by users, such as fragmentation analysis, routing analysis, read-write separation analysis, cache analysis, etc. It then sends the SQL to the real database at the back end, processes the returned results appropriately, and returns them to the user at last.
Introduction to MyCAT Splitting
- schema splitting and business repository: Tables with many columns can be split into multiple tables by column to reduce coupling.
- Vertical/Vertical Split: Depending on the business, tables from different businesses are placed in different databases (one table per inventory).
- Split Horizontal/Split Horizontal: Split tables with large amounts of data and store the data in different databases according to certain rules (slice for higher read-write concurrency).
MyCAT Scenario
- Read-write separation, simple configuration, support read-write separation and master-slave switching;
- Sub-database sub-tables, for more than 10 million tables to be fragmented, the maximum support 100 billion form fragmentation;
- Multi-tenant applications, one library per application, connect MyCAT only to the application, so as not to transform the database itself, to achieve multi-tenant;
- Reporting system, with the help of MyCAT's table-dividing ability, handles large-scale report statistics;
- As a simple and effective solution for real-time query of large amounts of data, such as 10 billion frequently queried records that need to be queried within three seconds, in addition to primary key-based queries, there may be range queries or other attribute queries, and mycat may be the simplest and most effective option.
- The database router, mycat's connection pool reuse mechanism based on mysql instances, allows each application to maximize the sharing of all connection pools of a mysql instance, and greatly improves concurrent database access capabilities.
MyCAT Infrastructure Building
MyCAT Environment Preparation

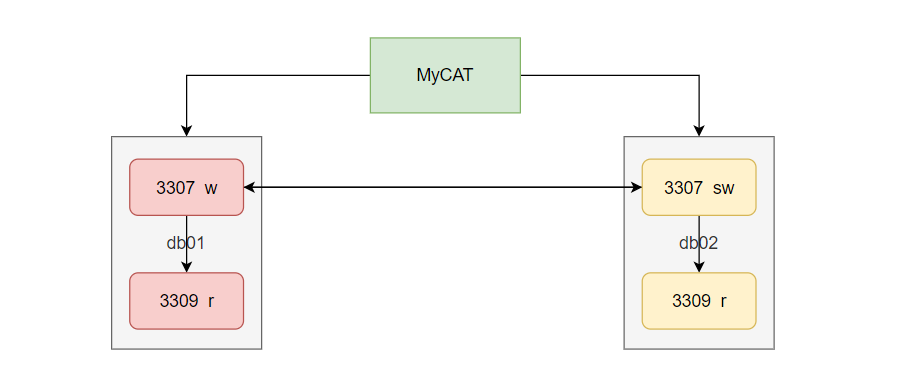
Node master-slave planning:
-
The db01 3307 instance and db02 3307 instance are mutually dominant and subordinate.
Each 3309 instance is a sublibrary of a local 3307 instance;192.168.1.5:3307 ⇋ 192.168.1.6:3307 192.168.1.5:3309 → 192.168.1.5: 3307 192.168.1.6:3309 → 192.168.1.6: 3307
-
db01 3308 instance and db02 3308 instance are mutually dominant and subordinate;
Each 3310 instance is a sublibrary of a local 3308 instance;192.168.1.5:3308 ⇋ 192.168.1.6:3308 192.168.1.5:3310 → 192.168.1.5: 3308 192.168.1.6:3310 → 192.168.1.6: 3308
Node Partition Planning:
- shard1 & shard2
shard1:
    Master: 192.168.1.5:3307
    slave1: 192.168.1.5:3309
    Standby Master: 192.168.1.6:3307
    slave2: 192.168.1.6:3309
shard2:
    Master: 192.168.1.6:3308
    slave1: 192.168.1.6:3310
    Standby Master: 192.168.1.5:3308
    slave2: 192.168.1.5:3310
Deployment process:
-
Create multiple instances
Two virtual machines, db01 (192.168.1.5) and db02 (192.168.1.6)
Create four MySQL instances per virtual machine: 3307 3308 3309 3310
Create a script:[root@db01 ~]# cat /scripts/deploy_multiple_instances.sh # delete historical environment pkill mysqld rm -rf /data mv /etc/my.cnf /etc/my.cnf.bak # make data directory mkdir /data/33{07..10}/data -p # grant promissions to the data directory chown -R mysql.mysql /data # Initialize the data directory mysqld --initialize-insecure --user=mysql --datadir=/data/3307/data --basedir=/app/mysql &> /dev/null && echo "3307 initialized complete." mysqld --initialize-insecure --user=mysql --datadir=/data/3308/data --basedir=/app/mysql &> /dev/null && echo "3308 initialized complete." mysqld --initialize-insecure --user=mysql --datadir=/data/3309/data --basedir=/app/mysql &> /dev/null && echo "3309 initialized complete." mysqld --initialize-insecure --user=mysql --datadir=/data/3310/data --basedir=/app/mysql &> /dev/null && echo "3310 initialized complete." # edit profile cat >/data/3307/my.cnf<<EOF [mysqld] basedir=/app/mysql datadir=/data/3307/data socket=/data/3307/mysql.sock port=3307 log-error=/data/3307/mysql.log log_bin=/data/3307/mysql-bin binlog_format=row skip-name-resolve server-id=7 gtid-mode=on enforce-gtid-consistency=true log-slave-updates=1 EOF cat >/data/3308/my.cnf<<EOF [mysqld] basedir=/app/mysql datadir=/data/3308/data port=3308 socket=/data/3308/mysql.sock log-error=/data/3308/mysql.log log_bin=/data/3308/mysql-bin binlog_format=row skip-name-resolve server-id=8 gtid-mode=on enforce-gtid-consistency=true log-slave-updates=1 EOF cat >/data/3309/my.cnf<<EOF [mysqld] basedir=/app/mysql datadir=/data/3309/data socket=/data/3309/mysql.sock port=3309 log-error=/data/3309/mysql.log log_bin=/data/3309/mysql-bin binlog_format=row skip-name-resolve server-id=9 gtid-mode=on enforce-gtid-consistency=true log-slave-updates=1 EOF cat >/data/3310/my.cnf<<EOF [mysqld] basedir=/app/mysql datadir=/data/3310/data socket=/data/3310/mysql.sock port=3310 log-error=/data/3310/mysql.log log_bin=/data/3310/mysql-bin binlog_format=row skip-name-resolve server-id=10 gtid-mode=on enforce-gtid-consistency=true log-slave-updates=1 EOF # add to systemd manager cat >/etc/systemd/system/mysqld3307.service<<EOF [Unit] Description=MySQL Server Documentation=man:mysqld(8) Documentation=http://dev.mysql.com/doc/refman/en/using-systemd.html After=network.target After=syslog.target [Install] WantedBy=multi-user.target [Service] User=mysql Group=mysql ExecStart=/app/mysql/bin/mysqld --defaults-file=/data/3307/my.cnf LimitNOFILE = 5000 EOF cat >/etc/systemd/system/mysqld3308.service<<EOF [Unit] Description=MySQL Server Documentation=man:mysqld(8) Documentation=http://dev.mysql.com/doc/refman/en/using-systemd.html After=network.target After=syslog.target [Install] WantedBy=multi-user.target [Service] User=mysql Group=mysql ExecStart=/app/mysql/bin/mysqld --defaults-file=/data/3308/my.cnf LimitNOFILE = 5000 EOF cat >/etc/systemd/system/mysqld3309.service<<EOF [Unit] Description=MySQL Server Documentation=man:mysqld(8) Documentation=http://dev.mysql.com/doc/refman/en/using-systemd.html After=network.target After=syslog.target [Install] WantedBy=multi-user.target [Service] User=mysql Group=mysql ExecStart=/app/mysql/bin/mysqld --defaults-file=/data/3309/my.cnf LimitNOFILE = 5000 EOF cat >/etc/systemd/system/mysqld3310.service<<EOF [Unit] Description=MySQL Server Documentation=man:mysqld(8) Documentation=http://dev.mysql.com/doc/refman/en/using-systemd.html After=network.target After=syslog.target [Install] WantedBy=multi-user.target [Service] User=mysql Group=mysql ExecStart=/app/mysql/bin/mysqld --defaults-file=/data/3310/my.cnf LimitNOFILE = 5000 EOF # grant promissions to the data directory chown -R mysql.mysql /data # start mysqld instances systemctl start mysqld3307 systemctl start mysqld3308 systemctl start mysqld3309 systemctl start mysqld3310 # check instances status mysql -S /data/3307/mysql.sock -e "select @@server_id" mysql -S /data/3308/mysql.sock -e "select @@server_id" mysql -S /data/3309/mysql.sock -e "select @@server_id" mysql -S /data/3310/mysql.sock -e "select @@server_id" -
shard1 deployment master-slave relationship
192.168.1.5:3307 ⇋ 192.168.1.6:3307# db02 mysql -S /data/3307/mysql.sock -e "grant replication slave on *.* to repl@'192.168.1.%' identified by '123';" mysql -S /data/3307/mysql.sock -e "grant all on *.* to root@'192.168.1.%' identified by '123' with grant option;" # db01 mysql -S /data/3307/mysql.sock -e "CHANGE MASTER TO MASTER_HOST='192.168.1.6', MASTER_PORT=3307, MASTER_AUTO_POSITION=1, MASTER_USER='repl', MASTER_PASSWORD='123';" mysql -S /data/3307/mysql.sock -e "start slave;" mysql -S /data/3307/mysql.sock -e "show slave status\G" # db02 mysql -S /data/3307/mysql.sock -e "CHANGE MASTER TO MASTER_HOST='192.168.1.5', MASTER_PORT=3307, MASTER_AUTO_POSITION=1, MASTER_USER='repl', MASTER_PASSWORD='123';" mysql -S /data/3307/mysql.sock -e "start slave;" mysql -S /data/3307/mysql.sock -e "show slave status\G"
192.168.1.5:3309 → 192.168.1.5: 3307
# db01
mysql  -S /data/3309/mysql.sock  -e "CHANGE MASTER TO MASTER_HOST='192.168.1.5', MASTER_PORT=3307, MASTER_AUTO_POSITION=1, MASTER_USER='repl', MASTER_PASSWORD='123';"
mysql  -S /data/3309/mysql.sock  -e "start slave;"
mysql  -S /data/3309/mysql.sock  -e "show slave status\G"
192.168.1.6:3309 → 192.168.1.6: 3307
# db02
mysql  -S /data/3309/mysql.sock  -e "CHANGE MASTER TO MASTER_HOST='192.168.1.6', MASTER_PORT=3307, MASTER_AUTO_POSITION=1, MASTER_USER='repl', MASTER_PASSWORD='123';"
mysql  -S /data/3309/mysql.sock  -e "start slave;"
mysql  -S /data/3309/mysql.sock  -e "show slave status\G"
-
shard2 deployment master-slave relationship
192.168.1.5:3308 ⇋ 192.168.1.6:3308# db01 mysql -S /data/3308/mysql.sock -e "grant replication slave on *.* to repl@'192.168.1.%' identified by '123';" mysql -S /data/3308/mysql.sock -e "grant all on *.* to root@'192.168.1.%' identified by '123' with grant option;" # db02 mysql -S /data/3308/mysql.sock -e "CHANGE MASTER TO MASTER_HOST='192.168.1.5', MASTER_PORT=3308, MASTER_AUTO_POSITION=1, MASTER_USER='repl', MASTER_PASSWORD='123';" mysql -S /data/3308/mysql.sock -e "start slave;" mysql -S /data/3308/mysql.sock -e "show slave status\G" # db01 mysql -S /data/3308/mysql.sock -e "CHANGE MASTER TO MASTER_HOST='192.168.1.6', MASTER_PORT=3308, MASTER_AUTO_POSITION=1, MASTER_USER='repl', MASTER_PASSWORD='123';" mysql -S /data/3308/mysql.sock -e "start slave;" mysql -S /data/3308/mysql.sock -e "show slave status\G"
192.168.1.5:3310 → 192.168.1.5: 3308
# db01
mysql  -S /data/3310/mysql.sock -e "CHANGE MASTER TO MASTER_HOST='192.168.1.5', MASTER_PORT=3308, MASTER_AUTO_POSITION=1, MASTER_USER='repl', MASTER_PASSWORD='123';"
mysql  -S /data/3310/mysql.sock -e "start slave;"
mysql  -S /data/3310/mysql.sock -e "show slave status\G"
192.168.1.6:3310 → 192.168.1.6: 3308
# db02
mysql  -S /data/3310/mysql.sock -e "CHANGE MASTER TO MASTER_HOST='192.168.1.6', MASTER_PORT=3308, MASTER_AUTO_POSITION=1, MASTER_USER='repl', MASTER_PASSWORD='123';"
mysql  -S /data/3310/mysql.sock -e "start slave;"
mysql  -S /data/3310/mysql.sock -e "show slave status\G"
-
Check master-slave status
# db01 [root@db01 ~]# mysql -S /data/3307/mysql.sock -e "show slave status\G"|grep Yes Slave_IO_Running: Yes Slave_SQL_Running: Yes [root@db01 ~]# mysql -S /data/3308/mysql.sock -e "show slave status\G"|grep Yes Slave_IO_Running: Yes Slave_SQL_Running: Yes [root@db01 ~]# mysql -S /data/3309/mysql.sock -e "show slave status\G"|grep Yes Slave_IO_Running: Yes Slave_SQL_Running: Yes [root@db01 ~]# mysql -S /data/3310/mysql.sock -e "show slave status\G"|grep Yes Slave_IO_Running: Yes Slave_SQL_Running: Yes # db02 [root@db02 ~]# mysql -S /data/3307/mysql.sock -e "show slave status\G"|grep Yes Slave_IO_Running: Yes Slave_SQL_Running: Yes [root@db02 ~]# mysql -S /data/3308/mysql.sock -e "show slave status\G"|grep Yes Slave_IO_Running: Yes Slave_SQL_Running: Yes [root@db02 ~]# mysql -S /data/3309/mysql.sock -e "show slave status\G"|grep Yes Slave_IO_Running: Yes Slave_SQL_Running: Yes [root@db02 ~]# mysql -S /data/3310/mysql.sock -e "show slave status\G"|grep Yes Slave_IO_Running: Yes Slave_SQL_Running: Yes -
Import Test Library
# db01
mysql>  mysql -S /data/3307/mysql.sock
source /root/world.sql
mysql>  mysql -S /data/3308/mysql.sock
source /root/world.sql
MyCAT Download Installation
-
Install Java Runtime Environment
[root@db01 ~]# yum install -y java
-
Download the unzipped MyCAT software
[root@db01 ~]# wget http://dl.mycat.org.cn/1.6.7.6/20201112144313/Mycat-server-1.6.7.6-release-20201112144313-linux.tar.gz
[root@db01 ~]# tar xf Mycat-server-1.6.7.6-release-20201112144313-linux.tar.gz
[root@db01 ~]# mkdir /application
[root@db01 ~]# mv mycat /application/
-
View MyCAT software directory structure
[root@db01 ~]# ls /application/mycat/
bin  catlet  conf  lib  logs  version.txt
-
Start and Connect MyCAT
# Configuring environment variables
[root@db01 ~]# vim /etc/profile
export PATH=/application/mycat/bin:$PAT
[root@db01 ~]# source /etc/profile

# Start MyCAT
[root@db01 ~]# mycat start
Starting Mycat-server...
[root@db01 ~]# netstat -lntup | grep 8066
tcp6       0      0 :::8066                 :::*                    LISTEN      6719/java
[root@db01 ~]# netstat -lntup | grep 9066
tcp6       0      0 :::9066                 :::*                    LISTEN      6719/java

# Connect to MyCAT (default username and password is root 123456, set in server.xml)
[root@db01 conf]# mysql -uroot -p123456 -h 192.168.1.5 -P8066
-
Introduction to MyCAT related files
[root@db01 ~]# ls /application/mycat/logs/
mycat.log       # mycat detailed work log
mycat.pid
switch.log
wrapper.log     # mycat startup log

[root@db01 ~]# ls /application/mycat/conf/
schema.xml      # Main Profile (Read-Write Separation, High Availability, Distributed Policy Customization, Node Control)
server.xml      # Configurations related to mycat software itself
rule.xml        # Fragmentation rule profile, record fragmentation rule list, usage, etc.
-
Edit Profile
[root@db01 ~]# cd /application/mycat/conf/
[root@db01 conf]# mv schema.xml schema.xml.bak
[root@db01 conf]# vim schema.xml
<?xml version="1.0"?>
<!DOCTYPE mycat:schema SYSTEM "schema.dtd">
<mycat:schema xmlns:mycat="http://io.mycat/">

<schema name="TESTDB" checkSQLschema="false" sqlMaxLimit="100" dataNode="dn1"> </schema>          # TESTDB Logical Library to Access Data Node dn1
    <dataNode name="dn1" dataHost="localhost1" database= "wordpress" />                           # Definition of data node dn1: accessing DN1 means accessing wordpress database (library name determines)
    <dataHost name="localhost1" maxCon="1000" minCon="10" balance="1"  writeType="0" dbType="mysql" dbDriver="native" switchType="1">       # Data Host, Determine Host IP of Physical Node, etc.
        <heartbeat>select user()</heartbeat>
    <writeHost host="db01" url="192.168.1.5:3307" user="root" password="123">
            <readHost host="db02" url="192.168.1.5:3309" user="root" password="123" />
    </writeHost>
    </dataHost>
</mycat:schema>
schema(TESTDB)→ dataNode(dn1) → dataHost(host,r,w)
- schema: The database defined by MyCAT only exists logically and does not exist physically. Database middleware can be viewed as a logical library composed of one or more database clusters.
mysql> show databases;
+----------+
| DATABASE |
+----------+
| TESTDB   |
+----------+
1 row in set (0.00 sec)
- DataNode: After data slicing, a large table is divided into different fragmented databases, each of which is in the same database as the dataNode.
- DataHost: The physical host on which the data node resides is the dataHost.
- schema: The database defined by MyCAT only exists logically and does not exist physically. Database middleware can be viewed as a logical library composed of one or more database clusters.
MyCAT Basic Functions
MyCAT Configuration Read-Write Separation
-
Edit the schema.xml configuration file (change the database = of the datanode and the contents of writehost and readhost)
[root@db01 conf]# vim schema.xml <?xml version="1.0"?> <!DOCTYPE mycat:schema SYSTEM "schema.dtd"> <mycat:schema xmlns:mycat="http://io.mycat/"> <schema name="TESTDB" checkSQLschema="false" sqlMaxLimit="100" dataNode="dn1"> </schema> <dataNode name="dn1" dataHost="localhost1" database= "world" /> <dataHost name="localhost1" maxCon="1000" minCon="10" balance="1" writeType="0" dbType="mysql" dbDriver="native" switchType="1"> <heartbeat>select user()</heartbeat> <writeHost host="db01" url="192.168.1.5:3307" user="root" password="123"> <readHost host="db02" url="192.168.1.5:3309" user="root" password="123" /> </writeHost> </dataHost> </mycat:schema> ~ -
Restart mycat
[root@db01 conf]# mycat restart
-
Read-Write Separation Test
[root@db01 conf]# mysql -uroot -p123456 -h 192.168.1.5 -P8066
mysql> use TESTDB;

mysql> select @@server_id;
+-------------+
| @@server_id |
+-------------+
|           9 |
+-------------+
1 row in set (0.02 sec)

mysql> begin ;select @@server_id; commit;
Query OK, 0 rows affected (0.01 sec)

+-------------+
| @@server_id |
+-------------+
|           7 |
+-------------+
1 row in set (0.01 sec)

Query OK, 0 rows affected (0.01 sec)
Note: The above case implements a read-write separation between master 1 and slave, where the write operation falls to the master library and the read operation falls to the slave library.
MyCAT Configuration High Availability
- MyCAT uses the first writehost by default and the second standby writehost as an alternate read-only service. That is, three nodes in this architecture provide read services.
- The standby writehost provides write services, followed by readhost, which provides read services.
- When the write node is down, standby writehost provides the write service with no switching action (because standby writehost is always servicing and the data is consistent).
Deployment process:
-
Edit schema.xml configuration file
[root@db01 conf]# vim schema.xml <?xml version="1.0"?> <!DOCTYPE mycat:schema SYSTEM "schema.dtd"> <mycat:schema xmlns:mycat="http://io.mycat/"> <schema name="TESTDB" checkSQLschema="false" sqlMaxLimit="100" dataNode="dn1"> </schema> <dataNode name="dn1" dataHost="localhost1" database= "world" /> <dataHost name="localhost1" maxCon="1000" minCon="10" balance="1" writeType="0" dbType="mysql" dbDriver="native" switchType="1"> <heartbeat>select user()</heartbeat> <writeHost host="db01" url="192.168.1.5:3307" user="root" password="123"> <readHost host="db02" url="192.168.1.5:3309" user="root" password="123" /> </writeHost> <writeHost host="db03" url="192.168.1.6:3307" user="root" password="123"> <readHost host="db04" url="192.168.1.6:3309" user="root" password="123" /> </writeHost> </dataHost> </mycat:schema> ~ -
Restart mycat
[root@db01 conf]# mycat restart
-
Test High Availability
Before writing node down# Read Test mysql> select @@server_id; +-------------+ | @@server_id | +-------------+ | 17 | +-------------+ 1 row in set (0.11 sec) mysql> select @@server_id; +-------------+ | @@server_id | +-------------+ | 19 | +-------------+ 1 row in set (0.10 sec) mysql> select @@server_id; +-------------+ | @@server_id | +-------------+ | 9 | +-------------+ 1 row in set (0.20 sec) # Write Test mysql> begin; select @@server_id; commit; Query OK, 0 rows affected (0.01 sec) +-------------+ | @@server_id | +-------------+ | 7 | +-------------+ 1 row in set (0.00 sec) Query OK, 0 rows affected (0.01 sec)
After write node is down
# Read Test
mysql> select @@server_id;
+-------------+
| @@server_id |
+-------------+
|          19 |
+-------------+
1 row in set (0.08 sec)

# Write Test
mysql> begin; select @@server_id; commit;
Query OK, 0 rows affected (0.01 sec)

+-------------+
| @@server_id |
+-------------+
|          17 |
+-------------+
1 row in set (0.00 sec)

Query OK, 0 rows affected (0.00 sec)
Introduction to MyCAT properties
<dataHost name="localhost1" maxCon="1000" minCon="10" balance="1" writeType="0" dbType="mysql" dbDriver="native" switchType="1">
-
balance attribute
There are currently three types of load balancing:
1. balance="0", Do not turn on read-write separation, all read operations will be sent to the currently available writeHost Up.
2. balance="1",Default configuration. All readHost and standby writeHost participate in select Statement load balanced, simply put, when the two-master-two-slave mode(M1->S1,M2->S2,also M1 and M2 Mutual Preparedness),Normally, M2,S1,S2 Participate select Statement load balancing.
3. balance="2",All read operations are random on writeHost,readhost Upper Distribution(Write under low pressure).
-
writetype property
There are currently two types of load balancing:
1. writeType="0", Default configuration. All write operations are sent to the first configuration writeHost,The first hangs up to the second surviving writeHost,Primary switch after restart, switch logged in configuration file:dnindex.properties
2. writeType="1",All write operations are sent randomly to the configured writeHost,But not recommended
-
switchtype property
1. switchType="-1" Indicates no automatic switch
2. switchType="1" Default value, auto-switch
3. switchType="2" Be based on MySQL The state of master-slave synchronization determines whether to switch, and the heartbeat statement is show slave status
-
maxCon property: maximum number of concurrent connections
-
minCon property: The number of connection threads that MyCAT automatically opens on the back-end node after it starts (too large for memory resource pressure)
-
tempReadHostAvailable property: This parameter can be turned on when one master and one slave (when one writehost and one readhost) and read can be temporarily turned on when the write node is down; if two writehosts and two readhosts, it is not necessary to turn on this property.
-
select user() monitors the heartbeat and uses this statement to detect whether the database is down
MyCAT Core Functions
MyCAT Vertical Subtable
Requirement: Place the city and count tables in the world database on separate nodes
-
Edit Profile
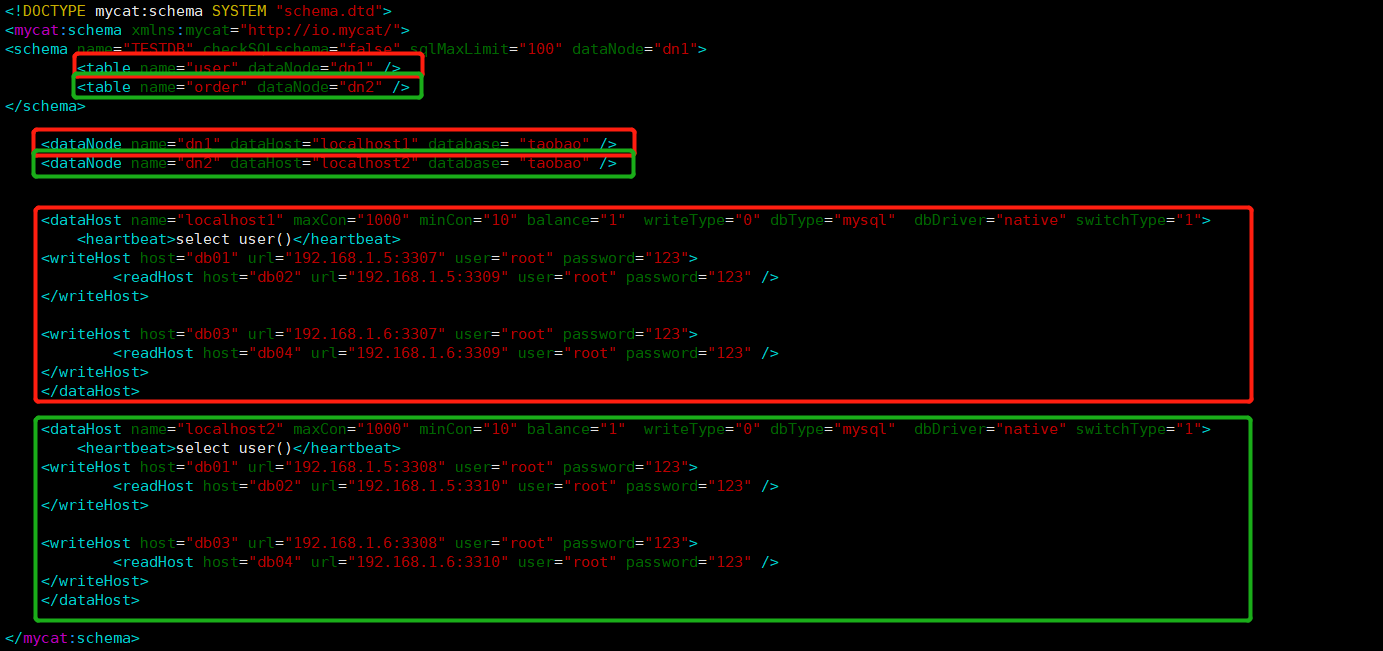
<?xml version="1.0"?> <!DOCTYPE mycat:schema SYSTEM "schema.dtd"> <mycat:schema xmlns:mycat="http://io.mycat/"> <schema name="TESTDB" checkSQLschema="false" sqlMaxLimit="100" dataNode="dn1"> <table name="user" dataNode="dn1" /> <table name="order" dataNode="dn2" /> </schema> <dataNode name="dn1" dataHost="localhost1" database= "taobao" /> <dataNode name="dn2" dataHost="localhost2" database= "taobao" /> <dataHost name="localhost1" maxCon="1000" minCon="10" balance="1" writeType="0" dbType="mysql" dbDriver="native" switchType="1"> <heartbeat>select user()</heartbeat> <writeHost host="db01" url="192.168.1.5:3307" user="root" password="123"> <readHost host="db02" url="192.168.1.5:3309" user="root" password="123" /> </writeHost> <writeHost host="db03" url="192.168.1.6:3307" user="root" password="123"> <readHost host="db04" url="192.168.1.6:3309" user="root" password="123" /> </writeHost> </dataHost> <dataHost name="localhost2" maxCon="1000" minCon="10" balance="1" writeType="0" dbType="mysql" dbDriver="native" switchType="1"> <heartbeat>select user()</heartbeat> <writeHost host="db01" url="192.168.1.5:3308" user="root" password="123"> <readHost host="db02" url="192.168.1.5:3310" user="root" password="123" /> </writeHost> <writeHost host="db03" url="192.168.1.6:3308" user="root" password="123"> <readHost host="db04" url="192.168.1.6:3310" user="root" password="123" /> </writeHost> </dataHost> </mycat:schema> -
Create library tables
[root@db01 ~]# mysql -S /data/3307/mysql.sock -e "create database taobao charset utf8;"
[root@db01 ~]# mysql -S /data/3308/mysql.sock -e "create database taobao charset utf8;"
[root@db01 ~]# mysql -S /data/3307/mysql.sock -e "use taobao;create table user(id int,name varchar(20))";
[root@db01 ~]# mysql -S /data/3308/mysql.sock -e "use taobao;create table order_t(id int,name varchar(20))"
-
Restart mycat
[root@db01 ~]# mycat restart
Stopping Mycat-server...
Stopped Mycat-server.
Starting Mycat-server...
-
Look at the mycat library emoticons. For this case, the order_t and user tables are both in the TESTDB table, but the order_t and user tables are actually on different physical nodes, which allows for a vertical split.
mysql> show databases;
+----------+
| DATABASE |
+----------+
| TESTDB   |
+----------+
1 row in set (0.01 sec)

mysql> use TESTDB;
Reading table information for completion of table and column names
You can turn off this feature to get a quicker startup with -A

Database changed
mysql> show tables ;
+------------------+
| Tables_in_taobao |
+------------------+
| order_t          |
| user             |
+------------------+
2 rows in set (0.14 sec)
MyCAT Horizontal Split (Split)
Fragmentation requirements
- Very many rows
- Very frequent access
Fragmentation purpose
- Distributed storage of large data
- Provide balanced access routing
Fragmentation strategy
- Range slice:range
- Module Divider: mod
- Hash slicing: hash
- Enumeration Slices: Enumeration Types
- Time slice: e.g. by month
Optimize associated queries
- Global Table
- ER slicing
MyCAT range slicing
-
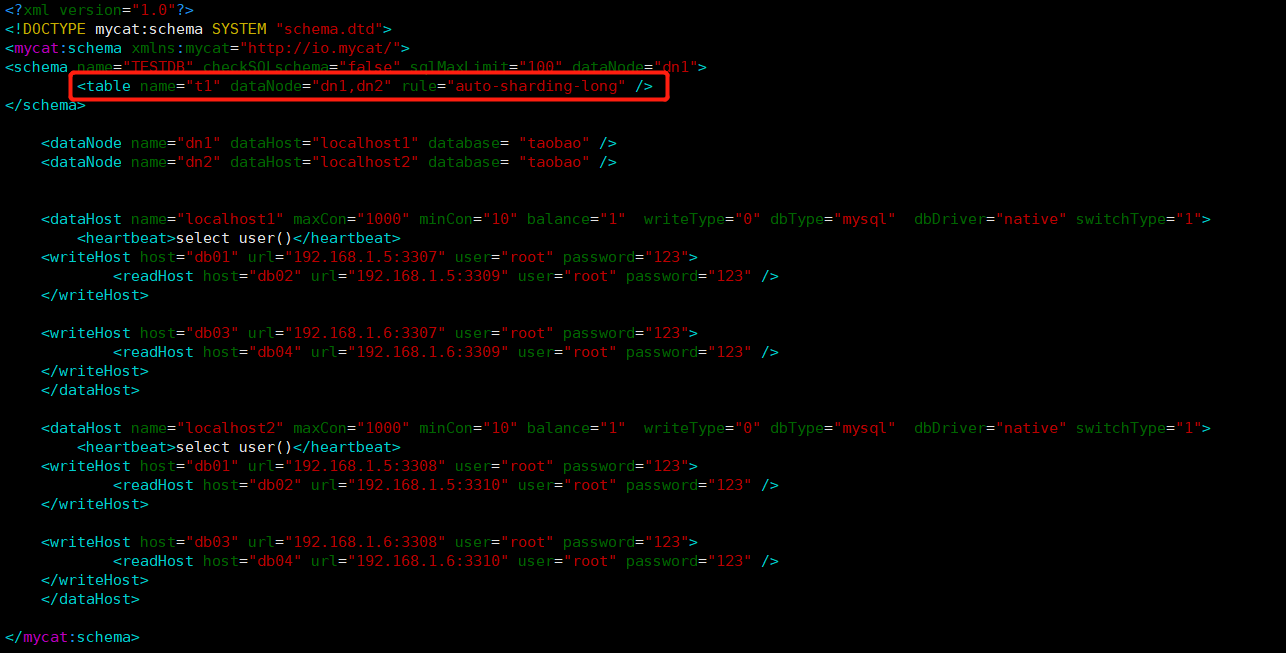
Edit the configuration file schema.xml
[root@db01 conf]# vim schema.xml

<table name="t1" dataNode="dn1,dn2" rule="auto-sharding-long" />
-
Looking at the configuration file rule.xml, you can see that the range allocation rule is specified by autopartition-long.txt
[root@db01 conf]# vim rule.xml <tableRule name="auto-sharding-long"> <rule> <columns>id</columns> <algorithm>rang-long</algorithm> </rule> <function name="rang-long" class="io.mycat.route.function.AutoPartitionByLong"> <property name="mapFile">autopartition-long.txt</property> </function> -
View and edit autopartition-long.txt
[root@db01 conf]# cat autopartition-long.txt
# range start-end ,data node index
# K=1000,M=10000.
0-500M=0
500M-1000M=1
1000M-1500M=2

[root@db01 conf]# vim autopartition-long.txt
0-10=0
11-20=1
-
Create Test Table
[root@db01 conf]# mysql -S /data/3307/mysql.sock -e "use taobao;create table t1 (id int not null primary key auto_increment,name varchar(20) not null);"
[root@db01 conf]# mysql -S /data/3308/mysql.sock -e "use taobao;create table t1 (id int not null primary key auto_increment,name varchar(20) not null);"
-
Restart mycat
[root@db01 conf]# mycat restart
Stopping Mycat-server...
Stopped Mycat-server.
Starting Mycat-server...
-
test
# mycat input data
[root@db01 conf]# mysql -uroot -p123456 -h 127.0.0.1 -P 8066

mysql> insert into t1(id,name) values(1,'a'),(2,'b');
Query OK, 2 rows affected (2.22 sec)
Records: 2  Duplicates: 0  Warnings: 0

mysql> insert into t1(id,name) values(11,'aa'),(12,'bb');
Query OK, 2 rows affected (0.13 sec)
Records: 2  Duplicates: 0  Warnings: 0

mysql> select * from t1;
+----+------+
| id | name |
+----+------+
|  1 | a    |
|  2 | b    |
| 11 | aa   |
| 12 | bb   |
+----+------+
4 rows in set (0.20 sec)
Query mysqld3307 and mysqld3308 respectively
[root@db01 conf]# mysql -S /data/3307/mysql.sock -e "select * from taobao.t1;"
+----+------+
| id | name |
+----+------+
|  1 | a    |
|  2 | b    |
+----+------+
[root@db01 conf]# mysql -S /data/3308/mysql.sock -e "select * from taobao.t1;"
+----+------+
| id | name |
+----+------+
| 11 | aa   |
| 12 | bb   |
+----+------+
MyCAT Mould Divider
Remaining slicing method: The slicing key (a column) is balanced with the number of nodes to get the remainder and write the data to the corresponding node.
-
Edit schema.xml
[root@db01 conf]# vim schema.xml <table name="t2" dataNode="dn1,dn2" rule="mod-log" /> -
View rule.xml
[root@db01 conf]# vim rule.xml <tableRule name="mod-long"> <rule> <columns>id</columns> <algorithm>mod-long</algorithm> </rule> </tableRule> <function name="mod-long" class="io.mycat.route.function.PartitionByMod"> <!-- how many data nodes --> <property name="count">2</property> </function> -
Create Test Table
mysql -S /data/3307/mysql.sock -e "use taobao;create table t2 (id int not null primary key auto_increment,name varchar(20) not null);"
mysql -S /data/3308/mysql.sock -e "use taobao;create table t2 (id int not null primary key auto_increment,name varchar(20) not null);"
-
Restart mycat
[root@db01 conf]# mycat restart
Stopping Mycat-server...
Stopped Mycat-server.
Starting Mycat-server...
-
test
# mycat input data
[root@db01 conf]# mysql -uroot -p123456 -h 127.0.0.1 -P 8066

mysql> insert into t2(id,name) values(1,'a'),(2,'b');
Query OK, 2 rows affected (2.22 sec)
Records: 2  Duplicates: 0  Warnings: 0

mysql> insert into t2(id,name) values(3,'c'),(4,'d');
Query OK, 2 rows affected (0.13 sec)
Records: 2  Duplicates: 0  Warnings: 0

mysql> select * from t2;
+----+------+
| id | name |
+----+------+
|  1 | a    |
|  2 | b    |
|  3 | c    |
|  4 | d    |
+----+------+
4 rows in set (0.20 sec)
Query mysqld3307 and mysqld3308 respectively
[root@db01 conf]# mysql -S /data/3307/mysql.sock -e "select * from taobao.t2;"
+----+------+
| id | name |
+----+------+
|  2 | b    |
|  4 | d    |
+----+------+
[root@db01 conf]# mysql -S /data/3308/mysql.sock -e "select * from taobao.t2;"
+----+------+
| id | name |
+----+------+
|  1 | a    |
|  3 | c    |
+----+------+
MyCAT Enumeration Slices
-
Edit the configuration file schema.xml
vim schema.xml
<table name="t3" dataNode="dn1,dn2" rule="sharding-by-intfile" />
-
View the configuration file rule.xml
cat rule.xml <tableRule name="sharding-by-intfile"> <rule> <columns>name</columns> # columns identifies the table fields to be fragmented <algorithm>hash-int</algorithm> # algorithm slice function, where mapFile identifies the profile name in the slice function configuration </rule> </tableRule> <function name="hash-int" class="io.mycat.route.function.PartitionByFileMap"> <property name="mapFile">partition-hash-int.txt</property> <property name="type">1</property> # Only numbers are supported without the line partition-hash-int.txt </function> -
Edit partition-hash-int.txt
vim partition-hash-int.txt
beijing=0
shanghai=1
-
Test...
MyCAT Global Table
<table name="country" primaryKey="id" type="global" dataNode="dn1,dn2" />
Use scenarios
- If some data in your business is similar to a data dictionary, such as configuration files, configurations of common businesses, or tables with little or no change in data volume, and these tables are often not very large and are used in most business scenarios, then this table is suitable for Mycat global tables. Global tables do not need to slice data, they need to save one piece of data on all slices, that isIn Join operation, Mycat prefers global table joins within the same slice to Join aggregation between business table and global table, avoiding cross-library Join. During data insertion operation, MYCAT distributes data to all slices corresponding to global table, and randomly obtains one node to read data when reading data.
MyCAT ER slicing
To prevent cross-slicing join s, you can use E-R mode.
<table name="A" dataNode="dn1,dn2" rule="mod-long">
       <childTable name="B" joinKey="yy" parentKey="xx" />
</table>