1.1 realistic background
In the actual production environment, if the database is read and written in the same database server, it can not meet the actual needs in terms of security, high availability and high concurrency. Therefore, generally speaking, the Master-slave replication method is used to synchronize data, The scheme of improving the high concurrent load capacity of the database through read-write separation is deployed and implemented.
1.2 master slave replication
Master slave replication (also known as AB replication) allows data from one MySQL database server (master server) to be replicated to one or more MySQL database servers (slave servers).
MySQL master-slave replication type
Replication type of MySQL
1.3 statement based replication
Row based replication
Mixed type replication
Working process of master-slave replication
the process of master-slave replication is roughly as follows: the MySQL master server opens the Binary log file, and the relevant operations of MySQL are recorded in the Binary file. The I/O thread reads the relevant operations from the Binary file of the master server, and then writes them to the Relay log, The SQL thread from the server reads from the Relay log, and the related operations can be synchronized with the master server.
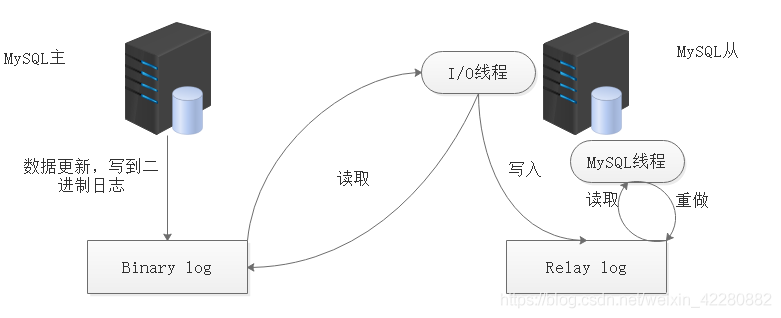
In the process of master-slave replication, a very important part is to specify the master server binary file and the synchronization position in the file on the slave server; By specifying these two locations, you can clearly know where to start synchronization.
2.1 MySQL read / write separation
Because the database will lock rows or tables when reading and writing, if the read and write operations are all on one server, the high concurrent processing capacity of the server is greatly limited, so the read and write of the database is separated.
Read write separation scheme
Internal implementation based on program code
Implementation based on intermediate agent layer
MySQL-Proxy
Amoeba
MySQL read-write separation principle
the front-end Amoeda proxy server performs the separation recognition of reading and writing, allocates the transactional query to the master server, allocates the select query to the slave server, and the slave server can synchronously write the data after relevant operations from the master server.
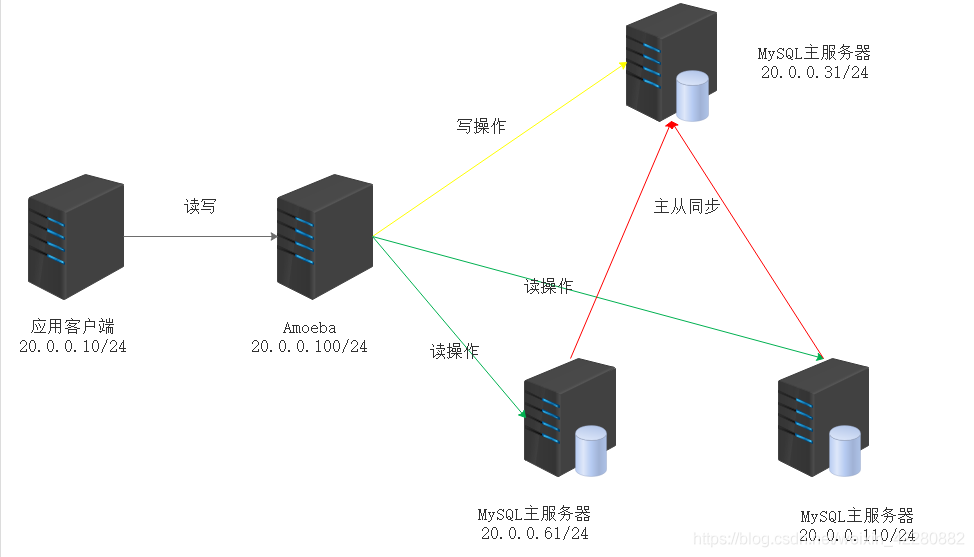
In the process of configuring read-write separation, three authorizations are involved. One is the replicable permissions authorized by the master server to the slave server; The second is the read or write permission granted to amoeda by MySQL server; Third, Amoeba server allows users to access authorization; These three authorizations are granted by creating corresponding users.
the front proxy server performs polling and reading operations on the slave server, that is, taking turns.
2.2MySQL master-slave replication and read-write separation configuration example
Case overview
In enterprise applications, mature businesses usually have a large amount of data
A single MySQL cannot meet the actual needs in terms of security, high availability and high concurrency
Configure multiple master-slave database servers to realize read-write separation
Case environment
Amoeba server maoeda: 20.0.0.100 install amoeba-mysql-binary-2.2.0 tar,jdk-6u14-linux-x64
MySQL master: 20.0.0.31 compile and install mysql-5.7.17 tar,boost_1_59_0.tar
Compile and install MySQL-5.7.17.0 from server slave01:20.0.0.61 tar,boost_1_59_0.tar
Compile and install MySQL-5.7.17.0 from server slave02: 20.0.0.110 tar,boost_1_59_0.tar
client: 20.0.0.10 yum install mysql
Configuration steps
Three MySQL servers compile and install MySQL
1.install MySQL Environment dependent package
[root@localhost ~]#yum -y install ncurses ncurses-devel bison cmake gcc gcc-c++

2.Create program users to manage maintenance processes
[root@localhost ~]#useradd -s /sbin/nologin mysql

3.Compile and install
 Put the installation package into the server
[root@localhost ~]#tar zxvf mysql-5.7.17.tar.gz -C /opt
[root@localhost ~]#tar zxvf boost_1_59_0.tar.gz -C /usr/local

[root@localhost local]# mv /usr/local/boost_1_59_0/ /usr/local/boost

[root@localhost local]# cd /opt/mysql-5.7.17/
[root@localhost mysql-5.7.17]# cmake \
-DCMAKE_INSTALL_PREFIX=/usr/local/mysql \
-DMYSQL_UNIX_ADDR=/usr/local/mysql/mysql.sock \
-DSYSCONFDIR=/etc \
-DSYSTEMD_PID_DIR=/usr/local/mysql \
-DDEFAULT_CHARSET=utf8 \
-DDEFAULT_COLLATION=utf8_general_ci \
-DWITH_INNOBASE_STORAGE_ENGINE=1 \
-DWITH_ARCHIVE_STORAGE_ENGINE=1 \
-DWITH_BLACKHOLE_STORAGE_ENGINE=1 \
-DWITH_PERFSCHEMA_STORAGE_ENGINE=1 \
-DMYSQL_DATADIR=/usr/local/mysql/data \
-DWITH_BOOST=/usr/local/boost \
-DWITH_SYSTEMD=1
###The position of boost is different from that before
[root@localhost mysql-5.7.17]#make &&make install

4.Adjust the permissions of the database directory
[root@localhost ~]# chown -R mysql:mysql /usr/local/mysql/

5.Adjust profile
vi /etc/my.cnf

[client]
port = 3306
default-character-set=utf8
socket = /usr/local/mysql/mysql.sock

[mysql]
port = 3306
default-character-set=utf8
socket = /usr/local/mysql/mysql.sock

[mysqld]
user = mysql
basedir = /usr/local/mysql
datadir = /usr/local/mysql/data
port = 3306
character_set_server=utf8
pid-file = /usr/local/mysql/mysqld.pid
socket = /usr/local/mysql/mysql.sock
server-id = 1

sql_mode=NO_ENGINE_SUBSTITUTION,STRICT_TRANS_TABLES,NO_AUTO_CREATE_USER,NO_AUTO_VALUE_ON_ZERO,NO_ZERO_IN_DATE,NO_ZERO_DATE,ERROR_FOR_DIVISION_BY_ZERO,PIPES_AS_CONCAT,ANSI_QUOTES

6.Setting environment variables
echo 'PATH=/usr/local/mysql/bin:/usr/local/mysql/lib:$PATH' >> /etc/profile
echo 'export PATH' >> /etc/profile
source /etc/profile

7.Initialize database
[root@localhost mysql]# cd /usr/local/mysql/bin/
[root@localhost bin]# mysqld \
--initialize-insecure \
--user=mysql \
--basedir=/usr/local/mysql/ \
--datadir=/usr/local/mysql/data
8.start-up
[root@localhost bin]# cd ..
[root@localhost mysql]# cp usr/lib/systemd/system/mysqld.service /lib/systemd/system/mysqld.service
[root@localhost mysql]#systemctl daemon-reload
[root@localhost mysql]# systemctl start mysqld
[root@localhost mysql]# netstat -antp |grep mysql
tcp6       0      0 :::3306                 :::*                    LISTEN      36069/mysqld

9.set up MySQL password
[root@localhost mysql]# mysqladmin -u root -p password

10.Login database
[root@localhost mysql]# mysql -uroot -p
Primary MySQL server configuration
[root@localhost ~]#iptables -F
[root@localhost ~]#setenforce 0
[root@localhost ~]# hostnamectl set-hostname master
[root@localhost ~]# su
[root@master ~]# vim /etc/my.cnf
...
## The id number of the primary server cannot be the same as that of other MySQL servers
server-id=10
## Open the binary log file. The file name starts with master bin
log-bin=master-bin
## Allow replication from server
log-slave-updates=true
[root@master ~]# systemctl restart mysqld
[root@master ~]# mysql -uroot -p123456
## Authorization, create a user myslave, and you can copy the master server on the 20.0.0.0/24 host through this user. The password is 123456
mysql> grant replication slave on *.* to 'myslave'@'20.0.0.%' identified by '123456';
mysql> flush privileges;
## To view the binary log file and the specific location node copied in the file, you need to configure it on the slave server
mysql>show master status;
+-------------------+----------+--------------+------------------+-------------------+
| File              | Position | Binlog_Do_DB | Binlog_Ignore_DB | Executed_Gtid_Set |
+-------------------+----------+--------------+------------------+-------------------+
| master-bin.000002 |      154 |              |                  |                   |
+-------------------+----------+--------------+------------------+-------------------+
1 row in set (0.00 sec)
## After reading it, don't do other operations on the database, otherwise the position will be wrong
Two slave server configurations
[root@localhost ~]#iptables -F
[root@localhost ~]#setenforce 0
[root@localhost ~]# hostnamectl set-hostname slave01
[root@localhost ~]# su
[root@slave01 ~]# vim /etc/my.cnf
## Server id
server-id = 20
## relay logs
relay-log=relay-log-bin
## Relay log index
relay-log-index=slave-relay-bin.index
[root@slave01 ~]# systemctl restart mysqld
[root@slave01 ~]# mysql -uroot -proot
## Specify the master server and related authorized users,
mysql>change master to master_host='20.0.0.31',master_user='myslave',master_password='123456',master_log_file='master-bin.000002',master_log_pos=154;
mysql>start slave;
mysql>show slave status\G;
##You should see that these two items are yes
               Slave_IO_Running: Yes
            Slave_SQL_Running: Yes
Verification: create a library or table on the master server and you can see it on the slave server
Proxy server amoeba configuration
[root@localhost ~]#iptables -F
[root@localhost ~]#setenforce 0
[root@localhost ~]# hostnamectl set-hostname slave01
[root@localhost ~]# su
Prepare installation package
[root@amoeba ~]# cp jdk-6u14-linux-x64.bin /usr/local/
[root@amoeba ~]# cd /usr/local
[root@amoeba local]# chmod +x jdk-6u14-linux-x64.bin
[root@amoeba local]# ./jdk-6u14-linux-x64.bin
Keep entering, yes, enter again
[root@amoeba local]# mv jdk1.6.0_14/ /usr/local/jdk1.6
[root@amoeba local]# vim /etc/profile
export JAVA_HOME=/usr/local/jdk1.6
export CLASSPATH=
C
L
A
S
S
P
A
T
H
:
CLASSPATH:
CLASSPATH:JAVA_HOME/lib:
J
A
V
A
H
O
M
E
/
j
r
e
/
l
i
b
e
x
p
o
r
t
P
A
T
H
=
JAVA_HOME/jre/lib export PATH=
JAVAHOME/jre/libexportPATH=JAVA_HOME/lib:
J
A
V
A
H
O
M
E
/
j
r
e
/
b
i
n
/
:
JAVA_HOME/jre/bin/:
JAVAHOME/jre/bin/:PATH:
H
O
M
E
/
b
i
n
e
x
p
o
r
t
A
M
O
E
B
A
H
O
M
E
=
/
u
s
r
/
l
o
c
a
l
/
a
m
o
e
b
a
e
x
p
o
r
t
P
A
T
H
=
HOME/bin export AMOEBA_HOME=/usr/local/amoeba export PATH=
HOME/binexportAMOEBAHOME=/usr/local/amoebaexportPATH=PATH:$AMOEBA_HOME/bin
[root@amoeba local]# source /etc/profile
[root@amoeba local]#mkdir /usr/local/amoeba
##Go to the directory of amoeba installation package
[root@amoeba ~]# tar zxvf amoeba-mysql-binary-2.2.0.tar.gz -C /usr/local/amoeba/
[root@amoeba ~]# chmod -R 755 /usr/local/amoeba/
[root@amoeba ~]# /usr/local/amoeba/bin/amoeba
amoeba start|stop
You need to authorize a user on three MySQL servers
At three mysql Add permissions to the server amoeba visit
mysql>grant all on *.* to 'test'@'20.0.0.%' identified by 'test123';
#######
[root@amoeba ~]# cd /usr/local/amoeba/
[root@amoeba amoeba]# vim conf/amoeba.xml
30                                         <property name="user">amoeba</property>
 31
 32                                         <property name="password">amoeba123</property>
 33

115                 <property name="defaultPool">master</property>
116
117
118                 <property name="writePool">master</property>
119                 <property name="readPool">slaves</property>
120
[root@amoeba amoeba]# vim conf/dbServers.xml
If the following configuration has a corresponding line, it is in<!-- -->The blue ones are annotated in the. You should remove the comments and change them again
20                       <property name="schema">mysql</property>

                        <!-- mysql user -->
23                        <property name="user">test</property>

                        <!--  mysql password -->
29                       <property name="password">test123</property>

                </factoryConfig>

45 <dbServer name="master"  parent="abstractServer">
                <factoryConfig>
                        <!-- mysql ip -->
48                        <property name="ipAddress">20.0.0.31</property>
                </factoryConfig>
        </dbServer>

52        <dbServer name="slave01"  parent="abstractServer">
                <factoryConfig>
                        <!-- mysql ip -->
55                        <property name="ipAddress">20.0.0.61</property>
                </factoryConfig>
        </dbServer>
Copy it from above and modify it
        <dbServer name="slave02"  parent="abstractServer">
                <factoryConfig>
                        <!-- mysql ip -->
                        <property name="ipAddress">20.0.0.110</property>
                </factoryConfig>
        </dbServer>
Almost at the end
 change <dbServer name="slaves" virtual="true">
                <poolConfig class="com.meidusa.amoeba.server.MultipleServerPool">
                        <!-- Load balancing strategy: 1=ROUNDROBIN , 2=WEIGHTBASED , 3=HA-->
                        <property name="loadbalance">1</property>

                        <!-- Separated by commas,such as: server1,server2,server1 -->
change                        <property name="poolNames">slave01,slave02</property>
                </poolConfig>
        </dbServer>
[root@amoeba amoeba]# /usr/local/amoeba/bin/amoeba start&
[1] 3278
[root@amoeba amoeba]# log4j:WARN log4j config load completed from file:/usr/local/amoeba/conf/log4j.xml
2020-08-27 09:43:53,879 INFO  context.MysqlRuntimeContext - Amoeba for Mysql current versoin=5.1.45-mysql-amoeba-proxy-2.2.0
log4j:WARN ip access config load completed from file:/usr/local/amoeba/conf/access_list.conf
2020-08-27 09:43:54,244 INFO  net.ServerableConnectionManager - Amoeba for Mysql listening on 0.0.0.0/0.0.0.0:8066.
2020-08-27 09:43:54,247 INFO  net.ServerableConnectionManager - Amoeba Monitor Server listening on /127.0.0.1:6800.

[root@amoeba ~]# netstat -antp | grep java
tcp6       0      0 :::8066                 :::*                    LISTEN      3278/java
tcp6       0      0 127.0.0.1:6800          :::*                    LISTEN      3278/java
tcp6       0      0 20.0.0.100:42394        20.0.0.110:3306         ESTABLISHED 3278/java
tcp6       0      0 20.0.0.100:37476        20.0.0.31:3306          ESTABLISHED 3278/java
tcp6       0      0 20.0.0.100:39476        20.0.0.61:3306          ESTABLISHED 3278/java
Client configuration and verification
Client authentication
[root@localhost ~]# hostnamectl set-hostname client
[root@localhost ~]# su
[root@client ~]# yum -y install mysql
[root@client ~]# mysql -uamoeba -pamoeba123 -h 20.0.0.100 -P8066
Welcome to the MariaDB monitor.  Commands end with ; or \g.
Your MySQL connection id is 1449171289
Server version: 5.1.45-mysql-amoeba-proxy-2.2.0 Source distribution

Copyright (c) 2000, 2018, Oracle, MariaDB Corporation Ab and others.

Type 'help;' or '\h' for help. Type '\c' to clear the current input statement.

MySQL [(none)]> show databases;
+--------------------+
| Database           |
+--------------------+
| information_schema |
| mask               |
| mysql              |
| performance_schema |
| school             |
| sys                |
+--------------------+
6 rows in set (0.00 sec)
Verify normal master-slave synchronization
##Create a jialing database on the client, which can be seen on both the master and slave servers
MySQL [(none)]> create database jialing;
Query OK, 1 row affected (0.01 sec)
Verify read / write separation
 To two, turn off from the server slave,
mysql> stop slave;
Query OK, 0 rows affected (0.00 sec)
Then insert several pieces of data into the data table on the client,
MySQL [mask]> insert into mess values(1,'jialing'),(2,'fangcc');
Query OK, 2 rows affected (0.02 sec)
Records: 2  Duplicates: 0  Warnings: 0
 It can only be seen on the primary server. After verification, the write is only written on the primary server

reach slave01 Insert several pieces of data on
mysql> insert into mess values(3,'yandi');
Query OK, 1 row affected (0.00 sec)
reach slave02 Insert several pieces of data on
mysql> insert into mess values(3,'zhousheng');
Query OK, 1 row affected (0.00 sec)
When viewed on the client, the data of the two slave servers will be read in a polling manner instead of that of the master server. It is verified that the reading is only on the slave server
MySQL [mask]> select * from mess;
+------+----------+
| id   | name     |
+------+----------+
|    1 | zhangsan |
|    2 | lisi     |
|    3 | yandi    |
+------+----------+
3 rows in set (0.01 sec)

MySQL [mask]> select * from mess;
+------+-----------+
| id   | name      |
+------+-----------+
|    1 | zhangsan  |
|    2 | lisi      |
|    3 | zhousheng |
+------+-----------+
3 rows in set (0.00 sec)