Note: mysql5.0 is used here 7.29 instantiate, install and deploy on two machines respectively.
106.13.145.174/3306 (Master) and 39.101.213.45/3306 (slave)
1. Install on two machines respectively, and install mysql-5.7.29 decompression version
1.1 upload the installation package to / usr/lcoal
tar -zxvf mysql-5.7.29-linux-glibc2.12-x86_64.tar.gz
1.2 rename and create the log file of the service process
mv mysql-5.7.29-linux-glibc2.12-x86_64 mysql

cd mysql

mkdir log

mkdir data

echo "" > /usr/local/mysql/log/mysqld.log

chown -R root:root /usr/local/mysql/log/mysqld.log
1.3 execute the installation script (version 5.6)
/usr/local/mysql/scripts/mysql_install_db --user=root --basedir=/usr/local/mysql --datadir=/usr/local/mysql/data
1.4 execute the installation script (version 5.7)
/usr/local/mysql/bin/mysql_install_db --user=root --basedir=/usr/local/mysql --datadir=/usr/local/mysql/data
1.5 create and modify configuration files
Note: mysql5 The version after 7.18 has no default configuration file and needs to be created by itself
Upload directly to find my CNF file can be uploaded to / etc / (if necessary, please contact me here)
Modify before startup
vim /usr/local/mysql/support-files/mysql.server
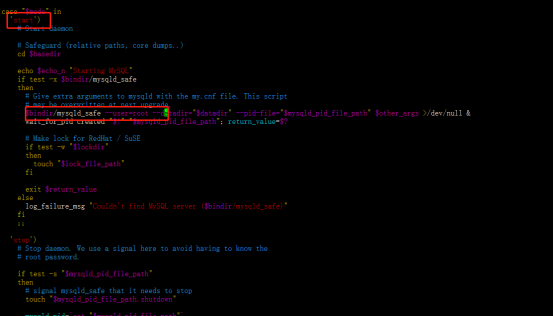
Find the start module and add -- user=root to mysqld_safe is enough
Add mysql environment variable
vim /etc/profile
increase
/usr/local/mysql/bin

Save exit Esc,:wq!
Configuration effective
source /etc/profile
Create your own mysql service startup script mysqlserver SH, the script is as follows:
#!/bin/sh
if [ -z $1 ]; then
        echo "ERROR::you must input a name(start/restart/stop/status)"
        exit 0
fi

/usr/local/mysql/support-files/mysql.server $1
Give the script executable permission (/ www/shell this path is my own script storage path)
chmod +x /www/shell/mysqlserver.sh
mysql start
/www/shell/mysqlserver.sh start

cd /usr/local/mysql/bin

./mysql -uroot -p
If the startup has the following errors:
ERROR 2002 (HY000): Can't connect to local MySQL server through socket '/usr/local/mysql/data/mysql.sock' (2)
First find mysql Sock path
find / -name mysql.sock
Found path in
/tmp/mysql.sock
Modify mysql. In the configuration file The sock path is / TMP / MySQL sock
vim /etc/my.cnf
Restart the mysql service again
cd /usr/local/mysql/bin
The client connects to mysql (the environment variable can be set here so that mysql can be executed anywhere)
./mysql -uroot -p

Enter password:
ERROR 1045 (28000): Access denied for user 'root'@'localhost' (using password: NO)
View initial password
cat /root/.mysql_secret

mysql -uroot -p
After logging in again, set the remote login and modify the initial root password
alter user 'root'@'localhost' identified by '123abc';

GRANT ALL PRIVILEGES ON *.* TO 'root'@'%' IDENTIFIED BY '123abc' WITH GRANT OPTION;

flush privileges;
2.mysql master-slave configuration
2.1 setting the master database (106.13.145.174) configuration file:
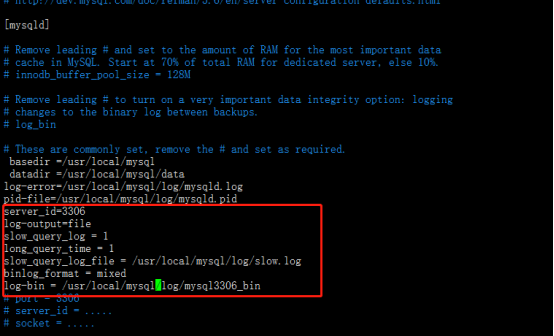
vim /etc/my.cnf finds the [mysqld] module and adds the following
server_id=3306

log-output=file

slow_query_log = 1

long_query_time = 1

slow_query_log_file = /usr/local/mysql/log/slow.log

binlog_format = mixed

log-bin = /usr/local/mysql/log/mysql3306_bin
Restart database
/www/shell/mysqlserver.sh restart

mysql -uroot -p
After successful login
SHOW MASTER STATUS;
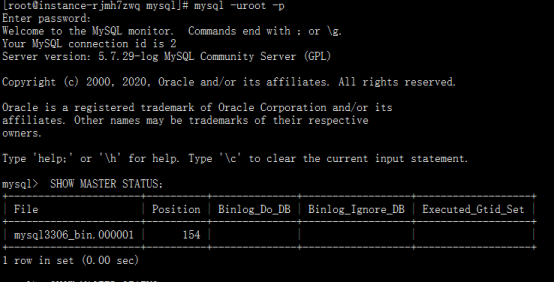
Remember the values of File and Position, and configure the parameters required from the library later
mysql3306_ bin. 00000 1 and 154
2.2 setting slave Library (39.101.213.45) configuration file:
vim /etc/my.cnf finds the [mysqld] module and adds the following
server_id=3307

log-output=file

slow_query_log = 1

long_query_time = 1

slow_query_log_file = /usr/local/mysql/log/slow.log

binlog_format = mixed

log-bin = /usr/local/mysql/log/mysql3307_bin
Similar to setting the main library, wq! Save and restart mysql and log in to mysql -uroot -p
Set up link from library to master library
change master to master_host='106.13.145.174',master_port=3306,master_user='root',master_password='123abc',master_log_file='mysql3306_bin.000001',master_log_pos=154;
After running, there will be the following information:

start slave;

show slave status \G
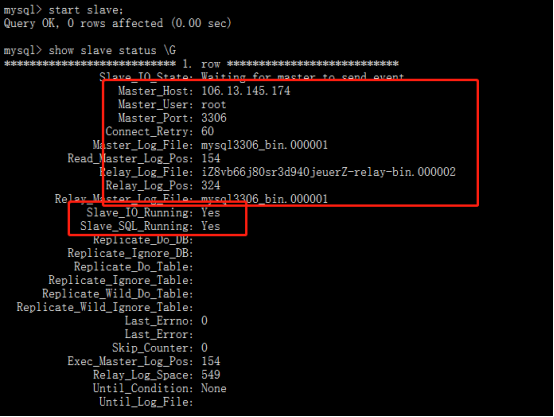
This completes the master-slave setting.
3. Test master-slave
3.1 log in to the master database (106.13.145.174) to create the test01 database and create the slave table_ test
mysql -uroot -p

mysql> create database test01;

mysql> use test01;

mysql> create table slave_test(id int(6),name varchar(10));

mysql> insert into slave_test values(000001,'zhaoyanfei');

mysql> show tables;
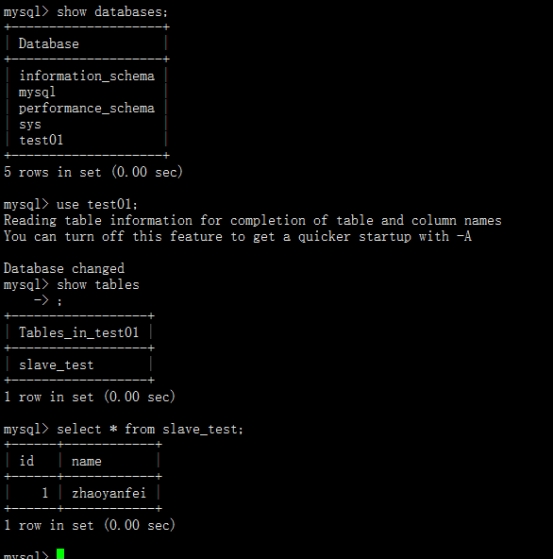
3.2 log in to the slave(39.101.213.45) and check whether there are databases and tables created by the master database
mysql -uroot -p

mysql> show databases;

mysql> use test01;

mysql> show tables;
