Hello, I'm Chen Zefeng. I'm responsible for Flow pipeline arrangement and task scheduling engine in Yunxiao. Under the cloud effect product system, we have served enterprise users with various R & D scales and technical depth, and received a lot of user feedback. For users who use Flow to build on the cloud, the construction speed is a key element of common concern. In the process of in-depth analysis of user cases, we found many common problems. We only need to modify and optimize their own project or engineering configuration, which can greatly improve the performance of the construction and further accelerate the efficiency of CICD. Today, we will take container image construction as the starting point and summarize some very practical optimization skills in practical engineering.
In the cloud native era, the construction and deployment of software are inseparable from Container technology. When it comes to containers, almost everyone subconsciously thinks of Docker. There are two very important concepts in Docker: Image and Container. The former is a static view, which packages the directory structure and running environment of the application; The latter is a dynamic view (process), which shows the running state of the program (cpu, memory, storage) and other information. The next article mainly shares how to write skills that can make the construction process of Dockerfile faster and build images smaller.
Image definition
First, let's take a look at the Docker image, which is stacked by multiple read-only layers, and each layer is the incremental modification of the previous layer. When you create a new container based on a mirror image, a new writable layer is added at the top of the base layer. This layer is commonly referred to as the "container layer". The following figure shows an example based on Docker The application image built by IO / CentOS basic image is the view when creating the container.
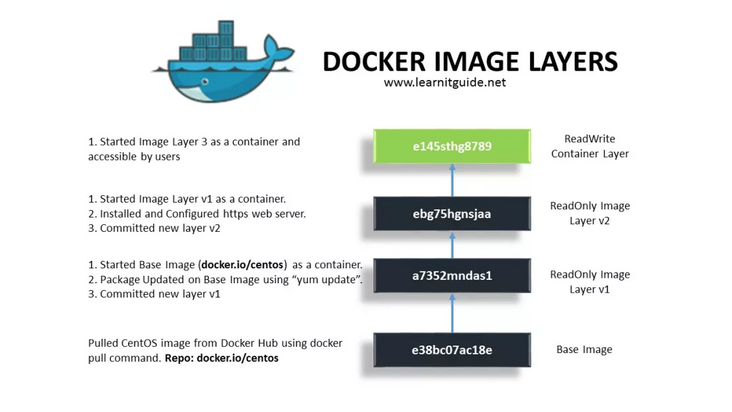
From the figure, we can see the process of image construction and container startup.
- First, pull the basic image docker io/centos;
- Based on docker IO / CentOS to start A container, run the instruction yum update and then conduct docker commit to submit A new read-only layer v1 (it can be understood that A new temporary image A is generated, but the user will not directly reference it);
- Start A new container based on the temporary image A, run, install and configure http server and other software, submit A new read-only layer v2, and also generate the image version B finally referenced by the developer here;
- For containers running based on image version B, another read-write layer will be added (operations such as file creation, modification and deletion of containers will take effect in this layer);
Image source
The image is mainly generated by Docker by reading and running the instructions of Dockerfile. Take an example of Dockerfile on the official website:
FROM ubuntu:18.04
COPY . /app
RUN make /app
CMD python /app/app.py
Its core logic is to define the base image of the reference, execute the COPY instruction, COPY the file from the context to the container, RUN run the RUN, execute the user-defined build script, and finally define the CMD or ENTRYPOINT started by the container. Building a more efficient image should also be optimized around the concepts involved above.
Dockerfile optimization techniques
Use domestic basic image
As a cloud build product, Flow will provide users with a new build environment for each build to avoid excessive operation and maintenance costs caused by environmental pollution. Because of this, each time Flow builds, it will download the basic image specified in the Dockerfile again.
If the basic image specified in Dockerfile comes from Docker Hub, the download may be slow due to network delay, such as:
- From Nginx
- From java:8
- FROM openjdk:8-jdk-alpine
Typical phenomena are as follows:
You can transfer your basic image file to the domestic image warehouse and modify your Dockerfile file. The operation steps are as follows:
- Pull the overseas image to the local image. docker pull openjdk:8-jdk-alpine;
- Push the basic image to the domestic region (such as Beijing, Shanghai, etc.) of Alibaba cloud image warehouse (cr.console.aliyun.com). docker tag openjdk:8-jdk-alpine registry.cn-beijing.aliyuncs.com/yournamespace/openjdk:8-jdk-alpinedocker push registry.cn-beijing.aliyuncs.com/yournamespace/openjdk:8-jdk-alpi;
- Modify the FROM in your dockerfile and download the image FROM your own image repository. From registry.cn-beijing.aliyuncs.com/yournamespace/openjdk:8-jdk-alpine;
Minimum and sufficient basic image
In addition to occupying more disk space, large image will also occupy more network consumption during application deployment, resulting in longer service startup time. Use a smaller base image, such as alpine as the base image. Here we take a look at a packaged MySQL client binary image, which is based on the image size comparison between alpine and ubuntu.
FROM alpine:3.14
RUN apk add --no-cache mysql-client
ENTRYPOINT ["mysql"]

FROM ubuntu:20.04
RUN apt-get update \
    && apt-get install -y --no-install-recommends mysql-client \
    && rm -rf /var/lib/apt/lists/*
ENTRYPOINT ["mysql"]
From this, we can see that using a base image as small as possible is conducive to greatly reducing the size of the image.
Reduce context sensitive catalog files
Docker is a c/s architecture design. When users execute docker build, they do not build directly in the client, but pass the directory specified in build as the context to the server, and then execute the image construction process mentioned above. If a large number of unnecessary files are associated in the context of image construction, it can be used Docker ignore to ignore these files (similar to. gitignore, the defined files will not be tracked and transferred).
The following is an example on the official website. By building the log, we can see that the size of the context is only tens of byte s:
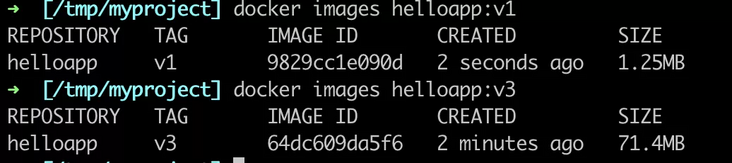
mkdir myproject && cd myproject
 echo "hello" > hello
 echo -e "FROM busybox\nCOPY / /\nRUN cat /hello" > Dockerfile
 docker build -t helloapp:v1 --progress=plain .
#7 [internal] load build context
#7 sha256:6b998f8faef17a6686d03380d6b9a60a4b5abca988ea7ea8341adfae112ebaec
#7 transferring context: 26B done
#7 DONE 0.0s
When we put a large file irrelevant to the program (or irrelevant small file, such as the dependent package of application construction, etc.) under myproject, we found that 70 MB of content needs to be transferred to the server when rebuilding helloapp:v3, and the image size is 71 MB.
#5 [internal] load build context
#5 sha256:746b8f3c5fdd5aa11b2e2dad6636627b0ed8d710fe07470735ae58682825811f
#5 transferring context: 70.20MB 1.0s done
#5 DONE 1.1s
Reduce the number of layers and control the size of layers
If we equate the simplicity of image construction with the execution process of script instructions such as bash, we will often step on too many image layers, which contain pits of useless files. Let's take a look at the writing method of the three dockerfile s and the image size they build respectively.
- The first is centos_git_nginx:normal image, which is based on centos. Two layers are added to the basic image. GIT and nginx binaries are installed respectively. You can see that the size of the image is about 402MB.
FROM centos
RUN yum install -y git
RUN yum install -y nginx

- Then we optimize the dockerfile and change it to the following way of adding only one layer. You can see that the size of the image is reduced to 384 MB, which proves that the reduction of layers can reduce the size of the image.
FROM centos
RUN yum install -y git &&  yum install -y nginx

- Since the yum install process will generate some cache data, which are not needed during the running of the application, we will delete it immediately after installing the software, and then the observation image will be reduced to 357 MB again.
FROM centos
RUN yum install -y git && \
    yum install -y nginx && \
    yum clean all && rm -rf /var/cache/yum/*

TIPS: we know that each layer generated in the image construction process is a read-only layer and can no longer be modified. The following writing method does not play a role in reducing the size of the image, but also adds a useless image layer.
FROM centos
RUN yum install -y git && \
    yum install -y nginx
RUN yum clean all && rm -rf /var/cache/yum/*
It should be noted that it is not necessarily a good practice to pursue too few layers, which will reduce the probability of layers being cached when building or pulling images.
Place invariant layers in front and variable layers in back
When we execute docker build multiple times at the same time, we can find that when we build again after building an image, docker will reuse the image data in the cache directly.
In fact, docker will gradually complete the instructions in Dockerfile and execute each instruction in the specified order. When examining each instruction, docker looks for an existing image in its cache that can be reused. Docker starts with the existing parent image in the cache and compares the next instruction with all the child images derived from the basic image to see if one of them is generated with the same instruction. Otherwise, the cache will be invalid.
For example, we can put simple and often dependent basic software such as git, make and other frequently used instructions that are not often changed to the front for execution, so that the process layer of image construction can directly use the previously generated cache instead of repeatedly downloading software, which wastes bandwidth and time.
Here we compare the two writing methods. First, initialize the relevant directories and files:
 mkdir myproject && cd myproject
 echo "hello" > hello
- The first way to write dockerfile is to first COPY the file, and then RUN to install the software.
FROM ubuntu:18.04
COPY /hello /
RUN apt-get update --fix-missing && apt-get install -y \
    aufs-tools \
    automake \
    build-essential \
    curl \
    dpkg-sig \
    libcap-dev \
    libsqlite3-dev \
    mercurial \
    reprepro \
    ruby1.9.1 \
    && rm -rf /var/lib/apt/lists/*
Through time docker build -t cache_test -f Dockerfile . After the image construction is successful, it can be found that the subsequent construction directly hits the cache to generate an image.
time docker build -t cache_test -f Dockerfile .
[+] Building 59.8s (8/8) FINISHED
 => [internal] load build definition from Dockerfile                                                                                                                                                                     0.0s
 => => transferring dockerfile: 35B                                                                                                                                                                                      0.0s
 => [internal] load .dockerignore                                                                                                                                                                                        0.0s
 => => transferring context: 2B                                                                                                                                                                                          0.0s
 => [internal] load metadata for docker.io/library/ubuntu:18.04                                                                                                                                                          0.0s
 => [internal] load build context                                                                                                                                                                                        0.0s
 => => transferring context: 26B                                                                                                                                                                                         0.0s
 => [1/3] FROM docker.io/library/ubuntu:18.04                                                                                                                                                                            0.0s
 => CACHED [2/3] COPY /hello /                                                                                                                                                                                           0.0s
 => [3/3] RUN apt-get update && apt-get install -y     aufs-tools     automake     build-essential     curl     dpkg-sig     && rm -rf /var/lib/apt/lists/*                                                             58.3s
 => exporting to image                                                                                                                                                                                                   1.3s
 => => exporting layers                                                                                                                                                                                                  1.3s
 => => writing image sha256:5922b062e65455c75a74c94273ab6cb855f3730c6e458ef911b8ba2ddd1ede18                                                                                                                             0.0s
 => => naming to docker.io/library/cache_test                                                                                                                                                                            0.0s

docker build -t cache_test -f Dockerfile .  0.33s user 0.31s system 1% cpu 1:00.37 total
time docker build -t cache_test -f Dockerfile .
docker build -t cache_test -f Dockerfile .  0.12s user 0.08s system 34% cpu 0.558 total
Modify the contents of the hello file, echo "world" > > hello, and execute time docker build - t cache again_ test -f Dockerfile . , At this time, the time of image construction returns to about 1 minute.
- The dockerfile of the second method is as follows. We will install the basic software that is basically unchanged on the top and the hello file that may change on the bottom.
FROM ubuntu:18.04
RUN apt-get update && apt-get install -y \
    aufs-tools \
    automake \
    build-essential \
    curl \
    dpkg-sig \
    && rm -rf /var/lib/apt/lists/*
COPY /hello /
Through time docker build -t cache_test -f Dockerfile . For image construction, the first construction takes about 1 minute (if the construction is successful, hit the cache again to generate an image).
Modify the contents of the hello file, date > > hello, and execute time docker build - t cache again_ test -f Dockerfile . , At this time, the time of image construction is within 1s, that is, the cache layer built by the second layer is successfully reused.
Use multistage to separate build and runtime
Here is an example of golang. First, use the example code base https://github.com/golang/exa... clone to the local, add a dockerfile to build the application image.
FROM golang:1.17.6
ADD . /go/src/github.com/golang/example
WORKDIR /go/src/github.com/golang/example
RUN go build -o /go/src/github.com/golang/example/hello /go/src/github.com/golang/example/hello/hello.go
ENTRYPOINT ["/go/src/github.com/golang/example/hello"]
We can see that the size of the image is 943 MB, and the program normally outputs Hello, Go examples!
Next, let's optimize the above process using multi-stage construction and as little runtime as possible.
FROM golang:1.17.6 AS BUILDER
ADD . /go/src/github.com/golang/example
RUN go build -o /go/src/github.com/golang/example/hello /go/src/github.com/golang/example/hello/hello.go

FROM golang:1.17.6-alpine
WORKDIR /go/src/github.com/golang/example
COPY --from=BUILDER /go/src/github.com/golang/example/hello /go/src/github.com/golang/example/hello
ENTRYPOINT ["/go/src/github.com/golang/example/hello"]
You can see that the current image size is only 317 MB. Through multi-stage construction, the application construction and runtime dependency are separated, and only the software that depends on runtime will eventually be hit into the application image.

Click the link below to experience the cloud effect pipeline Flow immediately.
https://www.aliyun.com/produc...