Introduction to Nacos
Nacos is a dynamic service discovery, configuration management and service management platform that is easier to build cloud native applications. As one of the three components of Spring Cloud Alibaba, Nacos integrates the functions of service registration and discovery center, configuration center and service management, similar to Eureka / consult + config + admin. The Nacos architecture is as follows:
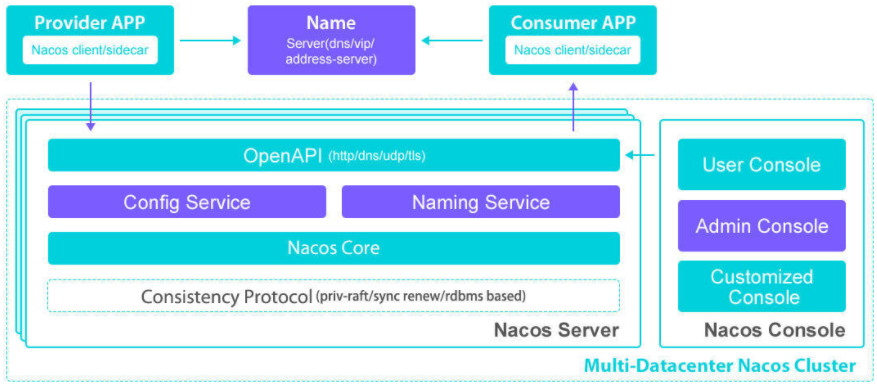
Nacos Server has two operation modes: standalone and cluster. The standalone mode is generally used for demo and testing without changing any configuration; Cluster mode can be used in production environment. In addition, standalone only uses Derby, which is ignored even if MySQL is configured in application.properties;
The cluster mode will automatically use mysql. At this time, if MySQL is not configured, an error will be reported.
Next, deploy a set of highly available Nacos cluster based on Ubuntu 1804. The cluster adopts nginx reverse proxy mode
1, Environmental preparation
| service | IP |
|---|---|
| nginx | 192.168.20.130 |
| nacos1 | 192.168.20.131 |
| nacos2 | 192.168.20.132 |
| nacos3 | 192.168.20.133 |
| mysql | 192.168.20.135 |
Configure domain name
hostnamectl --static set-hostname nginx
vim /etc/hosts
#nacos-cluster
192.168.20.130  nginx
192.168.20.131  nacos1
192.168.20.132  nacos2
192.168.20.133  nacos3
192.168.20.135  mysql
Configuring java environment with nacos and mysql
Install the java1.8 script java8-install.sh
#!/bin/bash
tar -zxf jdk-8u261-linux-x64.tar.gz -C /usr/local/src/
ln -sv /usr/local/src/jdk1.8.0_261 /usr/local/jdk
ln -sv /usr/local/jdk/bin/java /usr/bin/
cat >> /etc/profile <<EOF
export JAVA_HOME=/usr/local/jdk
export JRE_HOME=\$JAVA_HOME/jre
export CLASSPATH=.:\$JAVA_HOME/lib/dt.jar:\$JAVA_HOME/lib/tools.jar:\$JRE_HOME/lib
export PATH=\$PATH:\$JAVA_HOME/bin:\$JRE_HOME/bin
EOF

. /etc/profile
java -version
chmod +x java8-install.sh  &&  ./java8-install.sh
2, Install mysql
Download binary MySQL: https://downloads.mysql.com/archives/community/
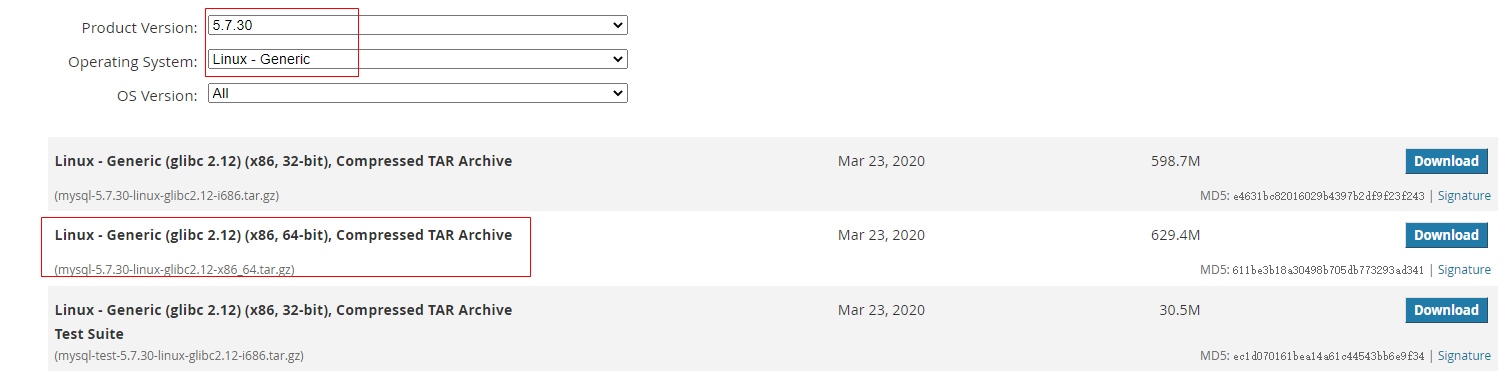
root@mysql:~# wget https://downloads.mysql.com/archives/get/p/23/file/mysql-5.7.30-linux-glibc2.12-x86_64.tar.gz
root@mysql:~# tar -zxf mysql-5.7.30-linux-glibc2.12-x86_64.tar.gz -C /usr/local/
root@mysql:~# cd /usr/local  &&  mv mysql-5.7.30-linux-glibc2.12-x86_64 mysql
Configure system environment variables
root@mysql:/usr/local# vim /etc/profile
export MYSQL_HOME=/usr/local/mysql
export JAVA_HOME=/usr/local/jdk
export JRE_HOME=$JAVA_HOME/jre
export CLASSPATH=.:$JAVA_HOME/lib/dt.jar:$JAVA_HOME/lib/tools.jar:$JRE_HOME/lib
export PATH=$PATH:$JAVA_HOME/bin:$JRE_HOME/bin:$MYSQL_HOME/bin
root@mysql:/usr/local# source /etc/profile
Create mysql user and database data directory
root@mysql:/usr/local/mysql# groupadd mysql && useradd -M -s /sbin/nologin mysql -g mysql
root@mysql:/usr/local/mysql# mkdir -p /data/mysql && chown -R mysql /data/mysql && chown -R mysql:mysql /usr/local/mysql
Create database configuration file my.cnf
root@mysql:/usr/local/mysql# vim /etc/my.cnf
[client]
port = 3306
socket = /data/mysql/mysql.sock

[mysqld]
port = 3306
socket = /data/mysql/mysql.sock
user = mysql
basedir = /usr/local/mysql
datadir = /data/mysql
skip-external-locking
key_buffer_size = 32M
max_allowed_packet = 1024M
table_open_cache = 128
sort_buffer_size = 768K
net_buffer_length = 8K
read_buffer_size = 768K
read_rnd_buffer_size = 512K
myisam_sort_buffer_size = 8M
query_cache_size = 16M
tmp_table_size = 32M
performance_schema_max_table_instances = 1000
explicit_defaults_for_timestamp = true
#skip-networking
max_connect_errors = 100
open_files_limit = 65535

log_bin=mysql-bin
binlog_format=mixed
server_id = 232
expire_logs_days = 10
early-plugin-load = ""

default_storage_engine = InnoDB
innodb_file_per_table = 1
innodb_buffer_pool_size = 128M
innodb_log_file_size = 32M
innodb_log_buffer_size = 8M
innodb_flush_log_at_trx_commit = 1
innodb_lock_wait_timeout = 50

[mysqldump]
quick
max_allowed_packet = 16M

[mysql]
no-auto-rehash

[myisamchk]
key_buffer_size = 32M
sort_buffer_size = 768K
read_buffer = 2M
write_buffer = 2M
Initialize the database and record the initial password
root@mysql:/usr/local/mysql# apt install -y libaio*		#Install system dependent Libraries
root@mysql:/usr/local/mysql# /usr/local/mysql/bin/mysqld --initialize --user=mysql --basedir=/usr/local/mysql --datadir=/data/mysql
2021-11-30T03:49:01.883997Z 0 [Warning] InnoDB: New log files created, LSN=45790
2021-11-30T03:49:01.906523Z 0 [Warning] InnoDB: Creating foreign key constraint system tables.
2021-11-30T03:49:01.963239Z 0 [Warning] No existing UUID has been found, so we assume that this is the first time that this server has been started. Generating a new UUID: 74e02eb1-5190-11ec-87d8-00505632ccbe.
2021-11-30T03:49:01.963786Z 0 [Warning] Gtid table is not ready to be used. Table 'mysql.gtid_executed' cannot be opened.
2021-11-30T03:49:02.202634Z 0 [Warning] CA certificate ca.pem is self signed.
2021-11-30T03:49:02.603075Z 1 [Note] A temporary password is generated for root@localhost: .ZWmGiql?62z
Add mysqld to system service
root@mysql:/usr/local/mysql# cp support-files/mysql.server /etc/init.d/mysqld
root@mysql:/usr/local/mysql# chmod +x /etc/init.d/mysqld
root@mysql:/usr/local/mysql# vim /etc/systemd/system/mysqld.service
[Unit]
Description=mysqld
After=network.target

[Service]
Type=forking
ExecStart=/etc/init.d/mysqld start
ExecReload=/etc/init.d/mysqld restart
ExecStop=/etc/init.d/mysqld stop
PrivateTmp=true

[Install]
WantedBy=multi-user.target
Start mysql, test the connection, modify the initial password, and log in with the new password for verification
root@mysql:/usr/local/mysql# systemctl daemon-reload && systemctl start mysqld && systemctl enable mysqld
root@mysql:/usr/local/mysql# mysql -u root -p'.ZWmGiql?62z'
mysql> set password='Hlro@123';
root@mysql:/usr/local/mysql# mysql -u root -p'Hlro@123'
mysql: [Warning] Using a password on the command line interface can be insecure.
Welcome to the MySQL monitor.  Commands end with ; or \g.
Your MySQL connection id is 4
Server version: 5.7.30-log MySQL Community Server (GPL)

Copyright (c) 2000, 2020, Oracle and/or its affiliates. All rights reserved.

Oracle is a registered trademark of Oracle Corporation and/or its
affiliates. Other names may be trademarks of their respective
owners.

Type 'help;' or '\h' for help. Type '\c' to clear the current input statement.

mysql> show databases;
+--------------------+
| Database           |
+--------------------+
| information_schema |
| mysql              |
| performance_schema |
| sys                |
+--------------------+
4 rows in set (0.00 sec)
Create nacos database and authorize
mysql> create database nacos;
Query OK, 1 row affected (0.01 sec)

mysql> grant all on nacos.* to nacos@'192.168.20.%' identified by 'Nacos@123';
Query OK, 0 rows affected, 1 warning (0.01 sec)

mysql> flush privileges;
Query OK, 0 rows affected (0.00 sec)
Local connection test
root@mysql:~# mysql -h 192.168.20.135 -u nacos -p'Nacos@123'
mysql> show databases;
+--------------------+
| Database           |
+--------------------+
| information_schema |
| nacos              |
+--------------------+
2 rows in set (0.00 sec)
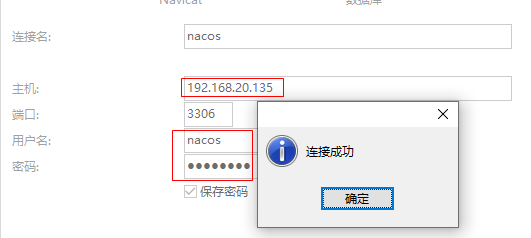
windows(192.168.20.1) test connection: Navicat connection test
3, Install Nacos (nacos1, nacos2, nacos3)
GitHub Download: https://github.com/alibaba/nacos/releases/tag/2.0.3
root@nacos1:~# wget https://github.com/alibaba/nacos/releases/download/2.0.3/nacos-server-2.0.3.tar.gz
root@nacos1:~# tar -zxf nacos-server-2.0.3.tar.gz -C /usr/local/
Modify the configuration file: cluster.conf, application.properties
root@nacos1:~# cd /usr/local/nacos/  &&  cp conf/cluster.conf.example conf/cluster.conf
root@nacos1:/usr/local/nacos# vim conf/cluster.conf
#nacos-cluster
192.168.20.131:8848
192.168.20.132:8848
192.168.20.133:8848
root@nacos1:/usr/local/nacos# vim conf/application.properties
server.servlet.contextPath=/nacos
### Default web server port:
server.port=8848
### If use MySQL as datasource, the database created on mysql is nacos
db.num=1db.url.0=jdbc:mysql://192.168.20.135:3306/nacos?characterEncoding=utf8&connectTimeout=1000&socketTimeout=3000&autoReconnect=true&useUnicode=true&useSSL=false&serverTimezone=UTC
db.user.0=nacos
db.password.0=Nacos@123
Create a database table and copy the sql script under the nacos configuration file to the database server
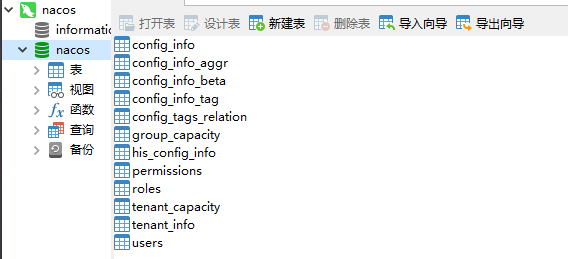
root@nacos1:/usr/local/nacos# scp conf/nacos-mysql.sql 192.168.20.135:/usr/local/mysql/
nacos The user logs in to the database and switches to nacos Library, execution nacos-mysql.sql script
mysql> use nacos;
Database changed
mysql> source /usr/local/mysql/nacos-mysql.sql;
Query OK, 0 rows affected (0.03 sec)
Query OK, 0 rows affected (0.01 sec)
Query OK, 0 rows affected (0.00 sec)
Query OK, 0 rows affected (0.02 sec)
Query OK, 0 rows affected (0.00 sec)
Query OK, 0 rows affected (0.01 sec)
Query OK, 0 rows affected (0.00 sec)
Query OK, 0 rows affected (0.01 sec)
Query OK, 0 rows affected (0.00 sec)
Query OK, 0 rows affected (0.00 sec)
Query OK, 0 rows affected (0.03 sec)
Query OK, 0 rows affected (0.00 sec)
Query OK, 1 row affected (0.01 sec)
Query OK, 1 row affected (0.00 sec)
mysql>
Or copy the SQL command in the SQL script and run the command in Navicat. Note that you need to switch to the nacos library for execution
Start nacos, view logs, and execute on three nacos
root@nacos1:~# /usr/local/nacos/bin/startup.sh
/usr/local/jdk/bin/java -Djava.ext.dirs=/usr/local/jdk/jre/lib/ext:/usr/local/jdk/lib/ext  -server -Xms2g -Xmx2g -Xmn1g -XX:MetaspaceSize=128m -XX:MaxMetaspaceSize=320m -XX:-OmitStackTraceInFastThrow -XX:+HeapDumpOnOutOfMemoryError -XX:HeapDumpPath=/usr/local/nacos/logs/java_heapdump.hprof -XX:-UseLargePages -Dnacos.member.list= -Xloggc:/usr/local/nacos/logs/nacos_gc.log -verbose:gc -XX:+PrintGCDetails -XX:+PrintGCDateStamps -XX:+PrintGCTimeStamps -XX:+UseGCLogFileRotation -XX:NumberOfGCLogFiles=10 -XX:GCLogFileSize=100M -Dloader.path=/usr/local/nacos/plugins/health,/usr/local/nacos/plugins/cmdb -Dnacos.home=/usr/local/nacos -jar /usr/local/nacos/target/nacos-server.jar  --spring.config.additional-location=file:/usr/local/nacos/conf/ --logging.config=/usr/local/nacos/conf/nacos-logback.xml --server.max-http-header-size=524288
nacos is starting with cluster
nacos is starting,you can check the /usr/local/nacos/logs/start.out
root@nacos1:~# cat /usr/local/nacos/logs/start.out
2021-11-30 04:39:19,677 INFO Nacos is starting...
2021-11-30 04:39:19,706 INFO Nacos started successfully in cluster mode. use external storage
Log in to the web to view any IP. The default account password is nacos
http://192.168.20.131:8848/nacos/#/login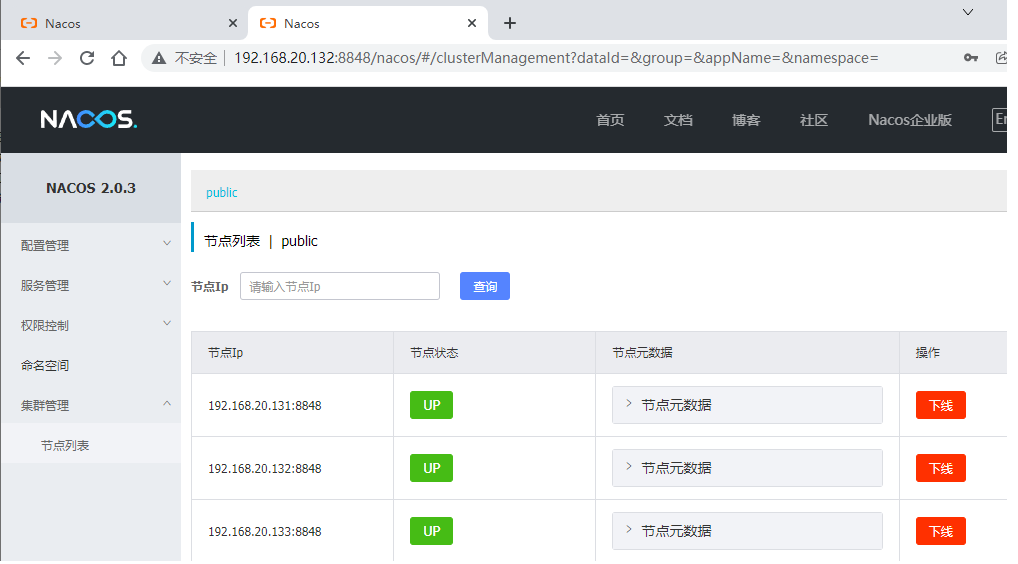
4, Configure nginx to implement reverse proxy
Download nginx: https://nginx.org/en/download.html
root@nginx:~# wget https://nginx.org/download/nginx-1.20.2.tar.gz
 Install the compilation environment and dependent packages
root@nginx:~# apt install gcc make openssl-devel zlib-devel openssl build-essential libtool libpcre3 libpcre3-dev zlib1g-dev
root@nginx:~# useradd -s /sbin/nologin nginx
root@nginx:~# tar -zxf nginx-1.20.2.tar.gz -C /usr/local/src/
root@nginx:~# cd /usr/local/src/nginx-1.20.2/
root@nginx:/usr/local/src/nginx-1.20.2#  ./configure --prefix=//usr/local/nginx --user=nginx --group=nginx --with-stream  --with-stream_realip_module
root@nginx:/usr/local/src/nginx-1.20.2# make  &&  make install
root@nginx:~# ls /usr/local/nginx/
conf  html  logs  sbin
root@nginx:~# chown -R nginx.nginx /usr/local/nginx
root@nginx:~# ln -sv /usr/local/nginx/sbin/nginx /usr/sbin/
'/usr/sbin/nginx' -> '/usr/local/nginx/sbin/nginx'
root@nginx:~# nginx -V
nginx version: nginx/1.20.2
built by gcc 7.5.0 (Ubuntu 7.5.0-3ubuntu1~18.04)
configure arguments: --prefix=/usr/local/nginx --user=nginx --group=nginx --with-stream --with-stream_realip_module
root@nginx:~# vim /etc/systemd/system/nginx.service
[Unit]
Description=nginx - high performance web server
Documentation=http://nginx.org/en/docs/
After=network-online.target remote-fs.target nss-lookup.target
Wants=network-online.target
[Service]
Type=forking

ExecStart=/usr/local/nginx/sbin/nginx -c /usr/local/nginx/conf/nginx.conf
ExecReload=/bin/kill -s HUP $MAINPID
ExecStop=/bin/kill -s TERM $MAINPID
[Install]
WantedBy=multi-user.target
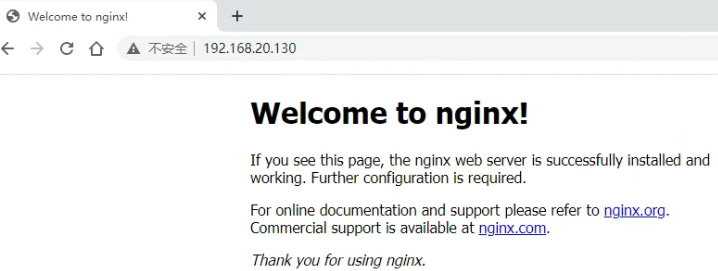
Start nginx test Homepage
root@nginx:~# systemctl daemon-reload && systemctl start nginx.service && systemctl enable nginx.service
Compile the configuration file, add tcp reverse proxy, add stream on the http module, and restart NGINX
root@nginx:/usr/local/nginx/conf# vim nginx.conf
stream{
    upstream nacos {
        server  192.168.20.131:8848;
        server  192.168.20.132:8848;
        server  192.168.20.133:8848;
    }
    server {
	listen 8848;
	proxy_connect_timeout 1s; #Connection timeout
	proxy_timeout 3s; #Forwarding timeout
	proxy_pass nacos; #Forward to specific server group
    }
}
root@nginx:~# systemctl restart nginx.service
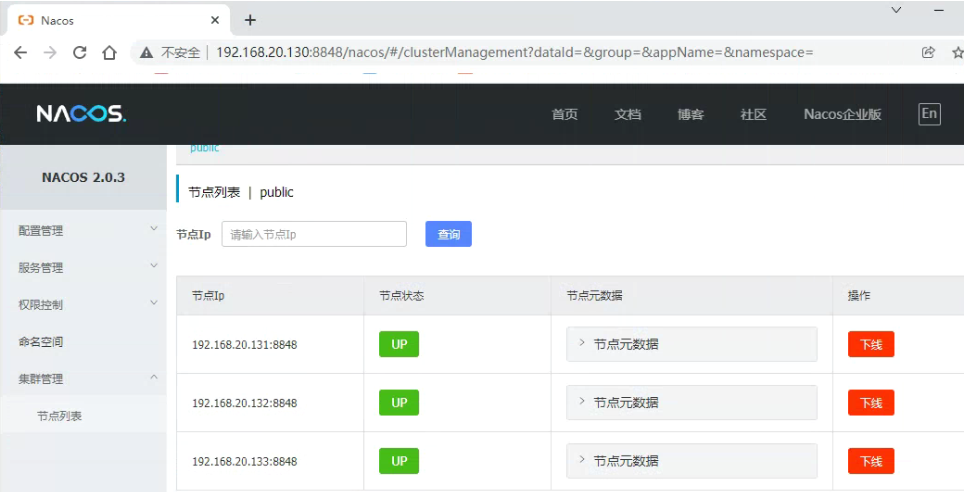
Browser access authentication
http://192.168.20.130:8848/nacos
nginx can be combined with Keepalived to achieve high availability. MySQL can also be deployed as a cluster or master-slave replication mode to achieve higher levels of high availability