Nacos of the registry
Springcloud + nacos – version selection
Before everything starts, you need to confirm all versions, because if the versions do not match, it may lead to many strange problems.
1. Front
- First confirm the version of Spring Cloud Alibaba from the spring official website
- Confirm the version of Spring Boot and Nacos through the version of Spring Cloud Alibaba
Version confirmed on the official website
Address: https://spring.io/projects/spring-cloud-alibaba
Confirm spring cloud Alibaba: 2.2.1 RELEASE
2. Select Spring Boot Version
Version confirmed on the official website
Address: https://start.spring.io/actuator/info
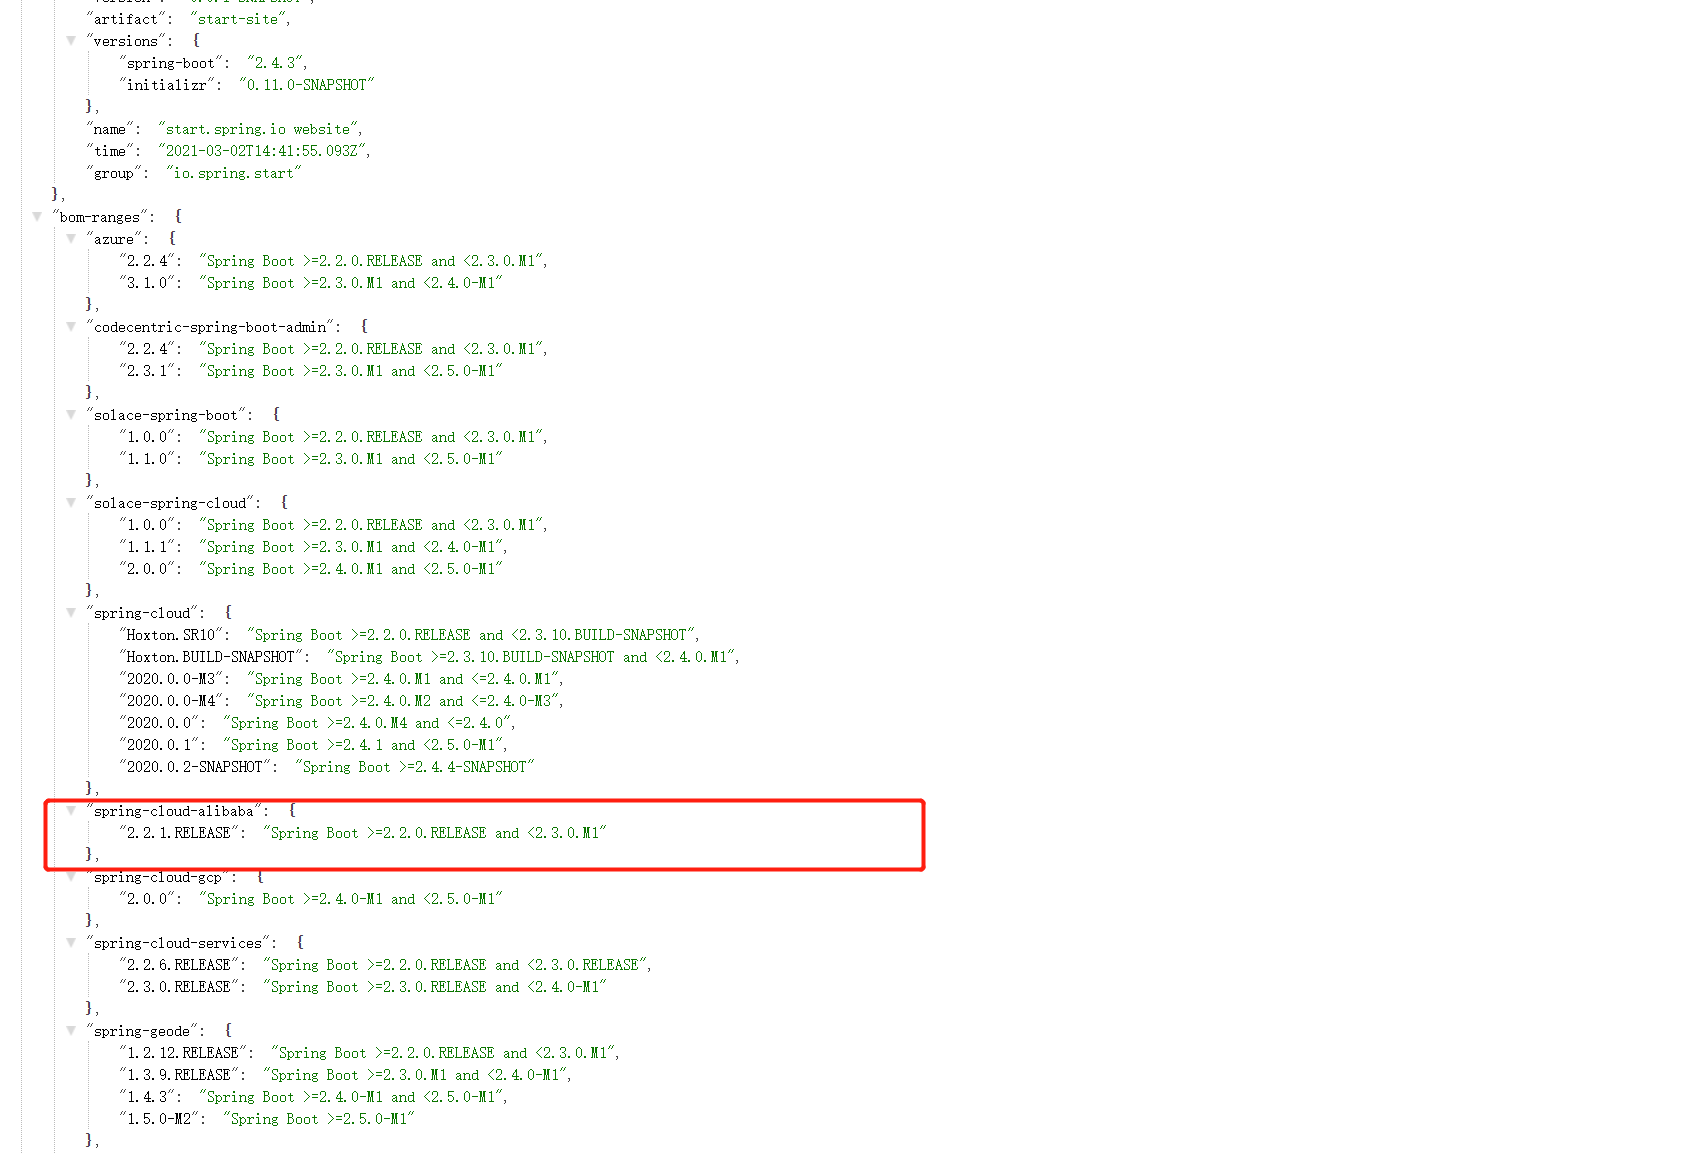
Now we can know the Spring Boot version: > = 2.2.0 RELEASE and <2.3.0. M1
We're looking at the recommended version of nacos
Version confirmed on official website
Address: https://github.com/alibaba/spring-cloud-alibaba/wiki/ Version Description
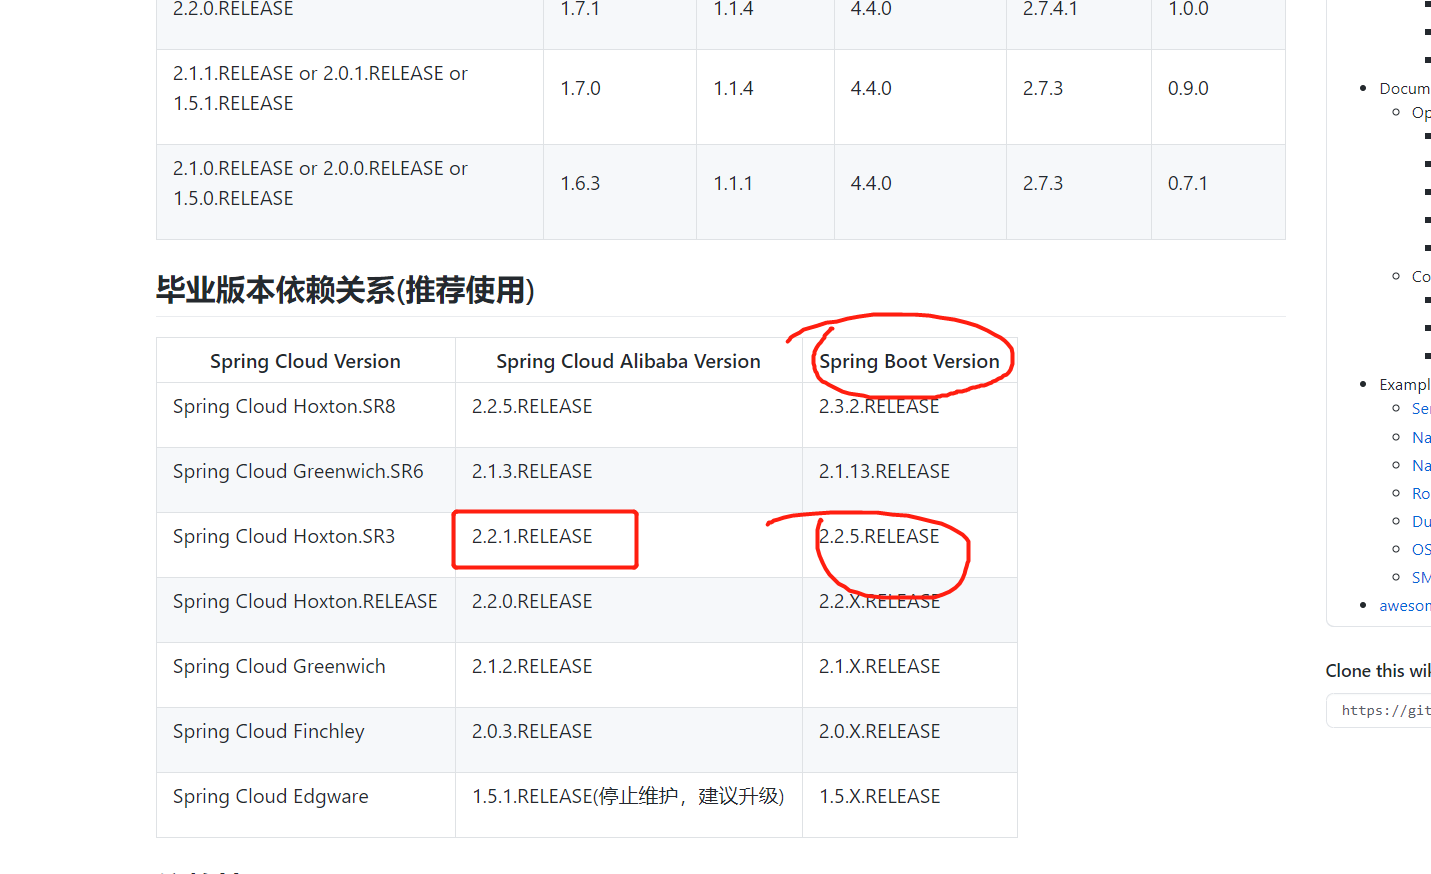
Confirm spring boot: 2.2.5 RELEASE
3. Select Nacos Version
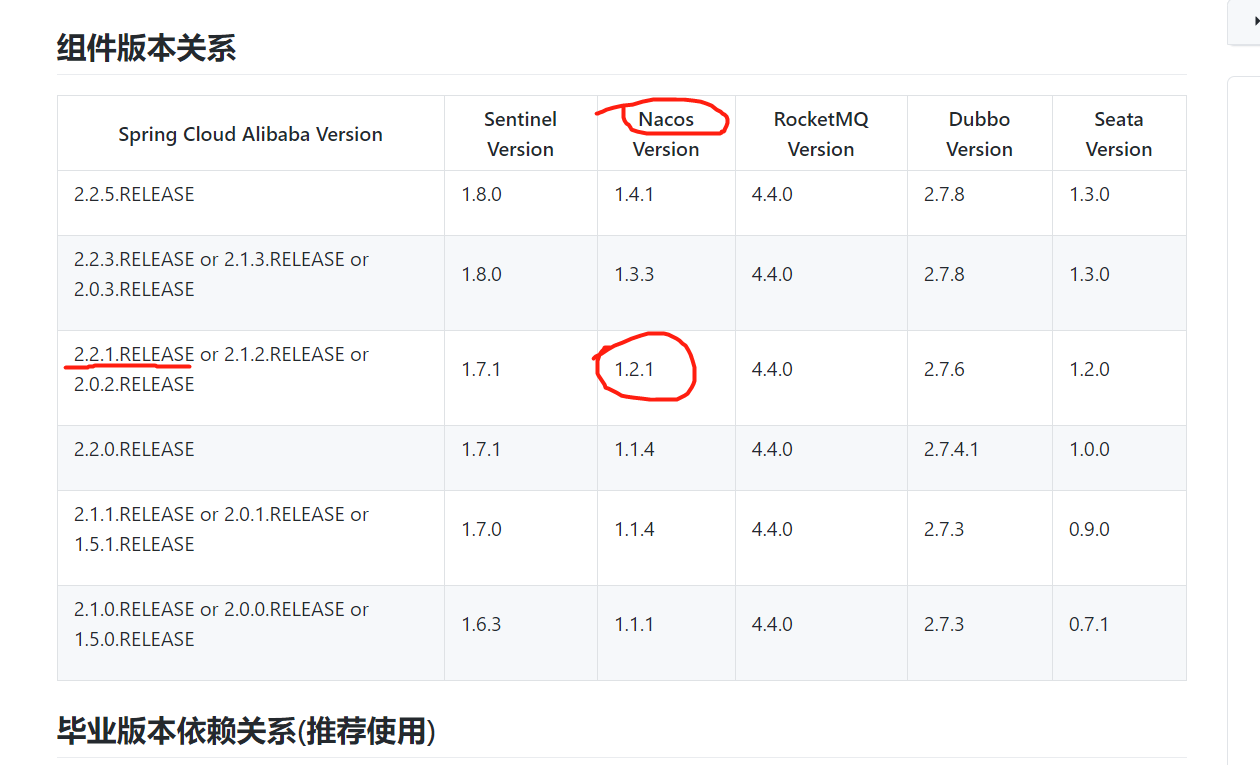
Confirm Nacos: 1.2.1
4. Select Spring Cloud
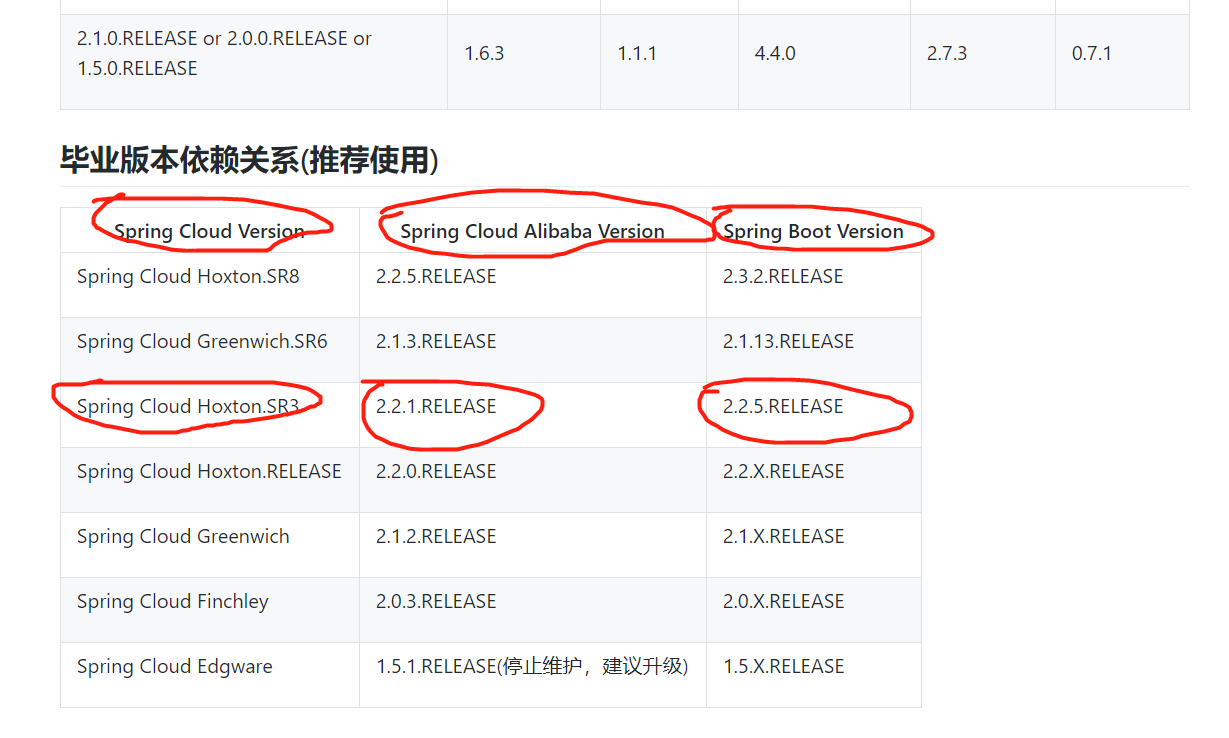
Confirm spring cloud: Hoxton SR3
Registration Center
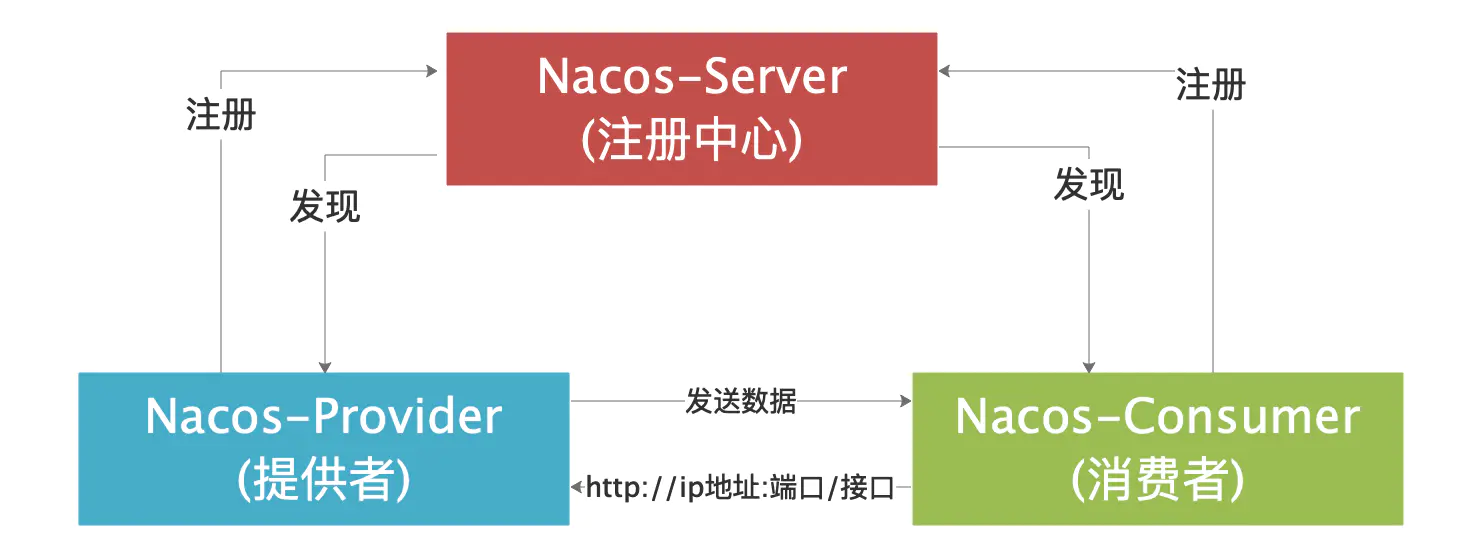
The registry plays a very important role in the microservice project. It is a link in the microservice architecture, similar to the "address book". It records the mapping relationship between the service and the service address. In the distributed architecture, the service will register here. When the service needs to call other services, it will find the service address here and call it.
In the distributed system, we are faced with the following problems
How to manage the huge network service structure?
How to get offline in time after service downtime?
How to effectively expand the service level during peak traffic?
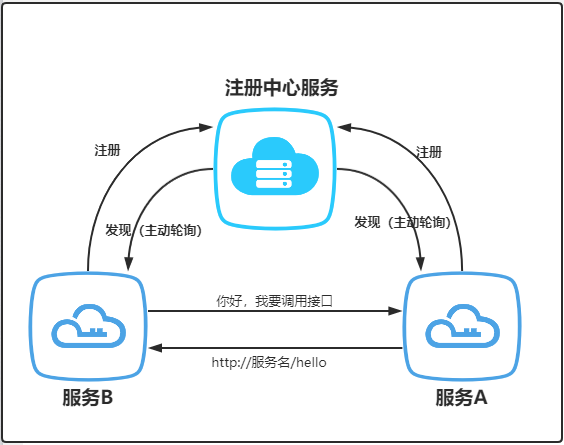
In addition to the basic service registration and discovery mechanism, at least the following five aspects should be considered from the perspective of development, operation and maintenance:
- Test activity: after the service is registered, how to test the service to ensure the availability of the service?
- Load balancing: when there are multiple service providers, how to balance the load of each provider?
- Integration: how to integrate the registry on the service provider or caller?
- Runtime dependency: what impact does the introduction of the registry have on the runtime environment of the application?
- Availability: how to ensure the availability of the registry itself, especially to eliminate single points of failure?
Nacos registry
Get started quickly
Nacos Alibaba is an open source dynamic service discovery, configuration management and service management platform that is easier to build cloud native applications. The Chinese documents are very complete, Document address stamp
Download and launch
- Source download
$ git clone https://github.com/alibaba/nacos.git
$ cd nacos/
$ mvn -Prelease-nacos -Dmaven.test.skip=true clean install -U
$ ls -al distribution/target/

// change the $version to your actual path
$ cd distribution/target/nacos-server-$version/nacos/bin
- Installation package download
Can from Latest stable version Download Nacos server - $version Zip package.
After Windows Downloads and decompresses (. zip), directly click bin / startup CMD is OK.
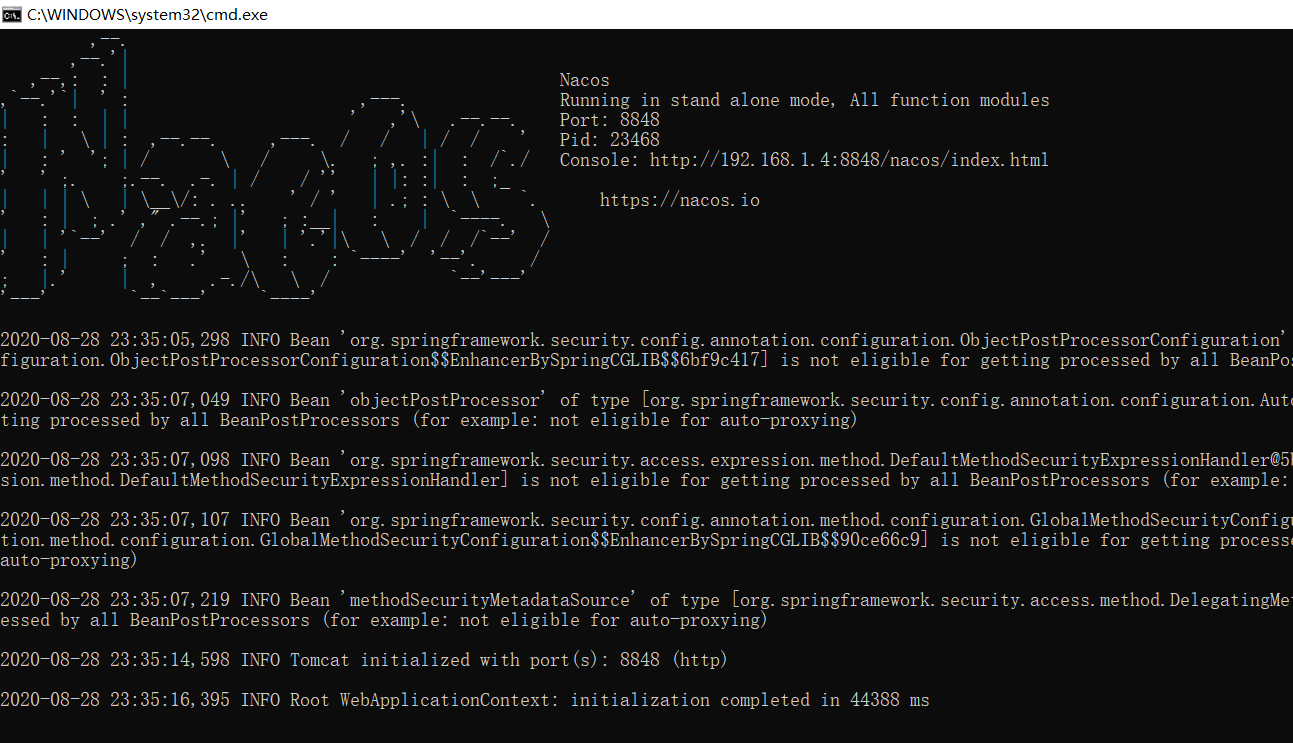
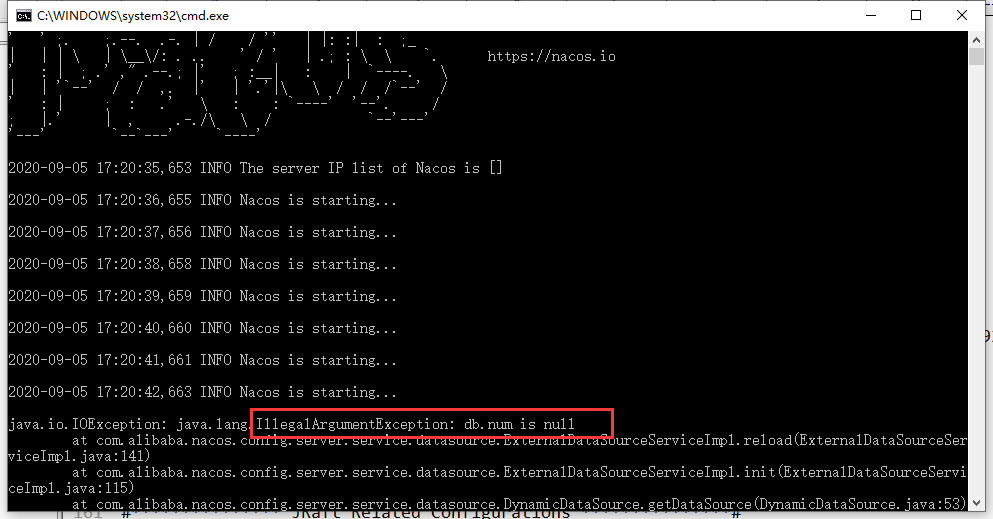
If you accidentally report the following errors:
java.io.IOException: java.lang.IllegalArgumentException: db.num is null
org.springframework.boot.web.embedded.tomcat.TomcatStarter.onStartup
work.boot.web.server.WebServerException: Unable to start embedded Tomcat
That means your Nacos is in cluster mode by default and needs to be changed to stand-alone mode
-
Found startup CMD file and edit it
-
Change cluster mode to stand-alone mode
set MODE="cluster"
Replace with:
set MODE="standalone"
- Linux/Unix/Mac
$ unzip nacos-server-$version.zip perhaps tar -xvf nacos-server-$version.tar.gz
$ cd nacos/bin
Start command (standalone stands for stand-alone mode, non cluster mode):
$ sh startup.sh -m standalone
If you are using the ubuntu system, or the error prompt [[symbol cannot be found when running the script, you can try to run as follows:
$ bash startup.sh -m standalone
- Open the console:
Nacos provides a visual operation platform. After installation, enter it in the browser http://localhost:8848 You can access it. The default user name and password are Nacos (I use version 1.3.0)
Build service
Unlike Eureka, it doesn't need to create a new web project. Like Zookeeper and Consul, it only needs to download, install and start our microservice and register it. Create two microservices, a client (caller) and a server (provider)
Here, I first create an aggregation module parent project named xianshishehui Nacos parent, and all subsequent modules are completed in the parent project.
Parent project POM XML file
<?xml version="1.0" encoding="UTF-8"?>
<project xmlns="http://maven.apache.org/POM/4.0.0"
         xmlns:xsi="http://www.w3.org/2001/XMLSchema-instance"
         xsi:schemaLocation="http://maven.apache.org/POM/4.0.0 http://maven.apache.org/xsd/maven-4.0.0.xsd">
    <modelVersion>4.0.0</modelVersion>

    <groupId>com.xianshishehui.nacos</groupId>
    <artifactId>xianshishehui-nacos-parent</artifactId>
    <version>1.0-SNAPSHOT</version>


    <!--Declare dependent versions-->
    <properties>
        <java.version>1.8</java.version>
        <spring-cloud.version>Hoxton.SR3</spring-cloud.version>
        <spring-boot.version>2.2.5.RELEASE</spring-boot.version>
        <spring-cloud-alibaba.version>2.2.1.RELEASE</spring-cloud-alibaba.version>
        <nacos.version>1.2.1</nacos.version>
    </properties>

    <dependencyManagement>
        <dependencies>
            <dependency>
                <groupId>org.springframework.cloud</groupId>
                <artifactId>spring-cloud-dependencies</artifactId>
                <version>${spring-cloud.version}</version>
                <type>pom</type>
                <scope>import</scope>
            </dependency>

            <dependency>
                <groupId>org.springframework.boot</groupId>
                <artifactId>spring-boot-dependencies</artifactId>
                <version>${spring-boot.version}</version>
                <type>pom</type>
                <scope>import</scope>
            </dependency>


            <dependency>
                <groupId>com.alibaba.cloud</groupId>
                <artifactId>spring-cloud-alibaba-dependencies</artifactId>
                <version>${spring-cloud-alibaba.version}</version>
                <type>pom</type>
                <scope>import</scope>
            </dependency>

        </dependencies>
    </dependencyManagement>
</project>
- Order service consumer
The screenshot of the project architecture is as follows
[the external chain picture transfer fails, and the source station may have an anti-theft chain mechanism. It is recommended to save the picture and upload it directly (img-m39wwbcs-1624516292498) (detailed analysis of Nacos in the registry. assets/image-20210623230028033.png)]
Order service consumer mainly has four files: startup class \ order controller \ bootstrap YML configuration file \ POM XML file
- pom.xml is mainly a dependency of nacos and alibaba cloud
<?xml version="1.0" encoding="UTF-8"?>
<project xmlns="http://maven.apache.org/POM/4.0.0" xmlns:xsi="http://www.w3.org/2001/XMLSchema-instance"
         xsi:schemaLocation="http://maven.apache.org/POM/4.0.0 https://maven.apache.org/xsd/maven-4.0.0.xsd">
    <modelVersion>4.0.0</modelVersion>
    <parent>
        <groupId>org.springframework.boot</groupId>
        <artifactId>spring-boot-starter-parent</artifactId>
        <version>2.2.5.RELEASE</version>
        <relativePath/> <!-- lookup parent from repository -->
    </parent>
    <groupId>com.xianshishehui.nacos</groupId>
    <artifactId>order-service-consumer</artifactId>
    <version>0.0.1-SNAPSHOT</version>
    <name>order-service-consumer</name>
    <description>Demo project for Spring Boot</description>

    <!--Declare dependent versions-->
    <properties>
        <java.version>1.8</java.version>
        <spring-cloud-alibaba.version>2.2.1.RELEASE</spring-cloud-alibaba.version>
    </properties>
    <dependencies>
        <dependency>
            <groupId>org.springframework.boot</groupId>
            <artifactId>spring-boot-starter-web</artifactId>
        </dependency>

        <!--It is important to join Alibaba service discovery dependency-->
        <dependency>
            <groupId>com.alibaba.cloud</groupId>
            <artifactId>spring-cloud-starter-alibaba-nacos-discovery</artifactId>
            <version>${spring-cloud-alibaba.version}</version>
        </dependency>

        <dependency>
            <groupId>org.springframework.boot</groupId>
            <artifactId>spring-boot-starter-test</artifactId>
            <scope>test</scope>
            <exclusions>
                <exclusion>
                    <groupId>org.junit.vintage</groupId>
                    <artifactId>junit-vintage-engine</artifactId>
                </exclusion>
            </exclusions>
        </dependency>
    </dependencies>

    <!--alibaba cloud Related dependency management-->
    <dependencyManagement>
        <dependencies>
            <dependency>
                <groupId>com.alibaba.cloud</groupId>
                <artifactId>spring-cloud-alibaba-dependencies</artifactId>
                <version>${spring-cloud-alibaba.version}</version>
                <type>pom</type>
                <scope>import</scope>
            </dependency>
        </dependencies>
    </dependencyManagement>


    <build>
        <plugins>
            <plugin>
                <groupId>org.springframework.boot</groupId>
                <artifactId>spring-boot-maven-plugin</artifactId>
            </plugin>
        </plugins>
    </build>
</project>
-
The startup class is mainly used to start the configuration of springboot and create http request Bean with RestTemplate
package com.xianshishehui.nacos.order.service; import org.springframework.boot.SpringApplication; import org.springframework.boot.autoconfigure.SpringBootApplication; import org.springframework.cloud.client.discovery.EnableDiscoveryClient; import org.springframework.cloud.client.loadbalancer.LoadBalanced; import org.springframework.context.annotation.Bean; import org.springframework.web.client.RestTemplate; @SpringBootApplication @EnableDiscoveryClient //a key public class OrderServiceConsumerApplication { // Add a RestTemplate object injection method. Note that the loaded annotation here must be added, otherwise it cannot be debugged remotely @Bean @LoadBalanced public RestTemplate restTemplate(){ return new RestTemplate(); } public static void main(String[] args) { SpringApplication.run(OrderServiceConsumerApplication.class, args); } } -
The order controller mainly receives the client request and will call the course service
 ```java
 package com.xianshishehui.nacos.order.service.consumer.controller;

 import org.springframework.beans.factory.annotation.Autowired;
 import org.springframework.web.bind.annotation.GetMapping;
 import org.springframework.web.bind.annotation.RequestMapping;
 import org.springframework.web.bind.annotation.RestController;
 import org.springframework.web.client.RestTemplate;

 @RestController
 @RequestMapping("order")
 public class OrderController {

     @Autowired
     private RestTemplate restTemplate;

     @GetMapping("get")
     public String get(){
         String result = restTemplate.getForObject(
                 "http://course-service/course/list", String.class
         );
         return result;
     }
 }

 ```

 4. bootstrap.yml Profile pair nacos And service ports

    ```yaml
    server:
      port: 6010
    spring:
      application:
        name: order-service
      cloud:
        nacos:
          discovery:
            #ip address must be configured
            server-addr: localhost:8848
            # Register your service with the registry
            register-enabled: true
            #namespace: all-register-service-namespace
    ```
- Order service consumer
Xianshishehui course service mainly has four files: startup class \ course controller \ bootstrap YML configuration file \ POM XML file The screenshot of the project structure is as follows
[the external chain picture transfer fails. The source station may have an anti-theft chain mechanism. It is recommended to save the picture and upload it directly (img-3zfcak1d-1624516292499) (detailed analysis of Nacos in the registry. assets/image-20210623230122754.png)]
-
pom.xml is mainly a dependency of nacos and alibaba cloud
<?xml version="1.0" encoding="UTF-8"?> <project xmlns="http://maven.apache.org/POM/4.0.0" xmlns:xsi="http://www.w3.org/2001/XMLSchema-instance" xsi:schemaLocation="http://maven.apache.org/POM/4.0.0 https://maven.apache.org/xsd/maven-4.0.0.xsd"> <modelVersion>4.0.0</modelVersion> <parent> <groupId>org.springframework.boot</groupId> <artifactId>spring-boot-starter-parent</artifactId> <version>2.2.5.RELEASE</version> <relativePath/> <!-- lookup parent from repository --> </parent> <groupId>com.xianshishehui.nacos.course</groupId> <artifactId>xianshishehui-course-service</artifactId> <version>0.0.1-SNAPSHOT</version> <name>xianshishehui-course-service</name> <description>Demo project for Spring Boot</description> <!--Declare dependent versions--> <properties> <java.version>1.8</java.version> <spring-cloud-alibaba.version>2.2.1.RELEASE</spring-cloud-alibaba.version> </properties> <dependencies> <dependency> <groupId>org.springframework.boot</groupId> <artifactId>spring-boot-starter-web</artifactId> </dependency> <!--It is important to join Alibaba service discovery dependency--> <dependency> <groupId>com.alibaba.cloud</groupId> <artifactId>spring-cloud-starter-alibaba-nacos-discovery</artifactId> <version>${spring-cloud-alibaba.version}</version> </dependency> <dependency> <groupId>org.springframework.boot</groupId> <artifactId>spring-boot-starter-test</artifactId> <scope>test</scope> <exclusions> <exclusion> <groupId>org.junit.vintage</groupId> <artifactId>junit-vintage-engine</artifactId> </exclusion> </exclusions> </dependency> </dependencies> <!--alibaba cloud Related dependency management--> <dependencyManagement> <dependencies> <dependency> <groupId>com.alibaba.cloud</groupId> <artifactId>spring-cloud-alibaba-dependencies</artifactId> <version>${spring-cloud-alibaba.version}</version> <type>pom</type> <scope>import</scope> </dependency> </dependencies> </dependencyManagement> <build> <plugins> <plugin> <groupId>org.springframework.boot</groupId> <artifactId>spring-boot-maven-plugin</artifactId> </plugin> </plugins> </build> </project> -
The boot class is mainly used to start the configuration of springboot
package com.xianshishehui.nacos.course; import org.springframework.boot.SpringApplication; import org.springframework.boot.autoconfigure.SpringBootApplication; import org.springframework.cloud.client.discovery.EnableDiscoveryClient; @SpringBootApplication @EnableDiscoveryClient public class XianshishehuiCourseServiceApplication { public static void main(String[] args) { SpringApplication.run(XianshishehuiCourseServiceApplication.class, args); } } -
Course controller, which mainly receives the caller's request
package com.xianshishehui.nacos.course.service.provider.controller;

import org.springframework.web.bind.annotation.GetMapping;
import org.springframework.web.bind.annotation.RequestMapping;
import org.springframework.web.bind.annotation.RestController;

@RestController
@RequestMapping("course")
public class CourseController {

    @GetMapping("list")
    public String get(){
        return "Course service accessed";
    }
}
-
bootstrap. The YML configuration file configures the nacos and service ports
server:
  port: 6020
spring:
  application:
    name: course-service
  cloud:
    nacos:
      discovery:
        #ip address must be configured
        server-addr: localhost:8848
        # Register your service with the registry
        register-enabled: true
        #namespace: all-register-service-namespace
Start service
Start two services in idea And check it in the nacos visual interface
[the external chain image transfer fails. The source station may have an anti-theft chain mechanism. It is recommended to save the image and upload it directly (img-taowjmml-1624516292499) (detailed analysis of Nacos in the registration center. assets/image-20210623230540252.png)]
[the external chain picture transfer fails. The source station may have an anti-theft chain mechanism. It is recommended to save the picture and upload it directly (img-ufdng36o-1624516292500) (detailed analysis of Nacos in the registry. assets/image-20210623230617932.png)]
When you see that two services have appeared in the above services, it indicates that the current service has been started successfully!
Browser access
Access the external interface of orderController in the browser http://localhost:6010/order/get. You can get the final result
[the external chain picture transfer fails. The source station may have an anti-theft chain mechanism. It is recommended to save the picture and upload it directly (img-ncb7caua-1624516292500) (detailed analysis of Nacos in the registry. assets/image-20210623230854270.png)]
So far, the nacos stand-alone service has been built
MySQL support
In the previous study, we have not made any special configuration for the Nacos server itself. Everything runs in the default stand-alone mode and has completed the study of all the above functions. However, the single machine operation mode of Nacos is only applicable to the learning and testing environment, which is obviously inappropriate for the production environment with high availability requirements.
Before building a Nacos cluster, we need to modify the data persistence configuration of Nacos to MySQL storage. By default, Nacos uses an embedded database to store data. Therefore, if multiple Nacos nodes in the default configuration are started, there is a consistency problem in the data storage. In order to solve this problem, Nacos adopts centralized storage to support cluster deployment. At present, it only supports MySQL storage.
Before version 0.7, in stand-alone mode, nacos used embedded database to store data, which was inconvenient to observe the basic situation of data storage. mysql data source support is added in version 0.7. After version 1.2.0, nacos automatically supports mysql 8.0 0 +, specific operation steps:
-
Install database, version requirements: 5.6.5+
-
Initialize mysql database
-
Modify conf / application Properties file, add mysql data source configuration (currently only mysql is supported), and Add url, user name and password of mysql data source.
Next, we use docker to install mysql
# Pull mysql:5.7 image
[root@localhost ~]#  docker pull mysql:5.7

# Run MySQL container mapping from port 3306 of the container service to port 3306 of the host MYSQL_ROOT_PASSWORD=123456: set the password of the root user of MySQL service
[root@localhost ~]# docker run -itd --name mysql-test -p 3306:3306 -e MYSQL_ROOT_PASSWORD=123456 mysql:5.7
Test whether mysql is installed successfully
[the external chain picture transfer fails. The source station may have an anti-theft chain mechanism. It is recommended to save the picture and upload it directly (img-cjngolci-1624516292501) (detailed analysis of Nacos in the registry. assets/image-20210623233902546.png)]
Enter the virtual machine ip \ port \ account \ password, and then verify whether the connection is successful
[the external chain picture transfer fails. The source station may have an anti-theft chain mechanism. It is recommended to save the picture and upload it directly (img-8nbqutx7-1624516292502) (detailed analysis of Nacos in the registry. assets/image-20210623234104682.png)]
Add mysql configuration library to the database
Add a new Nacos in mysql database_ Config configuration database
[the external chain picture transfer fails. The source station may have an anti-theft chain mechanism. It is recommended to save the picture and upload it directly (img-zpbv2cgs-1624516292502) (detailed analysis of Nacos in the registry. assets/image-20210624105916773.png)]
nacos configuration file modification supports mysql
Edit Nacos / conf / application Properties file
Modify the database configuration, including name, time zone, account and password Modify according to the actual situation
[the external chain picture transfer fails. The source station may have an anti-theft chain mechanism. It is recommended to save the picture and upload it directly (img-oh7aj9q1-1624516292503) (detailed analysis of Nacos in the registration center. assets/image-20210624110253679.png)]
Database initialization nacos configuration
Copy Nacos / conf / Nacos mysql The sql statements in the sql file are executed in the configuration library The created configuration library table will be obtained in the database
[the external chain picture transfer fails. The source station may have an anti-theft chain mechanism. It is recommended to save the picture and upload it directly (img-oxxbjfyl-1624516292503) (detailed analysis of Nacos in the registry. Assets / image-202106241104444939. PNG)]
[the external chain picture transfer fails. The source station may have an anti-theft chain mechanism. It is recommended to save the picture and upload it directly (img-5cnulcqd-1624516292504) (detailed analysis of Nacos in the registry. assets/image-20210624110507534.png)]
Test nacos Mysql support
Start nacos, add the configuration in the nacos configuration interface, and then check whether the database configuration is generated
[the external chain picture transfer fails. The source station may have an anti-theft chain mechanism. It is recommended to save the picture and upload it directly (img-erx8gsuu-1624516292504) (detailed analysis of Nacos in the registry. Assets / image-202106241106640039. PNG)]
[the external chain picture transfer fails. The source station may have an anti-theft chain mechanism. It is recommended to save the picture and upload it directly (img-kss1qo1c-1624516292505) (detailed analysis of Nacos in the registry. assets/image-20210624110734450.png)]
So far, the configuration of mysql support in the stand-alone version of nacos has been completed
Configuration center
Integration with the framework
application. Some system variable data configured in YML will usually be taken out and used in the Controller with @ Value, but if you want to change it, you need to change the code, package and deploy. It's very troublesome. We need to make the configuration file change dynamically Nacos also uses the Spring Cloud native annotation @ RefreshScope to automatically update the configuration
-
Add the dependency of configuration center in the project
[the external chain image transfer fails. The source station may have an anti-theft chain mechanism. It is recommended to save the image and upload it directly (img-gjv9mih5-1624516292505) (detailed analysis of Nacos in the registration center. assets/image-20210624112847208.png)]
-
With bootstrap Add the configuration of the configuration center to the YML configuration file
You need to dynamically refresh the configuration. You need to add the following configuration
[the external chain picture transfer fails. The source station may have an anti-theft chain mechanism. It is recommended to save the picture and upload it directly (img-6hufrl4e-1624516292506) (detailed analysis of Nacos in the registry. Assets / image-202106241138247766. PNG)]
-
The @ RefreshScope annotation is added to the Controller class to support the configuration center to obtain dynamic configuration
package com.xianshishehui.nacos.order.service.consumer.controller;import org.springframework.beans.factory.annotation.Autowired;import org.springframework.beans.factory.annotation.Value;import org.springframework.cloud.context.config.annotation.RefreshScope;import org.springframework.web.bind.annotation.GetMapping;import org.springframework.web.bind.annotation.RequestMapping;import org.springframework.web.bind.annotation.RestController;import org.springframework.web.client.RestTemplate;@RestController@RequestMapping("order")@RefreshScope //Dynamic refresh configuration public class ordercontroller {@ Autowired private resttemplate resttemplate; @ value ("${merber. Name}") private string merbername@ Value("${merber.age}") private String MerberAge; @ GetMapping("get") public String get(){ return "merberName:" + MerberName +", merberAge" + MerberAge; }} -
Dynamically modify the configuration in the visual interface
[the external chain image transfer fails. The source station may have an anti-theft chain mechanism. It is recommended to save the image and upload it directly (img-lxf2v1el-1624516292506) (detailed analysis of Nacos in the registration center. assets/image-20210624114058273.png)]
-
Configuration center naming rules
-
Data Id:
In Nacos Spring Cloud, the complete configuration format of data set (Data Id) is as follows:
${spring.cloud.nacos.config.prefix}-${spring.profiles.active}.${spring.cloud.nacos.config.file-extension}`,Popular point is`prefix-environment-Extension-
prefix: the default is spring application. The value of name can also be set through the configuration item spring cloud. nacos. config. prefix to configure
# Manual assignment spring: cloud: nacos: config: prefix: order-service-config # If not specified, the scheme of application name is adopted by default spring: application: name: order-sevice #service name
-
active: is the value of configuring the development environment. A program cannot always be in the development environment. It may need to switch to the test environment and the online environment. Their configuration files are different. Therefore, in order to facilitate environment switching, we configure different development environment documents. For example, we used to work in application In YML, dev, test and prod are configured, where dev is the development environment.
**Note: * * when spring profile. When active is empty, the corresponding connector - will not exist, and the splicing format of dataId will become ${prefix}$ {file-extension}
spring: profiles: active: dev #Represents the development environment
-
File extension: finally, we need to specify the configuration file type. The default is properties. We can specify the file type ourselves, such as configuration:
spring:
  cloud:
    nacos:
      config:
        file-extension: yaml #Specifies that the configuration file type is yaml file
Nacos provides us with several types: TEXT, JSON, XML, YAML, HTML and Properties
After specifying the configuration file type, we finally add a new configuration file in the configuration center: order-sevice-dev.yaml
-
-
Group
${spring.cloud.nacos.config.group}
If not configured, select Nacos Default: DEFAULT_GROUP
-
-
Start the service for verification
[the external chain picture transfer fails. The source station may have an anti-theft chain mechanism. It is recommended to save the picture and upload it directly (img-byemchtk-1624516292507) (detailed analysis of Nacos in the registry. assets/image-20210624114538993.png)]
reference
https://www.bilibili.com/video/BV1QD4y1d7Bm
https://www.it235.com/%E9%AB%98%E7%BA%A7%E6%A1%86%E6%9E%B6/SpringCloudAlibaba/nacos.html#%E6%B3%A8%E5%86%8C%E4%B8%AD%E5%BF%83
https://blog.csdn.net/qq_38637558/article/details/114448690