Hello, I'm Charlie ~ there are many anti crawling measures on the website, such as js anti crawling, ip anti crawling, css anti crawling, font anti crawling, verification code anti crawling, sliding click verification anti crawling, etc. today, we learn font anti crawling by crawling a recruitment.
Font anti crawl
Font anti crawling: a common anti crawling technology, which is an anti crawling strategy completed by combining web pages with front-end font files. 58 cities and car homes were the first to use font anti crawling technology. Now many mainstream websites or apps also use font anti crawling technology to add an anti crawling measure to their own websites or apps.
Font anti crawling principle: some data in the page is replaced by custom fonts. When we don't use the correct decoding method, we can't get the correct data content.
Use custom fonts in HTML through @ font face, as shown in the following figure:

Its syntax format is:
@font-face{
font-family:"name";
src:url('Font file link');
url('Font file link')format('file type')
}
Font files are generally ttf type, eot type and woff type. Woff type files are widely used, so we generally encounter woff type files.
Taking woff type file as an example, what is its content, and what coding method makes the data correspond to the code one by one?
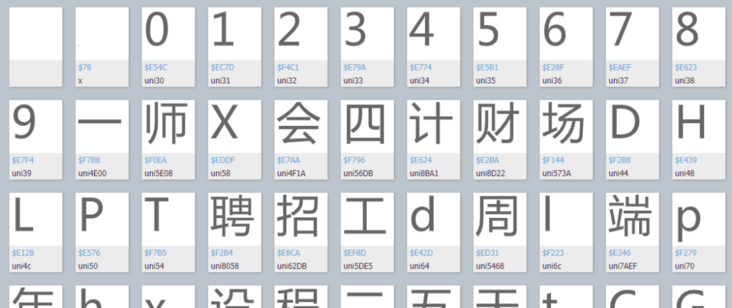
Taking the font file of a recruitment website as an example, we enter Baidu font compiler and open the font file, as shown in the following figure:
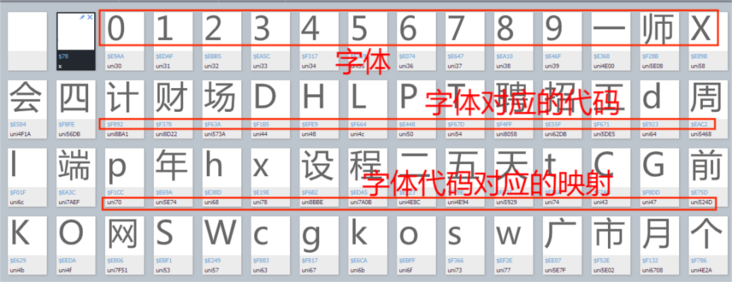
Open a font randomly, as shown in the following figure:

It can be found that font 6 is placed in a plane coordinate, and the code of font 6 is obtained according to each point of the plane coordinate. How to obtain the code of font 6 is not explained here.
How to solve font anti crawling?
First, the mapping relationship can be regarded as a dictionary. There are roughly two common methods:
The first method: manually extract the corresponding relationship between a group of codes and characters and display them in the form of a dictionary. The codes are as follows:
replace_dict={
    '0xf7ce':'1',
    '0xf324':'2',
    '0xf23e':'3',
    .......
    '0xfe43':'n',
}
for key in replace_dict:
    data=data.replace(key,replace_dict[key])
First, define a dictionary corresponding to the font and its corresponding code, and then replace the data one by one through the for loop.
Note: this method is mainly applicable to data with less font mapping.
The second method: first download the font file of the website, then convert the font file into an XML file, find the code of the font mapping relationship in it, decode it through the decode function, then combine the decoded code into a dictionary, and then replace the data one by one according to the dictionary content. Because the code is relatively long, no example code is written here, The code of this method will be shown in the actual combat drill later.
Well, that's all for font anti climbing. Next, we'll officially climb a recruitment website.
Actual combat drill
Custom font file lookup
First, enter a recruitment website and open the developer mode, as shown in the following figure:
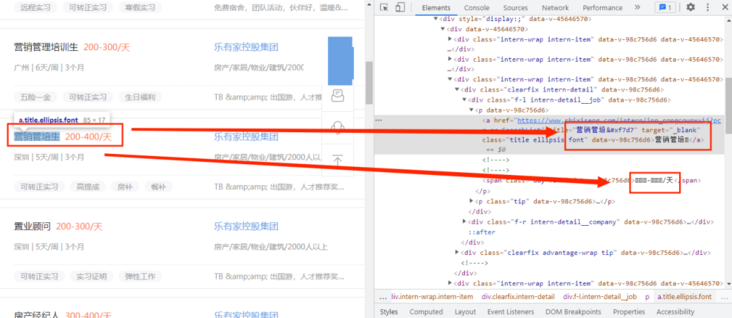
Here, we can see that only new words in the code can not function normally, but are used to replace the code. It is preliminarily determined that the user-defined font file is used. At this time, we will find the font file. Where can we find the font file? First open the developer mode and click the Network option, as shown in the following figure:
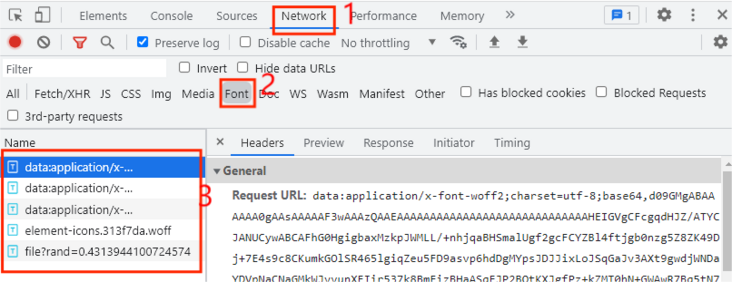
Generally, the font file is placed in the Font tab. We find that there are five entries in total. Which is the entry of the custom font file? When we click the next page each time, the custom font file will be executed once. At this time, we only need to click the next page in the web page, as shown in the figure below:
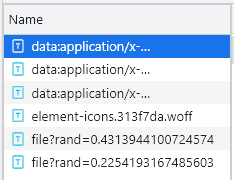
You can see an additional entry starting with file. At this time, it can be preliminarily determined that the file is a user-defined font file. Now we download it. The download method is very simple. Just copy the URL of the entry starting with file and open it on the web page. After downloading, open it in Baidu font compiler, as shown in the following figure:
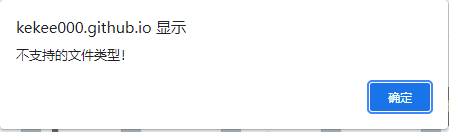
At this time, it is found that the file cannot be opened. Is it the wrong font file? The website prompts that this file type is not supported, so we change the suffix of the downloaded file to woff is trying to open it, as shown in the figure below:
Then it was successfully opened.
Font mapping relationship
The custom font file has been found, so how can we use it? At this time, we first customize the method get_fontfile() to process the custom font file, and then display the mapping relationship in the font file through the dictionary in two steps.
- Font file download and conversion;
- Font mapping decoding.
Font file download and conversion
Firstly, the update frequency of custom font files is very high. At this time, we can obtain the custom font files of web pages in real time to prevent the use of previous custom font files, resulting in inaccurate data acquisition. First, observe the url link of the custom font file:
https://www.xxxxxx.com/intern...
https://www.xxxxxx.com/intern...
https://www.xxxxxx.com/intern...
It can be found that only the rand parameter of the URL of the custom font file changes, and it is a random 16 bit floating-point number less than 1. Then we only need to construct the rand parameter. The main code is as follows:
def get_fontfile():
    rand=round(random.uniform(0,1),17)
    url=f'https://www.xxxxxx.com/interns/iconfonts/file?rand={rand}'
    response=requests.get(url,headers=headers).content
    with open('file.woff','wb')as f:
        f.write(response)
    font = TTFont('file.woff')
    font.saveXML('file.xml')
First, through random The uniform () method controls the size of the random number, and then the round() method controls the number of bits of the random number. In this way, the value of rand can be obtained Content converts the URL response content into binary and writes it to file In the woff file, the file content is obtained through the TTFont() method, and the content is saved as an xml file through the saveXML method. The contents of the xml file are shown in the following figure:

Font decoding and presentation
This font There are 4589 lines in the xml file. Which part is the code part of the font mapping relationship?
First, let's look back at the content of Baidu font encoder, as shown in the following figure:
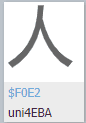
The corresponding code of Chinese character person is f0e2, so we're in the font Query person code in xml file, as shown in the following figure:
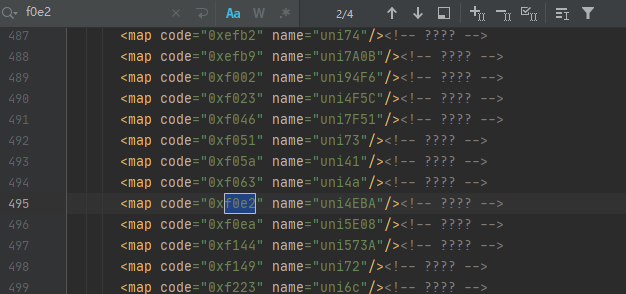
It can be found that there are four results in total, but each result is the same after careful observation. At this time, we can obtain the mapping relationship according to their code law, and then obtain the corresponding data value through decoding. Finally, it is displayed in the form of a dictionary. The main codes are as follows:
def get_fontfile():
    rand=round(random.uniform(0,1),17)
    url=f'https://www.xxxxxx.com/interns/iconfonts/file?rand={rand}'
    response=requests.get(url,headers=headers).content
    with open('file.woff','wb')as f:
        f.write(response)
    font = TTFont('file.woff')
    font.saveXML('file.xml')
First read file XML file content, find out and set the values of code and name in the code as keys and values respectively, then decode the values into the data we want through the for loop, and finally merge them into a tuple through the zip() method and convert them into dictionary data through the dict() method. The operation results are as follows:

Obtain recruitment data
In the previous step, we successfully converted the font mapping relationship into dictionary data. Next, we began to send a network request to obtain data. The main code is as follows:
def get_data(dict,url):
    response=requests.get(url,headers=headers).text.replace('&#','0')
    for key in dict:
        response=response.replace(key,dict[key])
    XPATH=parsel.Selector(response)
    datas=XPATH.xpath('//*[@id="__layout"]/div/div[2]/div[2]/div[1]/div[1]/div[1]/div')
    for i in datas:
        data={
            'workname':i.xpath('./div[1]/div[1]/p[1]/a/text()').extract_first(),
            'link':i.xpath('./div[1]/div[1]/p[1]/a/@href').extract_first(),
            'salary':i.xpath('./div[1]/div[1]/p[1]/span/text()').extract_first(),
            'place':i.xpath('./div[1]/div[1]/p[2]/span[1]/text()').extract_first(),
            'work_time':i.xpath('./div[1]/div[1]/p[2]/span[3]/text()').extract_first()+i.xpath('./div[1]/div[1]/p[2]/span[5]/text()').extract_first(),
            'company_name':i.xpath('./div[1]/div[2]/p[1]/a/text()').extract_first(),
            'Field_scale':i.xpath('./div[1]/div[2]/p[2]/span[1]/text()').extract_first()+i.xpath('./div[1]/div[2]/p[2]/span[3]/text()').extract_first(),
            'advantage': ','.join(i.xpath('./div[2]/div[1]/span/text()').extract()),
            'welfare':','.join(i.xpath('./div[2]/div[2]/span/text()').extract())
        }
        saving_data(list(data.values()))
First, customize the method get_data() and receive the dictionary data of the font mapping relationship, and then replace the dictionary content and data one by one through the for loop. Finally, extract the data we want through xpath(), and finally pass the data into our custom method saving_data().
Save data
The data has been obtained. Next, the data will be saved. The main codes are as follows:
def saving_data(data):
    db = pymysql.connect(host=host, user=user, password=passwd, port=port, db='recruit')
    cursor = db.cursor()
    sql = 'insert into recruit_data(work_name, link, salary, place, work_time,company_name,Field_scale,advantage,welfare) values(%s,%s,%s,%s,%s,%s,%s,%s,%s)'
    try:
        cursor.execute(sql,data)
        db.commit()
    except:
        db.rollback()
    db.close()
Start program
OK, the program is almost written. Next, we will write code to run the program. The main code is as follows:
if __name__ == '__main__':
    create_db()
    get_fontfile()
    for i in range(1,3):
        url=f'https://www.xxxxxx.com/interns?page={i}&type=intern&salary=-0&city=%E5%85%A8%E5%9B%BD'
        get_data(get_dict(),url)
Result display
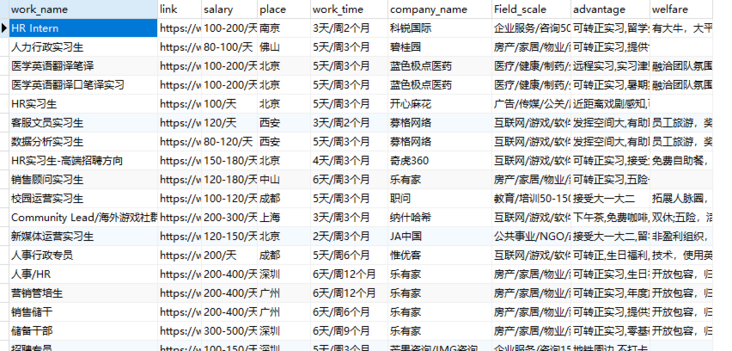
Well, learn the font to climb back and take a recruitment, that's all!!!
If the article is helpful to you, like + pay attention, your support is my biggest motivation