Nanny server installation jd generation hanging tutorial Qinglong panel version 2.8 + Ninja - (I)
Lazy car link: pilipili.vaiwan.com
be careful
It is recommended to install centos 7/8 (note that the kernel version of centos 6 is too low to install docker)
Novices suggest saving ck, resetting the system and installing from 0. The tutorial starts at 0.
Of course, the final shell can also use other ssh tools or operate directly in the system
Step 1: install docker and docker compose (some ECS can help you install the pagoda. If you have a pagoda panel, you can directly install docker in the white tower panel)
Novices are advised to use root permission. The code is as follows:
su root
1. Check your current kernel version through the uname -r command
uname -r
2. Update Yum package with root permission (students unfamiliar with linux commands are recommended to log in and install docker with root permission to save a lot of unnecessary trouble)
sudo yum update
3. Uninstall the old version: (if the old version has been installed)
(the old version is docker, and the latest community version is docker engine, which has been renamed docker CE)
sudo yum -y remove docker docker-common docker-selinux docker-engine
4. Set Yum source: (this article takes Yum installation as an example)
Install Yum utils and use the yum config manager tool to set the yum source. The last two are devicemapper driver dependencies
sudo yum install -y yum-utils device-mapper-persistent-data lvm2
5. Set yum source
Set up a yum source. The following two are available
sudo yum-config-manager --add-repo http://download.docker.com/linux/centos/docker-ce.repo (central warehouse)
sudo yum-config-manager --add-repo http://mirrors.aliyun.com/docker-ce/linux/centos/docker-ce.repo (ALI warehouse)
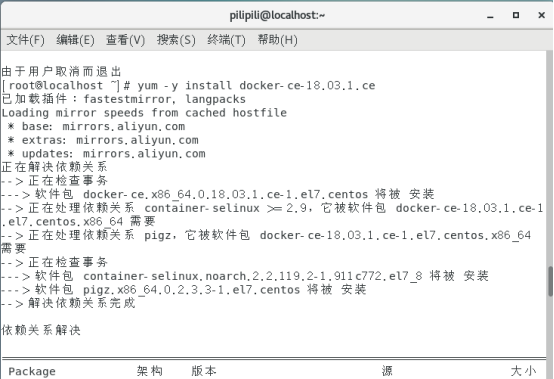
Select a version and install it: Yum install docker CE version number (take 18.03.1 as an example here)
sudo yum -y install docker-ce-18.03.1.ce

This indicates that the installation was successful
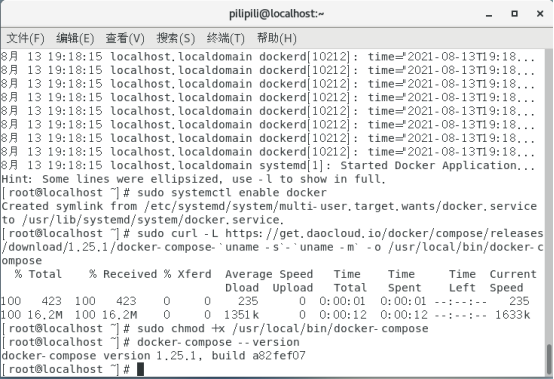
Start docker and set startup self startup
sudo systemctl start docker
sudo systemctl status docker
sudo systemctl enable docker
(note the input one by one)
Install docker compose
1. Download the docker compose binary file from github and install it (foreign server)
Download the latest docker compose file
sudo curl -L https://github.com/docker/compose/releases/download/1.16.1/docker-compose-`uname -s`-`uname -m` -o /usr/local/bin/docker-compose
2. If github access is too slow, you can use daocloud to download (domestic server)
sudo curl -L https://get.daocloud.io/docker/compose/releases/download/1.25.1/docker-compose-`uname -s`-`uname -m` -o /usr/local/bin/docker-compose
Add executable permissions
sudo chmod +x /usr/local/bin/docker-compose
Test installation results
docker-compose --version
Here, the first step is completed!
Step 2: install the container
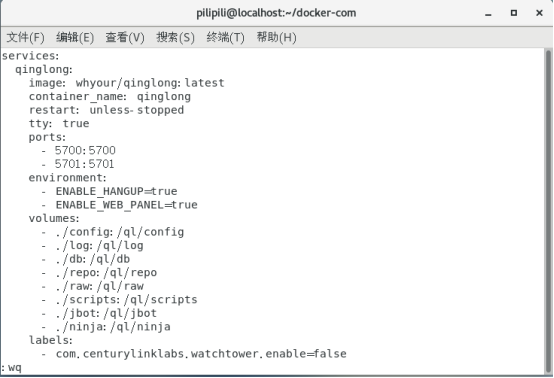
Create a directory under the root folder, and create docker - compose yml
For docker com created in my picture, you can use ql. The container is directly created in this folder, which is more convenient to use ql
mkdir ql
cd ql
touch docker-compose.yml
Fill in the following
version: "3"
services:
  qinglong:
    image: whyour/qinglong:latest
    container_name: qinglong
    restart: unless-stopped
    tty: true
    ports:
      - 5700:5700
      - 5701:5701
    environment:
      - ENABLE_HANGUP=true
      - ENABLE_WEB_PANEL=true
    volumes:
      - ./config:/ql/config
      - ./log:/ql/log
      - ./db:/ql/db
      - ./repo:/ql/repo
      - ./raw:/ql/raw
      - ./scripts:/ql/scripts
      - ./jbot:/ql/jbot
      - ./ninja:/ql/ninja
    labels:
      - com.centurylinklabs.watchtower.enable=false
(copy code starting from version)
In the server window, enter:
vi docker-compose.yml
Press i to enter edit mode
After pasting the code, press esc and enter ": wq" to save and exit

Then enter
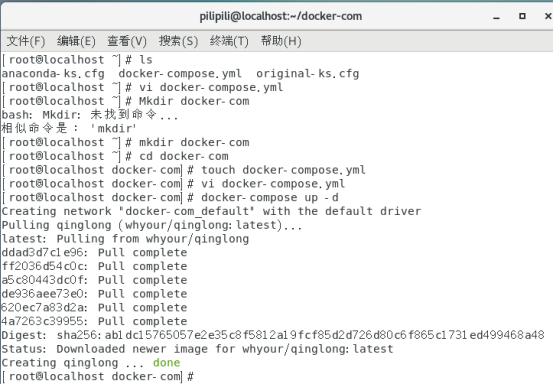
docker-compose up -d
Wait for the download to complete
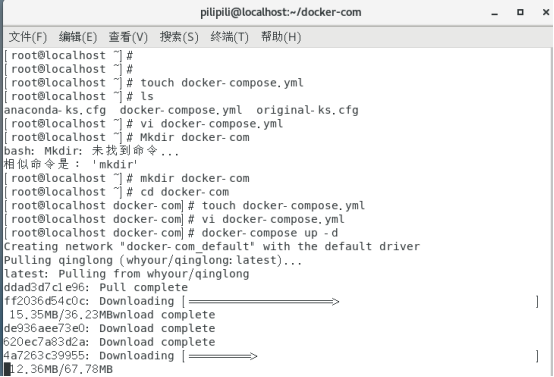
Show this when the installation is complete
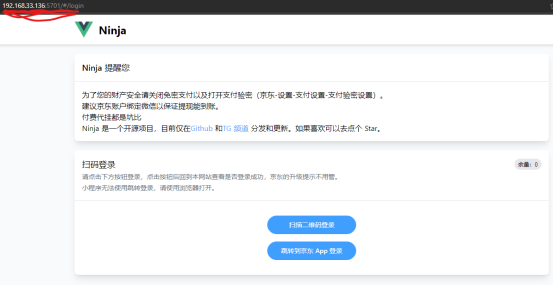
Then the browser logs in to ip:5700 (for example, if my ip is 10.10.10.10, enter 10.10.10: 5700)
(the initial account password is admin, and a new password will be created in auto.json when logging in for the first time)
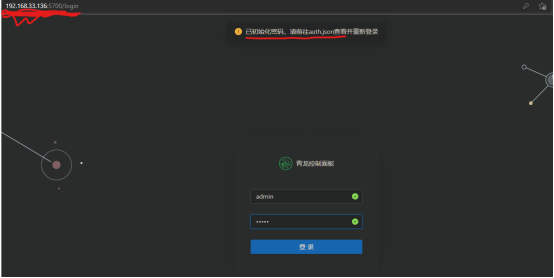
Get password:
cd ql/config
vi auth.json
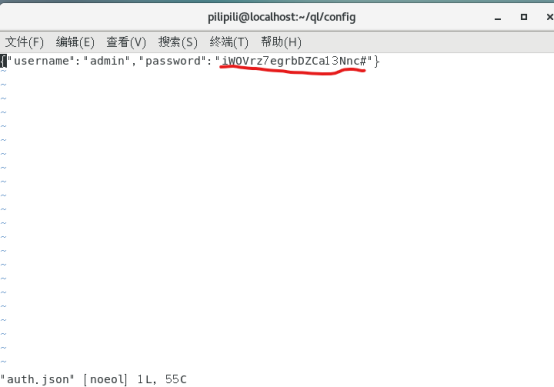
The password in double quotation marks is the password. Copy it and log in to the browser again
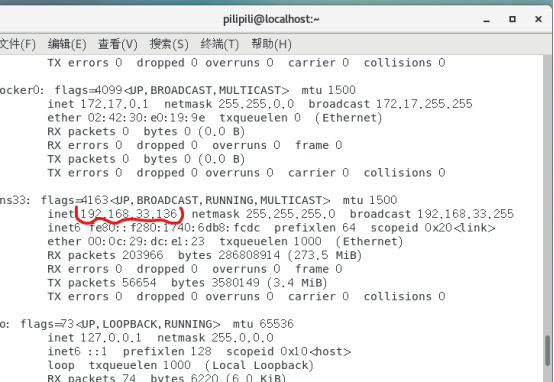
If you don't know the ip address, you can use the ifconfig command to get it
ifconfig
Enter container
ql is the container name, and the container name of this machine is qinglong
code:
docker exec -it qinglong bash
(exit container and enter exit)
Execute the following command
git clone <https://ghproxy.com/https://github.com/shufflewzc/ninja.git> /ql/ninja

cd /ql/ninja/backend

pnpm install

pm2 start
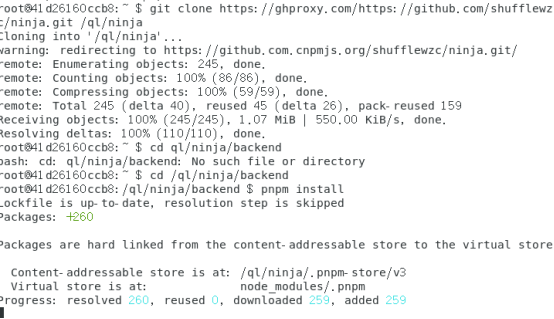
(it is recommended to input one by one, which is not easy to make mistakes)
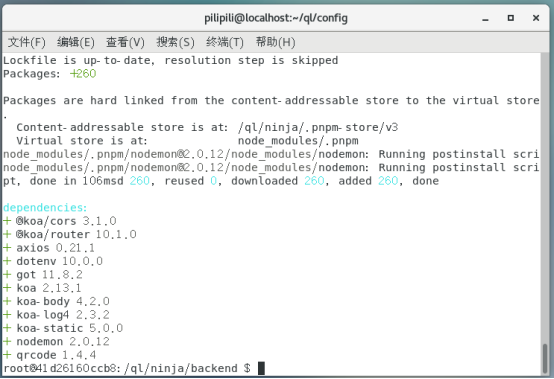
Here, the Ninja panel has been installed! Then start ninja
pm2 start
Ip:5701 is the front-end address
Last step
Open extra. In the Qinglong configs folder SH file
Paste in the following.
cd /ql/ninja/backend
pm2 start
The code is as follows:
cd
cd /ql/config
vi extra.sh
Paste the code in and it's done!