Whether it's a college website or an e-commerce page, switching and rotating focus maps should be an indispensable application.Take notes today on the technical essentials of Focus Map rotation for future review.
1. Structural Layer (HTML)
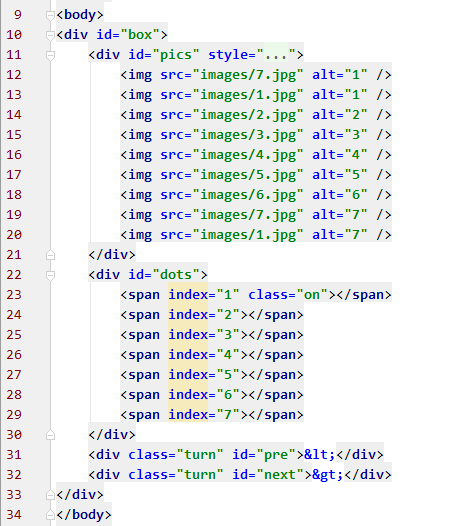
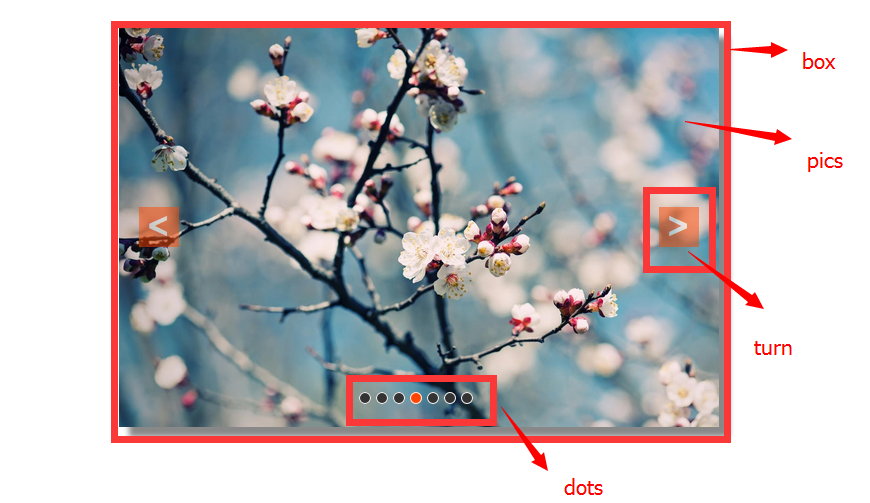
The HTML structure of the focus map is simple, it is a parent container (id=box), which contains three subcontainers: picture (id=pics), bottom button (id=dots), and action switch arrow (class=turn).The layout in Figure 2 below is the result of adding styles.


2. Representation Layer (CSS)
CSS is always necessary for page performance and style.For ease of description, each div module is represented by an id selector name or a class selector name.
1.box
As the parent container, box is the visual representation of the entire Focus Graph rotation structure on the web page. Its width and height are the width and height of the picture to be displayed.I set the picture to 600px wide and 400px high, centering and shading the parent container box.Styles can probably be set to your liking, but overflows must be hidden and positioning must be set to relative positioning in order to make the absolute positioning of subcontainers accurate.
#box{
    width: 600px;
    height: 400px;
    margin-top: 100px;
    margin-left: auto;
    margin-right: auto;
    overflow: hidden;
    position: relative;
    box-shadow: 10px 10px 5px #888;
}
2.pics
Pictures are used for placing pictures, because it is a left-right switching function. The height is still the height of a picture, but the width = (number of pictures displayed + 2)* the width of the picture is explained in the behavior layer.
Also note that pics are below the left-right switching arrows and bottom switching buttons as shown in the display picture, so the z-index should be set to 1.
#pics{
    width: 5400px;
    height: 400px;
    position: absolute;
    z-index: 1;
}
3.dots
Set z-index to 2 for upper display, absolute positioning, and other styles to your liking.Here I set the style of the mouse sliding over and the style (on) that matches the js corresponding to the picture position change.
#dots{
    width: 120px;
    height: 10px;
    position: absolute;
    bottom: 25px;
    left: 40%;
    z-index: 2;
}

#dots span{
    width: 10px;
    height: 10px;
    float: left;
    margin-right: 5px;
    background: #333;
    border: solid 1px #FFF;
    border-radius: 50%;
    cursor: pointer;
}

#dots .on{background: orangered;}
#dots span:hover{background: orangered;}
4.turn
The important style of left and right arrows is the same as dots, other customizations.Here I set the mouse to slide over the box to show the arrow.
.turn{
    width: 40px;
    height: 40px;
    color: #fff;
    background: orangered;
    line-height: 39px;
    text-align: center;
    font-size: 36px;
    font-weight: bold;
    opacity: 0.5;
    position: absolute;
    top: 180px;
    display: none;
    z-index: 2;
    cursor: pointer;
}
.turn:hover{opacity: 0.8;}
#box:hover .turn{display: block;}
The style and layout of this page are complete, but the implementation of behavior-level methods and functions is the focus.
3. Behavior Layer (JavaScript)
Get the node of the page in the global scope before defining the function.
1 var box = document.getElementById('box');
2 var pics = document.getElementById('pics');
3 var dots = document.getElementById('dots').getElementsByTagName('span');
4 var pre = document.getElementById('pre');
5 var next = document.getElementById('next');
1. Picture Switching Animation
The core method of rotating pictures is the animation of picture switching.The focus of this function is to receive a offset of displacement and then change the left value of pics relative to box to display the picture.
Previously set by CSS, the width of box was 600px, but the width of pics was 5400px. Because the box overflow was hidden, only one picture would be displayed on the page. By receiving offset, changing the left value (subtracting or adding n picture widths), the displayed picture could be changed.
There are also two problems: if you do not set the speed of picture switching, the picture will be switched whole, without entering the effect of switching; and if you do not keep clicking on the switching, it will consume too much memory to cause the computer card, the page will stop in the previous diagram before switching to the next one, and so on.So do a speed processing on the picture, and set that no other switching is allowed for a picture after switching.
 1     //Picture Switching Function
 2     function turn(offset){
 3         turned = true;                                      //Toggle Allow flag, defined in global scope, true to turn off allow Toggle
 4         var new_left = parseInt(pics.style.left) + offset;  //Last left value
 5         var total_time = 300;                               //Total displacement time
 6         var interval = 10;                                  //Time interval per displacement
 7         var speed = offset/(total_time/interval);           //Displacement Velocity - Per Displacement
 8
 9         function go(){
10             if((speed < 0 && parseInt(pics.style.left) > new_left) || (speed > 0 && parseInt(pics.style.left) < new_left)){ //Right cut||left cut
11                 pics.style.left = parseInt(pics.style.left) + speed +'px';
12                 setTimeout(go,interval);
13             }else{
14                 turned = false;     //Switch completed, switch on allow switch
15                 pics.style.left = new_left +'px';
16                 if( new_left < -4200){
17                     pics.style.left = -600 +'px';
18                 }
19                 else if( new_left > -600){
20                     pics.style.left = -4200 +'px';
21                 }
22             }
23         }
24         go();
25     }
2. Arrow Switching
Pass in a parameter based on the picture switching function turn().Because it switches from left to right, one picture width is passed in directly at a time.Switch in-600 to the right and in 600 to the left.
The key points to note here are the synchronization of the picture with the bottom button, the reset of the parameters after the last one on both sides, and the judgment of whether switching is allowed.
 1     //Arrow switch implementation
 2     next.onclick = function(){
 3         if(index == 7){
 4             index = 1;
 5         }else{
 6             index += 1;
 7         }
 8         show_dots();
 9         if(!turned){
10             turn(-600);
11         }
12     };
13     pre.onclick = function(){
14         if(index == 1){
15             index = 7;
16         }else{
17             index -= 1;
18         }
19         show_dots();
20         if(!turned){
21             turn(600);
22         }
23     };
3. Bottom button implementation
The button differs from the arrow in that it can switch to any picture by clicking it, so make a calculation before passing in the switch function turn().In addition, the buttons correspond to changes in style.
 1     //Button Switch Style
 2     function show_dots(){
 3         for(var i = 0; i < dots.length; i++){
 4             if(dots[i].className == 'on'){
 5                 dots[i].className = '';
 6                 break;
 7             }
 8         }
 9         dots[index - 1].className = 'on';
10     }
11     //Button Switch Implementation
12     for(var i = 0; i < dots.length; i++){
13         dots[i].onclick= function(){
14             if(this.className == 'on'){
15                 return;
16             }
17             var my_index = parseInt(this.getAttribute('index'));   //Be careful! index Is a custom attribute
18             var offset = -600 * (my_index - index);         //Calculate Switching Displacement
19
20             if(!turned){
21                 turn(offset);
22             }
23             index = my_index;
24             show_dots();
25         }
26     }
4. Autoplay
Automatic playback is naturally a problem with setting and clearing timers, which is not covered here.
 1     //Timed Animation
 2     function play(){
 3         time = setInterval(function(){
 4             next.onclick();
 5         },3000);
 6     }
 7     //Animation Stop
 8     function stop(){clearInterval(time);}
 9
10     play();
11     box.onmouseover = stop;
12     box.onmouseout = play;
Finally, attach demo and source link: demo,Source code.