Friendly tips: This article is a little long and winding. Come on!
The last article briefly explained net project template is created mainly through the project file * csproj is added under the same directory template.config folder and template JSON, and then use dotnet new -i to install the project template. This article continues to go deeper.
First set a small goal:
Implement a web api project template. You can choose to import NLog library and Dapper library; At the same time, it is hoped that the user authority authentication method can be selected. Here, there are three assumptions: none, fixed role and user-defined policy; You can also enter text information (such as author information) when creating a project. These input items are realized through template parameters.
In fact, after careful analysis, there are three types of parameters: 1. Judgment class is whether to use this third-party library; 2. Select one of the three authorization methods; 3. Enter a text class.
At the same time, in the last article, we directly use the source code to generate templates. The problem is that it is impossible for everyone to use the source code to generate local templates. If you can make a package here and use it, it will be much easier. Indeed, wechat generates a nupkg package from the template project, which can be uploaded to nuget Org for others to use.
Then let's take a look at the implementation steps.
In order to make you feel intuitively, I will first show the parameters you need to enter when creating a project:

Look at the template file first this time
1,template.json, under the project folder template.config directory
{
  "$schema": "http://json.schemastore.org/template",
  "author": "GUI Suwei",
  "classifications": [ "Common", "GUI Suwei template", "WebAPI", "C#9" ],
  "identity": "GSW  Nuget",
  "name": "GSW  Nuget",
  "shortName": "GSWNuget",
  "tags": {
    "language": "C#",
    "type": "project"
  },
  "sourceName": "GSWNuget",
  "symbols": {
    "Author": {
      "type": "parameter",
      "datatype": "text",
      "defaultValue": "",
      "replaces": "author",
      "description": "author"
    },
    "UseNLog": {
      "type": "parameter",
      "datatype": "bool",
      "defaultValue": "true",
      "description": "Whether to use NLog"
    },
    "UseDapper": {
      "type": "parameter",
      "datatype": "bool",
      "defaultValue": "true",
      "description": "Whether to use Dapper"
    },
    "AuthType": {
      "type": "parameter",
      "datatype": "choice",
      "defaultValue": "None",
      "choices": [
        {
          "choice": "None",
          "description": "None"
        },
        {
          "choice": "Role",
          "description": "Role"
        },
        {
          "choice": "policy",
          "description": "Policy"
        }
      ]
    },
    "None": {
      "type": "computed",
      "value": "(AuthType == \"None\")"
    },
    "Role": {
      "type": "computed",
      "value": "(AuthType == \"Role\")"
    },
    "Policy": {
      "type": "computed",
      "value": "(AuthType == \"Policy\")"
    }
  },
  "sources": [
    {
      "modifiers": [
        {
          "condition": "(!UseNLog)",
          "exclude": [ "NLog.config" ]
        }
      ]
    }
  ]
}
"sourceName": "GSWNuget", which is the name of the project.
Under "symbols" are the configuration template parameters:
UseDapper and UseNLog are bool types, allowing the person creating the project to choose whether to introduce these three-party packages.
Author is the input text type, in which repeat is to replace all the authors in the project file with the user input project, so this name is better not to be so generic.
AuthType is the verification plan for selecting permissions. Here, the operation result items of three options are added below. bool types: None, Role and Policy. The specific value is determined by the user's selection.
UseNLog is a bool type, but its purpose is special. There is a source behind the json file, which is used to determine NLog Config file, which is not displayed in the user's project to determine whether the file is saved or not.
2,ide.host.json. In order to display these values in the IDE for user input, you also need to enter them in template JSON create an IDE under the same directory host. JSON file. The function of this file is to give users friendly prompts for user input items in the IDE, and prepare an icon Png, which serves as the icon for this project template, and its storage location is the same as ide host. JSON is at the same level.
{
  "$schema": "http://json.schemastore.org/vs-2017.3.host",
  "icon": "icon.png",
  "symbolInfo": [
    {
      "id": "UseNLog",
      "name": {
        "text": "Use NLog"
      },
      "isVisible": "true"
    },
    {
      "id": "Author",
      "name": {
        "text": "Author"
      },
      "isVisible": "true"
    },
    {
      "id": "UseDapper",
      "name": {
        "text": "Use Dapper"
      },
      "isVisible": "true"
    },
    {
      "id": "AuthType",
      "isVisible": "true"
    }
  ]
}
3. Create a web api project GSWNuget, focusing on the above three requirements. First, look at the program CS file:
/********************************
 *author
 ********************************/
using Microsoft.AspNetCore.Hosting;
using Microsoft.Extensions.Configuration;
using Microsoft.Extensions.Hosting;
using Microsoft.Extensions.Logging;
using System;
using System.Collections.Generic;
using System.Linq;
using System.Threading.Tasks;
#if (UseNLog)
using NLog.Web;
#endif

namespace GSWNuget
{
    public class Program
    {

#if (UseNLog)
        public static void Main(string[] args)
        {
            var logger = NLogBuilder.ConfigureNLog("nlog.config").GetCurrentClassLogger();
            try
            {
                logger.Debug("init main");
                CreateHostBuilder(args).Build().Run();
            }
            catch (Exception exception)
            {
                logger.Error(exception, "Stopped program because of exception");
                throw;
            }
            finally
            {
                NLog.LogManager.Shutdown();
            }
        }

        public static IHostBuilder CreateHostBuilder(string[] args) =>
            Host.CreateDefaultBuilder(args)
                .ConfigureWebHostDefaults(webBuilder =>
                {
                    webBuilder.UseStartup<Startup>();
                })
                .ConfigureLogging(logging =>
                {
                    //  logging.ClearProviders();
                    //  logging.SetMinimumLevel(LogLevel.Trace);
                })
                .UseNLog();
#else
        public static void Main(string[] args)
        {
            CreateHostBuilder(args).Build().Run();
        }

        public static IHostBuilder CreateHostBuilder(string[] args) =>
            Host.CreateDefaultBuilder(args)
                .ConfigureWebHostDefaults(webBuilder =>
                {
                    webBuilder.UseStartup<Startup>();
                });
#endif
    }
}
#if #endif is to judge the user's input and determine the branch of the user's project. Here is the classification of NLog introduction and non introduction. In fact, there is no point. Whether the NLog library should be restore d or not is discussed in the project file.
Another is the author, which will eventually be replaced by the GuiSuWei text of the diagram.
Take another look at gswnuget Csproj is also #if, but it needs to be in <! --- > xml, after all.
<Project Sdk="Microsoft.NET.Sdk.Web">
  <PropertyGroup>
    <TargetFramework>net5.0</TargetFramework>
    <Version>2.0.0</Version>
  </PropertyGroup>
  <ItemGroup>
    <!--#if (UseDapper)
    <PackageReference Include="Dapper" Version="2.0.78" />
    #endif-->
    <PackageReference Include="Swashbuckle.AspNetCore" Version="5.6.3" />
    <PackageReference Include="NLog.Web.AspNetCore" Version="4.12.0" />
  </ItemGroup>
</Project>
Take another look at starup cs
/********************************
 *author
 ********************************/
using Microsoft.AspNetCore.Builder;
using Microsoft.AspNetCore.Hosting;
using Microsoft.AspNetCore.HttpsPolicy;
using Microsoft.AspNetCore.Mvc;
using Microsoft.Extensions.Configuration;
using Microsoft.Extensions.DependencyInjection;
using Microsoft.Extensions.Hosting;
using Microsoft.Extensions.Logging;
using Microsoft.OpenApi.Models;
using System;
using System.Collections.Generic;
using System.Linq;
using System.Threading.Tasks;

namespace GSWNuget
{
    public class Startup
    {
        public Startup(IConfiguration configuration)
        {
            Configuration = configuration;
        }
        public IConfiguration Configuration { get; }

        public void ConfigureServices(IServiceCollection services)
        {

#if None
            var authType = "None";
#endif
#if Role
            var authType = "Role";
#endif
#if Ploy
            var authType = "Ploy";
#endif
            services.AddControllers();
            services.AddSwaggerGen(c =>
            {
                c.SwaggerDoc("v1", new OpenApiInfo { Title = "GSWNuget", Version = "v1" });
            });
        }

        public void Configure(IApplicationBuilder app, IWebHostEnvironment env)
        {
            if (env.IsDevelopment())
            {
                app.UseDeveloperExceptionPage();
                app.UseSwagger();
                app.UseSwaggerUI(c => c.SwaggerEndpoint("/swagger/v1/swagger.json", "GSWNuget v1"));
            }

            app.UseHttpsRedirection();
            app.UseRouting();
            app.UseAuthorization();
            app.UseEndpoints(endpoints =>
            {
                endpoints.MapControllers();
            });
        }
    }
}
Among them, #if None, #if Role, #if Policy is the branch corresponding to the selected result.
Take another look at appsettings JSON. In appsettings, use #if after / /
{
  ////#if(UseDapper)
  //"Dapper": "dapper config",
  ////#endif

  ////#if(UseNLog)
  //"LogConfig": "log config",
  ////#endif
  "Logging": {
    "LogLevel": {
      "Default": "Information",
      "Microsoft": "Warning",
      "Microsoft.Hosting.Lifetime": "Warning"
    }
  },
  "AllowedHosts": "*"
}
Here, the project is basically ready, and then it will be packaged into nupkg. Nuget is used here Exe (download here) https://www.nuget.org/downloads ), generate the template project GSWNuget into nupkg and nuget through the command Exe needs a configuration file to generate nupkg, GSWNuget Nuspec, which is at the same level as the GSWNuget project directory.
<?xml version="1.0" encoding="utf-8"?>
<package xmlns="http://schemas.microsoft.com/packaging/2012/06/nuspec.xsd">
  <metadata>
    <id>GSWNuget</id>
    <version>0.0.1</version>
    <description>
     This is what I use to generate Nuget Formatted Templage.
    </description>
    <authors>GUI Suwei</authors>
    <license type="expression">MIT</license>
    <packageTypes>
      <packageType name="Template" />
    </packageTypes>
  </metadata>
  <files>
    <file src="GSWNuget\**\*.*" exclude="GSWNuget\**\bin\**\*.*;GSWNuget\**\obj\**\*.*" target="Content" />
  </files>
</package>
Next, execute the command:
> .\nuget.exe pack .\GSWNuget.nuspec -OutputDirectory .\nupkg
Gswnuget.xml will be generated under nupkg 1.0.0. Nupkg file
To install the GSWNuget project template:
> dotnet new -i GSWNuget.1.0.0.nupkg
Here, a GSWNuget type project template will be added to our project template.
Next, it's time to enjoy the results. Open vs, create a new project, search GSW, and you can create your own template project.
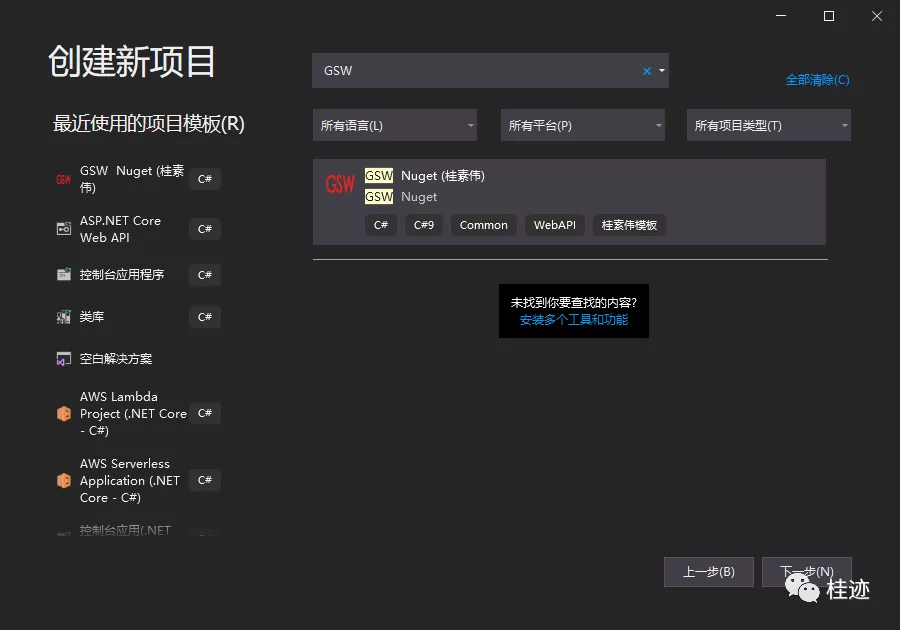
Here you can test whether different choices generate the desired results
Find time to make your own real project template and share it with you.