Ocelot is a NET Core is an open source API gateway with powerful functions, including routing, request aggregation, service discovery, authentication, authentication, current limiting and fusing, and built-in load balancer is integrated with Service Fabric and Butterfly Tracing. These functions only need simple configuration. We will describe the configuration of these functions one by one below.
introduce
In short, Ocelot is a bunch of ASP Net core middleware. After receiving the request, it will use a request builder to construct an HttpRequestMessage and send it to the downstream real server. After the downstream service returns the response, a middleware will map the returned HttpResponseMessage to the HttpResponse.
API Gateway - it is an access portal exposed to the outside of the system. This guy is a bit like a proxy access guy, just like a company's doorman, responsible for addressing, restricted access, security check, location guidance, and so on.
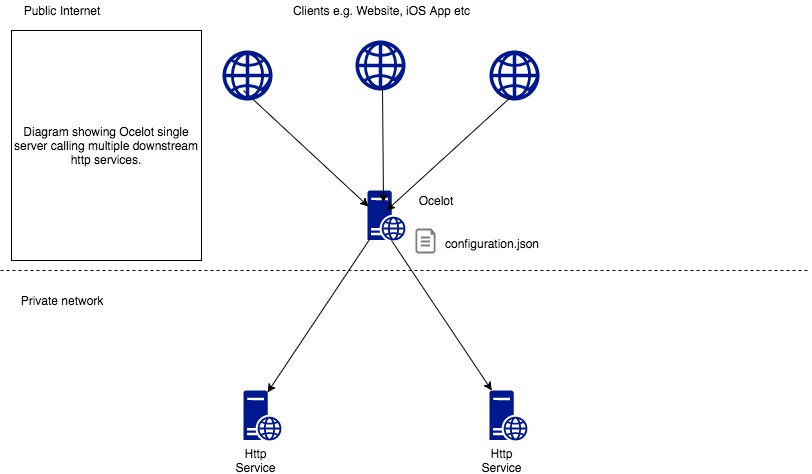
Basic use of Ocelot
Use a web service to host Ocelot, where there is a json configuration file that sets all the configurations for the current gateway. It will receive all client requests, route them to the corresponding downstream server for processing, and then return the request results. The correspondence between upstream and downstream requests is also called routing.
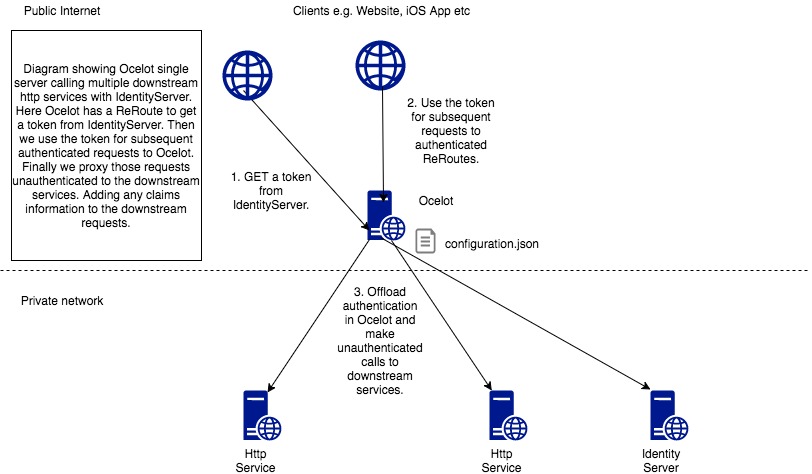
Integrating Identity Server
When it comes to authentication and authentication, we can combine with Identity Server. When the gateway needs to request authentication information, it will interact with the Identity Server server to complete it.
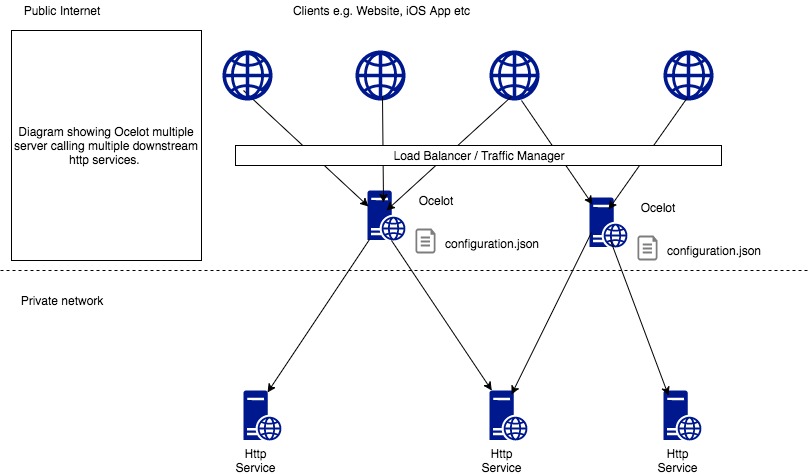
Gateway cluster
Only one gateway is very dangerous, that is, what we usually call a single point. As long as it hangs, all services hang up. This obviously cannot achieve high availability, so we can also deploy multiple gateways. Of course, at this time, you also need a load balancer in front of multiple gateways.
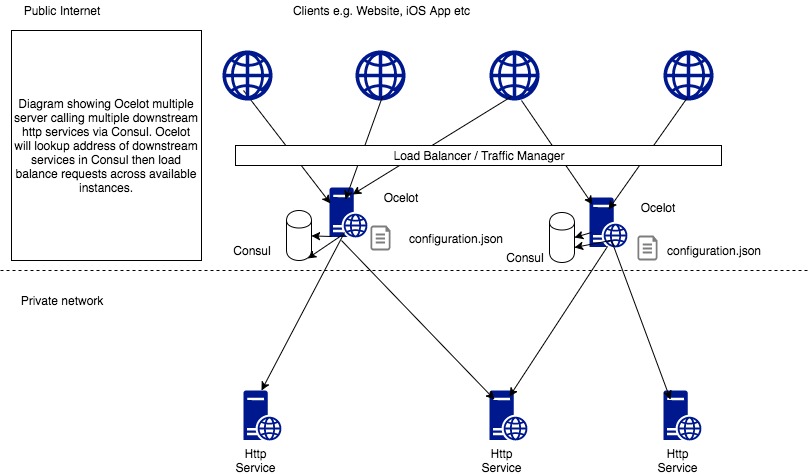
Consul service discovery
Ocelot already supports simple load function, that is, when there are multiple nodes in downstream services, Ocelot can assume the role of load balancing. However, it does not provide health check, and the service registration can only be completed by manually adding in the configuration file. This is not flexible enough and there are risks to some extent. At this time, we can use Consul for service discovery, which can be perfectly combined with ocelot.
Integration gateway
In ASP Net core 2.0 can complete the integration through nuget, or the command line dotnet add package Ocelot and add Ocelot nuget reference through vs2017 UI.
Install-Package Ocelot
to configure
We need to add one json file is used to add Ocelot configuration. The following is the most basic configuration information.
{
    "ReRoutes": [],
    "GlobalConfiguration": {
        "BaseUrl": "https://api.mybusiness.com"
    }
}
Pay special attention to that BaseUrl is an externally exposed Url. For example, our Ocelot runs in http://123.111.1.1 On an address of, but there is a {nginx bound domain name in front of it http://api.jessetalk.cn , our BaseUrl here is http://api.jessetalk.cn .
Add configuration file to ASP NET Core Configuration
Configuration dependency injection and Middleware
In startup In CS, we first need to reference two namespaces
using Ocelot.DependencyInjection;
using Ocelot.Middleware;
public void ConfigureServices(IServiceCollection services)
{
services.AddControllers();
services.AddOcelot(new ConfigurationBuilder()
.AddJsonFile("OcelotConfig.json")
.Build());
services.AddCors(options =>
{
options.AddPolicy("AllowAll",
builder => builder.AllowAnyOrigin().AllowAnyHeader()
.WithMethods("GET", "POST", "HEAD", "PUT", "DELETE", "OPTIONS")
);
});
}
// This method gets called by the runtime. Use this method to configure the HTTP request pipeline.
public void Configure(IApplicationBuilder app, IWebHostEnvironment env)
{
if (env.IsDevelopment())
{
app.UseDeveloperExceptionPage();
}
app.UseHttpsRedirection();
app.UseRouting();
app.UseCors("AllowAll");
app.UseAuthorization();
app.UseOcelot().Wait();
app.UseEndpoints(endpoints =>
{
endpoints.MapControllers();
});
}
Ocelot function introduction
Through the configuration file, you can complete the function configuration of Ocelot: routing, service aggregation, service discovery, authentication, authentication, current limiting, fusing, caching, Header header delivery, etc. The configuration file contains two root nodes: ReRoutes and GlobalConfiguration. ReRoutes is an array in which each element represents a route. We can configure the above functions for each route. The following is a complete routing configuration
{
          "DownstreamPathTemplate": "/",
          "UpstreamPathTemplate": "/",
          "UpstreamHttpMethod": [
              "Get"
          ],
          "AddHeadersToRequest": {},
          "AddClaimsToRequest": {},
          "RouteClaimsRequirement": {},
          "AddQueriesToRequest": {},
          "RequestIdKey": "",
          "FileCacheOptions": {
              "TtlSeconds": 0,
              "Region": ""
          },
          "ReRouteIsCaseSensitive": false,
          "ServiceName": "",
          "DownstreamScheme": "http",
          "DownstreamHostAndPorts": [
              {
                  "Host": "localhost",
                  "Port": 51876,
              }
          ],
          "QoSOptions": {
              "ExceptionsAllowedBeforeBreaking": 0,
              "DurationOfBreak": 0,
              "TimeoutValue": 0
          },
          "LoadBalancer": "",
          "RateLimitOptions": {
              "ClientWhitelist": [],
              "EnableRateLimiting": false,
              "Period": "",
              "PeriodTimespan": 0,
              "Limit": 0
          },
          "AuthenticationOptions": {
              "AuthenticationProviderKey": "",
              "AllowedScopes": []
          },
          "HttpHandlerOptions": {
              "AllowAutoRedirect": true,
              "UseCookieContainer": true,
              "UseTracing": true
          },
          "UseServiceDiscovery": false
}- Downstream is the downstream service configuration
- UpStream is the UpStream service configuration
- Aggregates} service aggregation configuration
- ServiceName, LoadBalancer, UseServiceDiscovery
- AuthenticationOptions configure service authentication
- RouteClaimsRequirement # configure Claims authentication
- RateLimitOptions limited flow configuration
- FileCacheOptions cache configuration
- QosOptions service quality and service quality
- DownstreamHeaderTransform header information forwarding
Next, we will introduce and configure these functions one by one
route
Routing is the most basic and core function of API gateway. ReRoutes is composed of multiple routing nodes.
{
    "ReRoutes": [
    ]
}
Each route consists of the following basic information:
The following configuration information is to forward the user's request / post/1} to localhost/api/post/1
{
    "DownstreamPathTemplate": "/api/post/{postId}",
    "DownstreamScheme": "https",
    "DownstreamHostAndPorts": [
            {
                "Host": "localhost",
                "Port": 80,
            }
        ],
    "UpstreamPathTemplate": "/post/{postId}",
    "UpstreamHttpMethod": [ "Get"]
}- DownstreamPathTemplate: next game
- DownstreamScheme: downstream service http schema
- DownstreamHostAndPorts: the address of the downstream service. If LoadBalancer is used, multiple items can be filled in here
- Upstream pathtemplate: upstream, that is, the request Url template entered by the user
- Upstream httpmethod: upstream request http method, array can be used
Universal template
Universal template means that all requests are forwarded, and the upstream pathtemplate and downstream pathtemplate are set to "/ {url}"
{
    "DownstreamPathTemplate": "/{url}",
    "DownstreamScheme": "https",
    "DownstreamHostAndPorts": [
            {
                "Host": "localhost",
                "Port": 80,
            }
        ],
    "UpstreamPathTemplate": "/{url}",
    "UpstreamHttpMethod": [ "Get" ]
}
The universal template has the lowest priority. As long as there are other routing templates, other routing templates will take effect first.
Upstream Host
The upstream Host is also one of the conditions used for routing judgment, which is distinguished by the Host when the client accesses. For example, when a.jesetalk Cn / users / {userid} and b.jessetalk Cn / users / {userid} two requests can be treated differently.
{
    "DownstreamPathTemplate": "/",
    "DownstreamScheme": "https",
    "DownstreamHostAndPorts": [
            {
                "Host": "10.0.10.1",
                "Port": 80,
            }
        ],
    "UpstreamPathTemplate": "/",
    "UpstreamHttpMethod": [ "Get" ],
    "UpstreamHost": "a.jessetalk.cn"
}
Priority
Set the optimization level for multiple conflicting routes
{
    "UpstreamPathTemplate": "/goods/{catchAll}"
    "Priority": 0
}
{
"UpstreamPathTemplate": "/goods/delete"
"Priority": 1
}For example, you have the same two routes. When / goods/delete is requested, the following one will take effect. In other words, prolity is large and will be preferred.
Routing load balancing
When the downstream service has multiple nodes, we can configure it in DownstreamHostAndPorts.
{
    "DownstreamPathTemplate": "/api/posts/{postId}",
    "DownstreamScheme": "https",
    "DownstreamHostAndPorts": [
            {
                "Host": "10.0.1.10",
                "Port": 5000,
            },
            {
                "Host": "10.0.1.11",
                "Port": 5000,
            }
        ],
    "UpstreamPathTemplate": "/posts/{postId}",
    "LoadBalancerOptions": {        "Type":"LeastConnection",   },
    "UpstreamHttpMethod": [ "Put", "Delete" ]
}
The LoadBalancer will determine the algorithm for load balancing
- LeastConnection – sends the request to the server that is most idle
- RoundRobin – send in turn
- NoLoadBalance – always sent to the first request or service discovery
In load balancing, we can also use service discovery in combination with Consul, which will be described in detail in later sections.
Request aggregation
Merge multiple API request results into one return. To achieve request aggregation, we need to give a Key to other participating routes.
{
    "ReRoutes": [
        {
            "DownstreamPathTemplate": "/",
            "UpstreamPathTemplate": "/laura",
            "UpstreamHttpMethod": [
                "Get"
            ],
            "DownstreamScheme": "http",
            "DownstreamHostAndPorts": [
                {
                    "Host": "localhost",
                    "Port": 51881
                }
            ],
            "Key": "Laura"
        },
        {
            "DownstreamPathTemplate": "/",
            "UpstreamPathTemplate": "/tom",
            "UpstreamHttpMethod": [
                "Get"
            ],
            "DownstreamScheme": "http",
            "DownstreamHostAndPorts": [
                {
                    "Host": "localhost",
                    "Port": 51882
                }
            ],
            "Key": "Tom"
        }
    ],
    "Aggregates": [
        {
            "ReRouteKeys": [
                "Tom",
                "Laura"
            ],
            "UpstreamPathTemplate": "/"
        }
    ]
}
When we request /, we will combine the results of / tom and / laura into one response return
{"Tom":{"Age": 19},"Laura":{"Age": 25}}It should be noted that:
- Aggregation services currently only support returning json
- At present, only Get mode is supported to request downstream services
- Any downstream response header s will be discarded
- If the downstream service returns 404, the aggregation service will not return 404 if the value of the key is empty
Some other functions will be implemented in the future
- Slow processing of downstream services
- Do some processing like GraphQL to process the returned results of downstream services
- 404 processing
Current limiting
Limiting the flow of requests can prevent the downstream server from crashing due to access overload. This function is added by our Zhang Shanyou and Zhang Duijin. Very elegant implementation, we only need to add some simple configurations under the route.
"RateLimitOptions": {
    "ClientWhitelist": [],
    "EnableRateLimiting": true,
    "Period": "1s",
    "PeriodTimespan": 1,
    "Limit": 1
}- ClientWihteList whitelist
- EnableRateLimiting: enable current limiting
- Period} statistical time period: 1s, 5m, 1h, 1d
- Peroidimespan # how many seconds can the client retry
- Limit is the maximum number of requests allowed in the statistical time period
Under GlobalConfiguration, we can also configure the following
"RateLimitOptions": {
  "DisableRateLimitHeaders": false,
  "QuotaExceededMessage": "Customize Tips!",
  "HttpStatusCode": 999,
  "ClientIdHeader" : "Test"
}- Whether Http header , X-Rate-Limit , and retry after , are disabled
- QuotaExceedMessage - the message returned when the request is overloaded and truncated
- HttpStatusCode: http status returned when the request is truncated due to overload
- ClientIdHeader is used to identify the request header of the client. The default is ClientId
Service quality and service quality
Fusing means stopping forwarding requests to downstream services. When the downstream service has failed, the re request is also a return, and increases the burden on the downstream server and API gateway. This function is implemented by Polly. We only need to make some simple configuration for routing
"QoSOptions": {
    "ExceptionsAllowedBeforeBreaking":3,
    "DurationOfBreak":5,
    "TimeoutValue":5000
}- ExceptionsAllowedBeforeBreaking how many exception requests are allowed
- DurationOfBreak fusing time, in seconds
- TimeoutValue: if the processing time of downstream requests exceeds how much, the request can be set to timeout
cache
Ocelot can cache downstream request results. At present, the caching function is not very powerful. It mainly depends on CacheManager To achieve this, we only need to add the following configurations under routing
"FileCacheOptions": { "TtlSeconds": 15, "Region": "somename" }Region is a partition of the cache. We can call Ocelot's administration API to remove the cache under a certain region.
authentication
If we need to authenticate downstream APIs and provide authentication services, we need to add authentication services to the Ocelot} gateway. This is different from giving a separate API or ASP Net core MVC is no different from adding authentication services.
public void ConfigureServices(IServiceCollection services)
{
    var authenticationProviderKey = "TestKey";

    services.AddAuthentication()
        .AddJwtBearer(authenticationProviderKey, x =>
        {
        });
}
Then, configure the AuthenticationOptions in the ReRoutes routing template. We only need to have the same AuthenticationProviderKey.
"ReRoutes": [{
        "DownstreamHostAndPorts": [
            {
                "Host": "localhost",
                "Port": 51876,
            }
        ],
        "DownstreamPathTemplate": "/",
        "UpstreamPathTemplate": "/",
        "UpstreamHttpMethod": ["Post"],
        "ReRouteIsCaseSensitive": false,
        "DownstreamScheme": "http",
        "AuthenticationOptions": {
            "AuthenticationProviderKey": "TestKey",
            "AllowedScopes": []
        }
    }]
JWT Tokens
To enable the gateway to support JWT Token authentication is actually the same as to enable the API to support JWT Token authentication
public void ConfigureServices(IServiceCollection services)
{
    var authenticationProviderKey = "TestKey";

    services.AddAuthentication()
        .AddJwtBearer(authenticationProviderKey, x =>
        {
            x.Authority = "test";
            x.Audience = "test";
        });

    services.AddOcelot();
}
Identity Server Bearer Tokens
The same is true for adding Identity Server authentication
public void ConfigureServices(IServiceCollection services)
{
    var authenticationProviderKey = "TestKey";
    var options = o =>
        {
            o.Authority = "https://whereyouridentityserverlives.com";
            o.ApiName = "api";
            o.SupportedTokens = SupportedTokens.Both;
            o.ApiSecret = "secret";
        };

    services.AddAuthentication()
        .AddIdentityServerAuthentication(authenticationProviderKey, options);

    services.AddOcelot();
}
Allowed Scopes
The Scopes here will be obtained from the claims in the current token, and our authentication service will rely on it. When the downstream API of the current route needs a permission, we need to declare it here. It has the same meaning as scope in oAuth2.
authentication
After we get claims through AllowedScopes in authentication, if we want to authenticate permissions, we need to add the following configuration
"RouteClaimsRequirement": {
    "UserType": "registered"
}
The claims carried in the token of the current request context cannot access the downstream service without "name =" UserType "and value =" registered ".
Request header conversion
There are two types of request header forwarding: transmitting to the downstream after conversion and transmitting to the client after receiving the conversion from the downstream. In the configuration of Ocelot, it is called Pre Downstream Request and Post Downstream Request. The current transformation only supports find and replace. The configurations we use are mainly upstream headertransform} and downstream headertransform
Pre Downstream Request
"Test": "http://www.bbc.co.uk/, http://ocelot.com/"
For example, we change the Test} value in the Header passed from the client to http://ocelot.com/ Then it will be transmitted to the downstream
 "UpstreamHeaderTransform": {
    "Test": "http://www.bbc.co.uk/, http://ocelot.com/"
},
Post Downstream Request
We can also convert the Test in the downstream Header to http://www.bbc.co.uk/ Then transfer to the client.
"DownstreamHeaderTransform": {
    "Test": "http://www.bbc.co.uk/, http://ocelot.com/"
},
variable
In the request header transformation, Ocelot provides us with two variables: BaseUrl and DownstreamBaseUrl. BaseUrl is the BaseUrl configured in GlobalConfiguration, which is the Url of downstream services. Here, 301 jump is used as an example of how to use these two variables.
In the default 301 jump, we will return a Location header, so we want to http://www.bbc.co.uk Replace with http://ocelot.com The latter is the external domain name of the gateway.
"DownstreamHeaderTransform": {
    "Location": "http://www.bbc.co.uk/, http://ocelot.com/"
},
 "HttpHandlerOptions": {
    "AllowAutoRedirect": false,
},
We use downstreamheadertranfromto replace the Location in the downstream returned request header with the domain name of the gateway instead of the domain name of the downstream service. So here we can also use BaseUrl as variable replacement.
"DownstreamHeaderTransform": {
    "Location": "http://localhost:6773, {BaseUrl}"
},
 "HttpHandlerOptions": {
    "AllowAutoRedirect": false,
},
When we have multiple downstream services, we can't find the one in front http://localhost:6773 , because it can be multiple values. So here we can use DownstreamBaseUrl.
"DownstreamHeaderTransform": {
    "Location": "{DownstreamBaseUrl}, {BaseUrl}"
},
 "HttpHandlerOptions": {
    "AllowAutoRedirect": false,
},
Claims conversion
The claims conversion function can convert the values in claims into request headers, query strings, or downstream claims. A special point about the conversion of claims is that it provides a method for parsing strings. For example, we have a sub claim. The claims' name = "sub" value = "usertypevalue|useridvalue". In fact, we won't make such a complex value. It is spliced, but we use such a complex value to demonstrate the function of string parsing.
The functions provided by Ocelot are divided into three paragraphs. The first paragraph is Claims[sub]. It is easy to understand that [] contains the name of our claim. The second paragraph is > to split the string, followed by an element in the array we want to get after splitting, which is represented by value[index], and the element in bit 0 can also be directly represented by value. The third paragraph also starts with > followed by our separator. In our example above, the separator is|
So here, if we want to take the "usertype" claim, it will be written as follows: claims [sub] > value [0] >|
After the Claim is obtained, if we want to put it in the request header, QueryString and Claim, there are the following three configurations.
Claims to Claims
"AddClaimsToRequest": {
    "UserType": "Claims[sub] > value[0] > |",
    "UserId": "Claims[sub] > value[1] > |"
}
Claims to Headers
"AddHeadersToRequest": {
    "CustomerId": "Claims[sub] > value[1] > |"
}
Here, we still use the claim of sub = usertypevalue|useridvalue | above for processing and conversion.
Claims to Query String
"AddQueriesToRequest": {
    "LocationId": "Claims[LocationId] > value",
}
There is no separation here, so value is taken directly.
Consul service discovery
{
"ReRoutes": [
{
"DownstreamPathTemplate": "/{url}", / / any url
"DownstreamScheme": "http",//
"Upstream pathtemplate": "/ videoinspectionconfig / {URL}", / / configurable
"UpstreamHttpMethod": [ "Get", "Post", "Delete", "Put" ],
"ServiceName": "TestCoreWebAPI.VideoInspectionConfig"
"LoadBalancerOptions": {
"Type":"RoundRobin"
},
"UseServiceDiscovery": true,
"ReRouteIsCaseSensitive": false
}
],
"GlobalConfiguration": {
"ServiceDiscoveryProvider": {
"Host": "114.115.215.189" / / consumer server "
"Port": 8500, / / consumer port, "token": "245d0a09-7139-bbea-aadc-ff170a0562b1" / / toekn in consumer acl. If acl is not configured, this node does not need
}
}
}
Reprint: https://www.cnblogs.com/jackielyj/p/13266841.html