docker network host level explanation
-
Docker Daemon will create a virtual bridge named docker0, which is used to connect the host and container, or connect different containers.
-
veth pair is used for communication between different network namespaces. veth pair sends data from one network namespace to veth of another network namespace.
-
Docker uses veth pair technology to create two virtual network interfaces veth0 and veth1 on the host computer (the characteristics of veth pair technology can ensure that no matter which Veth receives the network message, it will be unconditionally transmitted to the other party). As shown in the figure below
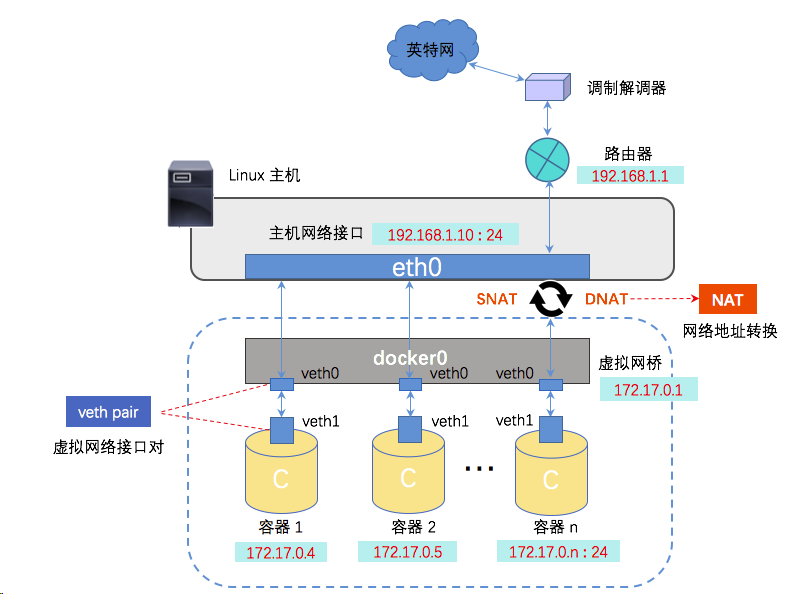
docker network description
View docker network
- Command: docker network list view the docker network type on the host
bridge mode is used by default
[root@ccx ~]# docker network list
NETWORK ID          NAME                DRIVER              SCOPE
e6ee3d8294cd        bridge              bridge              local
7fbf0d1de452        host                host                local
9ead5d6edce5        none                null                local
[root@ccx ~]#
- Give a brief description of the above network
- bridege: default network. Create a new network stack for the container on Docker bridge docker0
- none: the network is not configured. Users can enter the container later and configure by themselves
- Host: the container shares the Network namespace with the host
- Container: the container shares the Network namespace with another container. The pod in kubernetes is a Network namespace shared by multiple containers [I don't have this network above, but I can find this network by checking the information on the Internet, so let's have a look]
- Custom network: that is, bridege mode, which can only customize network segments, as described below.
bridge network description
- Containers cannot communicate with each other. If the host can connect to the Internet, each container can connect to the Internet.
- bridge network is equivalent to nat mode in VMware. It will automatically obtain IP and build the host as a switch.
- The Docker daemon creates a virtual Ethernet bridge docker0, which can automatically forward packets between any network card attached to it. By default, the daemon will create a pair of peer-to-peer interfaces, set one interface as the eth0 interface of the container, and place the other interface in the namespace of the host, so as to connect all containers on the host to this internal network. At the same time, the daemon will allocate an IP address and subnet to the container from the private address space of the bridge.
View docker_bridge network type details
Command: docker network inspect bridge
[root@ccx ~]# docker network inspect bridge
[
    {
        "Name": "bridge",
        "Id": "e6ee3d8294cdf0e33acc6f017917dbb9c3a0fb9e7e76ee9a29923b6af92a782a",
        "Created": "2021-06-18T15:28:23.482967747+08:00",
        "Scope": "local",
        "Driver": "bridge",
        "EnableIPv6": false,
        "IPAM": {
            "Driver": "default",
            "Options": null,
            "Config": [
                {
                    "Subnet": "172.17.0.0/16",
                    "Gateway": "172.17.0.1"
                }
            ]
        },
        "Internal": false,
        "Attachable": false,
        "Containers": {
            "305175003c1d3648da3efbe7afbb95574dce85042a4fb34bde9c40d90c1e3a48": {
                "Name": "d1",
                "EndpointID": "6e636282db32ad08c23cd7260a7ff98cd68fb471f7aea368cc237531be88bcce",
                "MacAddress": "02:42:ac:11:00:02",
                "IPv4Address": "172.17.0.2/16",
                "IPv6Address": ""
            },
            "83817192b3ad981916fbd4a5233f6938ed39fadbe397e808ce6fe9cae2d3ef37": {
                "Name": "db",
                "EndpointID": "ffbac933c7a2af9073beda2836832a547811567396b3c43a074213bfb3c6b860",
                "MacAddress": "02:42:ac:11:00:03",
                "IPv4Address": "172.17.0.3/16",
                "IPv6Address": ""
            }
        },
        "Options": {
            "com.docker.network.bridge.default_bridge": "true",
            "com.docker.network.bridge.enable_icc": "true",
            "com.docker.network.bridge.enable_ip_masquerade": "true",
            "com.docker.network.bridge.host_binding_ipv4": "0.0.0.0",
            "com.docker.network.bridge.name": "docker0",
            "com.docker.network.driver.mtu": "1500"
        },
        "Labels": {}
    }
]
[root@ccx ~]#
Create a docker_bridge network [also known as user-defined bridge]
- Create command: docker network create -d network type -- subnet = custom network segment / 24 custom network name
As follows: I create a 10.1.0.0/24 bridge network segment named mynet
[root@ccx ~]# docker network create -d bridge --subnet=10.1.0.0/24 mynet
4c69134c1f738325131234723aa53411bc356fd6f903340cd50ccbb337cfa05f
[root@ccx ~]# docker network list
NETWORK ID          NAME                DRIVER              SCOPE
e6ee3d8294cd        bridge              bridge              local
7fbf0d1de452        host                host                local
4c69134c1f73        mynet               bridge              local
9ead5d6edce5        none                null                local
[root@ccx ~]#
[root@ccx ~]# docker network inspect mynet
[
    {
        "Name": "mynet",
        "Id": "4c69134c1f738325131234723aa53411bc356fd6f903340cd50ccbb337cfa05f",
        "Created": "2021-06-18T16:45:59.696990876+08:00",
        "Scope": "local",
        "Driver": "bridge",
        "EnableIPv6": false,
        "IPAM": {
            "Driver": "default",
            "Options": {},
            "Config": [
                {
                    "Subnet": "10.1.0.0/24"
                }
            ]
        },
        "Internal": false,
        "Attachable": false,
        "Containers": {},
        "Options": {},
        "Labels": {}
    }
]
- The command parameters have to be kept in mind. We can view these parameters through man
# Find the line docker network create
[root@ccx ~]# man -k docker | grep netwo
docker-network-connect (1) - connect a container to a network
docker-network-create (1) - create a new network
docker-network-disconnect (1) - disconnect a container from a network
docker-network-inspect (1) - inspect a network
docker-network-ls (1) - list networks
docker-network-rm (1) - remove one or more networks
[root@ccx ~]# # Then execute the following command
[root@ccx ~]# man docker-network-create
#Turn down, and one line starts with $docker network create \. Here are the parameters
              $ docker network create \
                --driver=bridge \
                --subnet=172.28.0.0/16 \
                --ip-range=172.28.5.0/24 \
                --gateway=172.28.5.254 \
                br0
Create a container through a custom bridge network
- Parameters: - Network = network name [View docker network list]
For example, I create a centos container through the network mynet I created above
After successful creation, the ip you see is the customized network ip.
[root@ccx ~]# docker run -dit --name=d2 --restart=always --network=mynet hub.c.163.com/library/centos
8991f9ffe2cfe419de9aac2e48a3ac046d04b21b9d64c04dfb3431f154874748
[root@ccx ~]#
[root@ccx ~]# docker inspect d2 | grep IPA
            "SecondaryIPAddresses": null,
            "IPAddress": "",
                    "IPAMConfig": null,
                    "IPAddress": "10.1.0.2",
[root@ccx ~]#
host network description
-
The host network of docker is a shared host network, and the host does not have its own cyberspace.
-
This mode will disable the network isolation of Docker container. Because the container shares the network namespace of the host, the container and the host have the same IP address 172.17.119.96 and are directly exposed to the public network. Therefore, you need to coordinate through port mapping. This mode is faster than bridge mode (because there is no routing overhead), but it exposes the container directly to the public network, which is a security risk.
Create a container that specifies the network bit host
- Because this host is a shared host network, you don't have to create your own dock_ The meaning of host network can be used directly.
- For example, I use the host network to create a b1 container and check the ip address
Because the centos image above does not have the ipconfig command, I used the busybox image [the image is small, but the command is complete, which is suitable for testing, but it should be noted that the cmd used in this image is sh, not bash]
[root@ccx ~]# docker images
REPOSITORY                        TAG                 IMAGE ID            CREATED             SIZE
docker.io/busybox                 latest              69593048aa3a        10 days ago         1.24 MB
docker.io/nginx                   latest              d1a364dc548d        3 weeks ago         133 MB
hub.c.163.com/library/wordpress   latest              dccaeccfba36        3 years ago         406 MB
hub.c.163.com/library/centos      latest              328edcd84f1b        3 years ago         193 MB
hub.c.163.com/library/mysql       latest              9e64176cd8a2        4 years ago         407 MB
[root@ccx ~]# docker run -dit --name=b1 --restart=always --network=host docker.io/busybox
f2de84bfa8ed2f507d34ca3ace92e74637a02dcfbc6c890ab6a989da45471d5c
[root@ccx ~]# docker exec -it b1 sh
/ # ifconfig
# There are too many contents below, so I deleted a lot and only retained the existing ip options

ens33     Link encap:Ethernet  HWaddr 00:0C:29:04:51:6B
          inet addr:192.168.159.128  Bcast:192.168.159.255  Mask:255.255.255.0
          inet6 addr: fe80::1d92:633a:8803:17b2/64 Scope:Link
          UP BROADCAST RUNNING MULTICAST  MTU:1500  Metric:1
          RX packets:31256 errors:0 dropped:0 overruns:0 frame:0
          TX packets:10374 errors:0 dropped:0 overruns:0 carrier:0
          collisions:0 txqueuelen:1000
          RX bytes:30645011 (29.2 MiB)  TX bytes:1304944 (1.2 MiB)

ens34     Link encap:Ethernet  HWaddr 00:0C:29:04:51:75
          inet addr:192.168.159.129  Bcast:192.168.159.255  Mask:255.255.255.0
          inet6 addr: fe80::59c4:bb33:e5bb:ee6c/64 Scope:Link
          UP BROADCAST RUNNING MULTICAST  MTU:1500  Metric:1
          RX packets:1354 errors:0 dropped:0 overruns:0 frame:0
          TX packets:42 errors:0 dropped:0 overruns:0 carrier:0
          collisions:0 txqueuelen:1000
          RX bytes:87936 (85.8 KiB)  TX bytes:7136 (6.9 KiB)

# The following is the ip information I saw on my host
[root@ccx ~]# ip a
1: lo: <LOOPBACK,UP,LOWER_UP> mtu 65536 qdisc noqueue state UNKNOWN group default qlen 1000
    link/loopback 00:00:00:00:00:00 brd 00:00:00:00:00:00
    inet 127.0.0.1/8 scope host lo
       valid_lft forever preferred_lft forever
    inet6 ::1/128 scope host
       valid_lft forever preferred_lft forever
2: ens33: <BROADCAST,MULTICAST,UP,LOWER_UP> mtu 1500 qdisc pfifo_fast state UP group default qlen 1000
    link/ether 00:0c:29:04:51:6b brd ff:ff:ff:ff:ff:ff
    inet 192.168.159.128/24 brd 192.168.159.255 scope global noprefixroute dynamic ens33
       valid_lft 1087sec preferred_lft 1087sec
    inet6 fe80::1d92:633a:8803:17b2/64 scope link noprefixroute
       valid_lft forever preferred_lft forever
3: ens34: <BROADCAST,MULTICAST,UP,LOWER_UP> mtu 1500 qdisc pfifo_fast state UP group default qlen 1000
    link/ether 00:0c:29:04:51:75 brd ff:ff:ff:ff:ff:ff
    inet 192.168.159.129/24 brd 192.168.159.255 scope global noprefixroute dynamic ens34
       valid_lft 1602sec preferred_lft 1602sec
    inet6 fe80::59c4:bb33:e5bb:ee6c/64 scope link noprefixroute
       valid_lft forever preferred_lft forever
4: docker0: <BROADCAST,MULTICAST,UP,LOWER_UP> mtu 1500 qdisc noqueue state UP group default
    link/ether 02:42:c8:57:ce:6c brd ff:ff:ff:ff:ff:ff
    inet 172.17.0.1/16 scope global docker0
       valid_lft forever preferred_lft forever
    inet6 fe80::42:c8ff:fe57:ce6c/64 scope link
       valid_lft forever preferred_lft forever
host mode application
- This can be directly used for nginx container, so that we can access the host ip, which is equivalent to accessing the container.
[root@ccx ~]# docker run -dit --name=web --restart=always --network=host docker.io/nginx
ab8cc63f0c17e3049338f0a0224a9f0a0aa2b3293e1107698e101985f8d20b4e
[root@ccx ~]# docker ps
CONTAINER ID        IMAGE               COMMAND                  CREATED             STATUS              PORTS               NAMES
ab8cc63f0c17        docker.io/nginx     "/docker-entrypoin..."   6 seconds ago       Up 6 seconds                            web
[root@ccx ~]#
- At this point, you can directly see the content in nginx by entering the server ip in the browser
If the host ip cannot be opened, go to the host and close the firewall: systemctl stop firewalld
Welcome to nginx!
If you see this page, the nginx web server is successfully installed and working. Further configuration is required.

For online documentation and support please refer to nginx.org.
Commercial support is available at nginx.com.

Thank you for using nginx.
Description of container mode (generally used for caching, and it is faster to access on the same machine)
- I don't have this network on this host. This is what I found by checking the data. You can find out.
- After understanding the host mode, this mode is easy to understand. This pattern specifies that the newly created container shares a Network Namespace with an existing container, rather than with the host. The newly created container will not create its own network card and configure its own IP, but share IP and port range with a specified container. Similarly, in addition to the network, the two containers are isolated from each other, such as file system and process list. The processes of the two containers can communicate through the lo network card device.
none network description
- There is nothing to explain about this mode. It is mainly used for testing. The created container does not have any IP and cannot communicate with the host.
- However, you can enter the container and configure it yourself
Create a container that specifies the network bit none
There should be nothing to explain this process. Just look at the code below
[root@ccx ~]# docker run -it --name=c1 --restart=always --network=none docker.io/busybox
/ # ifconfig
lo        Link encap:Local Loopback
          inet addr:127.0.0.1  Mask:255.0.0.0
          inet6 addr: ::1/128 Scope:Host
          UP LOOPBACK RUNNING  MTU:65536  Metric:1
          RX packets:0 errors:0 dropped:0 overruns:0 frame:0
          TX packets:0 errors:0 dropped:0 overruns:0 carrier:0
          collisions:0 txqueuelen:1000
          RX bytes:0 (0.0 B)  TX bytes:0 (0.0 B)

/ # exit
[root@ccx ~]#
How to view container ip
Mode 1
- The first is to enter the container and use the command to view
If the container comes with bash, such as centos system, the process is as follows:
Because there are no ip a commands in the centos image below, the view fails [this situation can only be viewed through mode 2].
[root@ccx ~]# docker ps
CONTAINER ID        IMAGE                          COMMAND                  CREATED             STATUS              PORTS               NAMES
83817192b3ad        hub.c.163.com/library/mysql    "docker-entrypoint..."   7 minutes ago       Up 7 minutes        3306/tcp            db
305175003c1d        hub.c.163.com/library/centos   "/bin/bash"              46 minutes ago      Up 46 minutes                           d1
[root@ccx ~]# docker attach d1
[root@305175003c1d /]# ifconfig
bash: ifconfig: command not found
[root@305175003c1d /]# ip a
bash: ip: command not found
[root@305175003c1d /]# ls
anaconda-post.log  ccx  etc   lib    lost+found  mnt  proc  run   srv  tmp  var
bin                dev  home  lib64  media       opt  root  sbin  sys  usr
[root@305175003c1d /]#
- The second is that there is no bash process. You need to create a new bash process, such as mysql container
The process is as follows
[root@ccx ~]# docker ps
CONTAINER ID        IMAGE                          COMMAND                  CREATED             STATUS              PORTS               NAMES
83817192b3ad        hub.c.163.com/library/mysql    "docker-entrypoint..."   5 minutes ago       Up 5 minutes        3306/tcp            db
305175003c1d        hub.c.163.com/library/centos   "/bin/bash"              44 minutes ago      Up 44 minutes                           d1
[root@ccx ~]# docker exec - it db ip a
Error response from daemon: No such container: -
[root@ccx ~]# docker exec -it db ip a
1: lo: <LOOPBACK,UP,LOWER_UP> mtu 65536 qdisc noqueue state UNKNOWN group default qlen 1000
    link/loopback 00:00:00:00:00:00 brd 00:00:00:00:00:00
    inet 127.0.0.1/8 scope host lo
       valid_lft forever preferred_lft forever
    inet6 ::1/128 scope host
       valid_lft forever preferred_lft forever
27: eth0@if28: <BROADCAST,MULTICAST,UP,LOWER_UP> mtu 1500 qdisc noqueue state UP group default
    link/ether 02:42:ac:11:00:03 brd ff:ff:ff:ff:ff:ff
    inet 172.17.0.3/16 scope global eth0
       valid_lft forever preferred_lft forever
    inet6 fe80::42:acff:fe11:3/64 scope link
       valid_lft forever preferred_lft forever


# The above is to directly change the bash process into the command to be executed. You can also enter Bash and execute the command through the following

[root@ccx ~]# docker exec -it db bash
root@83817192b3ad:/# ip a
1: lo: <LOOPBACK,UP,LOWER_UP> mtu 65536 qdisc noqueue state UNKNOWN group default qlen 1000
    link/loopback 00:00:00:00:00:00 brd 00:00:00:00:00:00
    inet 127.0.0.1/8 scope host lo
       valid_lft forever preferred_lft forever
    inet6 ::1/128 scope host
       valid_lft forever preferred_lft forever
27: eth0@if28: <BROADCAST,MULTICAST,UP,LOWER_UP> mtu 1500 qdisc noqueue state UP group default
    link/ether 02:42:ac:11:00:03 brd ff:ff:ff:ff:ff:ff
    inet 172.17.0.3/16 scope global eth0
       valid_lft forever preferred_lft forever
    inet6 fe80::42:acff:fe11:3/64 scope link
       valid_lft forever preferred_lft forever
root@83817192b3ad:/#
Mode 2
- This is to filter out the password through the underlying code
Code: docker inspect container name | grep ipaddress -i - The process is as follows:
[root@ccx ~]# docker ps
CONTAINER ID        IMAGE                          COMMAND                  CREATED             STATUS              PORTS               NAMES
83817192b3ad        hub.c.163.com/library/mysql    "docker-entrypoint..."   10 minutes ago      Up 10 minutes       3306/tcp            db
305175003c1d        hub.c.163.com/library/centos   "/bin/bash"              49 minutes ago      Up 25 seconds                           d1
[root@ccx ~]# docker inspect db | grep ipaddress -i
            "SecondaryIPAddresses": null,
            "IPAddress": "172.17.0.3",
                    "IPAddress": "172.17.0.3",
[root@ccx ~]# docker inspect d1 | grep ipaddress -i
            "SecondaryIPAddresses": null,
            "IPAddress": "172.17.0.2",
                    "IPAddress": "172.17.0.2",
[root@ccx ~]#