1, nginx scheduling algorithm as load balancing service
| scheduling algorithm | effect |
|---|---|
| Polling (default) | Allocate to different back-end servers one by one in chronological order |
| Weighted polling | The higher the weight value, the higher the access probability assigned to the |
| ip_hash | Each request is allocated according to the hash result of the access IP, so that the same IP accesses a back-end server |
| url_hash | Allocate the request according to the hash result of the accessed URL, so that each URL is directed to the same back-end server |
| least_coon | The minimum number of connections, which back-end server has less connections, will be distributed to which back-end server |
| hash key value | hash custom key |
2, lz virtual machine description
| ip | explain |
|---|---|
| 192.168. 3.10 (nginx installed) | This virtual machine acts as a load balancing server |
| 192.168. 3.11 (nginx installed) | This virtual machine accesses three different pages through three ports configured by nginx (simulating three virtual machine applications) |
3, url_hash configuration syntax
Note: nginx1 Secondary configurations added after version 7.2
- Syntax: hash key [consistent]; Indicates that the key is appended after the hash.
- Default: - indicates that there is no configuration by default.
- Context: upstream indicates that it needs to be configured in the upstream block
4, url_hash scheduling algorithm demonstration
1. Configuration 192.168 3.11 virtual machine (i.e. simulating three virtual machine application servers)
(1) . create index1.html, index2.html and index3.html pages respectively in / opt/app/code1, code2 and code3 directories (simulate the index pages corresponding to the three servers respectively)
-
/Create index1.0 in the opt/app/code1 / directory html,index2.html,index3.html page, as follows:
index1.html content:<html lang="en"> <head> <meta charset="utf-8"> <title>server1 URL1</title> </head> <body> <h1>server1 URL1</h1> </body> </html>
index2.html content:
<html lang="en">
	<head>
		<meta charset="utf-8">
		<title>server1 URL2</title>
	</head>

	<body>
		<h1>server1 URL2</h1>
	</body>
</html>
index3.html content:
<html lang="en">
	<head>
		<meta charset="utf-8">
		<title>server1 URL3</title>
	</head>

	<body>
		<h1>server1 URL3</h1>
	</body>
</html>
-
/Create index1.0 in the opt/app/code2 / directory html,index2.html,index3.html page, as follows:
index1.html content:
<html lang="en">
	<head>
		<meta charset="utf-8">
		<title>server2 URL1</title>
	</head>

	<body>
		<h1>server2 URL1</h1>
	</body>
</html>
index2.html content:
<html lang="en">
	<head>
		<meta charset="utf-8">
		<title>server2 URL2</title>
	</head>

	<body>
		<h1>server2 URL2</h1>
	</body>
</html>
index3.html content:
<html lang="en">
	<head>
		<meta charset="utf-8">
		<title>server2 URL3</title>
	</head>

	<body>
		<h1>server2 URL3</h1>
	</body>
</html>
-
/Create index1.0 in the opt/app/code3 / directory html,index2.html,index3.html page, as follows:
index1.html content:
<html lang="en">
	<head>
		<meta charset="utf-8">
		<title>server3 URL1</title>
	</head>

	<body>
		<h1>server3 URL1</h1>
	</body>
</html>
index2.html content:
<html lang="en">
	<head>
		<meta charset="utf-8">
		<title>server3 URL2</title>
	</head>

	<body>
		<h1>server3 URL2</h1>
	</body>
</html>
index3.html content:
<html lang="en">
	<head>
		<meta charset="utf-8">
		<title>server3 URL3</title>
	</head>

	<body>
		<h1>server3 URL3</h1>
	</body>
</html>
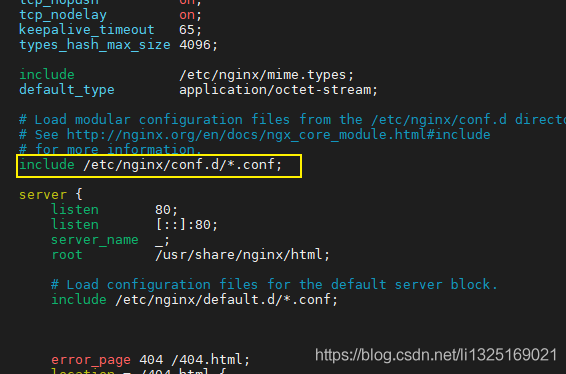
(2) . edit the nginx.conf configuration file. You can see that sub configuration files can be created in the / etc/nginx/conf.d / directory, as shown in the following figure:
(3) . create three configuration files server1.conf, server2.conf and server3.conf respectively in the / etc/nginx/conf.d/ directory (simulate three servers accessing the index page under the corresponding directory through different ports, that is, simulate three services and three different applications)
-
server1. The contents of the conf configuration file are as follows:
server { listen 8001; #8001 port server_name localhost; #ip address location / { root /opt/app/code1;#Specify the files in the code1 directory index index.html index.htm; } error_page 404 /404.html; location = /404.html { } error_page 500 502 503 504 /50x.html; location = /50x.html { } } -
server2. The contents of the conf configuration file are as follows:
server { listen 8002; #8002 port server_name localhost; #ip address location / { root /opt/app/code2;#Specify the files in the code2 directory index index.html index.htm; } error_page 404 /404.html; location = /404.html { } error_page 500 502 503 504 /50x.html; location = /50x.html { } } -
server3. The contents of the conf configuration file are as follows:
server {
        listen       8003; #8003 port
        server_name  localhost; #ip address

	location / {
	root /opt/app/code3;#Specify the files in the code3 directory
	index index.html index.htm;
	}


	error_page 404 /404.html;
	location = /404.html {
	}

	error_page 500 502 503 504 /50x.html;
	location = /50x.html {
	}
}
(4) , start the nginx service and load the configuration file again
-
Start nginx service
[root@localhost conf.d]# systemctl start nginx.service
-
Check whether the modified configuration file is correct. If successful is returned, it means that there is no error in the modification of the configuration file
[root@localhost nginx]# nginx -t -c /etc/nginx/nginx.conf

-
Reload the nginx configuration file and view
[root@localhost conf.d]# nginx -s reload -c /etc/nginx/nginx.conf
-
View the native nginx enabled ports
[root@localhost conf.d]# netstat -luntp|grep nginx

(5) The browser inputs the addresses respectively and accesses the corresponding index1, index2 and index3 pages of the simulated three servers (that is, simulate three different applications of the three services)
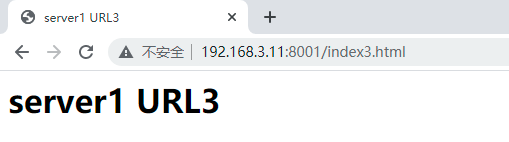
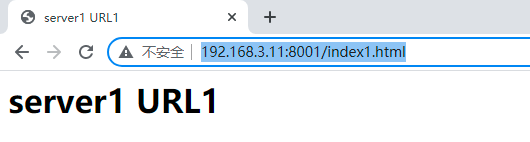
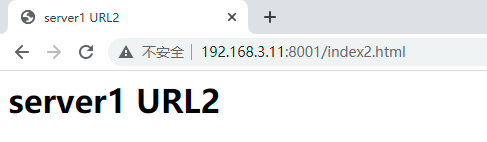
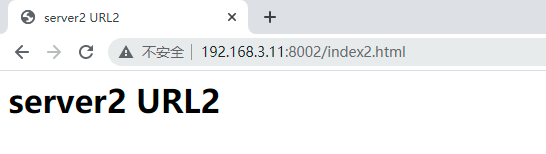
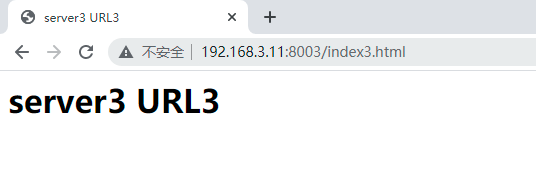
- http://192.168.3.11:8001/index1.html, http://192.168.3.11:8001/index2.html ,http://192.168.3.11:8001/index3.html
-
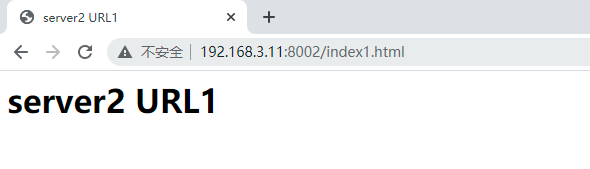
http://192.168.3.11:8002/index1.html, http://192.168.3.11:8002/index2.html ,http://192.168.3.11:8002/index3.html

-
http://192.168.3.11:8003/index1.html, http://192.168.3.11:8003/index2.html ,http://192.168.3.11:8003/index3.html
2. Configuration 192.168 3.10 virtual machine (i.e. load balancing server)
(1) . edit the nginx.conf configuration file. You can see that sub configuration files can be created in the / etc/nginx/conf.d / directory, as shown in the following figure:
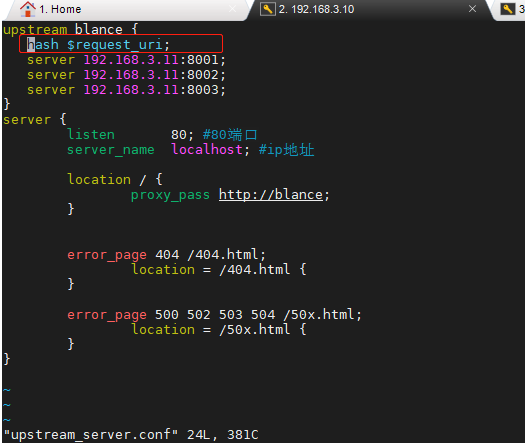
(2) . create the upstream_server.conf configuration file in the / etc/nginx/conf.d/ directory, as follows:
upstream blance {#Configure the corresponding application ip and port of the server
   hash $request_uri;;#Each request is allocated according to the hash result of the access url
   server 192.168.3.11:8001;
   server 192.168.3.11:8002;
   server 192.168.3.11:8003;
}
server {
	listen       80; #Port 80
	server_name  localhost; #ip address

	location / {#Configure the agent with the same name appended to upstream
		proxy_pass http://blance;
	}


	error_page 404 /404.html;
		location = /404.html {
	}

	error_page 500 502 503 504 /50x.html;
		location = /50x.html {
	}
}
(3) , start the nginx service and load the configuration file again
-
Start nginx service
[root@localhost conf.d]# systemctl start nginx.service
-
Check whether the modified configuration file is correct. If successful is returned, it means that there is no error in the modification of the configuration file
[root@localhost nginx]# nginx -t -c /etc/nginx/nginx.conf
-
Reload the nginx configuration file and view
[root@localhost conf.d]# nginx -s reload -c /etc/nginx/nginx.conf
-
View the native nginx enabled ports
[root@localhost conf.d]# netstat -luntp|grep nginx

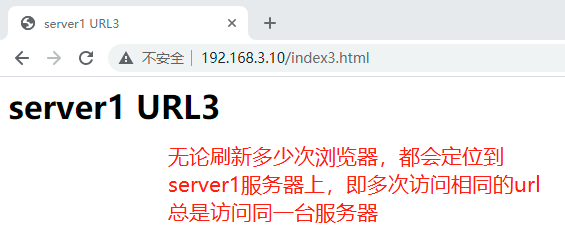
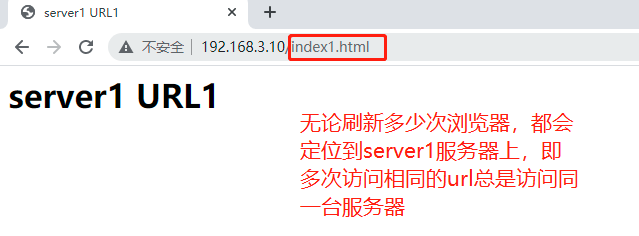
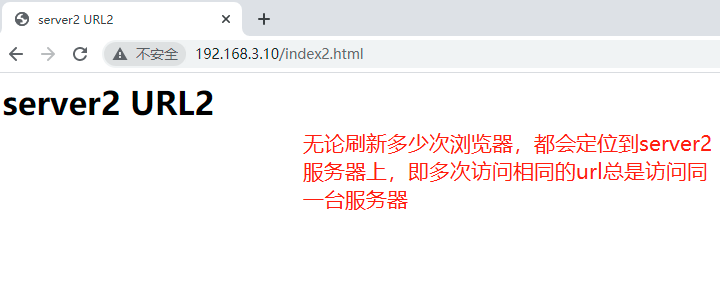
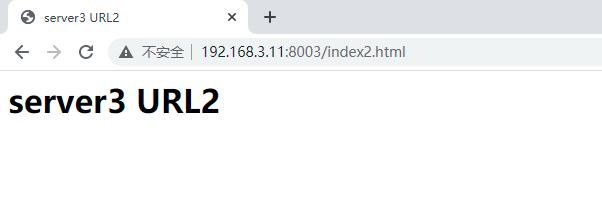
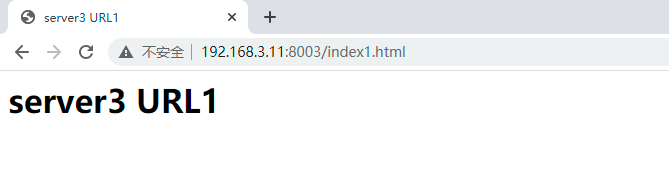
(4) , accessed separately through the browser http://192.168.3.10/index1.html , http://192.168.3.10/index2.html , http://192.168.3.10/index3.html , because the port of the load balancing server is 80, you can directly omit it. Refresh the server in turn. You can see that each refresh of the same computer accesses the page of the same back-end server, as shown in the following figure:
Note: url refers to all paths appended after ip in the screenshot annotation below