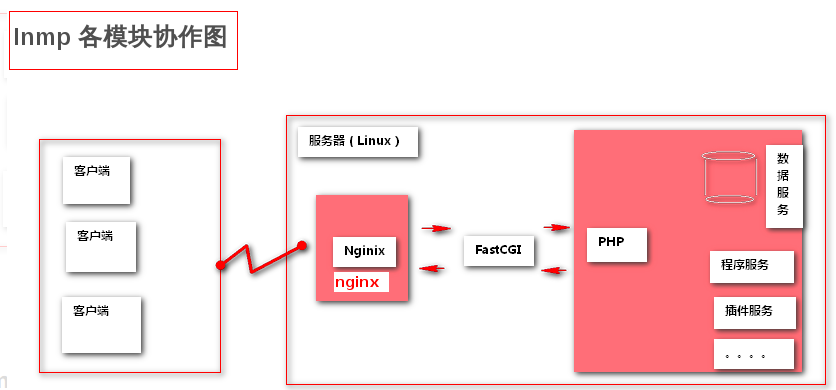
What is lnmp architecture
LNMP refers to a group of free software acronyms commonly used together to run dynamic websites or servers
L refers to Linux, N refers to Nginx, M generally refers to MySQL, MariaDB, P generally refers to PHP, Perl or Python
LNMP represents the website server architecture of Nginx+MySQL+PHP under Linux system
Linux is a general term of Unix computer operating system. It is the most popular free operating system at present
Representative versions include debian, centos, ubuntu, fedora, gentoo, etc
Nginx is a high-performance HTTP and reverse proxy server, as well as an IMAP/POP3/SMTP proxy server
Mysql is a small relational database management system
PHP is a scripting language embedded in HTML documents executed on the server side
These four kinds of software are free and open source software, which are combined to become a free, efficient and scalable website service system
Configure user
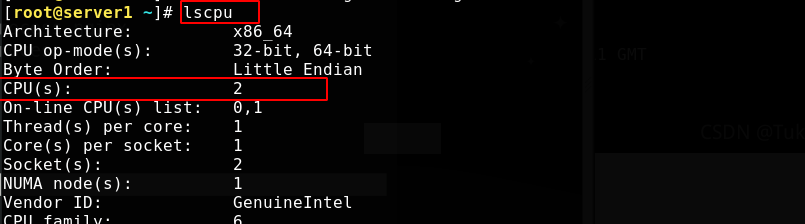
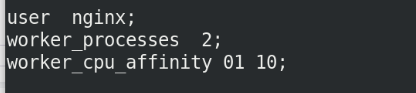
At / usr / local / nginx / conf / nginx In conf, you can define the users used by nginx and the number of workers. Generally, the number of workers is consistent with the number of cpu cores. Use the lscpu command to view cpu information
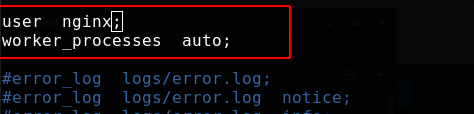
To use nginx user, you need to add the user; worker_processes is consistent with the number of cores by default, and auto is automatic recognition
[root@server1 ~]# useradd -d /usr/local/nginx -M -s /sbin/nologin nginx
[root@server1 ~]# vim /usr/local/nginx/conf/nginx.conf
After modifying the configuration, there is no problem in the test, and nginx is overloaded
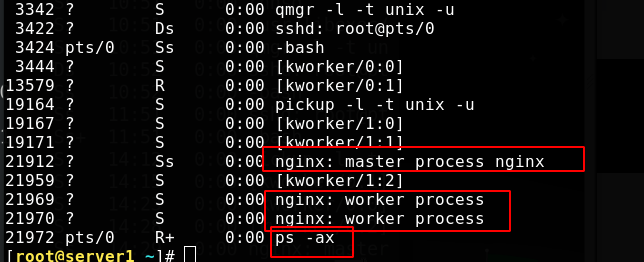
[root@server1 ~]# nginx -t
nginx: the configuration file /usr/local/nginx/conf/nginx.conf syntax is ok
nginx: configuration file /usr/local/nginx/conf/nginx.conf test is successful
[root@server1 ~]# nginx -s reload
[root@server1 ~]# ps -ax
View the process, one master and two worker s
Configure maximum connections
Modify the number of connections VIM / usr / local / nginx / conf / nginx conf

The maximum number of connections an application can open is limited. Kernel limit > system limit > application software limit.
First, check the file limit of the kernel, which is related to the memory of the system. The maximum number of connections set can be less than this number;
Use the following command to view system limits
The operating system restriction file is stored in VIM / etc / security / limits Conf edit the file to add content. This value also needs to be greater than or equal to the set maximum number of connections
/etc/pam. The system control session mode is recorded in the D / system auth file
#session component: configure and manage user sesson

Reverse proxy and load balancing of nginx
nginx provides reverse proxy services and different load balancing algorithms.
When doing reverse proxy, the number of connections should be divided by 2. According to the http protocol version, it may be divided by 4, but there will be restrictions on the operating system.
Demo environment:
server1		172.25.38.1		nginx-master
server2		172.25.38.2		nginx back-end
server3		172.25.38.3		nginx back-end
Send the configured nginx directory to the other two virtual machines, and configure the nginx service on the two back ends. The default number of connections is 1024, without setting the user.
[root@server1 local]# scp -r nginx/ server3:/usr/local
[root@server2 ~]# ln -s /usr/local/nginx/sbin/nginx /usr/local/sbin/
[root@server2 ~]# vim /usr/local/nginx/conf/nginx.conf
Set different web default pages to show the difference
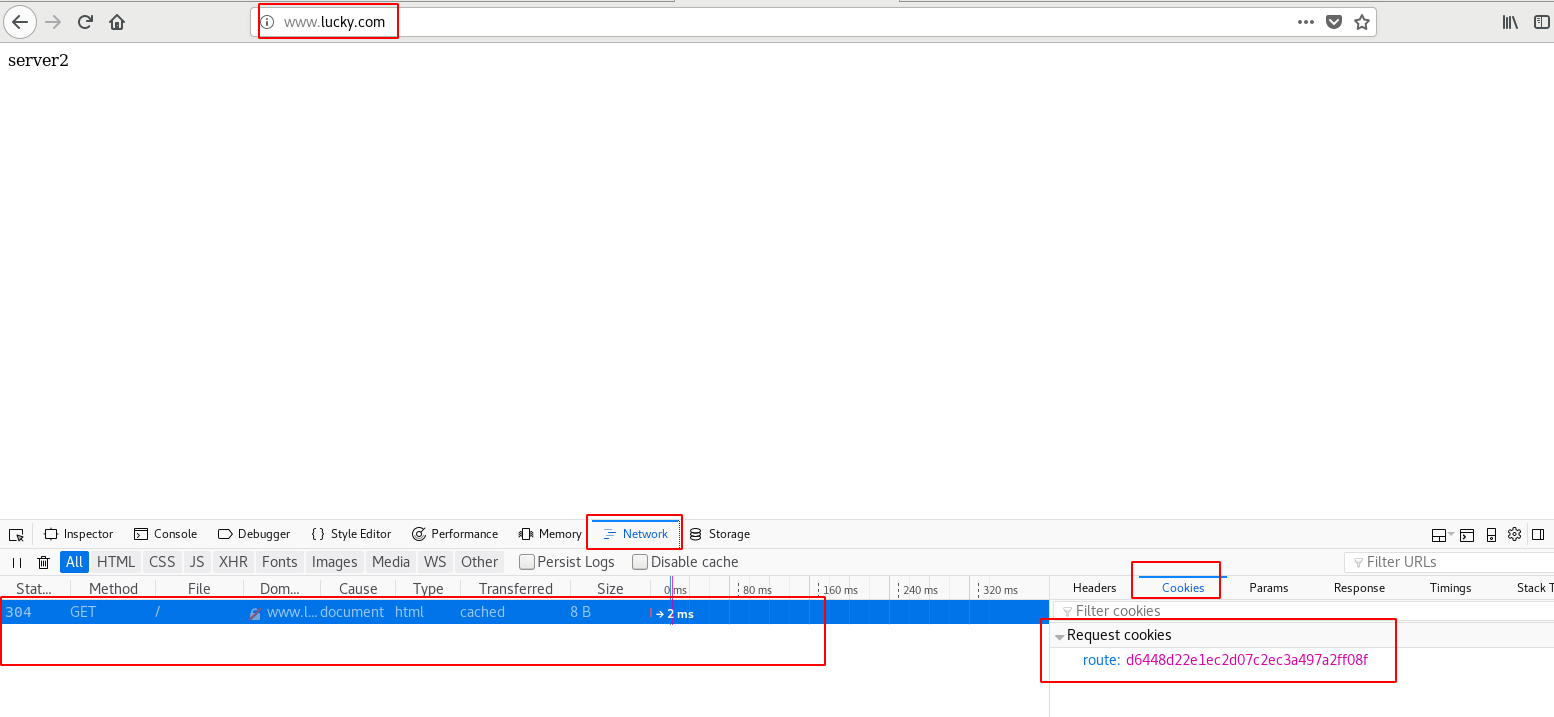
[root@server2 ~]# echo server2 > /usr/local/nginx/html/index.html
[root@server2 ~]# curl server2
server2
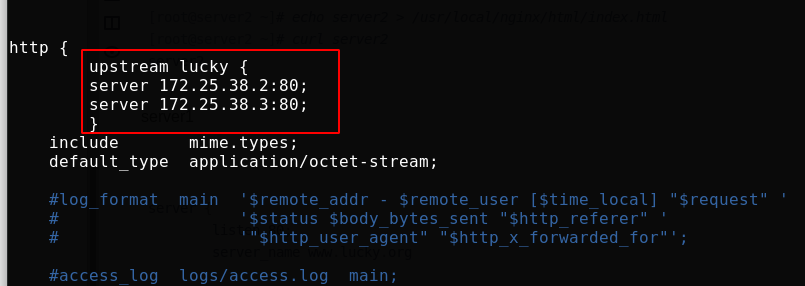
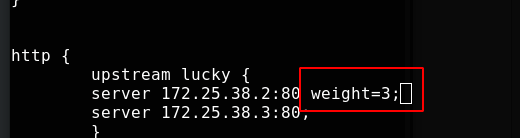
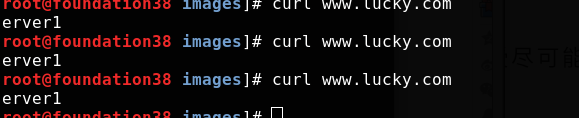
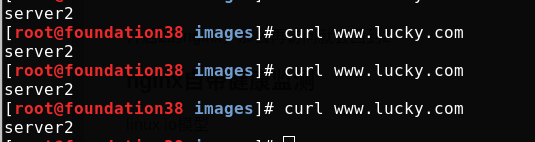
At the scheduling end server1, edit the main configuration file and add a load balancer; Add a load balancer in the http module. The default is rr scheduling
[root@server1 ~]# vim /usr/local/nginx/conf/nginx.conf
upstream lucky {
server 172.25.38.2:80;
server 172.25.38.3:80;
}
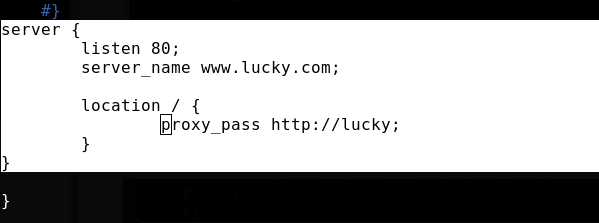
server {
listen 80;
server_name www.lucky.com;
location / {
proxy_pass http://lucky;
}
}
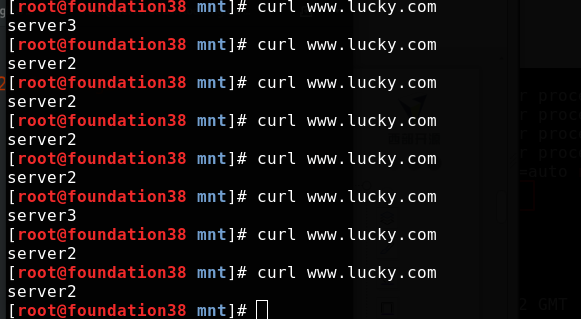
server is equivalent to the virtual host in apache. Visit www.lucky.com The domain name com will be scheduled to two back ends according to the load balancer algorithm
Test successful and reload nginx

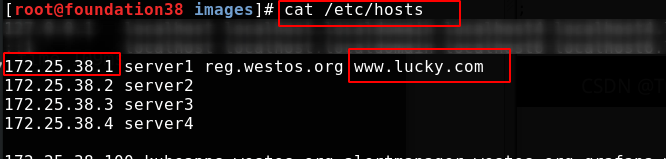
Add resolution on real machine
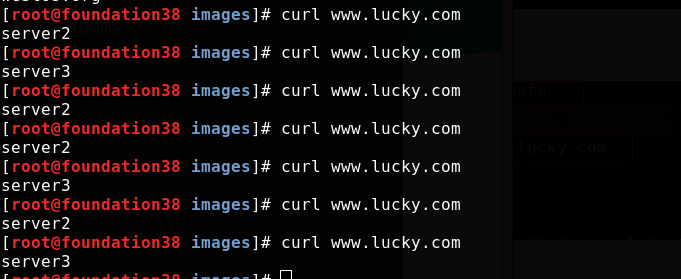
In the real machine test access, load balancing is realized
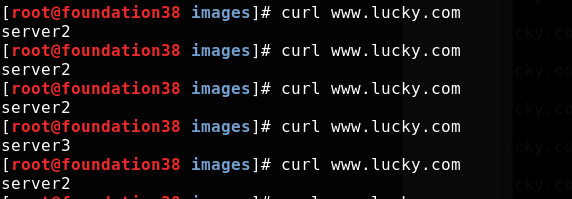
Back end weights can be specified
Test successful and reload nginx

Test access on real machine
Session retention
Session persistence refers to a mechanism on the load balancer, which can identify the relationship between the interaction process between the client and the server, and ensure that a series of related access requests will be allocated to one machine while performing load balancing.
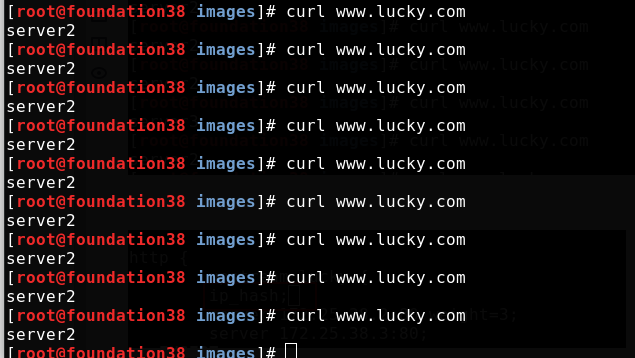
Use IP_ The hash module implements session holding
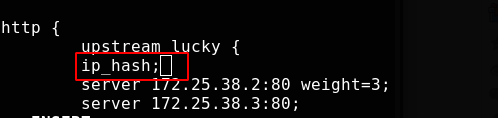
Test successful and reload nginx
[root@server1 local]# nginx -t
nginx: the configuration file /usr/local/nginx/conf/nginx.conf syntax is ok
nginx: configuration file /usr/local/nginx/conf/nginx.conf test is successful
[root@server1 local]# nginx -s reload
During the real machine test access, server2 is allocated to the real machine at the beginning, and it will remain as long as server2 survives
reserve
Set server1 as the local backup

Test successful and reload nginx
[root@server1 ~]# nginx -t
nginx: the configuration file /usr/local/nginx/conf/nginx.conf syntax is ok
nginx: configuration file /usr/local/nginx/conf/nginx.conf test is successful
[root@server1 ~]# nginx -s reload
Close the nginx of 2 and 3, and modify the nginx access page of 1
[root@server1 ~]# echo server1 > /usr/local/nginx/html/index.html
In the real machine test access, because the backend is down, it can only be scheduled to the backup (because nginx comes with health monitoring)
Turn on nginx of 2, and then access will return to 2
worker restrictions
[root@server1 ~]# vim /usr/local/nginx/conf/nginx.conf

nginx version smooth upgrade
arrive earlier than Official website Download a new version of nginx, unzip it into the unzip directory, and close debug
[root@server1 ~]# tar zxf nginx-1.21.1.tar.gz
[root@server1 ~]# cd nginx-1.21.1/
[root@server1 nginx-1.21.1]# vim auto/cc/gcc

The first two steps of the source compilation Trilogy
[root@server1 nginx-1.21.1]# ./configure --prefix=/usr/local/nginx --with-http_ssl_module --with-http_stub_status_module --with-threads --with-file-aio
[root@server1 nginx-1.21.1]# make
Back up the binary program of the old version in the software directory, and put the binary program of the new version in the execution directory
[root@server1 nginx-1.21.1]# cd /usr/local/nginx/sbin
[root@server1 sbin]# ls
nginx
[root@server1 sbin]# cp nginx nginx.old
[root@server1 sbin]# cd -
/root/nginx-1.21.1
[root@server1 nginx-1.21.1]# cd objs/
[root@server1 objs]# \cp -f nginx /usr/local/nginx/sbin/
Many commands omit some parameters. For example, only rm is executed. In fact, rm -i is executed, and cp -f is to force a full backup without prompting
Turn off the old master and tell the application to reload the configuration file. Sending an upgrade signal will close the worker of the original master without closing it, and open a new master and worker to use a new nginx file
SIGUSR1 and SIGUSR2 are signals sent to a process, which represent user-defined situations.
USR1 is also commonly used to tell applications to reload configuration files
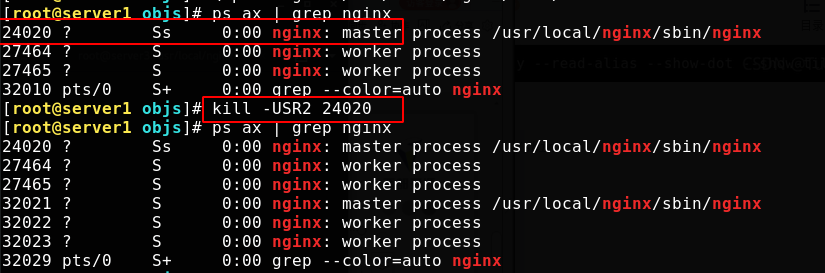
Check the process. The old master process is the only one left. The sigwing signal is ignored by the default process and is sent when the window size changes
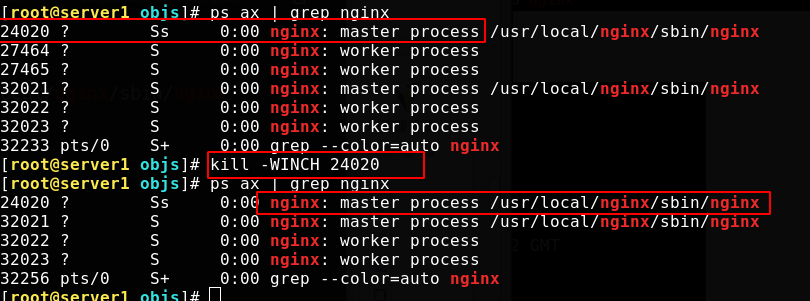
At this time, the version has been successfully upgraded unknowingly
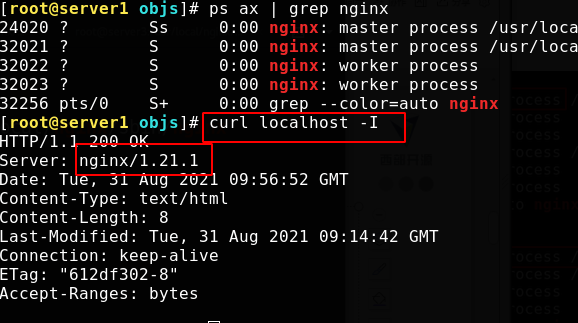
User access is OK
nginx version fallback
Start the woker node for the master process before upgrading
[root@server1 objs]# cd /usr/local/nginx/sbin/
[root@server1 sbin]# \cp -f nginx.old nginx
[root@server1 sbin]# kill -HUP 24020		#Send the SIGHUP signal to reload the process
[root@server1 sbin]# kill -WINCH 32021		#The SIGWINCH signal is ignored by the default process and is issued when the window size changes
[root@server1 sbin]# curl localhost -I
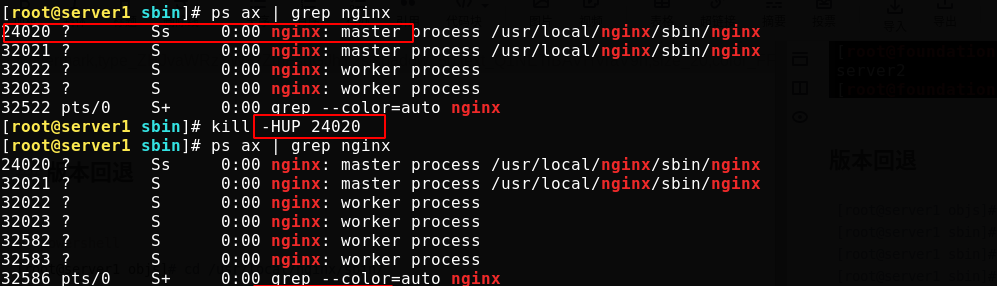
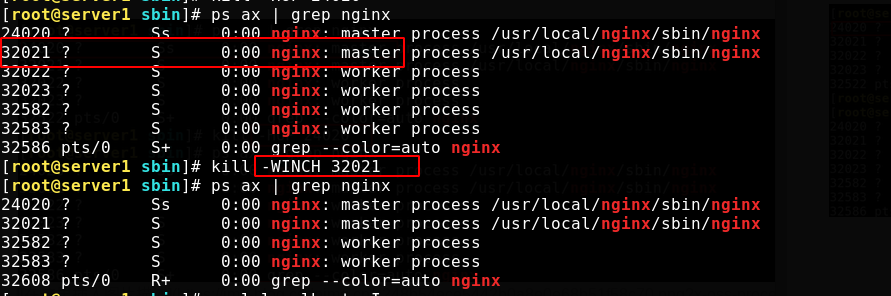
At this time, the version has been successfully rolled back unknowingly
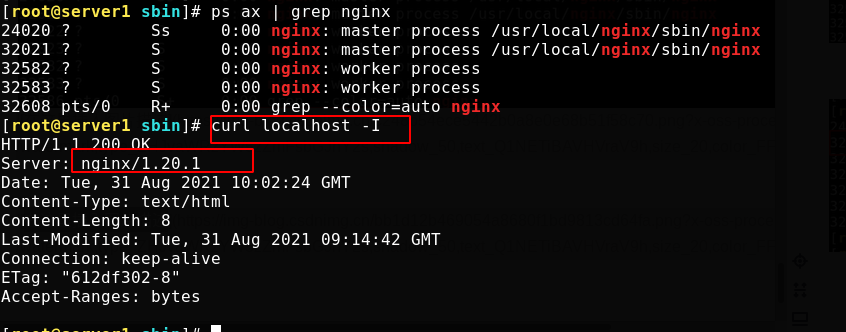
At this time, if you don't need a new version in the future, you can kill the master process of the new version directly
Non nginx built-in session holding module
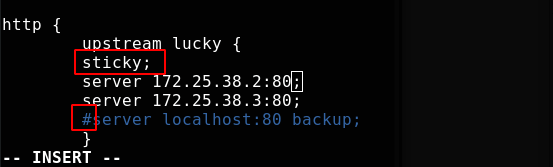
In the environment of multiple background servers, in order to ensure that a customer communicates with only one server, it is bound to use a long connection. The common is to use the IP provided by nginx_ Hash, but if the front end is a CDN, or a LAN client accesses the server at the same time, resulting in uneven server distribution and no guarantee that each access will stick to the same server. If cookie based can maintain a long connection and ensure the pressure balance of the server, ngx_http_sticky_module can realize this function.
client requests access to the service - > DNS server resolves the domain name to CDN - > CDN (nginx, squid, varnish) reverse proxy - > nginx reverse proxy fetches things from the back-end server - > webserver
Download and unzip ngx_http_sticky_module
[root@server1 ~]# yum install -y unzip
[root@server1 ~]# unzip nginx-goodies-nginx-sticky-module-ng-08a395c66e42.zip
[root@server1 ~]# cd nginx-1.20.1/
[root@server1 nginx-1.20.1]# make clean
rm -rf Makefile objs
Recompile in the nginx source folder and add this module
[root@server1 nginx-1.20.1]# ./configure --prefix=/usr/local/nginx --with-http_ssl_module --with-http_stub_status_module --with-threads --with-file-aio --add-module=/root/nginx-goodies-nginx-sticky-module-ng-08a395c66e42
[root@server1 nginx-1.20.1]# make
Recompile, overwrite the previous binary file, edit the configuration file and add modules
[root@server1 nginx-1.20.1]# cd objs/
[root@server1 objs]# \cp -f nginx /usr/local/nginx/sbin/
[root@server1 objs]# cd /usr/local/nginx/conf/
[root@server1 conf]# vim nginx.conf
Test successful and reload nginx

curl access test, no cookie, no session retention

Test access on real machine

Open the workbench to load cookie s
Restrict access to proxy HTTP resources
Using NGINX and NGINX Plus, you can limit:
1. Number of connections per key (for example, per IP address)
2. Request rate per key value (number of requests allowed to be processed in a second or minute)
3. Download speed of connection
Note that IP addresses can be shared behind NAT devices, so ip address restrictions should be used with caution.
The following modified contents are available in official documents, so only pictures are shown below: https://docs.nginx.com/nginx/admin-guide/security-controls/controlling-access-proxied-http/
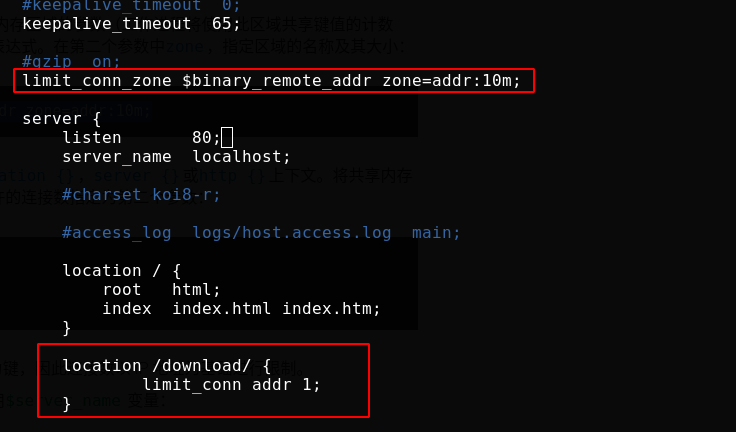
The following modifications are / usr / local / nginx / conf / nginx Conf configuration file
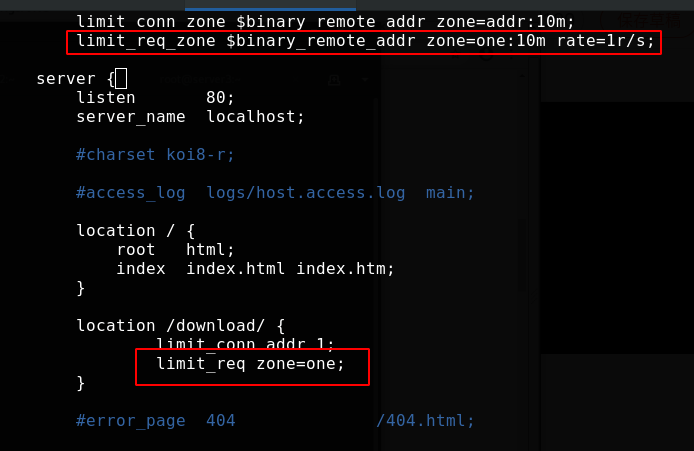
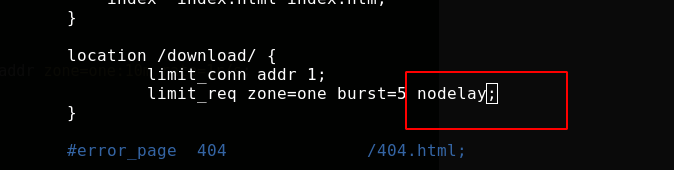
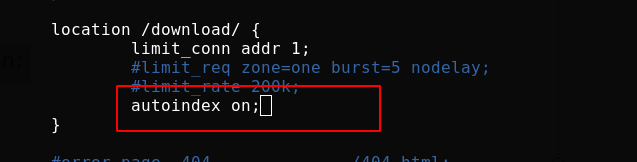
Limit connections
Modify the configuration file and add the following contents. Use limit_ The restricted location {} context within the scope of application of the conn instruction. Specify the name of the shared memory area as the first parameter and the number of connections allowed per key as the second parameter:
Test successful and reload nginx

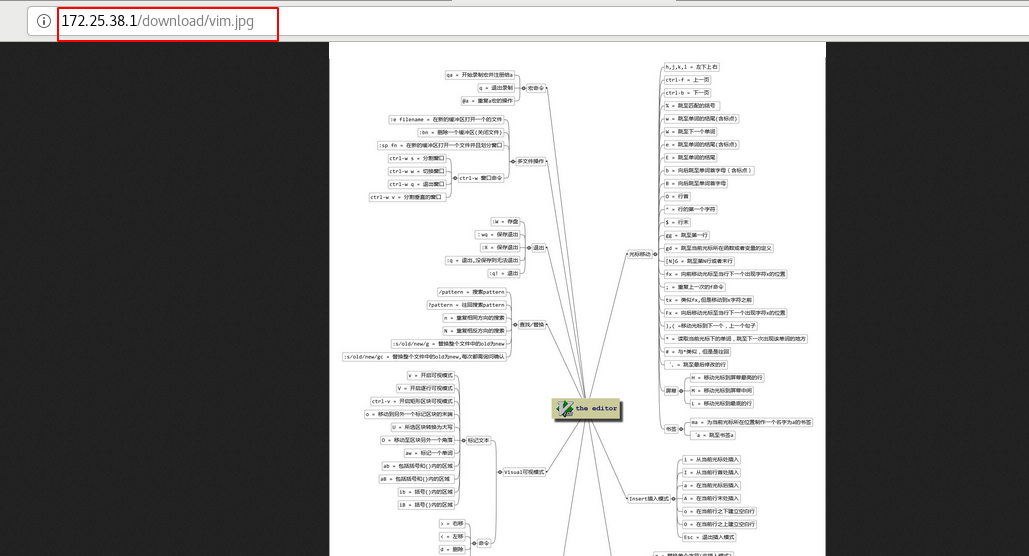
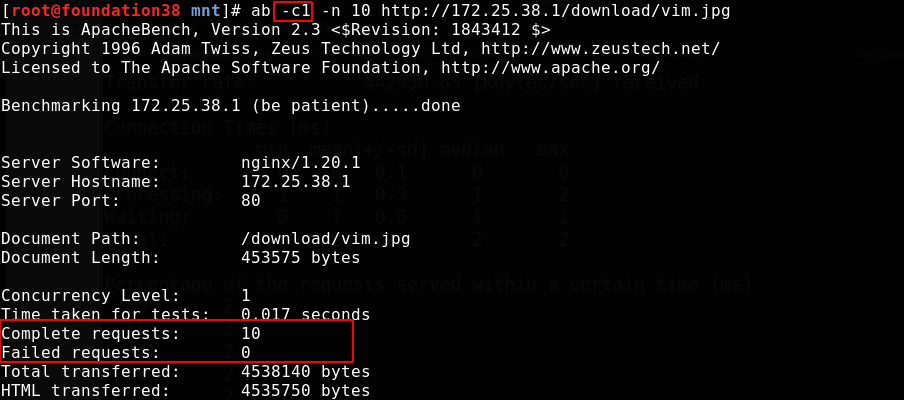
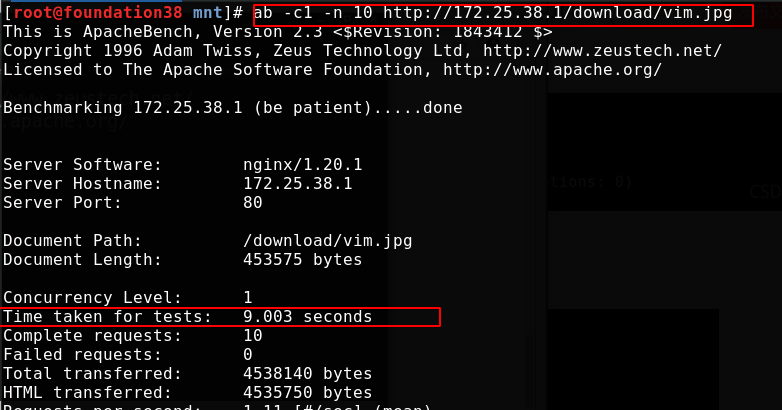
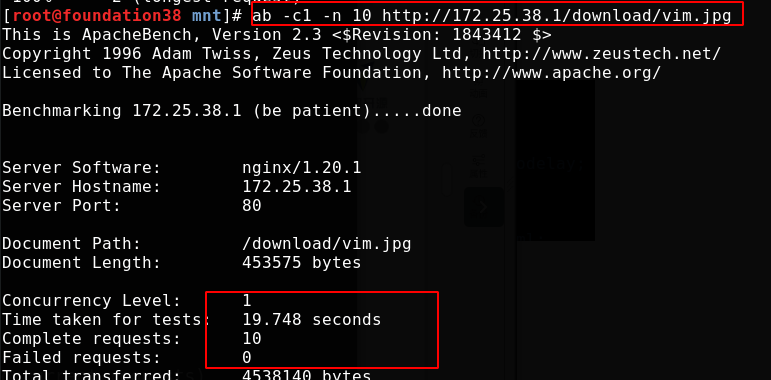
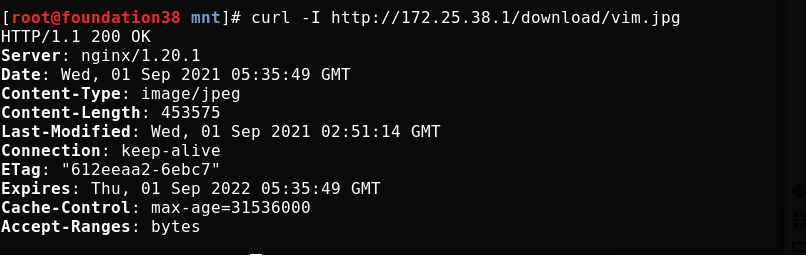
Create a download directory and put a picture
[root@server1 conf]# mkdir /usr/local/nginx/html/download
[root@server1 conf]# mv /root/vim.jpg /usr/local/nginx/html/download/
Reload nginx, and the browser is accessed successfully
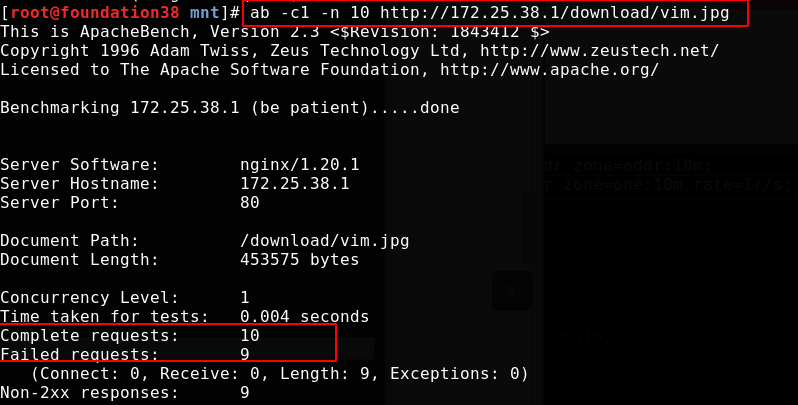
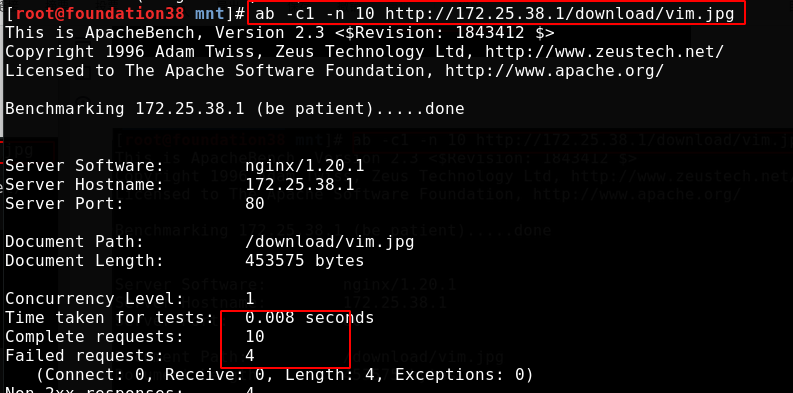
For the pressure test, the number of - c concurrent requests is 10, and the number of - n requests is 10, that is, 10 requests are sent together. Because we have made restrictions above, there will be requests that fail to access
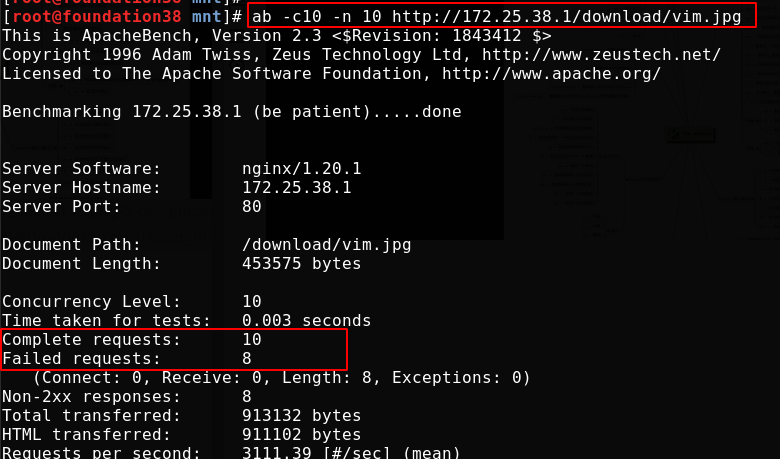
The above display may not be accurate. The log is accurate. You should read it in the log
[root@server1 conf]# cat /usr/local/nginx/logs/access.log
Most requests failed

Changing the concurrency number to 1 meets our limit and will not fail
Limit request rate
Rate limiting can be used to prevent DDoS (distributed denial of service attack) attacks, or prevent upstream servers from being flooded by too many requests at the same time. This method is based on the following leaky bucket algorithm: requests reach the bucket at various rates and leave the bucket at a fixed rate.
Modify the configuration file with limit_ req_ The zone instruction sets parameters. The instruction is defined at the http {} level, which allows different regions and request overflow parameters to be applied to different contexts. We set the access frequency of clients with the same identity. Here, the limit is 1 time per second
Overload nginx and conduct pressure measurement. All 9 exceeding the rate fail.
Processing too many requests
Requests are limited to compliance with limit_ req_ The rate defined in the zone instruction. If the number of requests exceeds the specified rate and the shared memory area is full, NGINX will respond to errors. Because traffic is often burst, it is not best to return errors in response to client requests during traffic bursts.
Such excessive requests in NGINX can be buffered and processed. limit_ The burst parameter of the req instruction sets the maximum number of requests waiting to be processed at the specified rate
Modify the configuration file, and requests exceeding the zone limit will be put into a queue of 5. Overloaded nginx
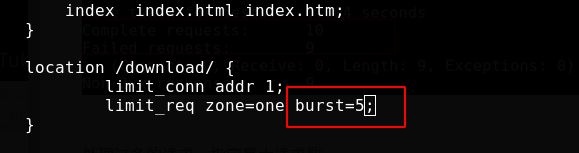
Now, although it exceeds our setting that only one request per second is allowed, it can be put into the queue to process one request per second. In the end, it only takes more than 9 seconds because the request itself will not take long. The tenth is the last one, and the request will end naturally
It can also be set to queue only once, that is, one request is processed in the first second, more requests are put into the queue containing 5 requests, and more requests are directly rejected
Overloads nginx access. As follows, because we have requested 10 times, 1 + 5 will only have 6 successes
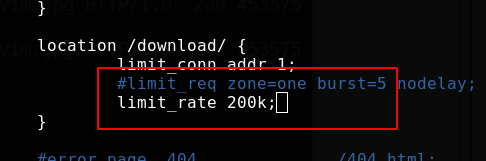
Limit bandwidth
To limit the bandwidth of each connection, use limit_rate instruction:
Request 10 times, about two seconds at a time
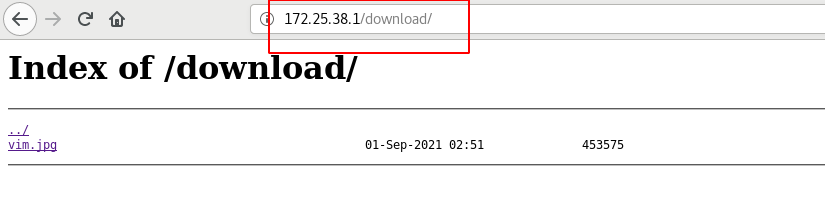
Automatic indexing: easy to download
When the path is not specified when accessing the location and there is no home page file under the path, enabling automatic indexing will display the directory structure of the location
Reload nginx to access the browser
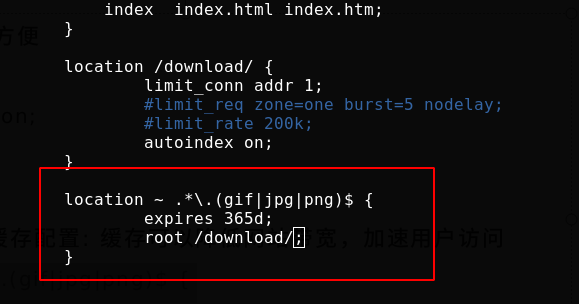
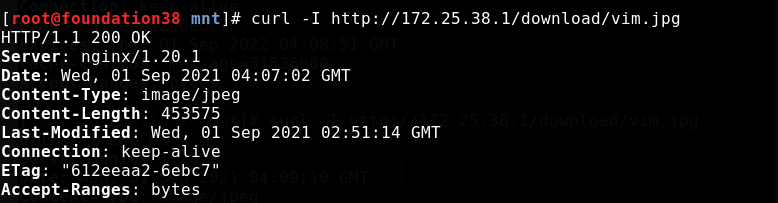
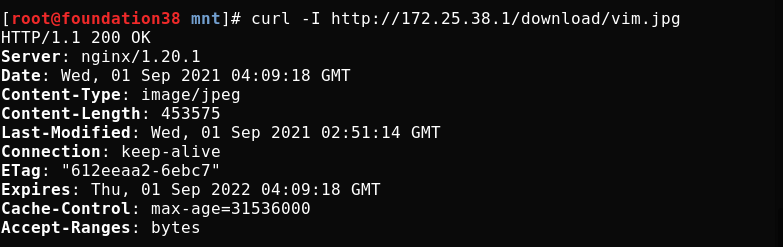
Nginx expire cache configuration
Nginx expire cache configuration: caching can reduce website bandwidth and accelerate user access
Modify the configuration file / usr / local / nginx / conf / nginx Conf, add parameters in the server module
        location ~ .*\.(gif|jpg|png)$ {
                expires 365d;
                root html;
        }
When accessing server/path/x.jpg, you will access x.jpg in the path under html in the nginx working directory
Access before overloading nginx
Test cache access after overloading nginx
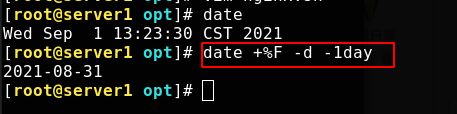
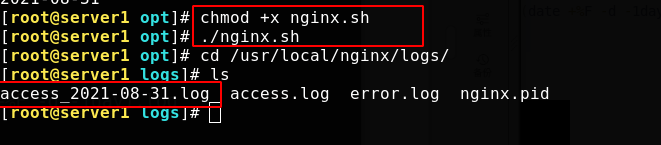
Log polling
Write scripts to record logs every 24 hours, that is, once a day
[root@server1 conf]# cd ..
[root@server1 nginx]# cd /opt/
[root@server1 opt]# ls
[root@server1 opt]# vim nginx.sh	#Script content
#!/bin/bash
cd /usr/local/nginx/logs && mv access.log access_$(date +%F -d -1day).log
kill -USR1 `cat /usr/local/nginx/logs/nginx.pid`
Because the of the previous day should be recorded at 0:00, the number of days should be reduced by one day
If you give the script execution permission to execute directly, you can see that the logging is successful
Add a crontab task to log every 24 hours, that is, once a day
crontab -e
00 00 * * * /opt/scripts/nginxlog.sh &> /dev/null
Set log permissions
chmod -R 700 /usr/local/nginx/logs
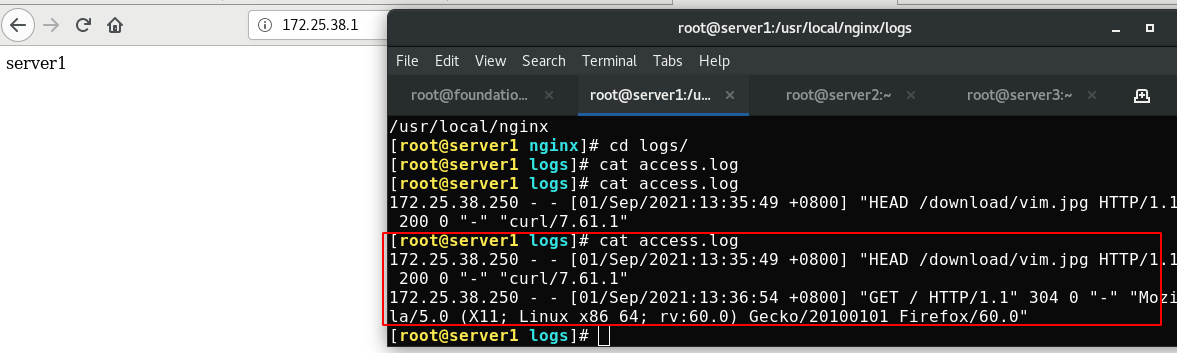
Monitoring log
Open the monitoring page without recording the monitoring log
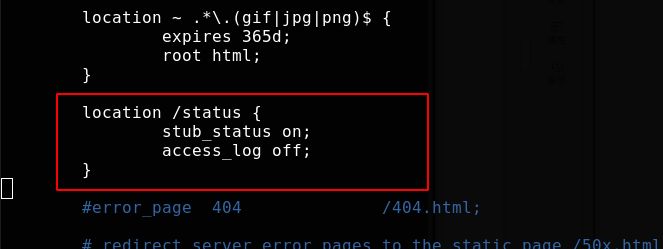
Access monitoring page
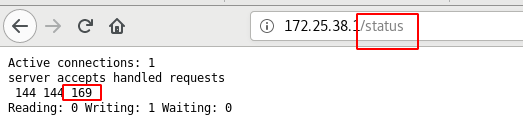
The increase of visits will be monitored in real time
Check the log. As we configured, there is no record

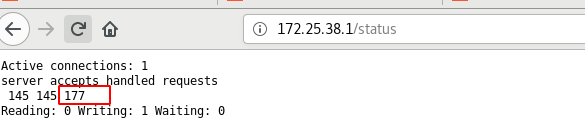
Access other resources
The log will record

Browser access to other resources will also be recorded
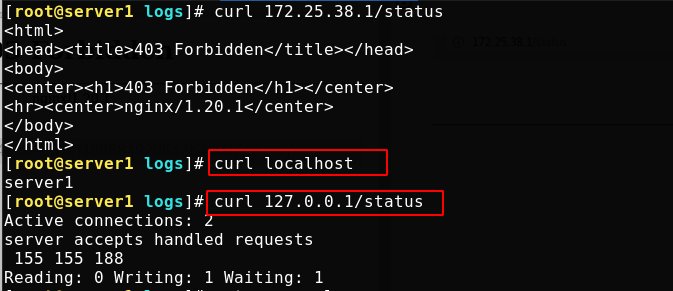
Now set the monitoring page to allow local access only
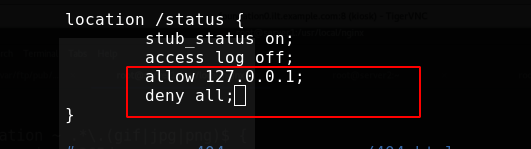
The browser uses a real machine, so it can't be accessed naturally

Local access should be accessed in the following ways
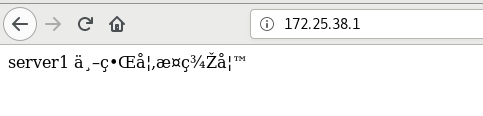
Chinese garbled code
Although the front-end can also solve the problem of Chinese garbled code, it can also be directly configured in the server to solve the problem of Chinese garbled code in some browser access
First write Chinese to the test page
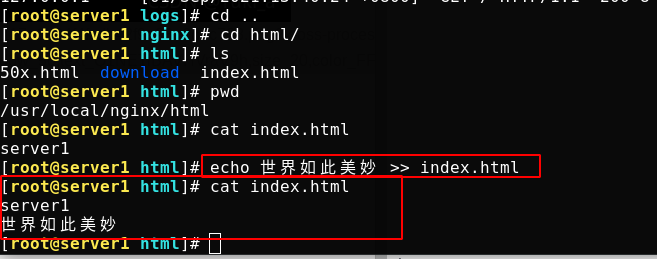
Browser access, garbled code
Modify profile
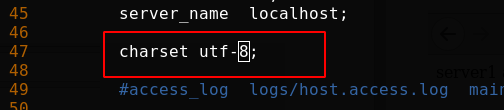
Overload nginx, clean up the browser cache and re access without garbled code (curl access itself has no cache)

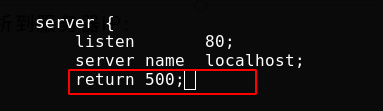
Prevent malicious domain name resolution to server IP
To prevent malicious domain name resolution to the server IP (some websites will resolve the domain name to your website address), you need to configure the resolution of the rejected domain name to the server IP during access. You can set which domain name is rejected and return the 500 status code
As follows, I only did a simple test locally
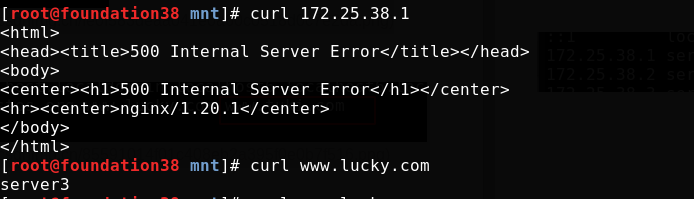
You can also redirect. For example, the domain name you visit will be directed to the web page I specify. I still tested it locally
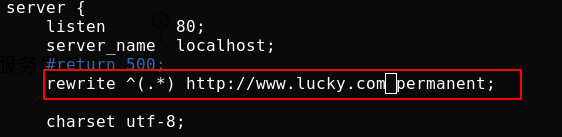
Access display 301 redirection
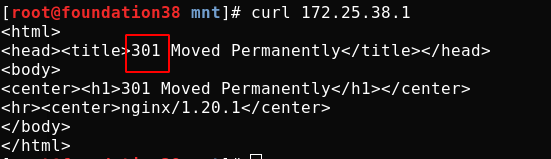
Enter ip access and redirect to the specified web page

80->443
Modify the configuration file, uncomment the contents as shown in the figure, enable 443, and modify the certificate key file name
Batch uncomment method:
1,:125,144s/#//g
2,use vim Visualization, press d that will do
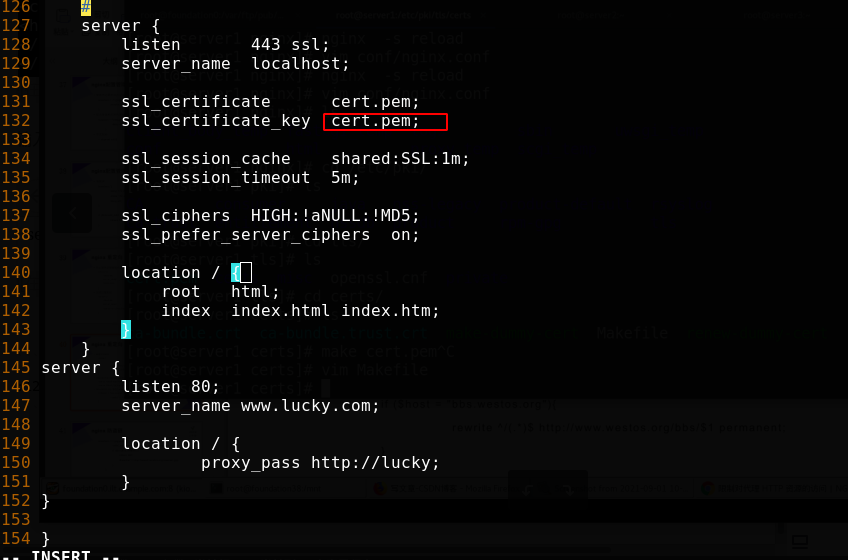
Add rewrite rule
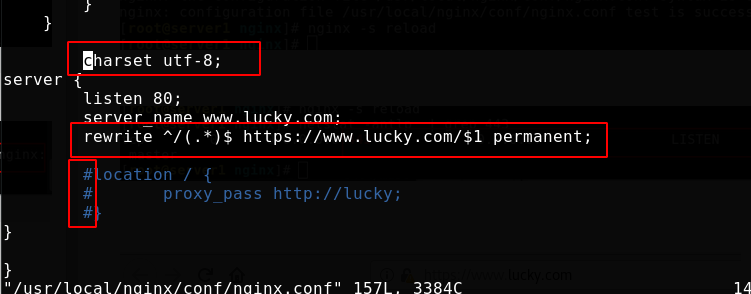
Generating pem files using scripts
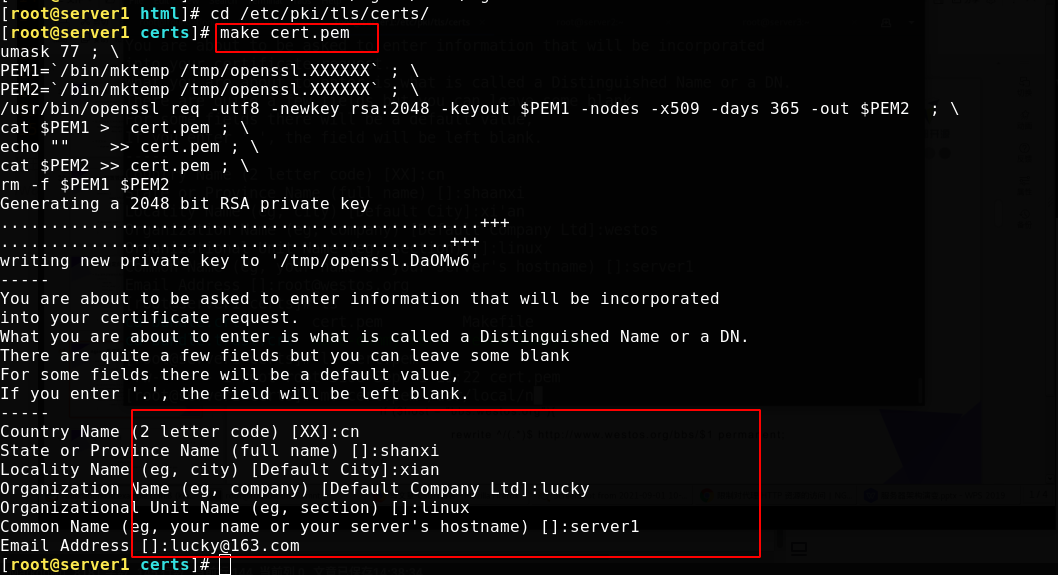
Copy the generated pem to nginx conf directory

Reload nginx to see if the port is open

If you visit http:server, you will be redirected to https
