[tcp]
nginx seven-tier load balancing
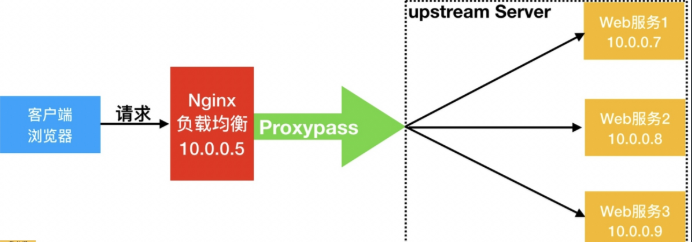
Overview of nginx load balancing
When our Web servers are directly user-oriented, they often carry a large number of concurrent requests. It is difficult for a single server to load. I use multiple Web servers to form a cluster. The front-end uses Nginx load balancing to distribute requests to our back-end server cluster to achieve load distribution. It will greatly improve system throughput, request performance and disaster tolerance.

So when a large number of user requests come, it is also a request scheduling node. The scheduling node forwards the user's request to the corresponding service node at the back end. After the service node processes the request, it forwards it to the scheduling node, and the scheduling node finally responds to the user node. This can also achieve a balanced effect, so Nginx is a typical SLB.
Load balancing is called many ways:
load balancing
load
Load Balance
LB
The name in the public cloud
SLB Ali Cloud Load Balancing
QLB Qingyun Load Balancing
CLB Tencent Cloud Load Balancing
ULB ucloud load balancing
Common load balancing software
Nginx
Haproxy
LVS
Four-Layer Load Balancing
The so-called four-tier load balancing refers to the transport layer in the seven-tier OSI model, so the transport layer Nginx can support the control of TCP/IP, so it can achieve load balancing only by forwarding the TCP/IP protocol to the client's requests. Then its advantage is that the performance is very fast, it only needs the application processing at the bottom level, but not at the bottom level. Some complicated logic is needed.

Seven Layer Load Balancing
The seven-tier load balancing is in the application layer, so it can fulfill many application protocol requests, such as the load balancing of http application, which can realize the rewriting of http information, header information, security application rule control, URL matching rule control, and the rules of forwarding, rewrite and so on. Nginx is a typical seven-tier load balancing SLB.

Difference
Four-tier load balancing data packets are distributed at the bottom level, while seven-tier load balancing data packets are distributed at the top level. It can be seen that the efficiency of seven-tier load balancing is not as high as that of four-tier load balancing.
But the seven-tier load balancing is closer to the service, such as: http protocol is the seven-tier protocol, we can use Nginx for session maintenance, URL path rule matching, head rewriting and so on. These are four-tier load balancing can not be achieved.
Note: Four-tier load balancing does not recognize domain names, and seven-tier load balancing does.
nginx load balancing configuration scenario
Nginx needs proxy_pass proxy module configuration to achieve load balancing.
Nginx load balancing differs from Nginx proxy in that one location of Nginx can only proxy one server, while Nginx load balancing forwards client request proxy to a set of upstream virtual service pools.
Preparatory environment
| role | Extranet IP(NAT) | Intranet IP(LAN) | host name |
|---|---|---|---|
| LB01 | eth0:10.0.0.5 | eth1:172.16.1.5 | lb01 |
| web01 | eth0:10.0.0.7 | eth1:172.16.1.7 | web01 |
| web02 | eth0:10.0.0.8 | eth1:172.16.1.8 | web02 |
Configure nginx on web01
[root@web01 ~]# cd /etc/nginx/conf.d/
[root@web01 conf.d]# cat node.conf
server {
    listen 80;
    server_name node.drz.com;
    location / {
        root /node;
        index index.html;
    }
}
[root@web01 conf.d]# mkdir /node
[root@web01 conf.d]# echo "Web01..." > /node/index.html
[root@web01 conf.d]# systemctl restart nginx
Configure nginx on web02
[root@web02 ~]# cd /etc/nginx/conf.d/
[root@web02 conf.d]# cat node.conf
server {
    listen 80;
    server_name node.drz.com;
    location / {
        root /node;
        index index.html;
    }
}
[root@web02 conf.d]# mkdir /node
[root@web02 conf.d]# echo "Web02..." > /node/index.html
[root@web02 conf.d]# systemctl restart nginx
Configuring nginx load balancing on lb01
[root@lb01 ~]# cd /etc/nginx/conf.d/
[root@lb01 conf.d]# cat node_proxy.conf
upstream node {
    server 172.16.1.7:80;
    server 172.16.1.8:80;
}
server {
    listen 80;
    server_name node.drz.com;

    location / {
        proxy_pass http://node;
        include proxy_params;
    }
}
[root@lb01 conf.d]# systemctl restart nginx
proxy_params for Nginx load balancing scheduling
[root@Nginx ~]# vim /etc/nginx/proxy_params
proxy_set_header Host $http_host;
proxy_set_header X-Real-IP $remote_addr;
proxy_set_header X-Forwarded-For $proxy_add_x_forwarded_for;

proxy_connect_timeout 30;
proxy_send_timeout 60;
proxy_read_timeout 60;

proxy_buffering on;
proxy_buffer_size 32k;
proxy_buffers 4 128k;
Open Browser Test: True Result Refreshes web01/web02 Switch
Solution: In the process of load balancing, when the back-end service of a machine goes down, it does not affect users.
proxy_next_upstream error timeout http_500 http_502 http_503 http_504;

vim upstream.conf
upstream  node {
        server 172.16.1.7;
        server 172.16.1.8;
}

server {
        listen 80;
        server_name blog.drz.com;

    location / {
            proxy_pass http://node;
            proxy_next_upstream error timeout http_500 http_502 http_503 http_504;
            include proxy_params;
    }

}
Scheduling algorithm for nginx load balancing
| scheduling algorithm | Summary |
|---|---|
| Polling (rr) | Allocate to different back-end servers in chronological order (default) |
| weight(wrr) | Weighted polling, the greater the weight value, the higher the access probability allocated |
| ip_hash | Each request is allocated according to the hash result of accessing IP, so that fixed access from the same IP to a back-end server is made. |
| url_hash | Assigning requests according to hash results of accessing URLs is that each URL is directed to the same back-end server |
| least_conn | Minimum number of links, that machine will distribute as few links as possible |
upstream load_pass {
    server 10.0.0.7:80;
    server 10.0.0.8:80;
}

upstream load_pass {
    server 10.0.0.7:80 weight=5;
    server 10.0.0.8:80;
}


#If all clients follow the same proxy, there will be too many connections to one server.
upstream load_pass {
    ip_hash;
    server 10.0.0.7:80 weight=5;
    server 10.0.0.8:80;
}
The state of the backend of nginx
State of Web Server in Front-end Nginx Load Balancing Scheduling
| state | Summary |
|---|---|
| down | Current server s are temporarily not involved in load balancing |
| backup | Reserved backup server |
| max_fails | Number of times requests are allowed to fail |
| fail_timeout | Service pause time after max_fails failure |
| max_conns | Limit the maximum number of receiving connections |
upstream load_pass {
    #Do not participate in any scheduling, generally used for downtime maintenance
    server 10.0.0.7:80 down;
}


upstream load_pass {
    server 10.0.0.7:80 down;
    server 10.0.0.8:80 backup;
    server 10.0.0.9:80 max_fails=1 fail_timeout=10s;
}

location  / {
    proxy_pass http://load_pass;
    include proxy_params;
}

upstream load_pass {
    server 10.0.0.7:80;
    server 10.0.0.8:80 max_fails=2 fail_timeout=10s;
}


upstream load_pass {
    server 10.0.0.7:80;
    server 10.0.0.8:80 max_conns=1;
}
Nginx load balancing health check
In the module provided by Nginx official module, there is no health check module for load balancing back-end node, but third-party module can be used.
nginx_upstream_check_module detects the health status of back-end services.
Third Party Module Project Address: TP
1. Install dependency packages
[root@lb02 ~]# yum install -y gcc glibc gcc-c++ pcre-devel openssl-devel patch
2. Download the nginx source package and the third-party module of the nginx_upstream_check module
[root@lb02 ~]# wget http://nginx.org/download/nginx-1.14.2.tar.gz
[root@lb02 ~]# wget https://github.com/yaoweibin/nginx_upstream_check_module/archive/master.zip
3. Decompress nginx source packages and third-party modules
[root@lb02 ~]# tar xf nginx-1.14.2.tar.gz
[root@lb02 ~]# unzip master.zip
4. Enter the nginx directory, patch (the version of nginx is 1.14 patch, choose 1.14 patch, p1 represents in the nginx directory, p0 is not in the nginx directory)
[root@lb02 ~]# cd nginx-1.14.2/
[root@lb02 nginx-1.14.2]# patch -p1 <../nginx_upstream_check_module-master/check_1.14.0+.patch
./configure --prefix=/etc/nginx --sbin-path=/usr/sbin/nginx --modules-path=/usr/lib64/nginx/modules --conf-path=/etc/nginx/nginx.conf --error-log-path=/var/log/nginx/error.log --http-log-path=/var/log/nginx/access.log --pid-path=/var/run/nginx.pid --lock-path=/var/run/nginx.lock --http-client-body-temp-path=/var/cache/nginx/client_temp --http-proxy-temp-path=/var/cache/nginx/proxy_temp --http-fastcgi-temp-path=/var/cache/nginx/fastcgi_temp --http-uwsgi-temp-path=/var/cache/nginx/uwsgi_temp --http-scgi-temp-path=/var/cache/nginx/scgi_temp --user=nginx --group=nginx --with-compat --with-file-aio --with-threads --with-http_addition_module --with-http_auth_request_module --with-http_dav_module --with-http_flv_module --with-http_gunzip_module --with-http_gzip_static_module --with-http_mp4_module --with-http_random_index_module --with-http_realip_module --with-http_secure_link_module --with-http_slice_module --with-http_ssl_module --with-http_stub_status_module --with-http_sub_module --with-http_v2_module --with-mail --with-mail_ssl_module --with-stream --with-stream_realip_module --with-stream_ssl_module --with-stream_ssl_preread_module --add-module=/root/nginx_upstream_check_module-master --with-cc-opt='-O2 -g -pipe -Wall -Wp,-D_FORTIFY_SOURCE=2 -fexceptions -fstack-protector-strong --param=ssp-buffer-size=4 -grecord-gcc-switches -m64 -mtune=generic -fPIC' --with-ld-opt='-Wl,-z,relro -Wl,-z,now -pie'
[root@lb02 nginx-1.14.2]# make && make install
5. Increase the function of health check on the existing load balance
[root@lb01 conf.d]# cat proxy_web.conf
upstream node {
    server 172.16.1.7:80 max_fails=2 fail_timeout=10s;
    server 172.16.1.8:80 max_fails=2 fail_timeout=10s;
    check interval=3000 rise=2 fall=3 timeout=1000 type=tcp;
    #Interval detection interval, in milliseconds
    #rise indicates that the request is normal twice, marking the state of the back end as up
    #fall indicates that the request failed three times, marking the state of the back end as down
    #Type type is tcp
    #Timeout timeout, in milliseconds
}

server {
    listen 80;
    server_name node.drz.com;
    location / {
        proxy_pass http://node;
        include proxy_params;
    }

    location /upstream_check {
        check_status;
    }
}
nginx load balancing session retention
When using load balancing, we will encounter the problem of session maintenance, which can be solved by the following way.
1. Using the ip_hash of nginx, the requests are assigned to the corresponding IP according to the IP of the client.
2. Session session sharing based on server (NFS, MySQL, memcache, redis, file)
To solve the problem of load balancing drawing, we need to understand the difference between session and cookie.
The browser side stores cookies. Each time the browser sends a request to the server side, the message header automatically adds cookie information.
The server will query the user's cookie as the key to find the corresponding value(session) in the storage.
The cookies of websites under the agreed domain name are the same, so the cookies of the same user are unchanged regardless of the server to which the request is assigned. That is to say, the session corresponding to cookie is also unique. So, just make sure that multiple business servers access the same shared storage server (NFS, MySQL, memcache, redis, file).
1. Configure nginx on web01
[root@web01 conf.d]# cat php.conf
server {
    listen 80;
    server_name php.drz.com;
    root /code/phpMyAdmin-4.8.4-all-languages;

    location / {
        index index.php index.html;
    }

    location ~ \.php$ {
        fastcgi_pass 127.0.0.1:9000;
        fastcgi_param SCRIPT_FILENAME $document_root$fastcgi_script_name;
        include fastcgi_params;
    }
}
[root@web01 conf.d]# systemctl restart nginx
2. Install phpmyadmin (both on web01 and web02)
[root@web01 conf.d]# cd /code
[root@web01 code]# wget https://files.phpmyadmin.net/phpMyAdmin/4.8.4/phpMyAdmin-4.8.4-all-languages.zip
[root@web01 code]# unzip phpMyAdmin-4.8.4-all-languages.zip
3. Configure phpmyadmin to connect to database remotely
[root@web01 code]# cd phpMyAdmin-4.8.4-all-languages/
[root@web01 phpMyAdmin-4.8.4-all-languages]# cp config.sample.inc.php config.inc.php
[root@web01 phpMyAdmin-4.8.4-all-languages]# vim config.inc.php
/* Server parameters */
$cfg['Servers'][$i]['host'] = '172.16.1.51';
4. Configuration authorization
chown -R www.www /var/lib/php/


[root@web01 phpMyAdmin-4.8.4-all-languages]# ll /var/lib/php/session/
//Total dosage 4
-rw-------. 1 www www 2424 8 January 21 18:41 sess_e96b27a6a628be47745a10a36e2fcd5a
 

5. Push the configuration files of phpmyadmin and nginx configured on web01 to web02 host
[root@web01 code]# scp -rp  phpMyAdmin-4.8.4-all-languages root@172.16.1.8:/code/
[root@web01 code]# scp /etc/nginx/conf.d/php.conf  root@172.16.1.8:/etc/nginx/conf.d/
6. Overload Nginx services on web02
[root@web02 code]# systemctl restart nginx
7. Authorization
[root@web02 code]# chown -R www.www /var/lib/php/
8. Access Load Balancing
[root@lb01 conf.d]# vim proxy_php.com.conf
upstream php {
        server 172.16.1.7:80;
        server 172.16.1.8:80;
}
server {
        listen 80;
        server_name php.drz.com;
        location / {
                proxy_pass http://php;
                include proxy_params;
        }
}

[root@lb01 conf.d]# nginx -t
nginx: the configuration file /etc/nginx/nginx.conf syntax is ok
nginx: configuration file /etc/nginx/nginx.conf test is successful
[root@lb01 conf.d]# systemctl restart nginx
After using the polling function of load balancing, you will find that session can never be logged in if it is saved in a local file. drz.com
Using redis to solve session login problems
1. Install redis memory database
[root@db01 ~]# yum install redis -y
2. Configure redis monitor on 172.16.1.0 segment
[root@db01 ~]# sed -i '/^bind/c bind 127.0.0.1 172.16.1.51' /etc/redis.conf
3. Start redis
[root@db01 ~]# systemctl start redis
[root@db01 ~]# systemctl enable redis
4.php configures session connection redis
#1. Modify the / etc/php.ini file
[root@web ~]# vim /etc/php.ini
session.save_handler = redis
session.save_path = "tcp://172.16.1.51:6379"
;session.save_path = "tcp://172.16.1.51:6379?auth=123 "# If redis has a password, use this method
session.auto_start = 1

#2. Annotate the two contents of php-fpm.d/www.conf, otherwise the session content will always be written to the / var/lib/php/session directory
;php_value[session.save_handler] = files
;php_value[session.save_path]    = /var/lib/php/session
5. Restart php-fpm
[root@web01 code]# systemctl restart php-fpm
6. Push the configurable files on web01 to web02
[root@web01 code]# scp /etc/php.ini root@172.16.1.8:/etc/php.ini
[root@web01 code]# scp /etc/php-fpm.d/www.conf root@172.16.1.8:/etc/php-fpm.d/www.conf
5. Restart php-fpm on web02
[root@web02 code]# systemctl restart php-fpm
6.redis view data
[root@db01 redis]# redis-cli
127.0.0.1:6379> keys *
1) "PHPREDIS_SESSION:1365eaf0490be9315496cb7382965954"

The difference between cookie and session
