Implementation principles of nine cross domain methods (full version)
preface
Cross domain requests are often encountered in front and back-end data interaction. What is cross domain and what kinds of cross domain methods are there, which is the content of this paper.
For the complete source code of this article, please stamp the GitHub blog. You will feel shallow on the paper. It is recommended to knock on the code
1, What is cross domain?
- What are homology strategies and their limitations?
Homology policy is a kind of agreement. It is the core and basic security function of the browser. Without homology policy, the browser is vulnerable to XSS, CSFR and other attacks. The so-called homology means that "protocol + domain name + port" are the same. Even if two different domain names point to the same ip address, they are not homologous.
The restricted contents of the same origin policy include:
Cookie, LocalStorage, IndexedDB and other stored content DOM node AJAX requests cannot be sent, but there are three tags that allow cross domain loading of resources:
<img src=XXX>
<link href=XXX>
<script src=XXX>
-
Common cross domain scenarios
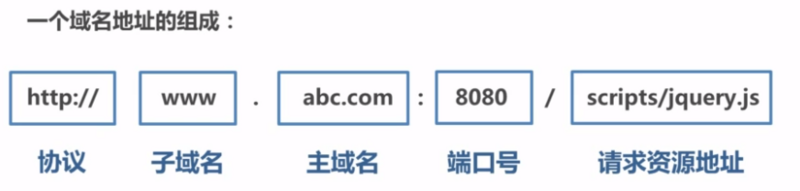
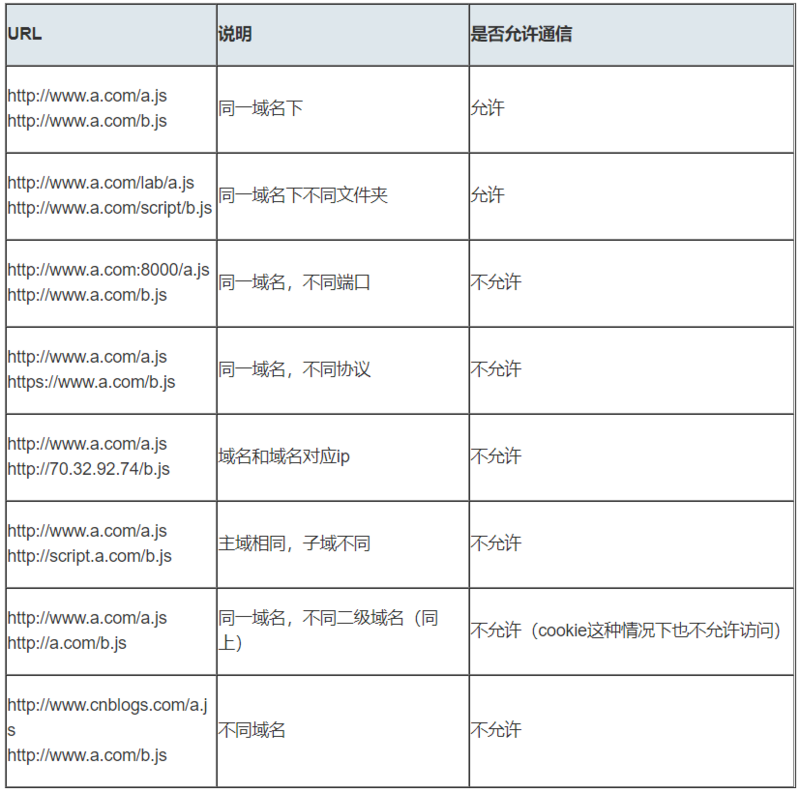
When any one of the protocol, subdomain name, primary domain name and port number is different, they are counted as different domains. If different domains request resources from each other, it is regarded as "cross domain". Common cross domain scenarios are shown in the following figure:
-
Two special points:
First: if the cross domain problem is caused by protocol and port, the "front desk" is powerless.
Second: on the cross domain issue, it is only identified through the "header of the URL", not based on whether the IP address corresponding to the domain name is the same. "Header of URL" can be understood as "agreement,
The domain name and port must match ''.Here you may have a question: the request is cross domain, so whether the request is sent or not?
Cross domain is not that the request cannot be sent, the request can be sent, and the server can receive the request and return the result normally, but the result is intercepted by the browser. You may wonder why cross domain requests can be initiated through forms
Ajax won't? Because in the final analysis, cross domain is to prevent users from reading the content under another domain name, Ajax
You can get the response. The browser thinks it's unsafe, so it intercepts the response. However, the form does not get new content, so cross domain requests can be initiated. It also shows that cross domain can not be completely blocked
CSRF, because the request is sent after all.
2, Cross domain solutions
1. jsonp
- JSONP principle
Taking advantage of the vulnerability that the < script > tag does not have cross domain restrictions, web pages can get JSON data dynamically generated from other sources. JSONP requests must be supported by the server of the other party. - Comparison between JSONP and AJAX
JSONP is the same as Ajax, which is the way that the client sends a request to the server and obtains data from the server. However, AJAX belongs to the same source strategy and JSONP belongs to the non same source strategy (cross domain request) - Advantages and disadvantages of JSONP
JSONP has the advantages of simplicity and good compatibility. It can be used to solve the problem of cross domain data access of mainstream browsers. The disadvantage is that it only supports the get method, which has limitations, is unsafe and may be attacked by XSS. - Implementation process of JSONP
1. Declare a callback function whose function name (such as show) is used as the parameter value to be passed to the server requesting data across domains. The function parameter is to obtain the target data (the data returned by the server).
2. Create a < script > tag, assign the cross domain API data interface address to the src of script, and pass the function name to the server in this address (you can pass the parameter through the question mark:? callback=show).
3. After receiving the request, the server needs to carry out special processing: splice the passed in function name and the data it needs to give you into a string. For example, the passed in function name is show, and the prepared data is show('I don't love you ').
4. Finally, the server returns the prepared data to the client through the HTTP protocol, and the client calls the callback function (show) declared before execution to operate on the returned data.
In development, you may encounter multiple JSONP requests with the same callback function name. At this time, you need to encapsulate a JSONP function yourself.
// index.html
function jsonp({ url, params, callback }) {
  return new Promise((resolve, reject) => {
    let script = document.createElement('script')
    window[callback] = function(data) {
      resolve(data)
      document.body.removeChild(script)
    }
    params = { ...params, callback } // wd=b&callback=show
    let arrs = []
    for (let key in params) {
      arrs.push(`${key}=${params[key]}`)
    }
    script.src = `${url}?${arrs.join('&')}`
    document.body.appendChild(script)
  })
}
jsonp({
  url: 'http://localhost:3000/say',
  params: { wd: 'Iloveyou' },
  callback: 'show'
}).then(data => {
  console.log(data)
})
The above code is equivalent to http://localhost:3000/say?wd=Iloveyou&callback=show This address requests data, and then the background returns show('I don't love you'). Finally, the function show() will be run to print out 'I don't love you'
// server.js
let express = require('express')
let app = express()
app.get('/say', function(req, res) {
  let { wd, callback } = req.query
  console.log(wd) // Iloveyou
  console.log(callback) // show
  res.end(`${callback}('i don't love you')`)
})
app.listen(3000)
- jsonp form of jQuery
JSONP is both GET and asynchronous requests. There are no other request methods and synchronous requests, and jQuery will clear the cache for JSONP requests by default.
2. cors
-
CORS requires both browser and backend support. IE 8 and 9 need to be implemented through XDomainRequest.
-
The browser will automatically communicate with CORS, and the key to realize CORS communication is the back end. As long as the back-end implements CORS, cross domain is realized.
-
The server can start CORS by setting access control allow origin. This attribute indicates which domain names can access resources. If wildcard is set, it indicates that all websites can access resources.
-
Although setting CORS has nothing to do with the front end, if the cross domain problem is solved in this way, there will be two situations when sending requests: simple requests and complex requests.
1. Simple request
As long as the following two conditions are met at the same time, it is a simple request
- Condition 1: use one of the following methods:
- GET HEAD POST
- Condition 2: the value of content type is limited to one of the following three:
- text/plain
- multipart/form-data
- application/x-www-form-urlencoded
- Any XMLHttpRequestUpload object in the request does not register any event listener; The XMLHttpRequestUpload object can use
XMLHttpRequest.upload attribute access.
2. Complex requests
- A request that does not meet the above conditions must be a complex request.
- For CORS requests with complex requests, an HTTP query request will be added before formal communication, which is called "pre check" request. This request is
option method to know whether the server allows cross domain requests through the request. - When we use PUT to request from the background, it is a complex request. The background needs to be configured as follows:
// Which method is allowed to access me
res.setHeader('Access-Control-Allow-Methods', 'PUT')
// Survival time of pre inspection
res.setHeader('Access-Control-Max-Age', 6)
// OPTIONS requests are not processed
if (req.method === 'OPTIONS') {
  res.end()
}
// Define the content returned in the background
app.put('/getData', function(req, res) {
  console.log(req.headers)
  res.end('i don't love you')
})
- Next, let's look at the next example of a complete complex request and introduce the fields related to the CORS request
// index.html
let xhr = new XMLHttpRequest()
document.cookie = 'name=xiamen' // Cookies cannot cross domains
xhr.withCredentials = true // Front end setting whether to bring cookie s
xhr.open('PUT', 'http://localhost:4000/getData', true)
xhr.setRequestHeader('name', 'xiamen')
xhr.onreadystatechange = function() {
  if (xhr.readyState === 4) {
    if ((xhr.status >= 200 && xhr.status < 300) || xhr.status === 304) {
      console.log(xhr.response)
      //Get the response header, and set access control expose headers in the background
      console.log(xhr.getResponseHeader('name'))
    }
  }
}
xhr.send()
//server1.js
let express = require('express');
let app = express();
app.use(express.static(__dirname));
app.listen(3000);
//server2.js
let express = require('express')
let app = express()
let whitList = ['http://localhost:3000 '] / / set whitelist
app.use(function(req, res, next) {
  let origin = req.headers.origin
  if (whitList.includes(origin)) {
    // Set which source can access me
    res.setHeader('Access-Control-Allow-Origin', origin)
    // Which header is allowed to access me
    res.setHeader('Access-Control-Allow-Headers', 'name')
    // Which method is allowed to access me
    res.setHeader('Access-Control-Allow-Methods', 'PUT')
    // Allow cookie s
    res.setHeader('Access-Control-Allow-Credentials', true)
    // Survival time of pre inspection
    res.setHeader('Access-Control-Max-Age', 6)
    // Allowed return header
    res.setHeader('Access-Control-Expose-Headers', 'name')
    if (req.method === 'OPTIONS') {
      res.end() // OPTIONS requests are not processed
    }
  }
  next()
})
app.put('/getData', function(req, res) {
  console.log(req.headers)
  res.setHeader('name', 'jw') //Return a response header, which needs to be set in the background
  res.end('i don't love you')
})
app.get('/getData', function(req, res) {
  console.log(req.headers)
  res.end('i don't love you')
})
app.use(express.static(__dirname))
app.listen(4000)
The above code is provided by http://localhost:3000/index.html towards http://localhost:4000/ Cross domain request, as we said above, the back end is the key to realize CORS communication.
Recommend an easy-to-use BUG monitoring tool Fundebug , welcome to try for free!
3. postMessage
postMessage is an API in HTML5 XMLHttpRequest Level 2 and one of the few window attributes that can operate across domains. It can be used to solve the following problems:
- Data transfer between the page and the new window it opens
- Message passing between multiple windows
- Page and nested iframe messaging
- Cross domain data transfer in the above three scenarios
- The postMessage() method allows scripts from different sources to communicate asynchronously in a limited way, and can realize cross text file, multi window and cross domain message transmission.
otherWindow.postMessage(message, targetOrigin, [transfer]);
- message: data to be sent to other window s.
- targetOrigin: specify which windows can receive message events through the origin attribute of the window. Its value can be string "*" (indicating unlimited) or a URI. When sending a message, if any of the protocol, host address or port of the target window does not match the value provided by targetOrigin, the message will not be sent; The message will be sent only if the three match exactly.
- Transfer (optional): a string of Transferable objects that are passed simultaneously with message Ownership of these objects will be transferred to the receiver of the message, and the sender will no longer retain ownership.
Let's look at the following examples: http://localhost:3000/a.html Page orientation http://localhost:4000/b.html Pass "I love you", and then the latter returns "I don't love you".
// a.html
  <iframe src="http://Localhost: 4000 / b.html "frameBorder =" 0 "id =" frame "onload =" load() "> < / iframe > / / an event is triggered after it is loaded
  //Embedded in http://localhost:3000/a.html
    <script>
      function load() {
        let frame = document.getElementById('frame')
        frame.contentWindow.postMessage('I love you!', 'http://localhost:4000 ') / / send data
        window.onmessage = function(e) { //Accept return data
          console.log(e.data) //i don't love you
        }
      }
    </script>
// b.html
  window.onmessage = function(e) {
    console.log(e.data) //I love you!
    e.source.postMessage('i don't love you', e.origin)
 }
4. websocket
WebSocket is a persistent protocol of HTML5. It realizes the full duplex communication between browser and server. At the same time, it is also a cross domain solution. WebSocket and HTTP are both application layer protocols based on TCP protocol. However, WebSocket is a two-way communication protocol. After the connection is established, WebSocket server and client can actively send or receive data to each other. At the same time, WebSocket needs the help of HTTP protocol when establishing a connection. After the connection is established, the two-way communication between client and server has nothing to do with HTTP.
The native WebSocket API is inconvenient to use. We use socket IO, which well encapsulates the webSocket interface, provides a simpler and more flexible interface, and provides downward compatibility for browsers that do not support webSocket.
Let's take a look at an example first: the local file socket HTML generates and receives data to localhost:3000
// socket.html
<script>
    let socket = new WebSocket('ws://localhost:3000');
    socket.onopen = function () {
      socket.send('I love you!');//Send data to server
    }
    socket.onmessage = function (e) {
      console.log(e.data);//Receive data returned by the server
    }
</script>
// server.js
let express = require('express');
let app = express();
let WebSocket = require('ws');//Remember to install ws
let wss = new WebSocket.Server({port:3000});
wss.on('connection',function(ws) {
  ws.on('message', function (data) {
    console.log(data);
    ws.send('i don't love you')
  });
})
5. Node middleware agent (cross domain twice)
Implementation principle: the same origin policy is the standard that the browser needs to follow. If the server requests from the server, it does not need to follow the same origin policy.
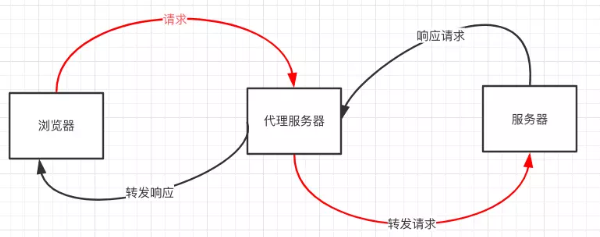
For proxy server, you need to do the following steps:
- Accept client requests.
- Forward the request to the server.
- Get the server response data.
- Forward the response to the client.
Let's start with an example: the local file index HTML file, through proxy server http://localhost:3000 To target server http://localhost:4000 Request data.
// index.html(http://127.0.0.1:5500)
 <script src="https://cdn.bootcss.com/jquery/3.3.1/jquery.min.js"></script>
    <script>
      $.ajax({
        url: 'http://localhost:3000',
        type: 'post',
        data: { name: 'xiamen', password: '123456' },
        contentType: 'application/json;charset=utf-8',
        success: function(result) {
          console.log(result) // {"title":"fontend","password":"123456"}
        },
        error: function(msg) {
          console.log(msg)
        }
      })
     </script>
// server1.js proxy server( http://localhost:3000)
const http = require('http')
// Step 1: accept the client request
const server = http.createServer((request, response) => {
  // The proxy server directly interacts with the browser and needs to set the header field of CORS
  response.writeHead(200, {
    'Access-Control-Allow-Origin': '*',
    'Access-Control-Allow-Methods': '*',
    'Access-Control-Allow-Headers': 'Content-Type'
  })
  // Step 2: forward the request to the server
  const proxyRequest = http
    .request(
      {
        host: '127.0.0.1',
        port: 4000,
        url: '/',
        method: request.method,
        headers: request.headers
      },
      serverResponse => {
        // Step 3: receive the response from the server
        var body = ''
        serverResponse.on('data', chunk => {
          body += chunk
        })
        serverResponse.on('end', () => {
          console.log('The data is ' + body)
          // Step 4: forward the response results to the browser
          response.end(body)
        })
      }
    )
    .end()
})
server.listen(3000, () => {
  console.log('The proxyServer is running at http://localhost:3000')
})
// server2.js(http://localhost:4000)
const http = require('http')
const data = { title: 'fontend', password: '123456' }
const server = http.createServer((request, response) => {
  if (request.url === '/') {
    response.end(JSON.stringify(data))
  }
})
server.listen(4000, () => {
  console.log('The server is running at http://localhost:4000')
})
The above code has crossed domains twice. It is worth noting that the browser sends a request to the proxy server and also follows the homology strategy. Finally, it is displayed in index HTML file print out {"title":"fontend","password":"123456"}
6. nginx reverse proxy
- The implementation principle is similar to the Node middleware agent. You need to build a transit nginx server to forward requests.
- Using nginx reverse proxy to realize cross domain is the simplest cross domain method. You only need to modify the configuration of nginx to solve the cross domain problem. It supports all browsers and session s, does not need to modify any code, and will not affect the server performance.
- Implementation idea: configure a proxy server through nginx (the domain name is the same as domain1, and the port is different) as a springboard machine. The reverse proxy accesses the domain2 interface, and can modify the domain information in the cookie to facilitate the writing of the current domain cookie and realize cross domain login.
- Download first nginx , and then put nginx. In the nginx directory Conf is modified as follows:
// proxy server
server {
    listen       81;
    server_name  www.domain1.com;
    location / {
        proxy_pass   http://www.domain2.com:8080;  # Reverse proxy
        proxy_cookie_domain www.domain2.com www.domain1.com; #Modify the domain name in the cookie
        index  index.html index.htm;

        # When using middleware proxy interfaces such as webpack dev server to access nignx, there is no browser participation at this time, so there is no homology restriction. The following cross domain configuration can not be enabled
        add_header Access-Control-Allow-Origin http://www.domain1.com;  # When the current end only crosses domains without cookie s, it can be*
        add_header Access-Control-Allow-Credentials true;
    }
}
Finally, start nginx through the command line nginx -s reload
// index.html
var xhr = new XMLHttpRequest();
// Front end switch: whether the browser reads or writes cookie s
xhr.withCredentials = true;
// Access the proxy server in nginx
xhr.open('get', 'http://www.domain1.com:81/?user=admin', true);
xhr.send();
// server.js
var http = require('http');
var server = http.createServer();
var qs = require('querystring');
server.on('request', function(req, res) {
    var params = qs.parse(req.url.substring(2));
    // Write cookie s to the front desk
    res.writeHead(200, {
        'Set-Cookie': 'l=a123456;Path=/;Domain=www.domain2.com;HttpOnly'   // HttpOnly: script cannot be read
    });
    res.write(JSON.stringify(params));
    res.end();
});
server.listen('8080');
console.log('Server is running at port 8080...');
7. window.name + iframe
- window. The uniqueness of the name attribute: the name value still exists after different pages (even different domain names) are loaded, and can support very long name value (2MB).
- a.html and b.html are in the same domain, both of which are http://localhost:3000 ; c.html is http://localhost:4000
 // a.html(http://localhost:3000/b.html)
  <iframe src="http://localhost:4000/c.html" frameborder="0" onload="load()" id="iframe"></iframe>
  <script>
    let first = true
    // The onload event will be triggered twice. The cross domain page will be loaded for the first time and the data will be saved in the window name
    function load() {
      if(first){
      // After the first onload (cross domain page) is successful, switch to the same domain proxy page
        let iframe = document.getElementById('iframe');
        iframe.src = 'http://localhost:3000/b.html';
        first = false;
      }else{
      // After the second onload (same domain b.html page) succeeds, read the same domain window Data in name
        console.log(iframe.contentWindow.name);
      }
    }
  </script>
b.html is an intermediate proxy page, which has the same domain as a.html, and the content is empty.
 // c.html(http://localhost:4000/c.html)
  <script>
    window.name = 'i don't love you'
  </script>
Summary: through the src attribute of iframe, the external domain is transferred to the local domain, and the cross domain data is transferred from the window of iframe Name is passed from the foreign domain to the local region. This skilfully bypasses the browser's cross domain access restrictions, but at the same time, it is a safe operation.
8. location.hash + iframe
-
Implementation principle: if a.html wants to communicate with c.html across domains, it can be realized through the middle page b.html.
Three pages, using iframe location between different domains Hash value transfer, direct js access between the same fields to communicate. -
Specific implementation steps: at first, a.html sends a hash value to c.html, then c.html receives the hash value, then passes the hash value to b.html, and finally b.html puts the result into the hash value of a.html.
Similarly, a.html and b.html are in the same domain http://localhost:3000 ; c.html is http://localhost:4000
 // a.html
  <iframe src="http://localhost:4000/c.html#iloveyou"></iframe>
  <script>
    window.onhashchange = function () { //Detect the change of hash
      console.log(location.hash);
    }
  </script>
 // b.html
  <script>
    window.parent.parent.location.hash = location.hash
    //b. HTML puts the result into the hash value of a.html, and b.html can be passed through parent Parent access a.html page
  </script>
 // c.html
 console.log(location.hash);
  let iframe = document.createElement('iframe');
  iframe.src = 'http://localhost:3000/b.html#idontloveyou';
  document.body.appendChild(iframe);
9. document.domain + iframe
This method can only be used when the secondary domain name is the same, such as a.test COM and b.test Com applies to this method.
You just need to add document. XML to the page domain ='test. Com 'means that if the secondary domain names are the same, cross domain can be realized.
- Implementation principle: both pages are forced to set document. XML through js Domain as the basic primary domain, the same domain is realized.
- Let's take an example: page a.zf1 Cn: 3000 / a.html get page b.zf1 Cn: the value of a in 3000 / b.html
// a.html
<body>
 helloa
  <iframe src="http://b.zf1.cn:3000/b.html" frameborder="0" onload="load()" id="frame"></iframe>
  <script>
    document.domain = 'zf1.cn'
    function load() {
      console.log(frame.contentWindow.a);
    }
  </script>
</body>
// b.html
<body>
   hellob
   <script>
     document.domain = 'zf1.cn'
     var a = 100;
   </script>
</body>
3, Summary
- CORS supports all types of HTTP requests and is the fundamental solution for cross domain HTTP requests
- JSONP only supports GET requests. The advantages of JSONP are that it supports old-fashioned browsers and can request data from websites that do not support CORS.
- Whether it is Node middleware agent or nginx reverse agent, the server is not restricted mainly through the homology strategy.
- cors and nginx reverse proxy are commonly used in daily work
Reference articles
- Cross domain resource sharing CORS detailed explanation
- Front end interview
- window.postMessage
- Front end common cross domain solutions (all)
- Deep cross domain issues (4) - use agents to solve cross domain problems
About Fundebug
Fundebug Focus on JavaScript, WeChat applet, WeChat games, Alipay applet, React Native, Node.js and Java online application real-time BUG monitoring. Since the official launch of "double 11" in 2016, Fundebug has handled a total of 900 million + error events. Paying customers include Google, 360, Jinshan software, people.com and many other brand enterprises. Welcome Free trial!

Click to jump to the reprint address! Just for learning! It is hereby declared that