preface:
The Buffer abstract class and its related implementation classes under the java.nio package are essentially used as a fixed number of containers.
Different from the data container byte [] in InputStream and OutputStream, the Buffer related implementation class container can store different basic types of data, retrieve the data in the container and operate repeatedly.
The operation of the Buffer is closely linked to the channel. Channel is the entrance (or exit) through which IO occurs, and channel is bidirectional, and Buffer is the target (or source) of these data transmission.
1.Buffer basic properties
    // Invariants: mark <= position <= limit <= capacity
    // Tag address, used with reset
    private int mark = -1;
    // The index of the next element to be read or written
    private int position = 0;
    // Count of existing elements in the container
    private int limit;
    // The total capacity of the container is set when the Buffer is created
    private int capacity;
For the following code
// position=mark=0
// limit=capacity=10
ByteBuffer buffer = ByteBuffer.allocate(10);
It is through the above four attributes that the repeated operation of data is realized.
2. Creation of buffer
Among the Buffer implementation classes, ByteBuffer is the most widely used. Therefore, the following examples are based on ByteBuffer (more specifically HeapByteBuffer). Later, special articles will explain the use and implementation of other basic types.
According to the ByteBuffer API, we can see the following four creation methods:
// 1. Directly allocate the Buffer of capacity size. The specific implementation type is HeapByteBuffer
public static ByteBuffer allocate(int capacity)

// 2. Directly allocate the Buffer of capacity size. The specific implementation type is DirectByteBuffer
public static ByteBuffer allocateDirect(int capacity)

// 3. Directly use array as the underlying data
public static ByteBuffer wrap(byte[] array)

// 4. Directly use array as the underlying data, and specify offset and length
public static ByteBuffer wrap(byte[] array,int offset, int length)
In addition, I will explain HeapByteBuffer and DirectByteBuffer in detail in
2.1 allocate creation method
ByteBuffer buffer = ByteBuffer.allocate(10);
buffer.put((byte)'f');
buffer.put((byte)'i');
buffer.put((byte)'r');
buffer.put((byte)'e');
The specific storage diagram is as follows: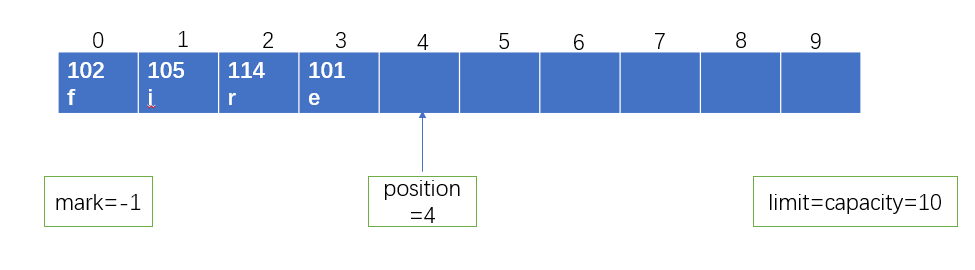
2.2 creation method of wrap
// wrap(byte[] array,int offset, int length)
// position=offset
// limit=position+length
// capacity=array.length()
ByteBuffer byteBuffer = ByteBuffer.wrap("fire".getBytes(), 1, 2);
The specific storage diagram is as follows:

3. Basic operation method of buffer
3.1 adding data
ByteBuffer buffer = ByteBuffer.allocate(10);
// 1. Store byte buffer put (byte b) byte by byte
buffer.put((byte)'h');

// 2. Bytes are stored in the corresponding index byte buffer put (int index, byte b);
buffer.put(0,(byte)'h');

// 3. Add byte array byte buffer put (byte [] SRC)
byte[] bytes = {'h','e','l','l','o'};
buffer.put(bytes);

// 4. Add other basic type ByteBuffer putInt(int x)
buffer.putInt(1);
3.2 data acquisition
ByteBuffer buffer = ByteBuffer.allocate(10);
buffer.put("hello".getBytes());

// 1. Get the data under index
byte b = buffer.get(0);

// 2. Get one by one (you need to flip first and set position to 0)
buffer.flip();
for (int i = 0; i < buffer.remaining(); i++) {
    byte b1 = buffer.get();
}

// 3. Transfer data to bytes
buffer.flip();
byte[] bytes = new byte[5];
ByteBuffer byteBuffer = buffer.get(bytes);
3.3 buffer flip
1) Flip is an important and simple method. When we use the put method to fill the Buffer, when we call get to obtain the data in the Buffer, we will not get the data. Because get obtains the data from the current position, we need to call flip to set the position to 0 first
// flip source code is as follows
// Relatively simple, we can also manually set buffer.limit(buffer.position()).position(0);
public final Buffer flip() {
    limit = position;
    position = 0;
    mark = -1;
    return this;
}
2) Compared with the flip method, rewind can also read data repeatedly. The only difference is that the limit parameter is not reset
// The source code is as follows
public final Buffer rewind() {
    position = 0;
    mark = -1;
    return this;
}
What is the difference between the above two? Let's illustrate it through the following example
ByteBuffer buffer = ByteBuffer.allocate(10);
// The execution position is 4
buffer.put("fire".getBytes());

// To test the difference between flip and rewind, reset it to 3
buffer.position(3);

// pos=0 lim=3 cap=10 after flip
buffer.flip();
for (int i = 0; i < buffer.remaining(); i++) {
    byte b1 = buffer.get();
    System.out.println(b1);// 102 105
}

// Note: the above flip related codes need to be tested separately
// After rewind, POS = 0, limit = cap = 10
buffer.rewind();
for (int i = 0; i < buffer.remaining(); i++) {
    byte b1 = buffer.get();
    System.out.println(b1);// 102 105 114 101
}
Summary: for flip, the upper limit of Buffer data operation after flip is the position of the last operation
In rewind, the upper limit is still limit, and all data can be manipulated again
3.4 buffer compression
Sometimes we need to release the operated data from the buffer and then refill the data (for the non operated data, we need to keep it).
We can copy the data that has not been operated (that is, the data between position limit) to position 0 again to meet the above requirements. The Buffer has implemented a specific method for this scenario, that is, the compact method
// Examples are as follows
ByteBuffer buffer = ByteBuffer.allocate(10);
buffer.put("fire".getBytes());

// Get a data and move position forward
buffer.flip();
buffer.get();

// Data compression
ByteBuffer compact = buffer.compact();
buffer before compression: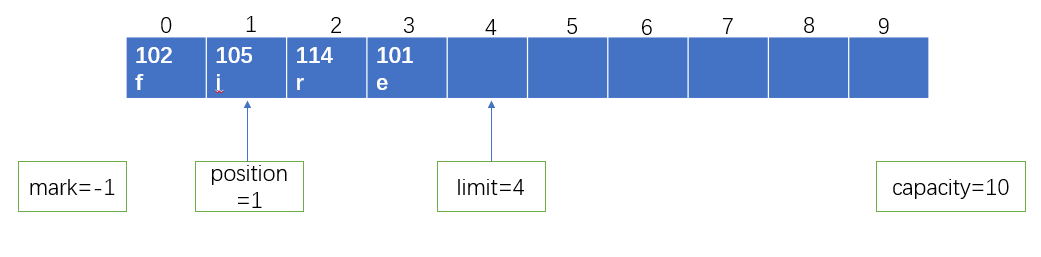
Compressed buffer: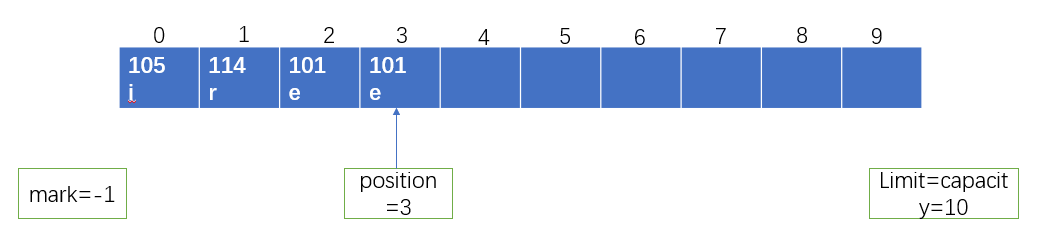
In comparison, copy the data (1-4, i.e. i r e) from the original position to limit to the position where index=0, position is 3, and the subsequent newly written data directly overwrites the position data of the original position=3.
3.5 marking and resetting
Mark and reset methods. Mark is used to mark and reset is used to return to the marked position. It's relatively simple. Let's look at the example directly
ByteBuffer buffer = ByteBuffer.allocate(10);
buffer.put("fire".getBytes());

// Directly set position to 2
buffer.position(2);

// Mark at position=2
buffer.mark();

// Get the data with position=2,
byte b = buffer.get(); // 114
// After obtaining the data of the next position, execute reset, and then re obtain the data. It is found that it is the same data
buffer.reset();
byte c = buffer.get(); // 114
After the reset operation, the position returns to 2, that is, the position at mark. Therefore, the two get methods obtain the value of the same position
3.6 reproduction
Buffer also provides the function of quickly copying a buffer
ByteBuffer buffer = ByteBuffer.allocate(10);
buffer.put("fire".getBytes());

// Copy buffer
ByteBuffer duplicate = buffer.duplicate();
The copied duplicate shares the source data array with the buffer, but has different position s and limit s
Summary:
As a container for data storage, Buffer has many implementation classes and APIs. This paper analyzes its basic APIs, and we will continue to analyze its implementation classes later.