NO.1 foundation drawing
Zero etching
🔗 HenCoder
Preface
- Get the xp value corresponding to dp
public static float dp2px(int dp){
        return TypedValue.applyDimension(TypedValue.COMPLEX_UNIT_DIP,dp, Resources.getSystem().getDisplayMetrics());
}
- Rotation direction
Path.Direction.CW; //Clockwise / * * clockwise*/
Path.Direction.CCW; // Counter clock wise*/
Generally, when we draw drawRect and drawCircle, we need to fill in the parameters of the receipt direction. The main function of the parameters of the secondary direction is to cross draw the graph. The drawing method closely related to it is path.setfilltype (path. Filltype. Even). Filltype has the following enumeration parameters:
WINDING         (0), // default
/**
 * Specifies that "inside" is computed by an odd number of edge
 * crossings.
 */
EVEN_ODD        (1),
 /**
  * Same as {@link #WINDING}, but draws outside of the path, rather than inside.
  */
INVERSE_WINDING (2),
  /**
   * Same as {@link #EVEN_ODD}, but draws outside of the path, rather than inside.
   */
INVERSE_EVEN_ODD(3);
- WINDING
When we judge whether an area is in the interior of the figure, we will use the following judgment method: make a ray arbitrarily in the area. There is an intersection (non tangent point) between the ray and the edge of the figure. If the number of focus points in the same direction is added, the direction is opposite, and the number of intersection points is subtracted. If the result is 0, it is in the exterior, if it is not 0, it is in the interior. The exterior is not drawn in the drawing.
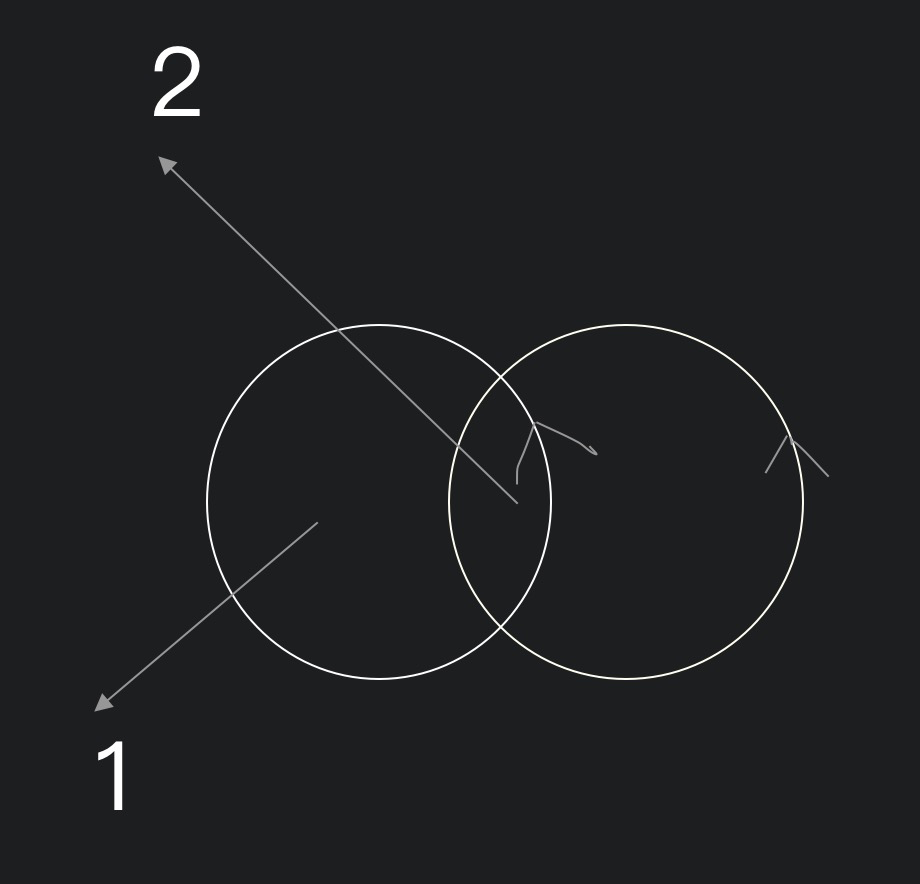
- EVEN_ODD
This parameter indicates that the double number is external and the single number is internal after intersection calculation. Generally used for making hollows.
- INVERSE_WINDING ,INVERSE_EVEN_ODD
Contrary to the above
- PathMeasure
// forceClosed force closed
PathMeasure pathMeasure = new PathMeasure(new Path(), false);
// Get the length of the drawing
pathMeasure.getLength();
// Get the tangent value of a point in the drawing
pathMeasure.getPosTan();
case analysis
- Dashboard
The case attempts to
The code content is as follows:
// Life cycle after super
    {
        paint.setStyle(Paint.Style.STROKE);
        paint.setStrokeWidth(5);
        pathArc.addArc(-RADIUS, -RADIUS, RADIUS, RADIUS, 150, 240);
        // Get the length of line segment through pathArc
        PathMeasure measure = new PathMeasure(pathArc, false);
        // The last scale should be subtracted from the length, otherwise it cannot be displayed
        float arc_length = measure.getLength() - Utils.dp2px(2);
        // The shape of the dotted line is drawn according to the Android coordinate system, and the tangent point of the installation drawing is drawn
        pathDash.addRect(0, 0, Utils.dp2px(2), Utils.dp2px(10), Path.Direction.CW);
        // advance: dashed space phase: distance from start point
        effect = new PathDashPathEffect(pathDash, arc_length / 19, 0, PathDashPathEffect.Style.ROTATE);

    }
The main content of draw:
protected void onDraw(Canvas canvas) {
        super.onDraw(canvas);

        canvas.drawArc((float) getWidth() / 2 - RADIUS,
                (float) getWidth() / 2 - RADIUS,
                (float) getWidth() / 2 + RADIUS,
                (float) getWidth() / 2 + RADIUS,
                150,
                240,
                false,
                paint);

        /**
         * Style of dial
         */
        paint.setPathEffect(effect);
        // Style of paint for drawing DashPathEffect
        canvas.drawArc((float) getWidth() / 2 - RADIUS,
                (float) getWidth() / 2 - RADIUS,
                (float) getWidth() / 2 + RADIUS,
                (float) getWidth() / 2 + RADIUS,
                150,
                240,
                false,
                paint);
        paint.setPathEffect(null);

        int key = 4;
        canvas.drawLine(getWidth() / 2, getWidth() / 2,
                (float) getWidth() / 2 + (float) Math.cos(Math.PI / 6 * 5 + Math.PI / 3*4 / 19 * key) * point_length,
                (float) getWidth() / 2 + (float) Math.sin(Math.PI / 6 * 5 + Math.PI / 3*4 / 19 * key) * point_length, paint);

        Log.e("tag", "onDraw: " + ((float) Math.sin(Math.PI / 3 * 2 + Math.PI / 30 * key) * point_length));
}
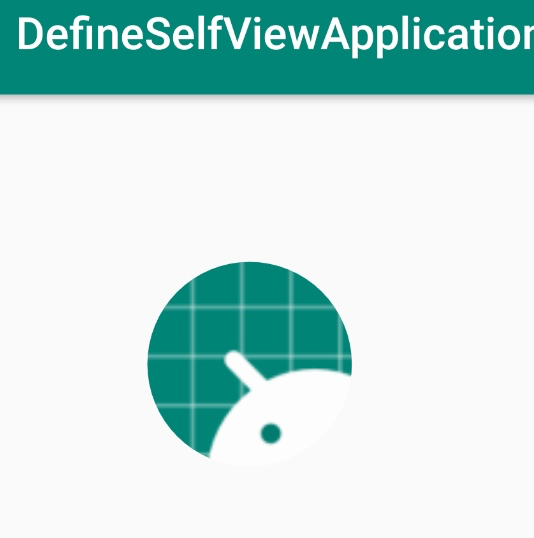
- Mask effect
Normal picture drawing:
    @Override
    protected void onDraw(Canvas canvas) {
        super.onDraw(canvas);

        canvas.drawBitmap(getBitmap(width),Utils.dp2px(50),Utils.dp2px(50),paint);

    }

    public Bitmap getBitmap(int width) {
        BitmapFactory.Options options = new BitmapFactory.Options();
        // You can only take the width to height, know the width to height ratio, and set it, which can save performance
        options.inJustDecodeBounds = true;
        BitmapFactory.decodeResource(getResources(), R.mipmap.ic_launcher, options);
        options.inJustDecodeBounds = false;
        options.inDensity = options.outWidth;
        options.inTargetDensity = width;
        return BitmapFactory.decodeResource(getResources(), R.mipmap.ic_launcher, options);

    }
Specify a picture area to draw:
⚠⚠ during the drawing process, we will set mask canvas draw in draw to specify the drawing area, but it can't achieve the effect. The main reason is that there is an underlying canvas under the mask, and the system regards it as the mask area, so all the areas on the canvas will be displayed. So we need to use off screen buffer (off screen buffer is used to draw static graph at high speed) to synthesize the graph for many times (take out the drawn part and separate it from the canvas as a whole, so that the mask will not be affected by the canvas as a whole).
 protected void onDraw(Canvas canvas) {
        super.onDraw(canvas);

        // Off screen buffer, get Bitmap area
        int saved=canvas.saveLayer(rectF,paint);
        // Draw the specified area (mask area)
        canvas.drawOval(PADDING/2*3,PADDING/2*3,(PADDING+width)/3*2,(PADDING+width)/3*2,paint);
        paint.setXfermode(xfermode);
        canvas.drawBitmap(getBitmap(width),PADDING,PADDING,paint);
        paint.setXfermode(null);
        // Put the off screen buffer back in place
        canvas.restoreToCount(saved);

    }

    public Bitmap getBitmap(int width) {
        BitmapFactory.Options options = new BitmapFactory.Options();
        // You can only take the width to height, know the width to height ratio, and set it, which can save performance
        options.inJustDecodeBounds = true;
        BitmapFactory.decodeResource(getResources(), R.mipmap.ic_launcher, options);
        options.inJustDecodeBounds = false;
        options.inDensity = options.outWidth;
        options.inTargetDensity = width;
        return BitmapFactory.decodeResource(getResources(), R.mipmap.ic_launcher, options);

    }
Draw edge:
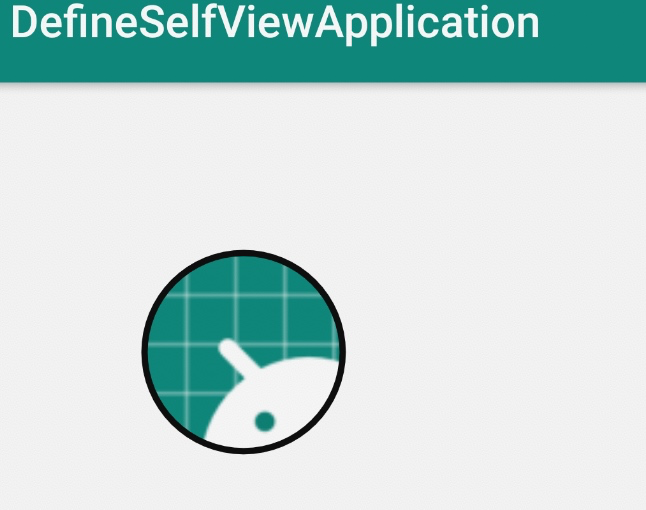
At the beginning, the mask is to convert the specified area into a specified figure, and then draw the content of the picture in the range. So you can specify a range in Xi'an, and then specify the mask area in China.
canvas.drawOval( PADDING/2*3,PADDING/2*3,(PADDING+width)/3*2,(PADDING+width)/3*2,paint);
// Off screen buffer, get Bitmap area
int saved=canvas.saveLayer(rectF,paint);
// Draw the specified area (mask area)
canvas.drawOval(PADDING/2*3+10,PADDING/2*3+10,(PADDING+width)/3*2-10,(PADDING+width)/3*2-10,paint);
paint.setXfermode(xfermode);
        canvas.drawBitmap(getBitmap(width),PADDING,PADDING,paint);
paint.setXfermode(null);
// Put the off screen buffer back in place
canvas.restoreToCount(saved);

