Introduction: Using vue+element-ui to develop the front-end, node.js+express+mongodb to develop the back-end, deployed to the Ali cloud server (mirror information Node.js).
1. Apply for Aliyun Server
You can apply for the cheapest one to practice. CentOS is selected for system image and Node.js is selected for application image (version 4.8.4, need to be upgraded).
2. Login Server
Open the terminal, enter sudo-i to switch users, and enter ssh root@public network ip
sudo -i
 ssh root@public network ip
 Enter your password (if it's the first time you need to type yes based on the prompt)
Password needs to be set in Server Operations-Remote Connection, as shown in Figure 1
3. Connecting Server with transmit Client
download transmit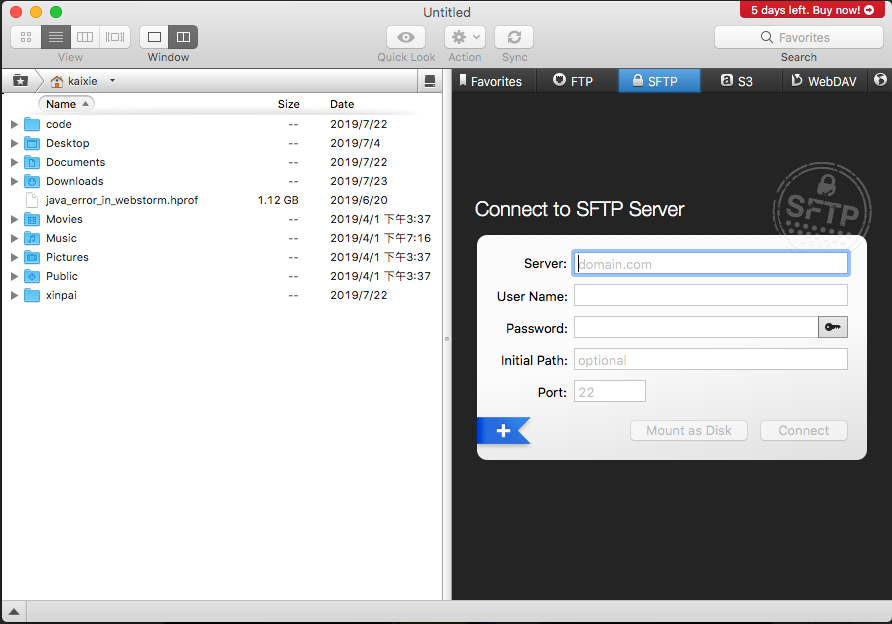
Player sftp, enter server public network ip, user name root, password * click connect
Connecting to the server, you can upload the code to the corresponding folder of the server and recommend the home folder.
4. Modify nginx
vi /usr/local/nginx/conf/nginx.conf
Amend as follows
server {
        listen 80;
        server_name _;

        return 404;
}

server {
        listen       80;
        server_name  Your domain name.com www.Your domain name.com;

        #charset koi8-r;

        #access_log  logs/host.access.log  main;

        location / {  // Here, all requests are forwarded to the service started by node through nginx
            proxy_pass http://127.0.0.1: port number of node JS configuration;
        }

        #error_page  404              /404.html;

        # redirect server error pages to the static page /50x.html
        #
        error_page   500 502 503 504  /50x.html;
        location = /50x.html {
            root   html;
        }

        # proxy the PHP scripts to Apache listening on 127.0.0.1:80
        #
        #location ~ \.php$ {
        #    proxy_pass   http://127.0.0.1;
        #}

        # pass the PHP scripts to FastCGI server listening on 127.0.0.1:9000
        #
        #location ~ \.php$ {
        #    root           html;
        #    fastcgi_pass   127.0.0.1:9000;
        #    fastcgi_index  index.php;
        #    fastcgi_param  SCRIPT_FILENAME  /scripts$fastcgi_script_name;
        #    include        fastcgi_params;
        #}
        # deny access to .htaccess files, if Apache's document root
        # concurs with nginx's one
        #
        #location ~ /\.ht {
        #    deny  all;
        #}
    }
Common methods for starting nginx
/usr/local/nginx/sbin/nginx
 / usr/local/nginx/sbin/nginx-t# Check that the configuration file is correctly written
 / Smooth restart of usr/local/nginx/sbin/nginx-s reload#Nginx
 / usr/local/nginx/nginx.conf# configuration file.
5. Upgrade node version
After entering the server through the terminal, enter nvm list
[root@iz2zeaxcuikwvill2ho8yiz bin]# nvm list
         v4.8.4
->      v12.6.0
default -> stable (-> v12.6.0)
node -> stable (-> v12.6.0) (default)
stable -> 12.6 (-> v12.6.0) (default)
iojs -> N/A (default)
lts/* -> lts/dubnium (-> N/A)
lts/argon -> v4.9.1 (-> N/A)
lts/boron -> v6.17.1 (-> N/A)
lts/carbon -> v8.16.0 (-> N/A)
lts/dubnium -> v10.16.0 (-> N/A)
[root@iz2zeaxcuikwvill2ho8yiz bin]#
v12.6.0 is used here.
Install stable version with nvm install stable
nvm use stable specifies a version
Change the default version with nvm alias default stable so that you don't have to switch versions every time
If we use es6 grammar in our node project, we need to upgrade the node version like this
6. Installing pm2
Global Installation
npm install pm2 -g
Use pm2 to start node project and maintain process
pm2 start ./bin/www // Start the project
pm2 list // View the current startup item
pm2 restart id // Restart the specified project
pm2 logs  // View node logs
7. Installation of mongodb
If there is mongodb in the project / usr/local, there is no need to install it
cd /usr/local
wget https://fastdl.mongodb.org/linux/mongodb-linux-x86_64-3.4.6.tgz
Unzip, rename folder name
tar zxvf mongodb-linux-x86_64-2.6.0.tgz
mv mongodb-linux-x86_64-2.6.0 mongodb
Create data and log storage directories
mkdir /var/mongodb
mkdir /var/mongodb/data
mkdir /var/mongodb/logs
Open the rc.local file and add the CentOS startup entry:
vim /etc/rc.d/rc.local
Append the mongodb startup command to this document and let mongodb start itself:
/usr/local/mongodb/bin/mongod --dbpath=/var/mongodb/data --logpath /var/mongodb/logs/log.log --logappend --auth --port 27017 --fork
 Note -- auth has this attribute and needs to verify login
Start mongo
/usr/local/mongodb/bin/mongod --dbpath=/var/mongodb/data --logpath /var/mongodb/logs/log.log --logappend --auth --port 27017 --fork
Start PM2 start. / bin / www, and then access public network ip