preparation
Of template files to be used Warehouse address
1. JSX
Let's look at the jsx syntax first. What did you do babel.js
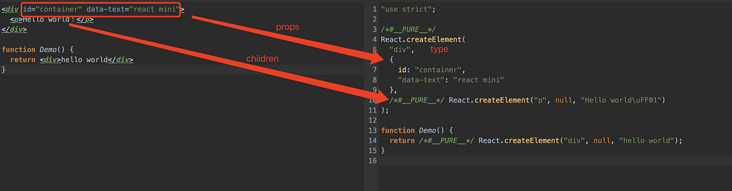
You can see that after babel translation, these jsx syntax finally calls react CreateElement, which requires three parameters: type, props and children. Its return value is the virtual DOM object. In other words, we can use babel to convert our jsx code into virtual DOM, but we need to implement our own createElement method
2. Project configuration
see Warehouse address , you can get the template file directly. Here we mainly introduce our How to configure in babelrc helps us parse the jsx code and automatically call the createElement method we wrote ourselves
You can see babel official website How to configure react.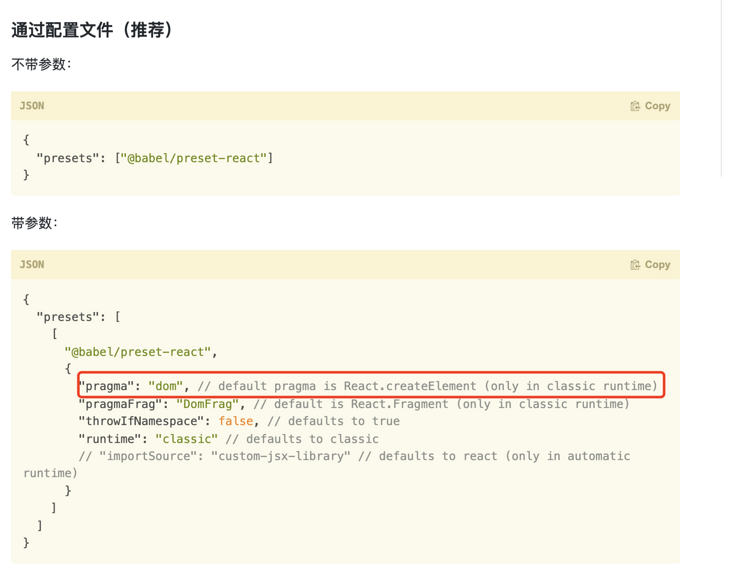
Configure @ babel / prset react in presets, and we will use it to convert jsx code in our code. Think about the above code. The functional components or jsx code we wrote were converted to react CreateElement code, so we can implement our customized createElement function with the help of babel
{
  "presets": [
    "@babel/preset-env",
    [
      "@babel/preset-react",
      {
        "pragma": "MyReact.createElement" //The default pragma is react CreateElement, that is, we need to implement our myreact CreateElement, you need to write myreact here createElement (only in classic runtime)
      }
    ]
  ]

}
3. Virtual DOM
3.1 what is Virtual DOM
javascript objects are used to describe real dom objects, and their structure is generally like this
vdom = {
    type: '',
    props: {} // Attribute object
    children: [] // Child element
}
3.2 creating Virtual DOM
3.2. 1 implement a createElement method
In our template file, we have used webpack to configure the code entry file, install the dependencies, and then run the project. At this time, nothing happens in the browser. babel helped us with the parsing of jsx
If this happens to you, please change the port number of devserver in the webpack by yourself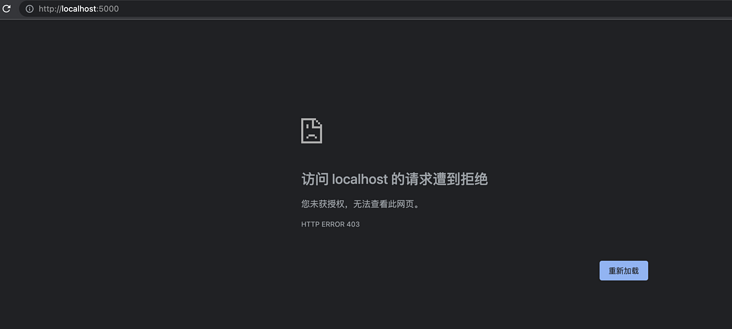
This is our project directory structure:
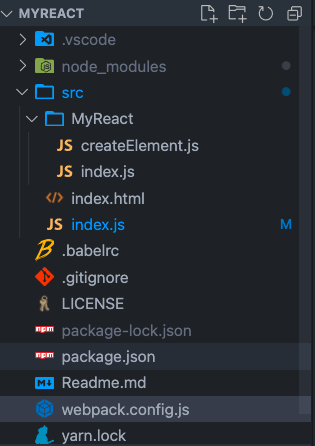
At the same time, you can also look at the directory structure of our project. Here I have added a createElement JS file, in which we will convert jsx code into virtual DOM objects.
As we mentioned above, react CreateElement will receive three parameters, type, props and children, and then automatically convert the jsx code into the following types. Therefore, what we need to do is to provide such a method to receive these three parameters, and then assemble them into the object we want.
vdom = {
    type: '',
    props: {} // Attribute object
    children: [] // Child element
}
First, create createdomelement. In the MyReact folder JS, whose structure we mentioned above, receives three parameters and returns a vdom object
export default function createElement(type, props, ...children) {
  return {
 type,
 props,
 children
  }
}
After creating the createElement method, we need to expose it to the outside, so in myreact / index JS, we expose it
// MyReact/index.js
import createElement from './createElement'
export default {
  createElement,
}
Then we introduce our MyReact into the entry file and write a piece of jsx code to see if it can meet our expectations
// index.js

import MyReact from "./MyReact"
// According to the use method of react, we first introduce our customized MyReact, which will call MyReact. jsx syntax Createelement(), and then return the VDOM we need
// This is in babelrc configured
const virtualDOM = (
  <div className="container">
 <h1>Hello Tiny React</h1>
 <h2 data-test="test">(I'm text)</h2>
 <div>
   Nested 1 <div>Nested 1.1</div>
 </div>
 <h3>(observation: This will be changed)</h3>
 {2 == 1 && <div>Render the current content if 2 and 1 are equal</div>}
 {2 == 2 && <div>2</div>}
 <span>This is a paragraph</span>
 <button onClick={() => alert("Hello")}>Click me</button>
 <h3>This will be deleted</h3>
 2, 3
 <input type="text" value="13" />
  </div>
)
console.log(virtualDOM)
See if the print results are our expectations
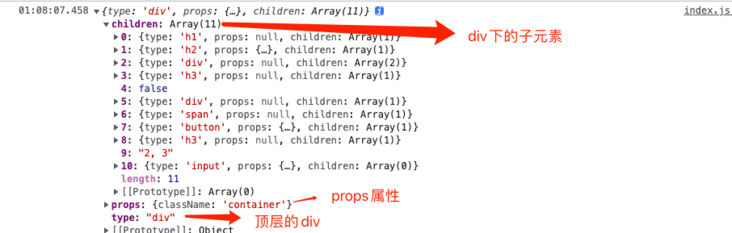
bingo, that's exactly what we want. Here you can see
- In children, some nodes are boolean, and we may have a null node that does not need to be converted
- In children, some nodes are text directly, and text nodes need to be converted
In props, you need to be able to access the children node
Neither of the above two special cases has been correctly converted to vDOM, so what we need to do next is to perform a createElement operation on the children node.3.2. 2. Improve the createElement method
As mentioned above, we need to recursively call the createElement method to generate the vDOM. According to the above three problems, we can make the following improvements
export default function createElement(type, props, ...children) {
// 1. Loop the children object for object conversion. If it is an object, call the createElement method once to convert it into a virtual dom. Otherwise, it returns directly because it is an ordinary node
const childrenElements = [].concat(...children).reduce((result, child) => {
  // 2. There are expressions in the node, which cannot render null nodes and boolean nodes. Therefore, we use reduce instead of map
  if (child !== true && child !== false && child !== null) {
    // If the child is already an object, put it directly into the result
    if (child instanceof Object) {
      result.push(child)
    } else {
      // If it is a text node, it is directly converted to this node
      result.push(createElement("text", { textContent: child }))
    }
  }
  return result
}, [])
// 3. props can access the children node,
return {
  type,
  props: Object.assign({ children: childrenElements }, props), // hebing Props
  children: childrenElements
}
}
Now look at our output. We can see that the false and plain text nodes in our children have been handled correctly. Here, our createElement ends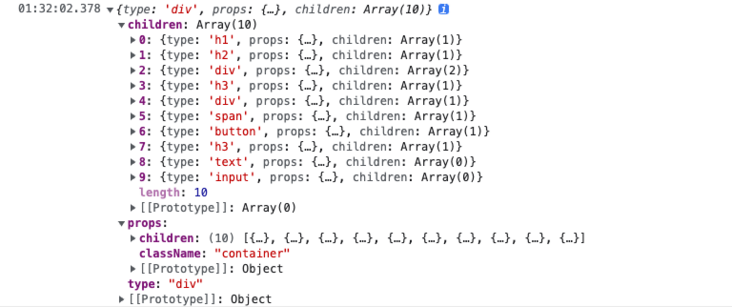
3.3 implementation method of render
3.3.1 render method
First, create render. In the MyReact folder js.
In render, we also need a diff method. The diff algorithm is to ensure that the view only updates the changed part. We need to compare the old and new DOMS (vDOM, oldDOM), and then update the dom(container) of the changed part. Let's first write a diff method, the actual algorithm, which we will add later.
// MyReact/render.js

import diff from "./diff"
export default function render(vDOM, container, oldDOM) {
  // diff algorithm
  diff(vDOM, container, oldDOM)
}
Then, we are at myreact / index JS exports the render method.
import createElement from './createElement'
import render from './render'
export default {
  createElement,
  render
}
3.3.2 diff method
From the analysis just now, we can know that this diff algorithm requires three parameters, newdom, container and olddom. Here, what we need to do is to compare the old and new domains. Here, we need a method to create elements, so now we need a mountlelement method, so we create the file mountlement JS for creating elements.
// MyReact/diff.js
import mountElement from "./mountElement"

export default function diff(vDOM, container, oldDOM) {
  // Determine whether the oldDOM exists
  if (!oldDOM) {
    // Create element
    mountElement(vDOM, container)
  }
}
3.3. 3. Mountlelement method
For our elements, we need to distinguish between native DOM elements and components. Components are divided into class components and function components. Here, we first render the native dom.
mountElement
- mountNativeElement
mountComponentElement
- class component
- Function component
// MyReact/mountElement.js

export default function mountElement(vDOM, container) {
  // Here, you need to distinguish between native dom elements and components. How? We will add this logic later
  mountNativeElement(vDOM, container)
}
3.3. 4. Mountnativeelement method
In this method, we need to turn the virtual DOM into a real DOM node. Here, we use a method to create a real DOM element, and then append it to the container.
// MyReact/mountNativeElement.js
import createDOMElement from "./createDOMElement"
/**
 * Render vdom to the specified node
 * @param {*} vDOM
 * @param {*} container
 */
export default function mountNativeElement(vDOM, container) {
  let newElement= createDOMElement(vDOM)
  container.appendChild(newElement)
}
Next, let's implement the createDOMElement method. Because we will use it later, we take it as a public function for convenience in other places.
This method, we need to do the following things.
- Create the passed in vDOM as an html element
- Creating html elements can be divided into two cases: plain text nodes or element nodes
Recursive creation of html elements for child nodes
// MyReact/createDOMElement.js
import mountElement from "./mountElement"
/**
 * Create virtual dom
 * @param {*} vDOM
 * @returns
 */
export default function createDOMElement(vDOM) {
  let newElement = null

  // 1. Render the text node. According to our previous processing, the plain text node is marked by text, and the value is textContent in props
  if (vDOM.type === 'text') {
 newElement = document.createTextNode(vDOM.props.textContent)
  } else {
 // 2. Render element node
 newElement = document.createElement(vDOM.type) // Type is the html element type div input p, these tags, and so on
 // Note that we only render the nodes here and do not put the props attribute on the html tag. We will do this later
  }
  // The above steps only create the root node, and you need to create child nodes recursively
  vDOM.children.forEach(child => {
 // Place it on the parent node. Since we are not sure whether the current child node is a component or an ordinary vDOM, we call the mountlelement method again. The current node container is newElement
 mountElement(child, newElement)
  })
  return newElement
}
The code is ready. Let's go to the browser to see if there are any changes. At this time, your browser should look like this. Then let's analyze. What else do we lack?
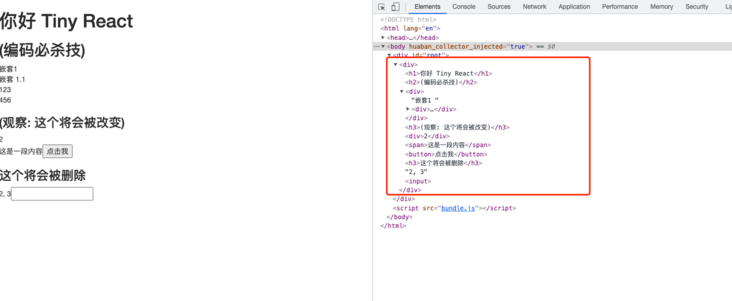
3.3. 5 method for updating node attributes (updatenodelement)
We have now implemented the rendering of jsx code onto the page. But now look at the structure of our virtual DOM. The following things are missing from our expectations
- className is not rendered as class
- These native attributes such as data test type value are not added to the corresponding tags
- Response event for button
Next, we will implement the updatenodelement method.
Or first create myreact / updatenodelement JS this file. Consider the question, when do we call this method to update the properties of node?
Above 3.3 In step 4, we are updating the node, so we need to update the attributes of the node there
Then we can be sure that we need two parameters, one is the container and the other is our virtual DOM, so as to determine a complete element
The next work is to assign props attribute to html in turn. Recall how to set the properties of html? We use element SetAttribute ('prop ', value)
After clarifying how to update the attributes above html, let's analyze which attributes and events we want to deal with
First, we need to traverse the props attribute of the current vDOM and determine the method of setting the attribute according to the key value
- Event binding: all our bound events start with on, like onClick;
- For attribute values such as value checked, we can't use the setAttribute method. When we use the native dom, we directly use input for value values such as input boxes Value sets the value of the input box;
- Children attribute, which is the node attribute we added manually before, so we want to eliminate children from it;
The className attribute needs to be changed to class. The remaining attributes can be set directly with the key
The code implementation is as follows:// MyReact/updateNodeElement.js export default function updateNodeElement (newElement, vDOM) { const { props } = vDOM // Traverse the key on vdom to obtain the value of each prop, Object.keys(props).forEach(key => { const currentProp = props[key] // If it starts with on, it is considered an event attribute, so we need to register an event onclick - > Click for it if (key.startsWith('on')) { // Since all events are named by humps, we need to convert them to lowercase, and then take the last event name const eventName = key.toLowerCase().slice(2) // Adds an event handler for the current element newElement.addEventListener(eventName, currentProp) } else if (key === 'value' || key === 'checked') { // Attribute value in input newElement[key] = currentProp } else if (key !== 'children') { // Put aside the children attribute, because this is its child node. Here, you need to distinguish className from other attributes newElement.setAttribute(key === 'className' ? 'class' : key, currentProp) } }) }Next, we find createdomelement JS file, we need to update its attribute value after rendering the element node
// MyReact/createDOMElement.js
import mountElement from "./mountElement"
/**
 * Create virtual dom
 * @param {*} vDOM
 * @returns
 */
export default function createDOMElement(vDOM) {
  let newElement = null

  // 1. Render the text node. According to our previous processing, the plain text node is marked by text, and the value is textContent in props
  if (vDOM.type === 'text') {
 newElement = document.createTextNode(vDOM.props.textContent)
  } else {
 // 2. Render element node
 newElement = document.createElement(vDOM.type) // Type is the html element type div input p, these tags, and so on
 // Update the properties of dom elements, events, and so on
 updateNodeElement(newElement, vDOM)
  }
  // The above steps only create the root node, and you need to create child nodes recursively
  vDOM.children.forEach(child => {
 // Place it on the parent node. Since we are not sure whether the current child node is a component or an ordinary vDOM, we call the mountlelement method again. The current node container is newElement
 mountElement(child, newElement)
  })
  return newElement
}
So far, we have completed the attribute setting. Now go back to the browser and see our results. The class attribute is correctly loaded on the element, and other attributes and event responses are also completed.

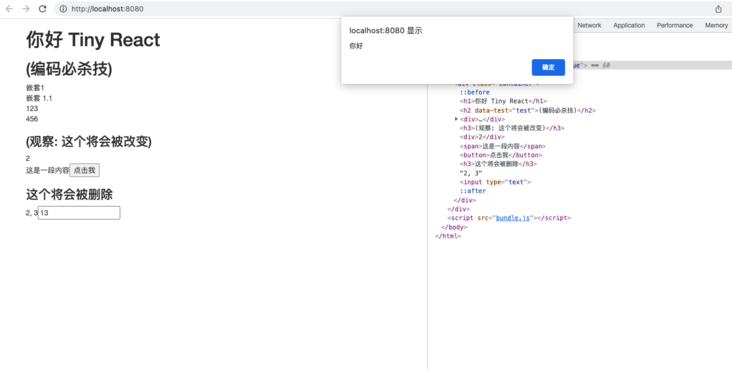
Phase one is complete!
Phase I summary
- jsx syntax can be converted into vDOM with the blessing of babel. We use babel preset react and configure it babelrc allows us to implement the custom createElement method. Then convert jsx to virtual DOM
- We use the createElement method to generate the virtual DOM object, use the diff algorithm (not implemented in this paper), and then update the dom
- Virtual DOM objects require us to convert all nodes into real dom.
- To create a node, we need to use element CreateElement (type) creates a text node element CreateElement (type) to set the attribute, we need to use element SetAttribute (key, value) this method.
- Node updates need to distinguish between html nodes and component nodes. Component nodes need to distinguish between class components and function components
Unfinished to be continued
As you can see, we only realized that the jsx code can be correctly rendered to the page, and we still have a lot of work to do. For example, the following code updates are put here. Source code
- Component rendering function component, class component
- Processing of props in component rendering
- Compare the vDOM when the dom element is updated and delete the node
- setState method
- Implement the ref attribute to get the dom object array
- Node marking and comparison of key attribute